Gateway | RS Pathfinder
Formerly known as Jumpoint
What is a Gateway?
A Gateway is a secure connection point used in Remote Support to facilitate access to remote systems without requiring direct public internet exposure, enabling secure, controlled remote sessions.
How is a Gateway useful in Remote Support?
A Gateway allows administrators to securely manage remote connections through internal networks or firewalls, ensuring protected access to remote systems while maintaining network security. Users can access computers on a remote network without having to pre-install software on every machine. Simply install a single Gateway agent at any network location to gain unattended access to every PC within that network.
How do I access the Gateway page?
- Sign into app.beyondtrust.io.
The BeyondTrust Home page displays. - From the left menu, click Remote Support > Asset Management.
The Jump Clients page opens. - At the top of the page, click Gateway.
The Gateway page displays.
The Gateway page
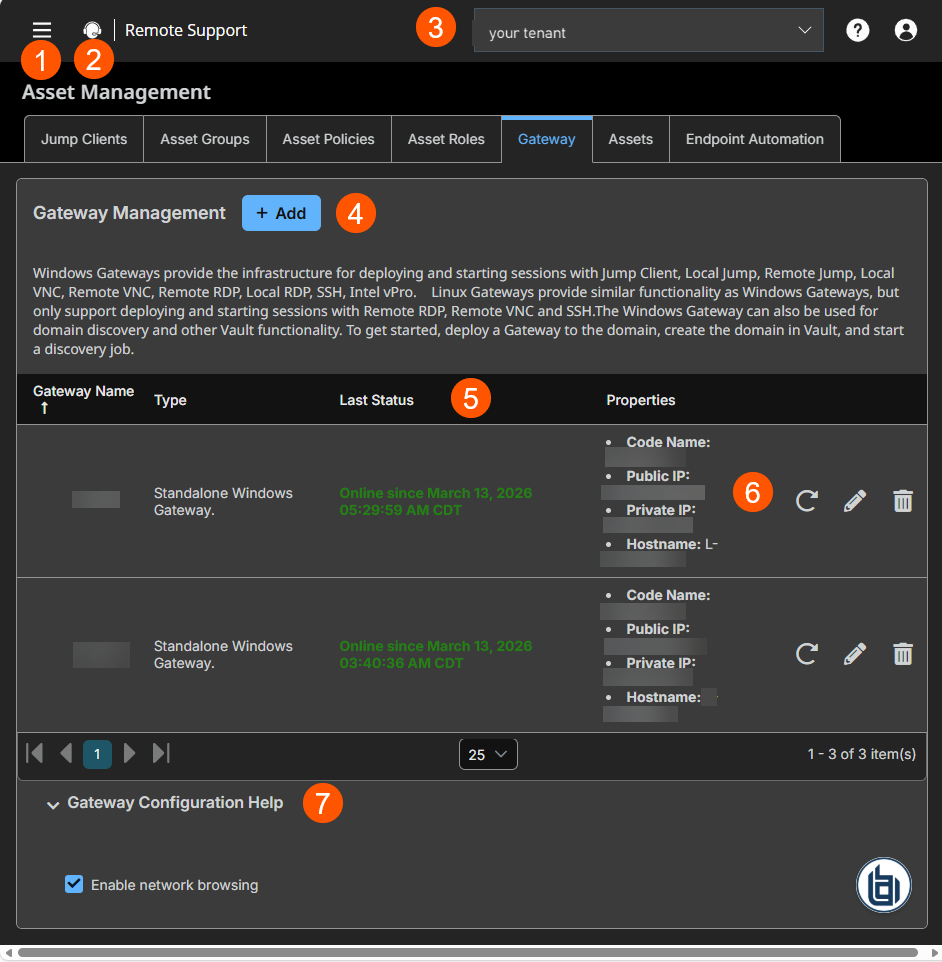
- Left menu: Easy access to all pages in Remote Support, including Status, Consoles & Downloads, My Account, Configuration, Asset Management, Vault, Console Settings, Users & Security, Reports, Public Portals, Dashboards, Management, and Appliance pages.
- Status: Opens the Status page.
- Header: Change your tenant site, manage your profile, and access documentation.
- Add: Adds a Gateway.
- Gateway columns: List Gateway columns.
Gateway columns
- Gateway Name: Unique name of the Gateway.
- Type: Displays the settings of the Gateway.
- Last Status: Displays the status in date and time of the Gateway.
- Properties: Displays the detailed information of the Gateway. For example, Hostname and IP addresses .
- Asset Roles options: You can redeploy, edit or delete an Asset role.
- Configuration Help: Suggestions on how to configure a Gateway or a clustered Gateway.
Gateway Management
Users can access computers on a remote network without having to pre-install software on every computer.
A Gateway allows a user to upload the Privileged Remote Access Endpoint Client software to computers on remote networks. The networks a Gateway provides access to are collectively called a Proxy.
TipWhen you select a system to host a Gateway, keep the following criteria in mind:
- The host system should be a system on the same local area network as the systems to which you wish to connect.
- The host system should be a system with high availability.
The host system should not be a system already being used as a server. File servers, print servers, web server, email servers, etc. all make poor choices for Gateway host systems.
Gateways attempt to close any active network connections to the target system before attempting the connection, for security purposes. A Gateway that coexists on such a server often reports "Network error disconnecting from host" messages when attempting to connect, as it attempts to close a network connection but fails to do so because some other software is actively using that network connection.
Add new Gateway
-
From the top of the page, click Add.
The Add Gateway page displays. -
In the Name field, create a unique name to help identify this Gateway. This name should help users locate this Gateway when they need to start a session with a computer on its same network.
-
In the Code name field, create a code name for integration purposes. If you do not set a code name, one is created automatically.
-
In the Comments field, add comments to help identify the purpose of this Gateway.
-
In the Gateway Platform section, select either Windows or Linux as the operating system, and whether the Gateway is clustered or not. If Clustered is checked, you are able to add multiple, redundant nodes of the same Gateway on different host systems. This ensures that as long as at least one node remains online, the Gateway is available.
Important infoOnce the Gateway has been created, this option cannot be changed.
-
In the Disabled field, set this field to make the Gateway unavailable to make connections. A disabled Gateway may still connect to the appliance, but is not usable by any users to perform connections.
-
If you want users to be able to connect to SSH-enabled and Telnet-enabled network devices through this Gateway, set the Enable Jump Method checkbox.
-
If the Enable Database Connection Method option is checked, users may make connections from their systems to remote endpoints through these types of Gateway.
If Network Connection is enabled on your system, and the Enable Database Connection Method is checked, there is an option to enter Managed IP Addresses for Database Connection. You can enter multiple IP address ranges via Start IP and End IP fields. This allows using the Database Connection feature on networks without DHCP.
-
Under RDP Service Account, select the vault account to be used by the Gateway to run a user-initiated client on the RDP server. This lets you to collect additional event information from an RDP session started with this Gateway.
This account in used only if the Remote RDP Asset is configured to enable the Session Forensics functionality. This option is not available for Linux Gateways.
The RDP Service Account setting must not use a local admin account, and must use a domain admin account with privileges on the endpoint including access to remotely connect to the endpoint's C$ share, remotely create and start services on the endpoint machine, and access remote file systems.
For more information, see Remote Desktop Protocol shortcuts.
-
Check Enable Proxy to set up a Gateway to function as a proxy server. This allows it to proxy connections for Assets on the network that do not have a native internet connection, such as POS systems.
Using a Gateway as a proxy routes traffic only to the Appliance.
You can enable Proxy on either a standalone Gateway or a Gateway cluster. If you set up a Gateway cluster as a Proxy and an endpoint is connected to one Proxy, if that system goes down, the endpoint can connect to another Proxy in the cluster. Proxy Proxies are not supported for Atlas deployments.
-
Under Proxy Host, type the hostname of the computer on which this Gateway is to be installed.
The hostname should not start with http://or https://. IP addresses are not recommended as they might change. The Gateway automatically detects the hostname if one is not provided. If this is a clustered Gateway, this field does not appear, and the Gateway automatically detects the hostname on install. If the hostname changes, you may have to redeploy any Assets that use this Gateway as a proxy.
The proxy host and port should be set carefully since any Asset deployed using this Gateway as a proxy server uses the settings available to it at the time of deployment and are not updated should the host or port change. If the host or port is changed, the Asset must be redeployed.
In order for a Gateway to function as a Proxy, its host system cannot reside behind a proxy. The Gateway must be able to access the internet without having to supply proxy information for its own connection.
-
Under Proxy Port, type the port through which Assets connect to this Gateway. If the port changes, you may have to redeploy any Assets that use this Gateway as a proxy.
It is a best practice to make an exception in the Windows firewall for the port on which the proxy server listens for the process to accept connections.
-
Check Allow HTTP GET to enable HTTP connections to proxy to the Appliance. This is needed only if you want to use a browser to access Remote Support for Admins from behind the proxy.
-
Under Network restrictions > Restriction Type, set a network restriction for connections using the following values:
Name Description No access restriction Lets Asset connections from any IP address. Deny access only for the following IP addresses Denies access to a connection by adding network address prefixes. Allow access only from the following IP addresses Limits the allowed connection by adding network address prefixes.
Netmasks are optional, and they can be given in either dotted-decimal or integer bitmask format. Entries that omit a netmask are assumed to be single IP addresses.
Group policies
This displays a listing of the group policies which allow users access to this Gateway. You can create Gateway memberships on the Users & Security > Group Policies page.
Allowed Users
You can configure allowed users for the group by doing the following steps:
- To add a user, search in New Member Name for users to add to this Asset Group.
- Select the user's role in the New Member Role dropdown to set their permissions specific to Assets in this Asset Group.
- You can select User's default to use the default Asset Roles set on the Users & Security > Group Policies page or the Users & Security > Users page. A Asset Role is a predefined set of permissions regarding Asset management and usage.
- In the New Member Asset Policy field, select the appropriate policy.
- Click Add.
- Existing Asset Group users are shown in the table, along with their assigned role and how the role was granted. You can filter the view by entering a string in the Filter by name text box.
- To edit a user's settings, click
 or to delete a user from the Asset Group, click
  .
.
The edit and delete functionality may be disabled for some users. This occurs either when a user is added by using a group policy or when a user's system Asset Role is set to anything other than the No Access permission.
You can click the group policy link to modify the policy as a whole. Any changes made to the group policy apply to all members of that group policy.
To add groups of users to an Asset Group, go to the Users & Security > Group Policies page and assign that group to one or more Asset Groups.
You can click the user link to modify the user's system Asset role. Any changes to the user's system Asset role apply to all other Asset Groups in which the user is an unassigned member.
You also can add the individual to the group, overriding their settings as defined elsewhere
Edit a Gateway
- Find the Gateway you want to edit from the list, then click Edit
 .
. - Makes your changes, then click Save.
Delete a Gateway
-
Find the Gateway you want to remove from the list, then click Delete
. -
Click Yes on the confirmation dialog.
Redeploy a Gateway
- Select a Gateway from the list, then click the Redeploy button
 .
. - Click Yes in the confirmation dialog.
