Security | RS On-prem
What is the Security page?
The Security page in the B Series Appliance web interface enables administrators to manage TLS certificates, create self-signed certificates, generate certificate requests, and import certificates signed by a certificate authority (CA). It also supports obtaining and automatically renewing TLS certificates from Let's Encrypt.
How is it useful to my organization?
This page is essential for securing communications between the appliance, clients, and web browsers. While the B Series Appliance comes with a pre-installed self-signed certificate, creating a self-signed certificate or obtaining a CA-signed certificate ensures better compatibility and security. The ability to request, upload, and automatically renew certificates simplifies certificate management, protects sensitive data, and maintains compliance with security standards.
How do I access the Security page?
- Use a Chromium-based browser to sign in to your B Series Appliance. The URL is provided in the BeyondTrust welcome email and includes your site URL followed by /appliance.
- From the top menu, click Security.
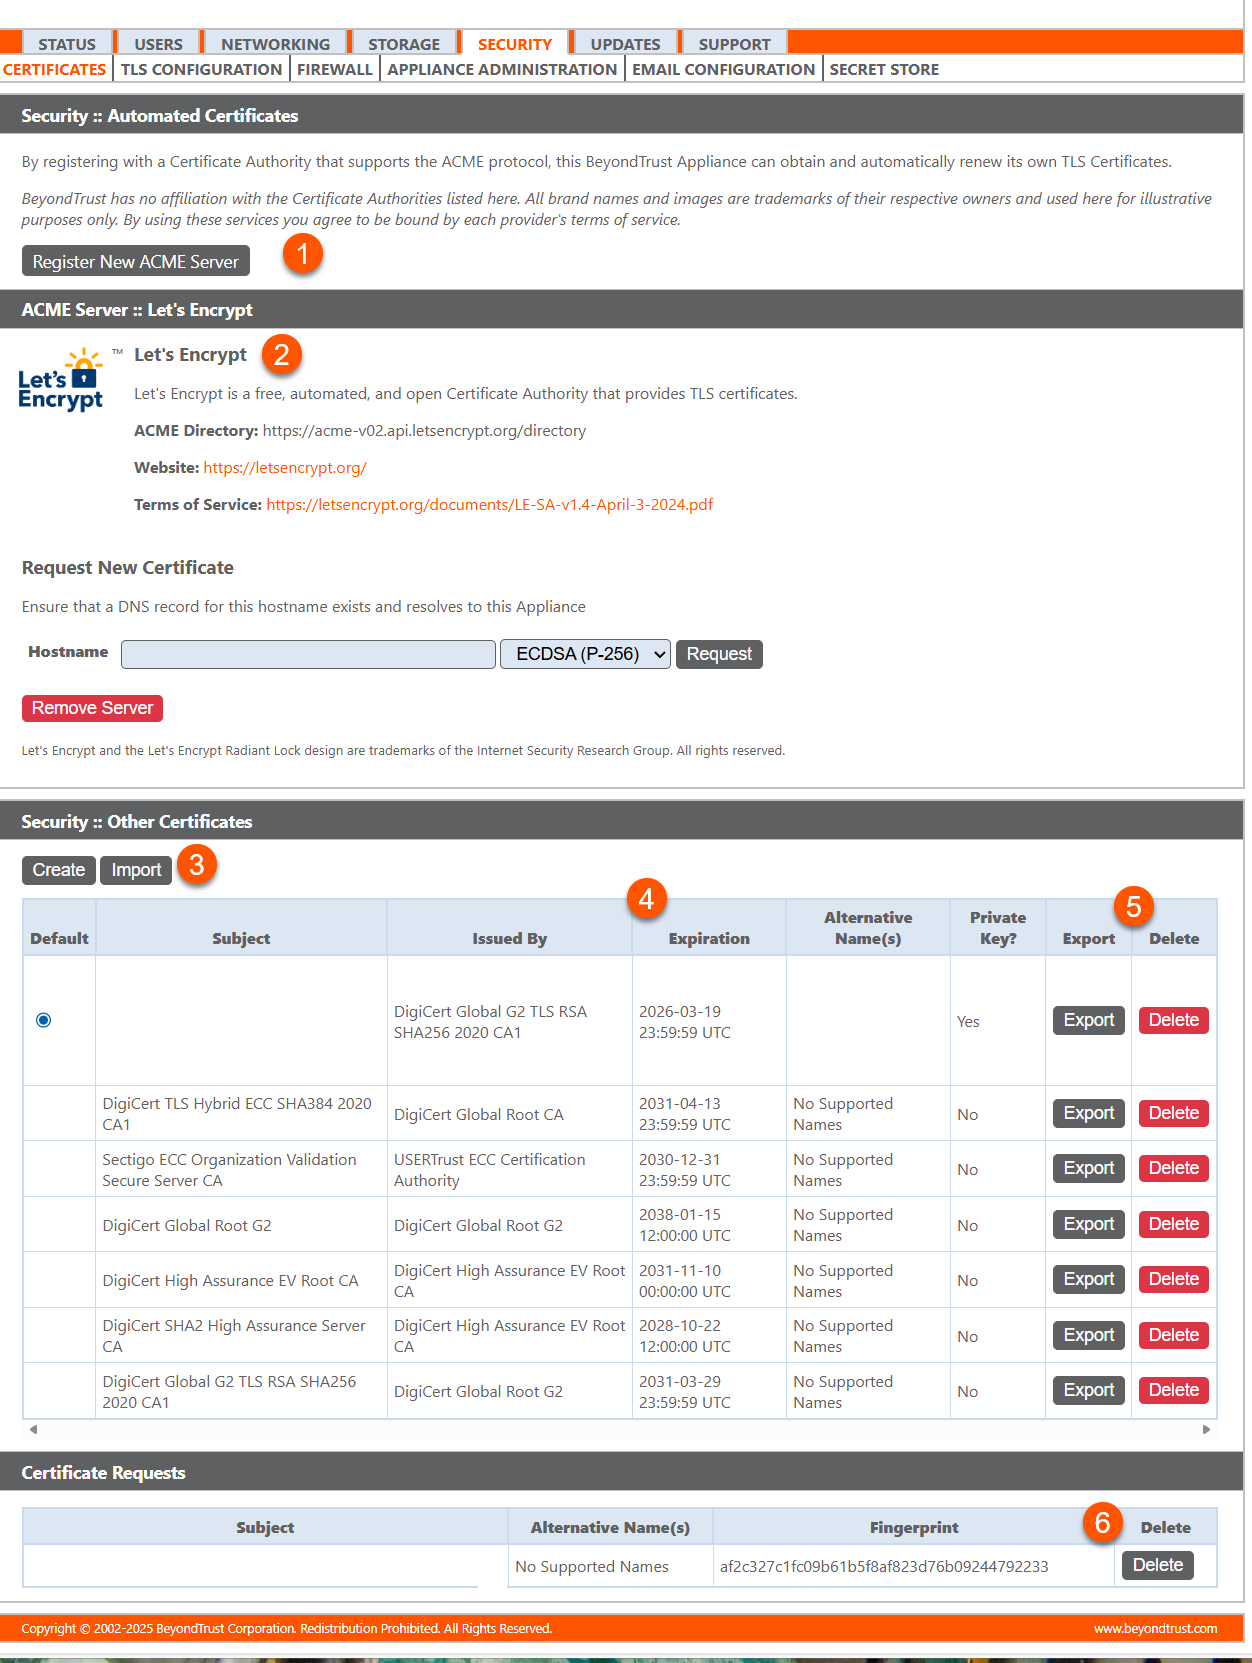
The Certificates page opens and displays by default.
-
Register ACME Server: Adds an ACME Server.
-
Let's Encrypt: Adds a new Certificate.
-
Security: Other Certificates: Create of import other security certificates.
-
Security: Other Certificates Columns: A list of Other Certificates columns.
Other Certificates columns
- Default: Displays the certificate that is default.
- Subject: Name of certificate.
- Issued By: The name who issued the certificate.
- Expiration: Expiration date of the certificate.
- Alternative Name(s): Display the alternative name of the certificate.
- Private Key?: Displays whether the certificate has a private key.
- Export: Exports the certificate.
- Delete: Deletes the certificate.
-
Security options: Export or delete a certificate.
Configure an automated certificate
ACME (Automatic Certificate Management Environment) servers automate the process of obtaining, managing, and renewing digital certificates. They use the ACME protocol, which is also used by Let's Encrypt, a popular Certificate Authority (CA).
ACME servers validate domain ownership by verifying that the entity requesting a certificate controls the domain, typically through DNS or HTTP challenges. Once validation is successful, the ACME server issues a certificate, commonly used for TLS/SSL to enable HTTPS on websites. Additionally, ACME servers support the automated renewal of certificates, helping to reduce the risk of certificate expiration and downtime.
The B Series Appliance integrates with several ACME servers to provide an automated, free, and secure way to obtain and manage TLS certificates. This functionality simplifies certificate management, ensuring secure communications while minimizing administrative effort.
- In the Security :: Automated Certificates section, click Register new ACME server.
The Automated Certificates :: Register New ACME Server section loads. - From the Server type dropdown, select the type of ACME server you want to use, such as Let's Encrypt or a custom ACME server.
Additional fields load based on the server type selected. - For Let's Encrypt and Buypass, fill out these fields.
- Directory URL: Specify the URL of the ACME server's directory endpoint for certificate management.
- Website: The website associated with the selected ACME server.
- Terms of Service: A link to the ACME server's terms of service.
- Email Address: Enter the email address to associate with your ACME account for notifications.
- For all other server types, fill out these fields.
- Directory URL: Specify the URL of the ACME server's directory endpoint for certificate management.
- Website: The website associated with the selected ACME server.
- Terms of Service: A link to the ACME server's terms of service.
- EAB Key ID: Enter the Key ID for External Account Binding (EAB) to link your ACME account with the server.
- EAB HMAC Key: Provide the HMAC Key for External Account Binding (EAB) to authenticate the ACME account.
- Email Address: Enter the email address to associate with your ACME account for notifications.
- Click Submit to apply your changes.
Request a new certificate from Let's Encrypt
Let's Encrypt issues signed certificates that are valid for 90 days at a time, and can automatically renew themselves indefinitely. In order to request or renew a Let's Encrypt certificate, you must meet the following requirements:
- The DNS for the hostname you are requesting must resolve to the B Series Appliance.
- The B Series Appliance must be able to reach Let's Encrypt on TCP 443.
- Let's Encrypt must be able to reach the B Series Appliance on TCP 80.
- The B Series Appliance must be able to reach apps.identrust.com on TCP 80 (Outbound).
To implement a Let's Encrypt certificate, in the Security :: Let's Encrypt™ Certificates section complete the following:
- Hostname: Enter the fully qualified domain name (FQDN) of the B Series Appliance.
- Use the dropdown to choose the certificate key type.
- Click Request.
As long as the above requirements are met, you are provided a certificate that automatically renews every 90 days once the validity check with Let's Encrypt has completed.
The B Series Appliance starts the certificate renewal process 30 days before the certificate is due to expire and requires the same process as the original request process does. If it has been unsuccessful 25 days prior to expiry, the B Series Appliance sends daily admin email alerts (if email notifications are enabled). The status will show the certificate in an error state.
Important informationBecause DNS can apply only to one B Series Appliance at a time, and because a B Series Appliance must be assigned the DNS hostname for which it makes a certificate request or renewal request, we recommend that you avoid use of Let's Encrypt certificates for failover B Series Appliance pairs.
For more information, see letsencrypt.org.
Set up other certificates
- To create a self-signed certificate or a certificate request from another issuer, locate the Security :: Other Certificates section.
- Click Create.
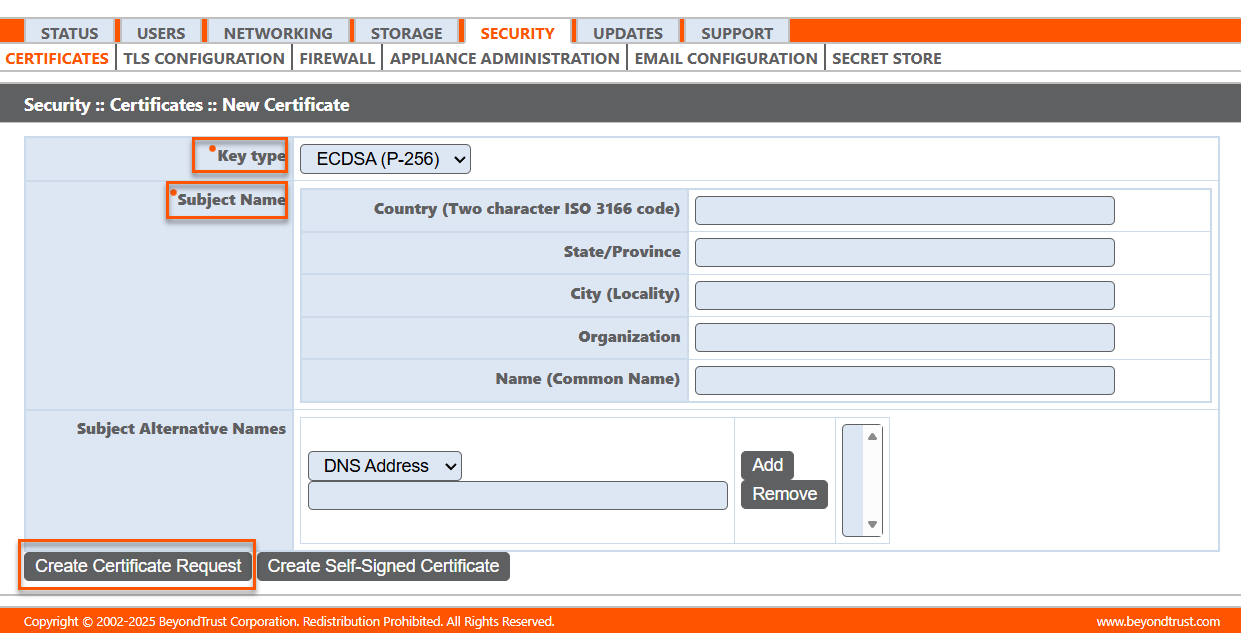
- From the Key type dropdown, choose to create a new key or select an existing key.
- Enter the remaining information pertaining to your organization.
If the certificate being requested is a replacement, you should select the existing key of the certificate being replaced.
If the certificate being requested is a re-key, you should select New Key for the certificate.
For a re-key, all information on the Security :: Certificates :: New Certificate section should be the same as the certificate for which re-key is being requested. A new certificate friendly name should be used so that it is easy to identify the certificate in the Security :: Certificates section.
Required information for the re-key can be obtained by clicking on the earlier certificate from the list displayed in the Security :: Certificates section.
For a new key or re-key certificate, the steps to import are the same.
Create a certificate request
- Locate the Security :: Other Certificates section and click Create.
- From the Key type dropdown, choose the Existing Key of your *.beyondtrustcloud.com certificate or select a new key type.
- Enter the remaining information pertaining to your organization.
- In the Name (Common Name) field, enter a descriptive title for your BeyondTrust site.
- In the Subject Alternative Names section, enter your BeyondTrust site hostname and click Add. Add a SAN for each DNS name or IP address to be protected by this SSL certificate.
DNS addresses can be entered as fully qualified domain names, such as access.example.com, or as wildcard domain names, such as *.example.com. A wildcard domain name covers multiple subdomains, such as access.example.com, and so forth.
- Create the request:
- If you intend to obtain a signed certificate from a certificate authority, click Create Certificate Request.
- To create a certificate signing request (CSR). Otherwise, click Create Self-Signed Certificate.
To use a CA-signed certificate, contact a certificate authority of your choice and purchase a new certificate from them using the CSR you created in BeyondTrust. Once the purchase is complete, the CA sends you one or more new certificate files, each of which you must install on the appliance.
To upload certificates or private keys, click Import. Browse to the first file and upload it. Repeat this for each certificate sent by your CA. Often, a CA will not sent their root certificate, which must be installed on your appliance. If the root is missing, a warning appears beneath your new certificate: "The certificate chain appears to be missing one or more certificate authorities and does not appear to terminate in a self-signed certificate".
To download the root certificate for your appliance certificate, check the information sent from your CA for a link to the appropriate root. If there is none, contact the CA to obtain it. If this is impractical, search their website for their root certificate store. This contains all the root certificates of the CA, and all major CAs publish their root store online.
Usually, the easiest way to find the correct root for your certificate is to open the certificate file on your local computer and inspect its "Certification Path" or "Certificate Hierarchy". The root of this hierarchy or path is typically shown at the top of the tree. Locate this root certificate on the root store of your CA's online root store. Once done, download it from the CA's root store and import it to your appliance as described above.
If the intermediate or root certificates are different from those currently in-use (or if a self-signed certificate was in-use), please request an update from BeyondTrust Technical Support. BeyondTrust Technical Support needs a copy of the new certificate and its intermediate and root certificates.
View certificates
View a table of SSL certificates available on your appliance.
For connections that do not supply a Server Name Indication (SNI) or supply an incorrect SNI, select a default SSL certificate from the list to provide for these connections by clicking the button under the Default column. The default SSL certificate cannot be a self-signed certificate nor the default appliance certificate provided for initial installation.
To learn more about SNI, see Server Name Indication.
Export certificates
- Click Export next to the certificate.
- Depending upon the type of certificate, the download may start immediately.
- Alternatively, choose to include the certificate, the private key (optionally secured by a passphrase), and/or the certificate chain, depending upon each item’s availability. Click Export to start the download.
The private key should never, or rarely, be exported from an appliance. If it is stolen, an attacker could easily compromise the BeyondTrust site which generated the key. If it does need to be exported, be sure to assign a strong password to the private key.
Delete certificates
Under normal circumstances, a certificate should never be deleted unless it has already been successfully replaced by a working substitute.
- Click Delete next to the certificate.
- When prompted to delete the certificate, click OK.
View certificate requests
- To view a table of pending requests for third-party-signed certificates, click a certificate request name.
The detail view also provides the request data you will give your preferred certificate authority when requesting a signed certificate.
If you are renewing a certificate, use the same certificate Request Data that was used for the original certificate.
Delete certificate requests
- Check the box for each desired request to delete.
- Select Delete from the dropdown at the top of the table.
- Click Apply.
- Review the certificate requests you wish to delete, and then click Delete.
Updated 5 months ago
