Configuration | RS Cloud
What is the Configuration page?
The Configuration page provides settings that allow users to customize their Remote Support experience, including interface preferences, notification settings, and session behavior configurations.
How is it useful to my organization?
This page enables users to personalize their support tools to align with their workflow, improving efficiency and ensuring a smoother support experience tailored to organizational needs.
How do I access the Configuration page?
- Use a Chromium-based browser to sign in to your Remote Support URL.
This URL is provided in the BeyondTrust welcome email and includes your site URL followed by /login. - From the left menu, click Configuration.
The Options page opens and displays by default.
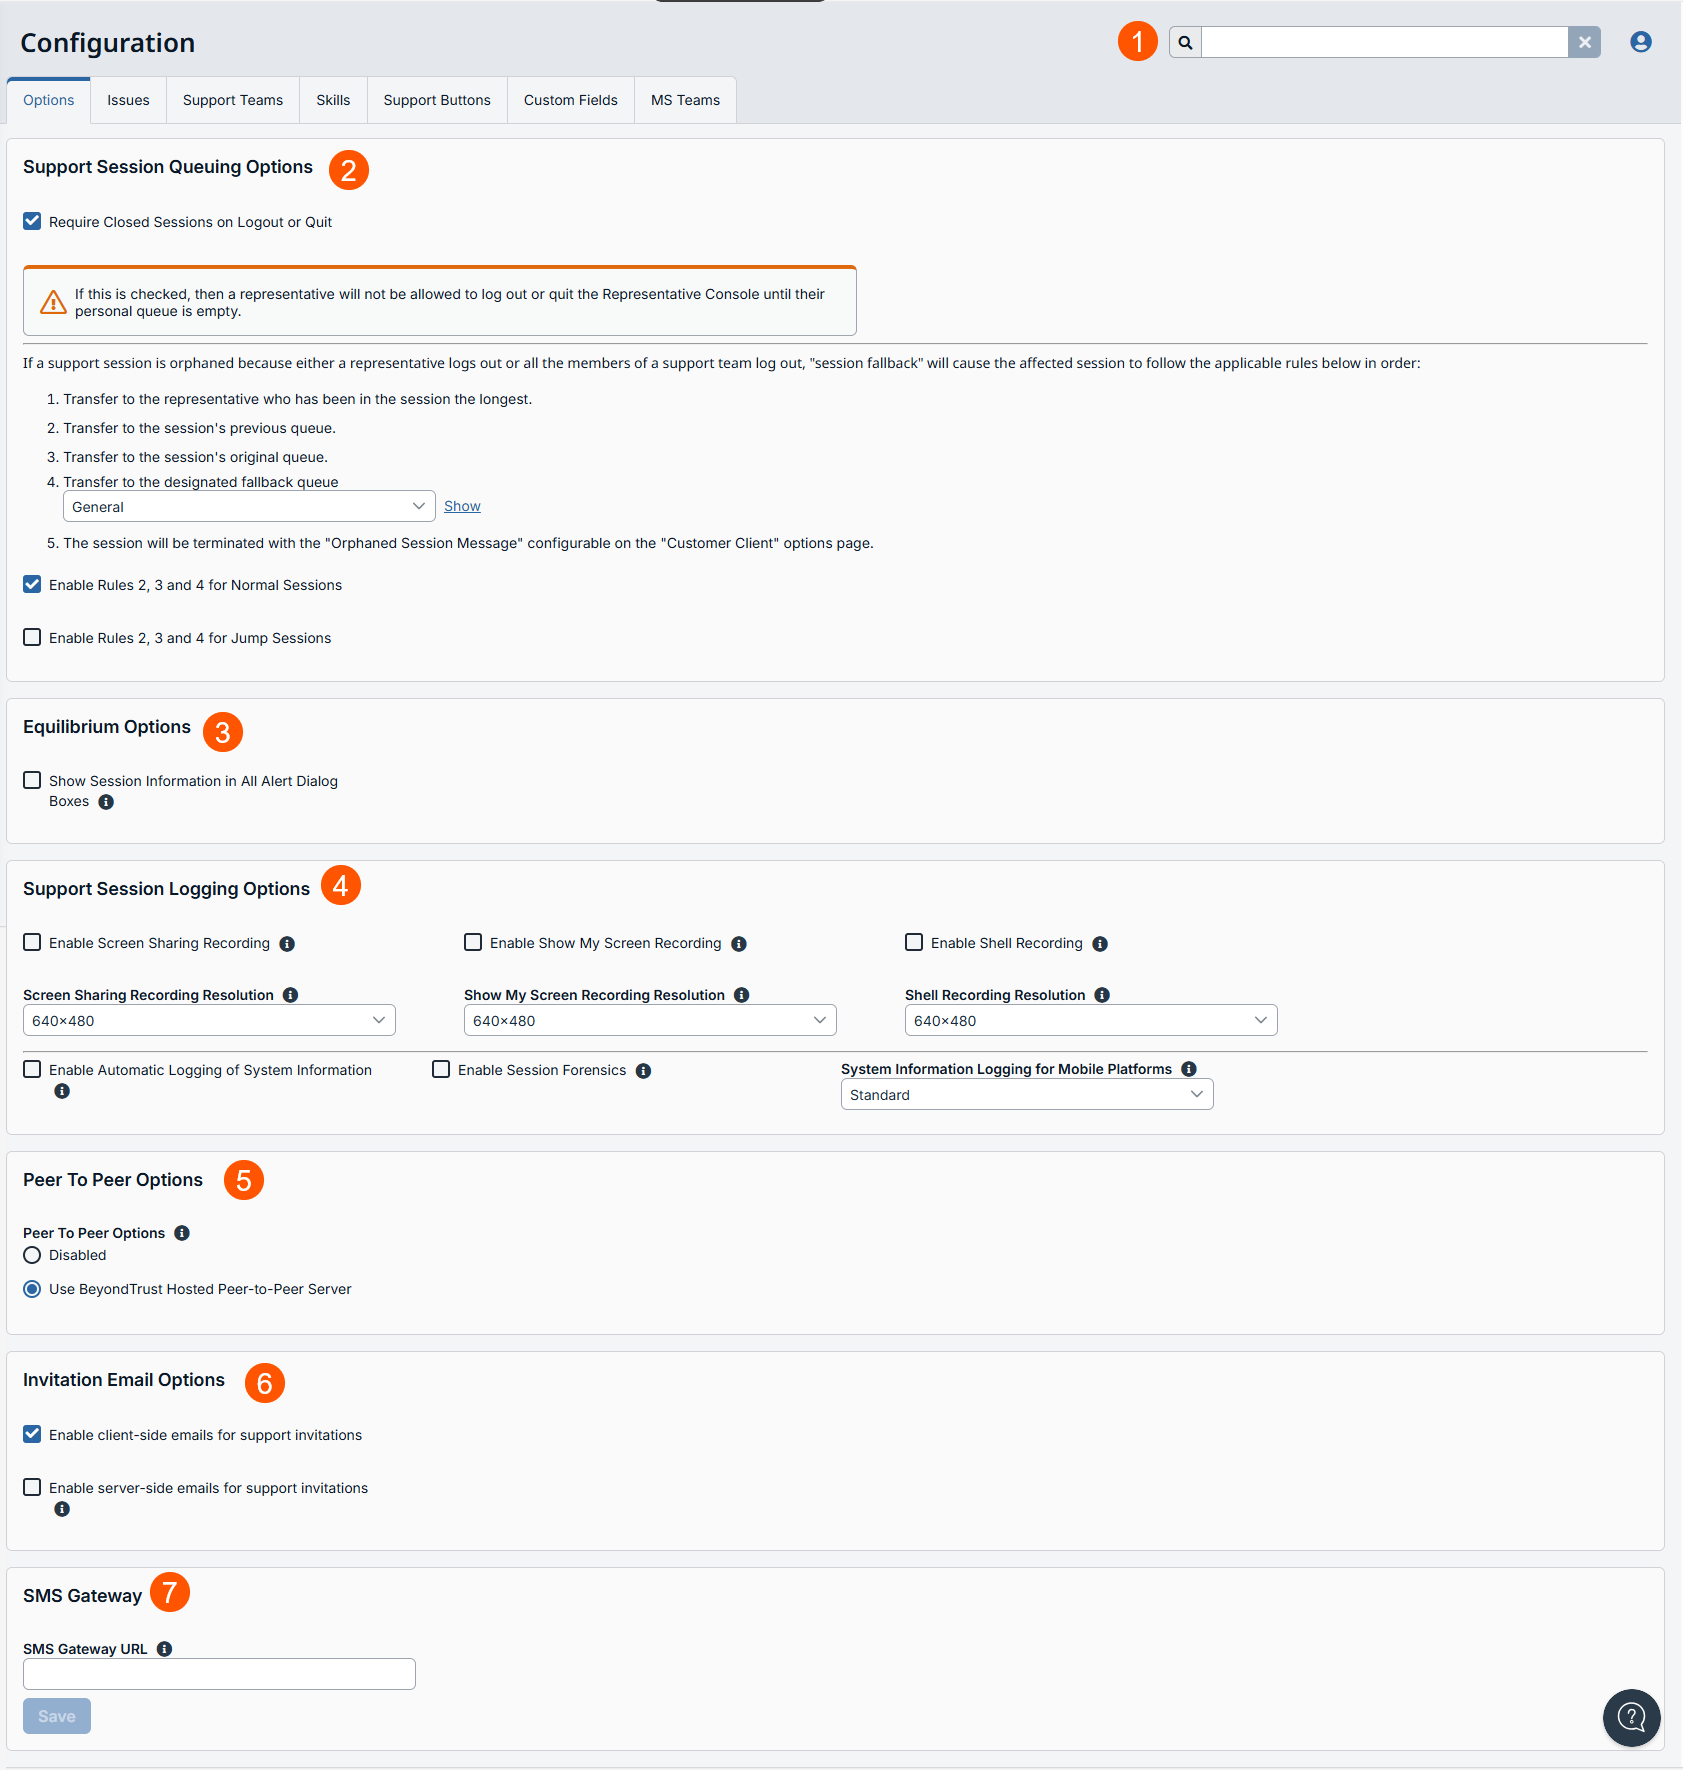
The Configuration page
- Search: Enter keywords to search for areas of the product.
- Support Sessions Queuing Options: Control how users interact with a session.
- Equilibrium Options: Shows session information in All Alert Dialog Boxes.
- Support Session Logging Options: Control screen sharing.
- Peer to Peer options: Enhances the performance of Screen Sharing, File Transfer, and Shell support tools.
- Invitation Email options: Settings for email.
- SMS Gateway: Add SMS Gateway URL.
Support session queuing options
Go to Configuration>Options to determine how representatives receive and manage support sessions in their queue.
Require representatives to close sessions
Check the Require Closed Sessions on Logout or Quit checkbox to prevent users from logging out if they have any current session tabs open or any sessions in their personal queue. This option helps prevent orphaned sessions.
Orphaned sessions and fallback rules
Orphaned sessions are when a support session is not assigned to any representative after they log out. In the event of an orphaned session, fallback rules determine how a session is assigned.
- If the session is shared, it transfers to the representative who has been in the session the longest.
- If the session is not shared, it transfers to the last queue it was in.
- If neither rule above applies, the session returns to the first queue it entered.
- If none of the above apply, the session goes to a designated fallback queue.
- Finally, the session ends if no queues are available.
If the session is in a persistent queue, the fallback rules do not apply. You can enable persistent queues from the Configuration > Support Teams page.
Designate a fallback queue
A fallback queue is where the session will go to if the first 3 rules do not apply.
- Go to Configuration>Options.
- Under 4., select a queue from the drop-down. A checkmark indicates the queue is set.
- Optionally, click Show to open the Support Teamspage to further manage this queue.
Enable and disable fallback rules
Select the checkboxes to turn rules 2, 3, and 4 on and off for support sessions.
Equilibrium options
These options determine what information is given to representatives in alerts.
Show or hide session information
Check Show Session Information in All Alert Dialogue Boxes to display the session information when representatives receive a new assignment.
For more information about equilibrium, see the Equilibrium guide.
Support session logging
These options determine how representatives can share and record during sessions.
Session recordings:
- do not begin until an attendee has joined. If no one joins, the session is not recorded.
- are saved in raw format. Resolution size affects playback only.
- can only be viewed by users with the appropriate permission.
Site-wide settings may be overridden by public site settings and customer preference, as configured on the Public Portals > Customer Client page.
Enable or disable screen share recording
- Go to Configuration > Options > Support Session Logging Options.
- Check Enable Screen Sharing Recording to automatically record a video when a customer shares their screen. Uncheck to turn off recording.
Enable or disable my screen recording
- Go to Configuration > Options > Support Session Logging Options.
- Check Enable Show My Screen Screen Recordingto record a video any time the Show My Screen feature is in use. Uncheck to turn off recording.
Enable or disable command shell recording
- Go to Configuration > Options > Support Session Logging Options.
- Check Enable Command Shell Recording to automatically record a video of any Command Shell activity during a session. Uncheck to turn off recording.
Enable or disable automatic system information logging
- Go to Configuration > Options > Support Session Logging Options.
- Check Enable Automatic Logging of System Information to automatically retrieve and log customer information at the beginning of a session.
- Afterwards, the information is available in the details section of the Support Session Report.
Change resolution of recordings
- Go to Configuration > Options >.
- Choose which recording option you want to change the resolution of.
- Select a resolution.
Enable or disable session forensics
- Go to Configuration > Options > Support Session Logging Options.
- Check Enable Session Forensics to search across all sessions based on session events, including chat messages, file transfer, registry editor events, and session foreground window changed events.
Set the logging level for mobile platforms
- Go to Configuration > Options > Support Session Logging Options.
- From the System Information Logging for Mobile Platformsdrop-down, choose Standard to pull a small set of data or Extended to pull all available information.
Peer-to-peer
Enabling peer-to-peer connections for support sessions enhances the performance of the Screen Sharing, File Transfer, and Command Shell support tools. Additional firewall configuration might be required to successfully establish peer to peer connections.
Enable a BeyondTrust-hosted peer-to-peer server
This is the default setting. BeyondTrust clients attempt to reach a peer-to-peer connection through the server hosted by BeyondTrust. This requires that your BeyondTrust clients can make outbound UDP 3478 connection requests to stun.bt3ng.com.
- Go to Configuration > Options> Peer to Peer Options.
- Select the Use BeyondTrust Hosted Peer-to-Peer Server radio button.
Disable peer-to-peer servers
Disables Peer to Peer connections. To enable this feature, you must choose a server to negotiate the session. When screen sharing, file transfer, or remote shell is detected, the peer-to-peer connection is attempted. If successful, this creates a direct connection between the representative and the client systems, while still sending a second data stream to the B Series Appliance for auditing purposes. If for any reason a peer-to-peer connection cannot be established, the session traffic defaults to the B Series Appliance-meditated connection.
- Go to Configuration > Options> Peer to Peer Options.
- Select the Disabled radio button.
Invitation email
Emails inviting users to a support session can be sent from the appliance or a local email.
Enable or disable client-side support invitation emails
- Go to Configuration > Options> Invitation Email Options.
- Select the Enable client-side emails for support invitations checkbox.
When enabled, representatives can send support and presentation invitation emails from a local email client, such as Outlook. These emails are sent using the representative’s email account. The representative can view and modify the email, if desired.
Enable or disable server-side support invitation emails
- Go to Configuration > Options> Invitation Email Options.
- Select the Enable server-side emails for support invitations checkbox.
If enabled, representatives can send support invitation emails from the B Series Appliance rather than their local email client. A dialog prompts the representative to specify the email recipient. The representative cannot preview or modify the subject or body of the email. The email address from which server-side emails are sent can be customized per portal from the Public Portals > Customer Client page, or the address specified on the Management > Email Configuration page can be used.
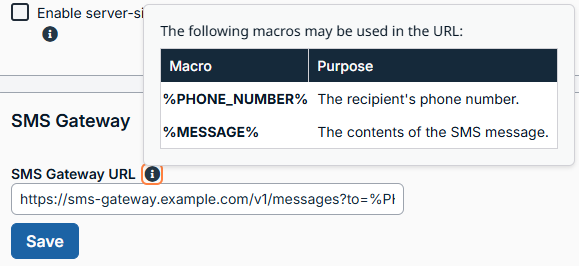
SMS Gateway
An SMS Gateway is a service or system that allows messages (SMS) to be sent and received between a device or application and a telecommunications network.
Add an SMS Gateway
-
Go to Configuration > Options> SMS Gateway.
-
Enter a secure SMS gateway URL from your ISP or third-party gateway provider.
-
Click Save
This gives representatives the option to send support access keys via SMS text message. SMS messages sent to other mobile devices will still receive a session link. The SMS communication is not logged in the B Series Appliance.
