Security providers | RS Pathfinder
What are security providers?
Security providers authenticate users against existing identity sources like LDAP, RADIUS, Kerberos, OpenID Connect, or SAML servers. They can also assign privileges based on the hierarchy and group settings defined in those servers.
How are security providers useful?
Security providers streamline user authentication by leveraging existing directory services with LDAP, enable single sign-on with SAML, OpenID Connect, and Kerberos, and enhance security through two-factor authentication methods like RSA via RADIUS.
How do I access the Security Providers page?
- Sign into app.beyondtrust.io.
The BeyondTrust Home page displays. - From the main menu, click Remote Support > Users & Security.
The User & Security page opens and the Users tab displays by default. - Click the Security Providers tab.
The Security Providers tab displays.
For users moving from Cloud or On-premises
The way authentication providers are managed in Remote Support on Pathfinder differs from Cloud and On-premises. Instead of configuring them directly in the admin interface of Remote Support, authentication providers are created and managed through the Pathfinder Platform.
All tasks related to creating and maintaining security providers must now be performed within Pathfinder configuration. This decreases the amount of administrative overhead and standardizes authentication configuration when configuring users across all BeyondTrust products.
Remote Support connects to the Pathfinder Platform using OpenID Connect (OIDC), which is automatically set up during the provisioning of your Pathfinder tenant.
As a result, all configuration of local and SAML users is managed at the Pathfinder Platform level, not within individual instances of the Remote Support (Remote Support) product.
SAML users and groups defined in Pathfinder are exposed within the Admin interface of Remote Support, where user and groups can be used for individual assignments or group policy configurations.
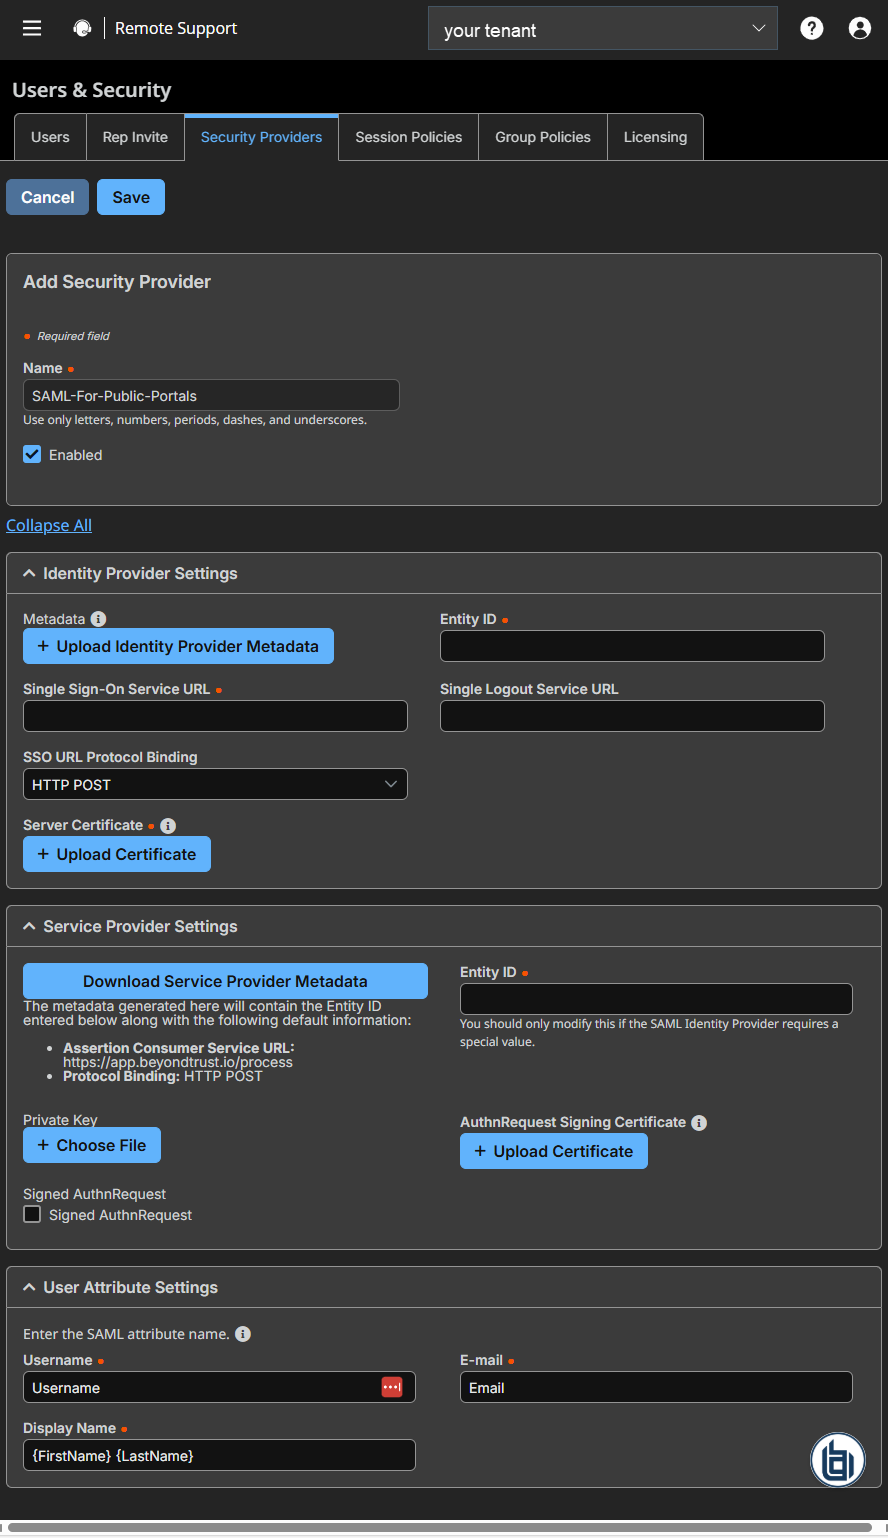
You do have the ability to add SAML for Public Portals.
The Security Providers page
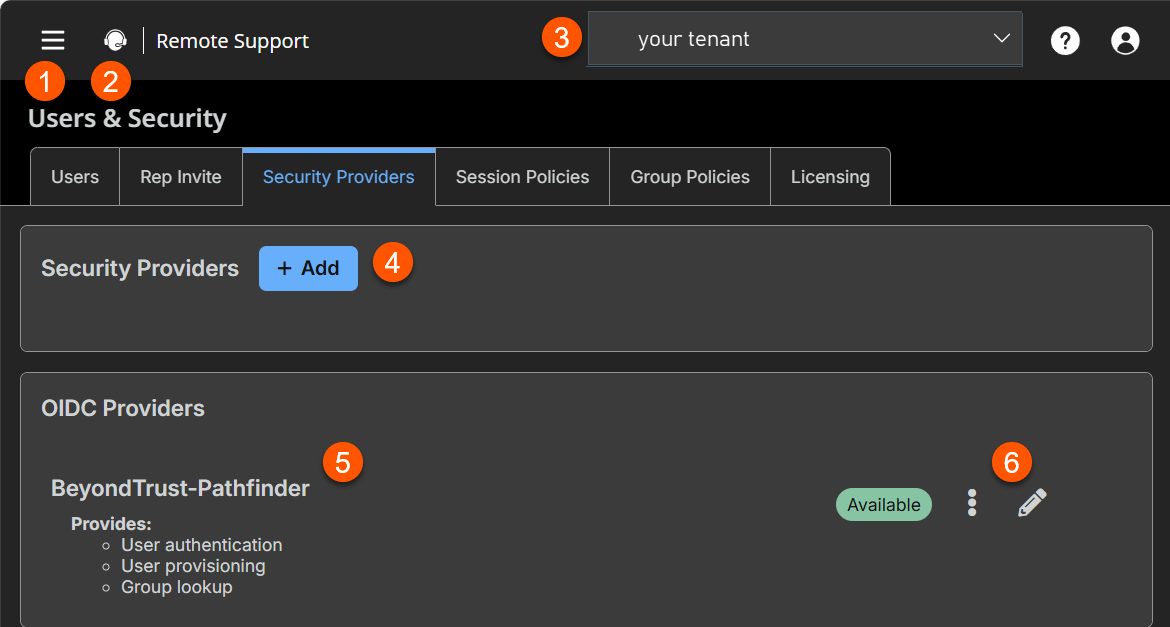
- Left menu: Easy access to all pages in Remote Support, including Status, Consoles & Downloads, My Account, Configuration, Asset Management, Vault, Console Settings, Users & Security, Reports, Public Portals, Dashboards, Management, and Appliance pages.
- Status: Opens the Status page.
- Header: Change your tenant site, manage your profile, and access documentation.
- Security Providers: A list of security providers is located on the Administration > Identity & Authentication Providers page.
- OIDC Provider: A list of OIDC providers.
- Security Providers list options: Edit a OIDC Security Provider.
How to manage security providers
Security providers are configured in the Administration tenant in Pathfinder. To add, edit, or delete a security provider, see Identity providers.
You can also add security providers for public portal authentication only by clicking  > Remote Support > Users & Security > Security Providers, and then clicking Add.
-
Name: Enter a unique name to help identify your provider.
-
Enabled: If checked, your appliance can search this security provider when a user attempts to log in to the representative console or /login. If unchecked, this provider will not be searched.
-
Identity provider settings
-
Metadata: The metadata file contains all the information needed for the initial setup of your SAML provider and must be downloaded from your identity provider. Save the XML file, and then click Upload Identity Provider Metadata to select and upload the selected file.
-
Entity ID: The unique identifier for the identity provider you are using.
-
Server certificate: This certificate will be used to verify the signature of the assertion sent from the identity provider.
The fields for Entity ID, Single sign-on service URL, Single Logout Service URL, and Certificate are automatically populated from the identity provider's metadata file. If you cannot get a metadata file from your provider, this information can be entered manually. For metadata files with multiple identity providers, enter the Entity ID of the desired Identity Provider in the field below before uploading the metadata.
-
Single sign-on service URL: When you want to log in to BeyondTrust using SAML, this is the URL where you are automatically redirected so you can log in.
-
Single Logout Service URL: When selected, users authenticated with SAML are automatically signed out of the Identity Provider when they log out of Remote Support.
-
SSO URL protocol binding: Determines whether a user posts or is redirected to the sign on URL. This should be left defaulted to redirect unless otherwise required by the identity provider. If request signing is enabled (under Service Provider settings), protocol binding is limited to redirect only.
-
-
Service provider settings
-
Download service provider metadata: Download the BeyondTrust metadata, which must then be uploaded to your identity provider.
-
Entity ID: This is your BeyondTrust URL. It uniquely identifies the service provider.
-
Private key: If necessary, you can decrypt messages sent by the identity provider, if they support and require encryption. Click Choose File to upload the private key necessary to decrypt the messages sent from the identity provider.
-
AuthnRequest signing certificate: This is the certificate used for signing AuthnRequests. The following formats are accepted: .cert, .cer, .crt, .der, .pem, .x-x509-ca-cert, .x-x509-user-cert, .x-pem-file.
-
Signed AuthnRequest: Check to enable request signing. If enabled, SSO URL protocol binding is limited to redirect only. The SSO URL protocol binding field is updated automatically, if necessary. A private key and signing certificate is required for request signing.
-
-
User attribute settings: SAML attributes are used to provision users within BeyondTrust. The default values match BeyondTrust-certified applications with various identity providers. If you are creating your own SAML connector, you may need to modify the attributes to match what is being sent by your identity provider.
-
Username: The SAML attribute that contains the user’s unique username or login ID.
-
E-mail: The SAML attribute that contains the user’s email address.
-
Display names: The SAML attribute that contains the user's display name.
-
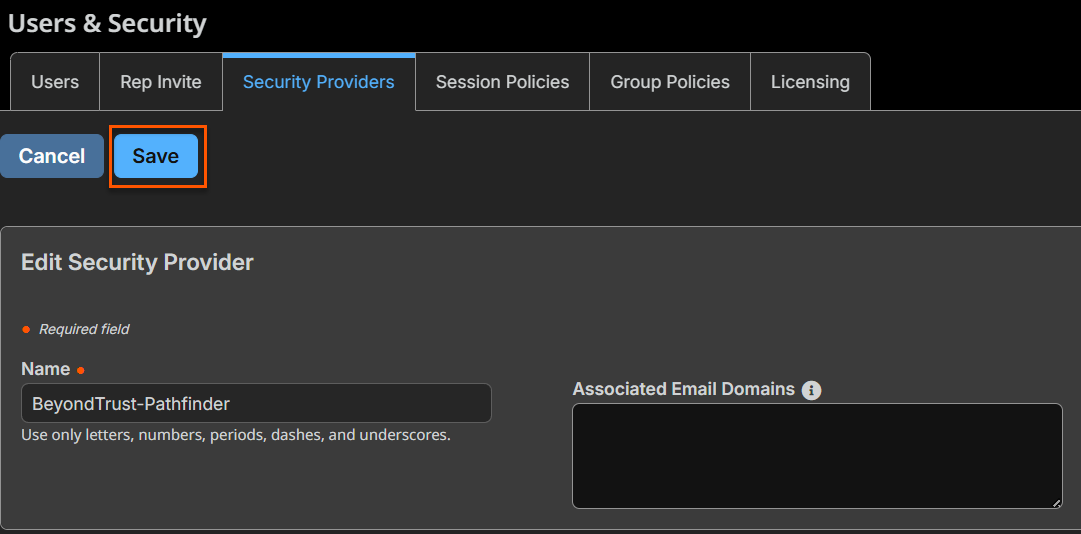
Edit an OIDC provider
-
From the Security Providers page, locate the provider from the OIDC Provider section.
-
To edit the provider, click
 .
. -
Make the necessary changes, then click Save.
SAML for public portals
- On the Security providers page, click + Add, and then select the security provider type from the list.
The Add Security Provider page displays. - Configure the security provider.
SAML fields
-
Name: The name for your SAML provider is auto-generated and cannot be edited at this time.
-
Enabled: If checked, your appliance can search this security provider when a user attempts to log in to the public portal. If unchecked, this provider is not searched.
-
Identity provider settings
-
Metadata: The metadata file contains all the information needed for the initial setup of your SAML provider and must be downloaded from your identity provider. Save the XML file, and then click Upload Identity Provider Metadata to select and upload the selected file.
The fields for Entity ID, Single sign-on service URL, Single Logout Service URL, and Server certificate are automatically populated from the identity provider's metadata file. If you cannot get a metadata file from your provider, this information can be entered manually. For metadata files with multiple identity providers, enter the Entity ID of the desired Identity Provider in the field below before uploading the metadata.
-
Entity ID: The unique identifier for the identity provider you are using.
-
Single sign-on service URL: When you want to log in to BeyondTrust using SAML, this is the URL where you are automatically redirected so you can log in.
-
Single Logout Service URL: When selected, users authenticated with SAML are automatically signed out of the Identity Provider when they log out of Remote Support.
-
SSO URL protocol binding: Determines whether a user posts or is redirected to the sign on URL. This should be left defaulted to redirect unless otherwise required by the identity provider. If request signing is enabled (under Service Provider settings), protocol binding is limited to redirect only.
-
Server certificate: This certificate is used to verify the signature of the assertion sent from the identity provider.
-
-
Service provider settings
-
Download service provider metadata: Download the BeyondTrust metadata, which must then be uploaded to your identity provider.
-
Entity ID: This is your BeyondTrust URL. It uniquely identifies the service provider.
-
Private key: If necessary, you can decrypt messages sent by the identity provider, if they support and require encryption. Click Choose file to upload the private key necessary to decrypt the messages sent from the identity provider.
-
AuthnRequest signing certificate: This is the certificate used for signing AuthnRequests. The following formats are accepted: .cert, .cer, .crt, .der, .pem, .x-x509-ca-cert, .x-x509-user-cert, .x-pem-file.
-
Signed AuthnRequest: Check to enable request signing. If enabled, SSO URL protocol binding is limited to redirect only. The SSO URL protocol binding field is updated automatically, if necessary. A private key and signing certificate is required for request signing.
-
-
User attribute settings: SAML attributes are used to provision users within BeyondTrust. The default values match BeyondTrust-certified applications with various identity providers. If you are creating your own SAML connector, you may need to modify the attributes to match what is being sent by your identity provider.
-
Username: The SAML attribute that contains the user’s unique username or login ID.
-
E-mail: The SAML attribute that contains the user’s email address.
-
Display names: The SAML attribute that contains the user's display name.
-
See Additional setup and tips to learn how to:
- Enable authentication on a public site
- Integrate SAML with third-party apps
- Click Save at the top of the page.
To view the security provider log
- From the Security Providers page, locate the provider from the OIDC Provider section.
- Click
 > View Log.
