
Remote Desktop Protocol (RDP) | RS for Desktop
Local RDP
Use BeyondTrust to start a Local Remote Desktop Protocol (RDP) session with remote Windows and Linux systems. Unlike a typical BeyondTrust RDP session, Local RDP sessions are not proxied through a Gateway, which means that users can Jump only to systems within their local network. To use Local RDP through BeyondTrust, you must have the user account permission Allowed Connection Types: Local RDP via the local network.
-
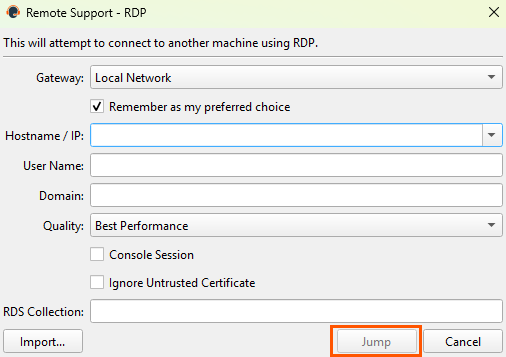
To start a Local RDP session from the representative console, open the Remote Desktop Protocol dialog from either the Support menu or RDP button.
-
Choose Local Network for your Gateway option.
-
Enter the hostname or IP address of the computer you wish to support.
-
Provide the username to sign in as.
-
Select a domain.
-
Select the quality at which to view the remote screen. This cannot be changed during the RDP session. Select the color optimization mode to view the remote screen. If you are going to be primarily sharing video, select Video Optimized; otherwise select between Black and White (uses less bandwidth), Few Colors, More Colors, or Full Color (uses more bandwidth). Both Video Optimized and Full Color modes allow you to view the actual desktop wallpaper.
-
To start a console session rather than a new session, check the Console Session box. If the server's certificate cannot be verified, you receive a certificate warning. Checking Ignore Untrusted Certificate allows you to connect to the remote system without seeing this message.
-
To import an RDP file, click the Import button. This pre-populates some of the fields required for the remote desktop protocol connection.
-
To begin the remote desktop (RDP) session, click Jump.
-
You are prompted to enter the password for the username you specified earlier.
-
Your remote desktop protocol (RDP) session begins.
Multi-monitor support
An option allows you to open a Remote Support connection expanded across all the monitors on the client computer regardless of the client monitor configuration. With this feature, you can fully utilize all the monitors connected to the client computer, therefore being able to adjust screen sizing and scaling during an RDP session across multiple monitors.
If you are using full screen view while using this feature, the remote system is displayed across all of your monitors.
RDP shortcuts
Use BeyondTrust to start a Remote Desktop Protocol (RDP) session with a remote Windows or Linux System. Because RDP sessions are converted to BeyondTrust sessions, users can share or transfer sessions, and sessions can be automatically audited and recorded as your administrator has defined for your site.
To use Local RDP through BeyondTrust, you must be on the same network segment as the target system and must have the user account permission Allowed Connection Types: Local RDP.
To use Remote RDP through BeyondTrust, you must have access to a Gateway and must have the user account permissions Allowed Connection Types: Remote RDP.
Create a Local RDP shortcut
To create a Local Microsoft RDP shortcut, click the Create button in the Asset Management Interface. From the dropdown, select Local RDP. RDP shortcuts appear in the Asset Management Interface with Jump Clients and other types of Asset shortcuts.
Organize and manage existing Assets by selecting one or more Assets and clicking Properties.
To view the properties of multiple Assets, the items selected must be the same type (e.g., all Jump Clients, all Remote Jumps, etc.).To review properties of other types of Assets, see the appropriate section in this guide.
Enter a Name for the Asset. This name identifies the item in the session tabs. This string has a maximum of 128 characters.
Enter the Hostname / IP of the system you wish to access.
By default, the RDP server listens on port 3389, which is therefore the default port BeyondTrust attempts. If the remote RDP server is configured to use a different port, add it after the hostname or IP address in the form of <hostname>:<port> or <ip address>:<port> (for example, 10.10.24.127:40000).
Provide the Username to sign in as, along with the Domain.
Select the Quality at which to view the remote screen. This cannot be changed during the RDP session. Select the color optimization mode to view the remote screen. If you are going to be primarily sharing video, select Video Optimized; otherwise, select between Black and White (uses less bandwidth), Few Colors, More Colors, or Full Color (uses more bandwidth). Both Video Optimized and Full Color modes allow you to view the actual desktop wallpaper.
To start a console session rather than a new session, check the Console Session box.
If the server's certificate cannot be verified, you receive a certificate warning. Checking Ignore Untrusted Certificate allows you to connect to the remote system without seeing this message.
Move Assets from one Asset Group to another using the Asset Group dropdown. The ability to move Assets to or from different Asset Groups depends upon your account permissions.
Further organize Assets by entering the name of a new or existing Tag. Even though the selected Assets are grouped together under the tag, they are still listed under the Asset Group in which each is pinned. To move an Asset back into its top-level Asset Group, leave this field blank.
Select the Public Portal through which this Asset should connect. If a session policy is assigned to this public portal, that policy may affect the permissions allowed in sessions started through this Asset. The ability to set the public portal depends on your account permissions.
Assets include a Comments field for a name or description, which makes sorting, searching, and identifying Assets faster and easier.
To set when users are allowed to access this Asset, choose a Asset Policy. These policies are configured by your administrator in the /login interface.
Choose a Session Policy to assign to this Asset. The session policy assigned to this Asset has the highest priority when setting session permissions. The ability to set a session policy depends on your account permissions.
Create a Remote RDP shortcut
To create a Remote Microsoft RDP shortcut, click the Create button in the Asset Management Interface. From the dropdown, select Remote RDP. RDP shortcuts appear in the Asset Management Interface with Jump Clients and other types of Asset shortcuts.
Organize and manage existing Assets by selecting one or more Assets and clicking Properties.
To view the properties of multiple Assets, the items selected must be the same type (e.g., all Jump Clients, all Remote Jumps, etc.). To review properties of other types of Assets, see the appropriate section in this guide.
Enter a Name for the Asset. This name identifies the item in the session tabs. This string has a maximum of 128 characters.
From the Gateway dropdown, select the network that hosts the computer you wish to access. The representative console remembers your Gateway choice the next time you create this type of Asset. Enter the Hostname / IP of system you wish to access.
By default, the RDP server listens on port 3389, which is therefore the default port BeyondTrust attempts. If the remote RDP server is configured to use a different port, add it after the hostname or IP address in the form of <hostname>:<port> or <ip address>:<port> (for example, 10.10.24.127:40000).
Provide the Username to sign in as, along with the Domain.
Select the Quality at which to view the remote screen. This cannot be changed during the RDP session. Select the color optimization mode to view the remote screen. If you are going to be primarily sharing video, select Video Optimized; otherwise, select between Black and White (uses less bandwidth), Few Colors, More Colors, or Full Color (uses more bandwidth). Both Video Optimized and Full Color modes allow you to view the actual desktop wallpaper.
To start a console session rather than a new session, check the Console Session box.
If the server's certificate cannot be verified, you receive a certificate warning. Checking Ignore Untrusted Certificate allows you to connect to the remote system without seeing this message.
Move Assets from one Asset Group to another using the Asset Group dropdown. The ability to move Assets to or from different Asset Groups depends upon your account permissions.
Further organize Assets by entering the name of a new or existing Tag. Even though the selected Assets are grouped together under the tag, they are still listed under the Asset Group in which each is pinned. To move an Asset back into its top-level Asset Group, leave this field blank.
Select the Public Portal through which this Asset should connect. If a session policy is assigned to this public portal, that policy may affect the permissions allowed in sessions started through this Asset. The ability to set the public portal depends on your account permissions.
Assets include a Comments field for a name or description, which makes sorting, searching, and identifying Assets faster and easier.
To set when users are allowed to access this Asset, choose a Asset Policy. These policies are configured by your administrator in the /login interface.
Choose a Session Policy to assign to this Asset. The session policy assigned to this Asset has the highest priority when setting session permissions. The ability to set a session policy depends on your account permissions.
Use an RDP shortcut
To use an Asset to start a session, select the shortcut from the Asset Management Interface and click the Jump button.
You are prompted to enter the password for the username you specified earlier.
Your RDP session now begins. Begin screen sharing to view the remote desktop. You can send the Ctrl-Alt-Del command, capture a screenshot of the remote desktop, and share clipboard contents. You can also share or transfer the RDP session with other logged-in BeyondTrust users, following the normal rules of your user account settings.
Multi-monitor support
An option allows you to open a Remote Support connection expanded across all the monitors on the client computer regardless of the client monitor configuration. With this feature, you can fully utilize all the monitors connected to the client computer, therefore being able to adjust screen sizing and scaling during an RDP session across multiple monitors.
- If you are using full screen view while using this feature, the remote system is displayed across all of your monitors.
- Assets can be set to allow multiple users to simultaneously access the same Asset. If set to Start New Session, then a new independent session starts for each user who Jumps to a specific RDP Asset. The RDP configuration on the endpoint controls any further behavior regarding simultaneous RDP connections.
Inject credentials within an RDP session
During a remote RDP session, you can use Vault credential injection to elevate privileges or authenticate with different credentials without leaving the session or typing a password (for example, to run an application as a different user). This includes injecting credentials mid-session, so you no longer need to disconnect and reconnect to perform a run as operation.
Remote Support supports credential injection in two RDP connection modes: the built-in Access Console and a Bring Your Own Tool (BYOT) connection using the native Windows RDP client. Both modes are supported when connecting through a Gateway.
Prerequisites
Two components must be in place before credential injection is available in RDP sessions.
BeyondTrust RDP Tools: installed on the endpoint
The BeyondTrust RDP Tools helper must be pre-installed on each endpoint where you want to use credential injection. This is a lightweight component deployed to remote systems, not to the representative's machine.
- Sign in to your PRA site at /login.
- Navigate to Consoles & Downloads.
- Locate and download the Remote Desktop Installer. The file downloads as an MSI.
- Deploy the MSI to target endpoints using Group Policy or your organization's endpoint management tool.
Credential injection is not available in RDP sessions until the BeyondTrust RDP Tools component is installed on the endpoint. Contact your administrator if you need assistance with deployment.
Vault credentials
You must have a Vault account with appropriate credentials and have been granted inject access. Only Vault credentials are available for injection during RDP sessions.
Inject credentials in the Representative Console
Use this method when you are connected to a remote endpoint through the Representative Console, including connections made through a Gateway. You can inject credentials at any point during the session, e.g.; at the login screen or mid-session when you need to elevate or switch users.
-
In the Representative Console, start a session with the target endpoint and begin screen sharing.
-
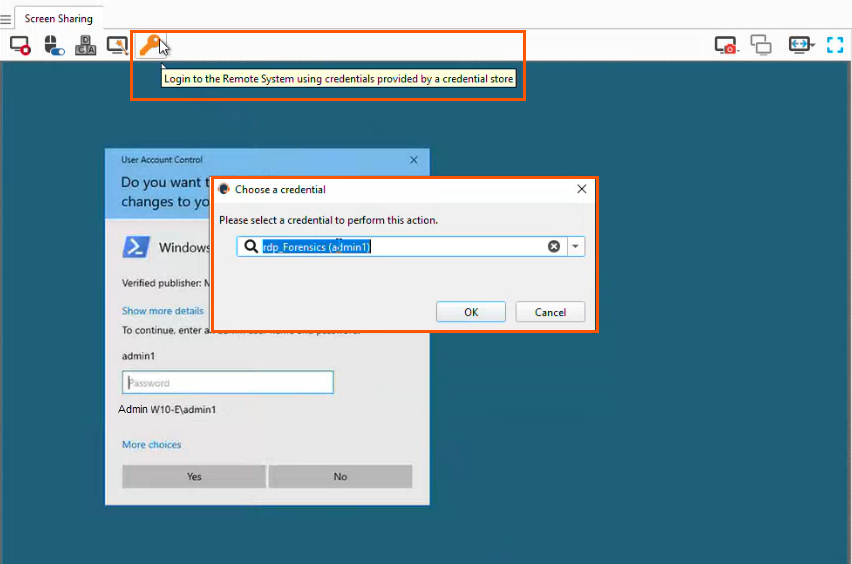
On the remote desktop, open the application you want to run with elevated privileges. For example, right-click PowerShell and select Run as administrator. A credentials prompt appears.
-
Select the Credential Injection icon in the prompt. The icon is enabled when a Vault credential is available for use.
-
Select the appropriate credential from the list.
-
Select OK. PRA injects the credential and the application launches under the selected user's credentials.
Inject credentials using a BYOT native Windows RDP connection
PRA also supports credential injection when you connect to an endpoint using the native Windows Remote Desktop client through a PRA tunnel. Use this method when you prefer to work in the native Windows RDP tool.
-
In the Representative Console, start a session with the target endpoint. PRA establishes a tunnel to the endpoint.
-
Select the native Windows RDP tool to open your connection. Accept the certificate warning if prompted. The RDP session starts.
-
If you are in full screen mode, exit full screen. The credential injection icon is only visible when you are not in full screen mode.
-
On the remote desktop, open the application you want to run with elevated privileges. For example, right-click PowerShell and select Run as administrator. A credentials prompt appears.
-
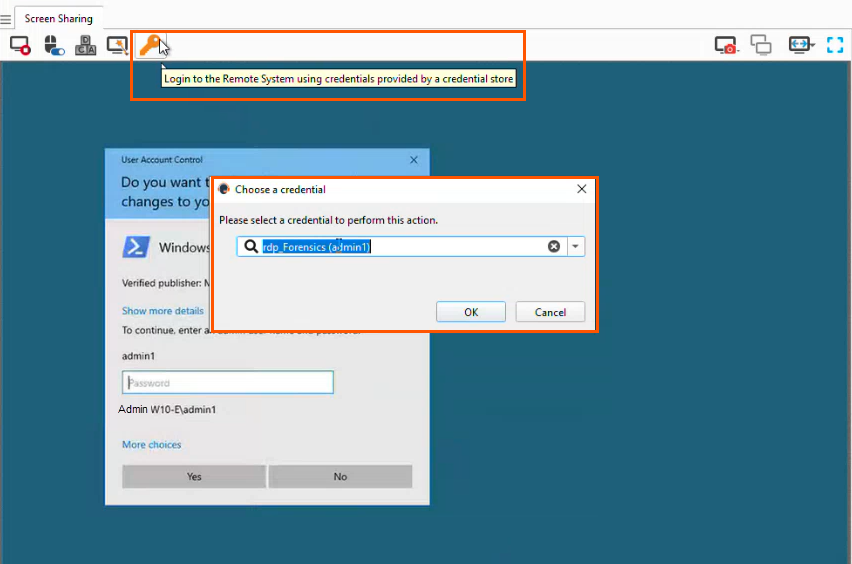
Select the Credential Injection icon in the prompt. A credentials prompt appears. When launching an RDP session using BYOT, the Credential Injection button remains available on the Console toolbar. To inject credentials mid-session, you must switch to the Console
-
Select the appropriate Vault credential from the list. PRA injects the credential into the prompt.
-
The application launches under the selected user's credentials.
Limitations
- Credential injection in RDP sessions requires the BeyondTrust RDP Tools component to be installed on the endpoint. Sessions on endpoints without this component do not display the injection icon.
- Only Vault credentials are available for injection. Local or manually entered credentials are not presented through the injection dialog.
- The credential injection icon is not visible when the native Windows RDP client is in full screen mode. Exit full screen to access it.
For more information on simultanous connections, see Simultaneous connections on the Assets page and the Asset Policies page.
Updated 3 months ago
