Representative collaboration | RS for Desktop
Chat with other representatives
From the Home tab of the console, you can chat with other logged-in users. If you are a member of one or more teams, select whichever team you would like to chat with from the list of queues at the left of the Home tab. You can chat with all members of that team or chat with just one user.
When you go back to your personal queue or select All Queues, you will remain in the chat for the queue you just left.
Click the arrow icon at the top left of the sidebar to collapse the sliding sidebar. If the sidebar is collapsed, hover over the arrow by the hidden window to reveal it. Click the pin icon that replaces the arrow icon at the top left of the sidebar to re-pin the sliding sidebar.
When typing in English, misspelled words are underlined in red. Right-click to view spelling suggestions or to ignore that spelling for the current console login.
In the settings, you can choose if the team chat should include status messages, such as users logging in and out, or only chats sent between team members.
Rep-to-rep screen share
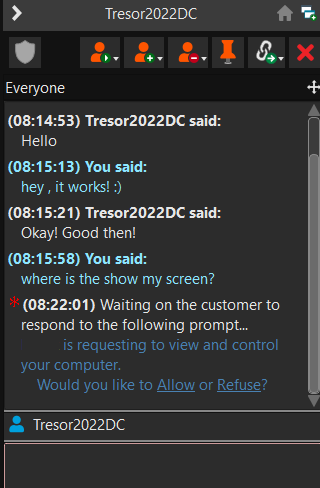
If your administrator has enabled this permission, you can share your screen with another user without the receiving user having to join a session. This option is available even if you are not in a session.
From a team queue, select a user, and click Show Screen. If working with more than one monitor, you can select which one to share or which apps should visible to the other user. Once you have made your selection, the receiving user gets a notification with the option to accept or decline the invitation.
A Show Screen window appears, showing the name of the user that is now viewing your screen. This window contains a chat box and the options to stop screen sharing, grant the receiving user control, and select which monitor and which apps to share. You can stop sharing your screen but keep this window open, or you can close the sharing session completely. If you leave the Show Screen window open, you can restart sharing your screen.
Share my screen tools
Sharing user
-
 Temporarily stop sharing your screen with another user. This pauses screen sharing but does not close the Show Screen window, allowing you to restart screen sharing.
 -
 (Re)start screen sharing.
 -
 Grant mouse and keyboard control to the user viewing your screen.
 -
Select the monitor to share with another user. The primary monitor is designated by a P.
-
 Select which apps to share with the user viewing your screen.
 -
 End the screen sharing session. This closes the user screen sharing interface.
Viewing user
-
 The user sharing their screen with you has granted you keyboard and mouse control.
 -
 Turn on a virtual pointer, visible on the sharing user's screen.
 -
 Capture a screenshot of the sharing user's screen at its full resolution.
 -
 View the remote screen at actual or scaled size.
 -
 View the remote desktop in full screen mode or return to the interface view.
 -
 End screen sharing session. This closes the user screen sharing interface.
Access requests
Based on predefined access sponsor groups, a representative with restricted permissions can request a more highly privileged representative to perform certain actions on their behalf, such as elevating a customer client to administrative rights or entering credentials for a remote system.
If a representative is a sponsor in one or more access sponsor groups, they will see an Access Requests tab in the representative console.
When a representative makes a request, all sponsors in the selected access sponsor group will see a new request in the Access Requests tab of the representative console.
When a sponsor accepts the request, they are prompted to join the session, reject the request and enter a reason for the rejection, or return the request to the queue.
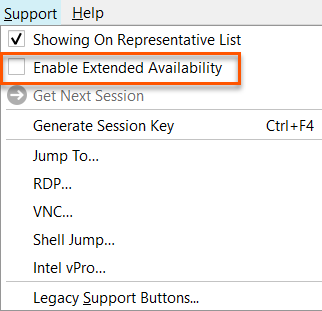
Extended availability
With extended availability, privileged users can receive email invitations to share sessions, even if they are not logged into the console. When sending an invitation, you may invite fellow team members. If permitted, you may also invite users from teams to which you do not belong. The ability to share sessions with users outside of your teams as well as to receive session invitations when logged out of the console extends your availability as a support representative.
If your account is configured for extended availability, you can enable or disable the functionality from the Support menu of the representative console.
If you have extended availability enabled, you see a notification when you log into the console. From this dialog, you can easily disable extended availability to avoid distraction while in a session, for example.
If you choose to keep extended availability enabled, a license slot is reserved for you until such time as extended availability is disabled. This ensures that if you are invited to join a session, you are not denied login due to license usage restrictions
Email notification and invitation
Each time you enable extended availability mode, the B Series Appliance notifies you via the email address configured for your user account, in the language you have specified, if available.
BeyondTrust does not pull email addresses from external LDAP directory stores. The email address must be configured in BeyondTrust in one of two ways:
- An administrator can add an email address to a user account by going to /login > Users & Security > Users and editing the account.
- The user can set their own email address by going to the /login > My Account page.
The notification includes the URL of the site as well as a link to quickly disable extended availability mode.
The B Series Appliance also sends an email notification when you are invited to a session. This allows you to join a session even if you are not currently logged into the console. The email notification includes links to accept or decline the invitation, as well as to decline the invitation while disabling extended availability mode.
Manage Support Buttons
Support Buttons allow customers to initiate a support session to their assigned support team, enter a session key, or submit an issue to a support queue. Deployed Support Buttons can be managed from the Support Button management interface. Note that a mass-deployed Support Button installed in system-wide mode must be removed using Add/Remove Programs or system management tools.
Access the Support Button management interface from:
- The Support menu of the representative console
- The Support Buttons button at the top of the representative console
The Support Button management interface displays a list of deployed Support Buttons along with usage statistics.
Administrators see all deployed Support Buttons, while privileged users can see the buttons associated with their personal queue and their team queues.
Click the Search By button (search icon) to select which fields to search. Then type in the text entry box and press enter to perform a search. Additionally, you can sort the data rows by clicking on a column header.
The Support Button usage statistics include:
- Static fields:
- ID
- Customer Name
- Computer Name
- Deploy Date
- Mass Deployed (Yes/No)
- Deployed By (Representative Private Display Name)
- Usage Count
- Last Used Date (or Never if none yet)
- Install Mode (User or System)
- Icon Preview
- Dynamic (allowed to edit) fields:
- Description
- Profile
- Deployed To (Queue)
- Enabled (Yes/No)
- Expiration
- Public Portal
You can also Edit the dynamic fields, Revoke a Support Button, or Export the Support Button usage statistics to a *.csv file. If you revoke a mass-deployed Support Button installed for all users of a system, the button may be removed only by using the system Add or Remove Programs control panel or systems management tools.
If you select Edit from the Support Button Management Interface, you can edit any of the dynamic fields. If multiple Support Buttons are selected to edit, Multiple Values is displayed in any dynamic fields that have different values.
If you select to Export the usage statistics, the file selection screen is shown. You can enter the file name desired and the location where you wish to save the *.csv file.
Dashboard
The dashboard feature enables privileged users to view and monitor ongoing sessions, enabling administrative oversight to help manage staff. Based on roles assigned from the Support Teams page of the administrative interface, team leads can monitor team members of a given team, and team managers can monitor both team leads and team members of that team.
If a user is a team manager or team lead of one or more teams, the dashboard pane appears beneath the queue selection pane on the Home tab of the console. This pane displays any logged-in team members of a lower role for the selected team.
Status indicators show whether users are available to take sessions (green), are idle (gray), are busy (yellow), or have auto-assign turned off (red). If a user is in more than one state, their status color shows the most important information in order of auto-assign turned off, busy, idle, and available. Hover over the user's name to view full details. A bar at the bottom of the dashboard shows the percentage of users in each state. Hover over this bar to view the number or users with each status. Users cannot manually alter how their statuses are displayed.
Select a user from the dashboard pane to view any sessions they may be running. A team manager or team lead can take over a session from another user of that team by selecting the appropriate session from the queue and clicking the Take Over button. This transfers ownership of that session to the team manager or team lead, with the original user remaining in the session as a participant. A team manager or team lead can also transfer ownership of a support session from one user to another user or team.
It is also possible for a team manager to join a session in progress by clicking the Join button. The behavior is similar to joining a session via session invitation, except that no invitation is required.
The team lead can join or take over a team member's session only if the team lead has start session access to the Asset that was used to create the session, or the dashboard setting to allow join or take over without start session access is checked.
Additionally, if configured in the /login interface, a team manager or team lead can monitor team members of a lower role even if there are no ongoing sessions, as long as those users are logged into the console.
A monitoring icon can be displayed in the corner of the user's desktop to indicate that monitoring is taking place. When the user moves the cursor near this icon, it moves to another corner to prevent obscuring the screen. Select the user whose screen you wish to view and then click the Monitor button. This opens a new tab in your console, displaying either the user's entire computer screen or only the console, depending on the administrative settings.
To gain control of the user’s computer, click the Enable Mouse/Keyboard Control button.
Within a team, a user can administrate only others with roles lower than their own.
Roles apply strictly on a team-by-team basis so that a user may be able to administrate another user in one team but not be able to administrate that same user in another team.
Representative survey
At the end of the session, you may be prompted to fill out a short survey regarding the session. Your administrator can fully customize the questions through the administrative interface and can review the results from the session reports. If one or more of the questions is required, you will not be allowed to close the session until you have answered those questions.
Your administrator may also choose to allow you access to the representative survey during a session. In this scenario, the survey can be used as a workflow template, allowing your administrator to push a series of questions and/or check mark points, as well as specific links you may use in your support session.
