Console settings | RS On-prem
What is the Console Settings page?
The Console Settings page allows administrators to configure and manage the settings for the representative console, including customizing behaviors related to user interactions, session management, and access control.
How is the Console Settings page useful to my organization?
This page is useful for tailoring the representative console to your organization's needs, allowing for adjustments to session handling, user interface preferences, and control over access to various features. It helps ensure the console operates efficiently and securely, improving both representative performance and customer support outcomes.
How do I access the Console Settings page?
- Use a Chromium-based browser to sign in to your Remote Support URL.
This URL is provided in the BeyondTrust welcome email and includes your site URL followed by /login. - From the left menu, click Console Settings.
The Rep Console Settings page opens and displays by default.
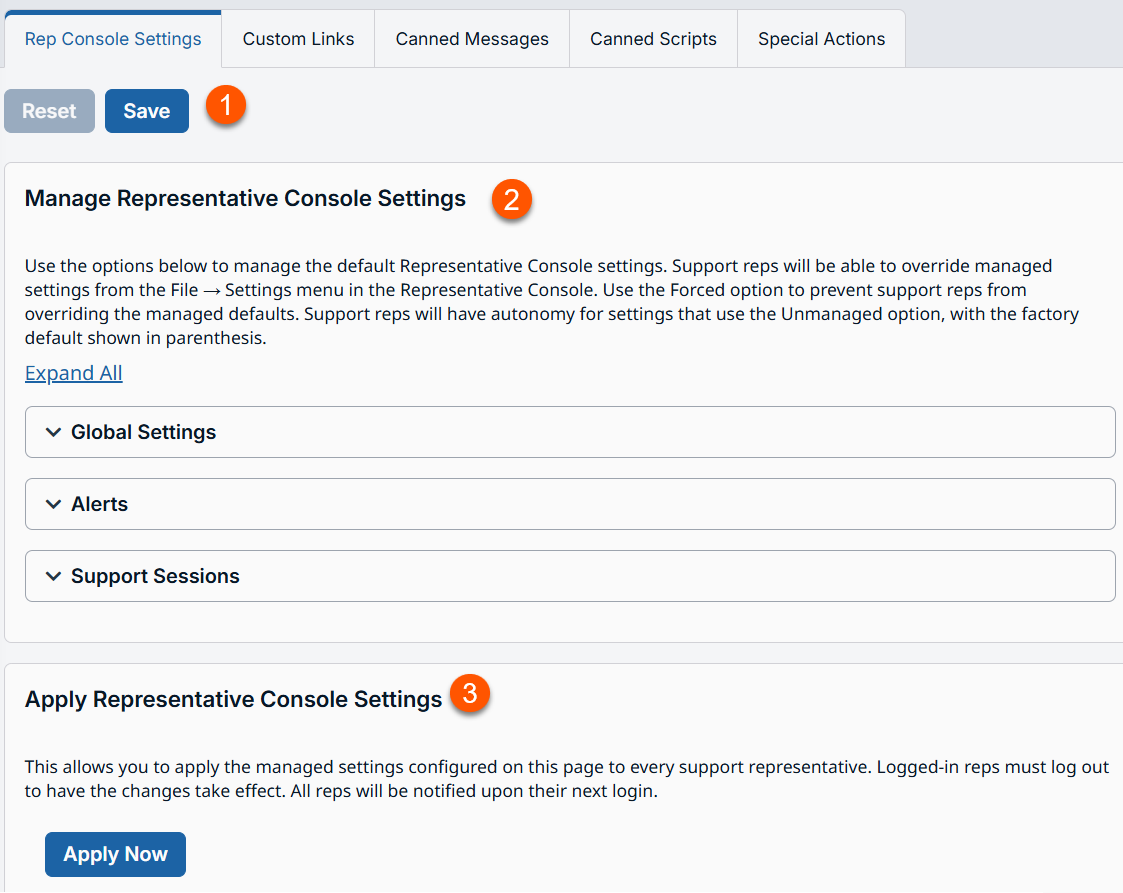
- Saves: Saves or resets console settings.
- Manage Representative Console Settings: Sets values for Global settings, Alerts, and Access Sessions.
- Apply Representative Console Settings: Applies managed settings to every user.
Manage representative console settings
You can configure the default representative console settings for your entire user base, applying a consistent representative console user experience and increasing team efficiency. You can force settings, allow settings to be overridden by the user, or leave settings unmanaged. If you select Unmanaged, the BeyondTrust default setting will be displayed alongside for your consideration.
Each Enable or Disable setting provides an administrative checkbox option to become a forced setting. Forced settings take effect on the user's next login and do not allow configuration in the console. Unforced settings may be overridden by a user through the settings window in the representative console.
For more information, see Settings and preferences.
A forced setting cannot be overridden unless an administrator deselects the Forced checkbox option for that setting in the /login administrative interface.
Choose the settings you want to be the default for your users, and click the Save button at the bottom of the page.
Note that saved settings take effect only upon login to the console. Even if you save and apply the changes by clicking the Apply Now button at the top of the page, detailed later, the user will not use the new settings until login.
If, for instance, you wish to set up default settings for new users but leave existing users' settings unchanged, save your managed settings but do not apply them. This will make it so all new representative console logins will begin with your managed default settings. Existing users will have forced settings applied upon next login, but all other settings will remain unchanged.
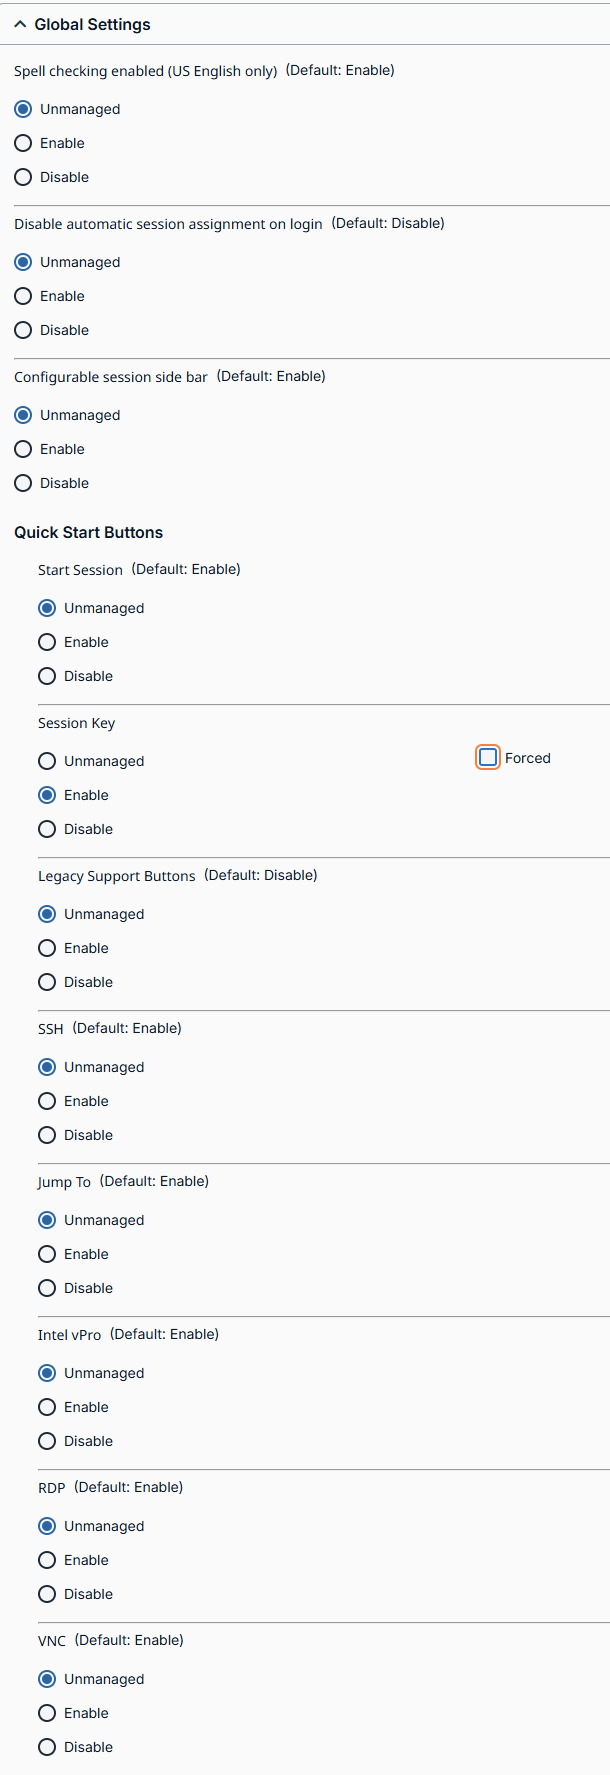
Global settings
Spell checking enabled
From the Global Settings section, you can choose to enable or disable spell check for chat and session notes. Currently, spell check is available for US English only.
Disable automatic session assignment on login
If automatic session assignment is disabled on login, then the user will not be assigned sessions automatically until they choose to opt in.
Configurable session side bar
Choose if you want the session menu icon to display, if the sidebar can be detached, and if the widgets on the session sidebar can be rearranged and resized.
Quick start buttons
For more information, see How do I start a support session.
Use the Forced option to prevent support reps from overriding the managed defaults.
Start session
Display a Start button at the top of the representative console. Clicking this button walks the user through the ways your customer can start a support session.
Session key
At the top of the representative console, display a session key generation button.
Support Buttons
At the top of the representative console, display a button to launch the Support Button management interface.
SSH
At the top of the representative console, display a button to launch a Shell Session.
Jump to
At the top of the representative console, display a button to launch a local or remote Session.
Intel® vPro
At the top of the representative console, display a button to launch access to a provisioned vPro Gateway.
RDP
At the top of the representative console, display a button to launch an RDP session.
VNC
At the top of the representative console, display a button to launch a VNC session.
Alerts
Audible alerts - play a sound when a chat message is received
Choose if a sound should be played when the user receives a chat message. If unmanaged or if enabled and not forced, the user may designate a custom sound in WAV format no larger than 1MB.
Visual alerts - flash the application icon when a chat message is received
Choose if the application icon should flash when the user receives a chat message.
Show status messages in support team chat windows
Choose if the team chat should include status messages, such as users logging in and out, or only chats sent between team members.
Pop-up notifications
Team queues
Choose if a user should receive a pop-up notification for chat messages received in a support team chat.
Support sessions
Choose if a user should receive a pop-up notification for chat messages received in a support session
Audible alerts - play a sound when a session enters any queue
Choose if a sound should be played when a session enters any of a user's queues.
Audible alerts - play a sound when a session is overdue in team queues
Choose if a sound should be played when a session is overdue in a team queue.
Visual alerts - flash the application icon when a session enters any queue
Choose if the application icon should flash when a session enters any of a user's queues.
Visual alerts - flash the application icon when a session is overdue in team queues
Choose if the application icon should flash when a session is overdue in a team queue.
Prompt when new customer enters personal queue
Set if a user should be prompted when a session enters their personal queue.
Pop-up notifications
Pop-up notifications appear independent of the representative console and on top of other windows. If the pop-up notification is enabled and not forced or left unmanaged, the user will be able to choose how they receive pop-up notifications.
Personal queue - new sessions, transferred sessions, shared sessions
Choose if a user should receive a pop-up notification for new sessions, transferred sessions, and/or shared sessions in this queue.
Team queues - new sessions, transferred sessions, shared sessions, overdue sessions
Choose if a user should receive a pop-up notification for new sessions, transferred sessions, shared sessions, and/or overdue sessions in this queue.
Pop-up behavior - location and duration
Set the default location and duration for pop-up notifications.
Support session assignment alerts
Audible alerts - play a sound when a session is assigned
Choose if a sound should be played when a session is automatically assigned to a user.
Expiring assignment sound
Choose if a sound should be played when an automatically assigned session invitation is about to expire. The alert can be either an audio file or the system beep. If unmanaged or if enabled and not forced, the user may designate a custom sound in WAV format no larger than 1MB.
Support sessions
Automatically request screen sharing
Choose whether you want your users' sessions to begin with chat only or to immediately request screen sharing.
Automatically detach
Choose if you want to open sessions as tabs in the representative console or to automatically detach sessions into new windows.
Prompt to elevate if customer's secure desktop is enabled
For situations where users may encounter support issues due to a customer's having enabled secure desktop, you can allow your users to be prompted to elevate to run with administrative rights when the session begins.
Default quality
Set the default quality for screen sharing sessions.
Default scaling
Set the default size for screen sharing sessions.
Automatically enter full screen mode when screen sharing starts
When screen sharing starts, the user can automatically enter full screen mode.
Automatically collapse the sidebar when full screen mode is used
When the screen sharing session enters full screen mode, the chat bar can automatically collapse.
Show my screen
Automatically minimize window when showing screen
When a user shows their screen to a customer during a session, you can choose to leave the representative console open or to minimize it to the user's taskbar.
Command shell
Number of lines of available command history
You can set the number of lines to save in the command shell history. The default value is 500 lines.
Save
Click Save, in the upper left, to save the profile settings you have configured. A message appears confirming settings saved or updated. Users who download the access console after you save a new profile receive the new settings as the default settings.
Apply access console settings
Apply now
To push the default settings to your users, click Apply Now. The page displays a confirmation message, Settings profile was successfully applied.
Users receive an alert dialog for confirmation when they first log in to the access console after you apply the settings. The dialog box warns them that their settings have changed and prompts them with the option to acknowledge the dialog or to open their access console settings window and review the changes.
Apply representative console settings
Apply now
If you wish to push the default settings to your entire user base, click Apply Now. The top of the page displays a confirmation message, Settings profile was successfully applied.
After applying new settings to your user base, the users will receive an alert dialog for confirmation when they first log in to the representative console after you apply the settings. The dialog warns them that their settings have changed and prompts them with the option simply to acknowledge the dialog or to open their representative console settings window to review the changes.
