Kerberos | RS
Benefits of Kerberos integration
BeyondTrust Remote Support integrates with Kerberos to deliver single sign-on and centralized authentication. Users gain secure access without re-entering passwords, while administrators manage accounts in one place.
- Simplify login with single sign-on.
- Centralize account control.
- Strengthen security with time-stamped tickets.
How do I access the Security Providers page?
- Use a Chromium-based browser to sign in to your Remote Support URL.
This URL is provided in the BeyondTrust welcome email and includes your site URL followed by /login. - From the left menu, click Users & Security.
The Users page opens and displays by default. - At the top of the page, click Security Providers.
The Security Providers page displays.
Add a security provider
- On the Security providers page, click + Add, and then select Kerberos from the list.
The Add Security Provider page displays. - Configure the security provider following the steps below.
Kerberos fields
Prerequisites
- Ensure you have a working Kerberos Key Distribution Center (KDC).
- Synchronize clocks across all clients, the KDC, and the appliance (Network Time Protocol is recommended).
- Create a service principal on the KDC for your appliance.
-
Name: Create a unique name to help identify this provider.
-
Enabled: If checked, your appliance can search this security provider when a user attempts to log in to the representative console or /login. If unchecked, this provider will not be searched.
-
Keep display name synchronized with remote system: If selected, a Kerberos-authenticated user's display name will be their User Principal Name. If deselected, display names can be edited locally on the appliance.
-
Strip realm from principal names: Select this option to remove the REALM portion from the User Principal Name when constructing the BeyondTrust username.
-
Authorization settings
-
User handling mode: Select which users can authenticate to your appliance.
-
Allow all users: Allows anyone who currently authenticates via your Key Distribution Center (KDC).
-
Allow only user principals specified in the list: Allows only specifically designated user principles.
-
Allow only user principals that match the regex: Allows only users principals who match a Perl-compatible regular expression (PCRE).
-
-
Default group policy: Each user who authenticates against an external server must be a member of at least one group policy in order to authenticate to your appliance, logging into either the /login interface or the representative console. You can select a default group policy to apply to all users allowed to authenticate against the configured server.
-
SPN handling mode
-
Allow only SPNs specified in the list: Allows only specific SPNs selected from a list of currently configured SPNs.
If unchecked, allows all configured service principal names (SPNs) for this security provider.
-
-
LDAP group lookup: If you want users on this security provider to be associated with their groups on a separate LDAP server, choose one or more LDAP group servers to use for group lookup.
-
See Additional setup and tips to:
- Understand SPN usage in Remote Support
- Review network setup examples
- Troubleshoot the integration
- Click Save at the top of the page.
Change priority order of security providers
- At the top of the Security providers page, click Change Order.
- Drag and drop security providers to set their priority. You can drag and drop servers within a cluster; clusters can be dragged and dropped as a whole.
- Click Save Order for prioritization changes to take effect.
Disable a security provider
Disable this security provider connection. This is useful for scheduled maintenance, when you want a server to be offline but not deleted.
- On the Security providers page, locate the security provider you want to disable.
- Click
 > Disable.
To re-enable the security provider, click ![]() > Enable.
> Enable.
View the log for a security provider
View the status history for a security provider connection.
- On the Security providers page, locate the security provider you want to view.
- Click > View Log.
Copy a security provider
Create a copy of an existing security provider configuration. This will be added as a top-level security provider and not as part of a cluster.
- On the Security providers page, locate the security provider you want to copy.
- Click > Copy.
Edit a security provider
If you edit the local security provider and select a default policy that does not have administrator permissions, a warning message appears. Ensure other users have administrator permissions before proceeding.
- On the Security providers page, locate the security provider you want to edit from the list.
- Click
 .
.
The Edit security provider page displays. - Edit the security provider details. The details available are the same as the Add security provider page details.
- Click Save at the top of the page.
Delete a security provider
- On the Security providers page, locate the security provider you want to delete.
- Click
 to delete the security provider.
Additional setup and tips
Kerberos: Service principal name use in BeyondTrust software
Browsers may use different methods to canonicalize the hostname for a site, including performing a reverse lookup of the IP of the hostname specified in the URL. The service principal name (SPN) canonicalization of this address may cause the browser to request an SPN based on an internal hostname rather than the appliance hostname.
For example, a BeyondTrust site built as hostname support.example.com may ultimately resolve to the hostname internal.example.com.
support.example.com → 10.0.0.1 → 1.0.0.10.in-addr.arpa → internal.example.com
The BeyondTrust software expects the SPN in the form of HTTP/ followed by the hostname configured in the BeyondTrust software during purchases or upgrade (HTTP/support.example.com). If the browser canonicalizes the hostname to an internal hostname and uses that hostname for the SPN (HTTP/internal.example.com), authentication will fail unless you have registered SPNs for both HTTP/internal.example.com and HTTP/support.example.com, and installed them on your appliance.
If SPNs for multiple hostnames are imported, the BeyondTrust software will use the site hostname to which it was previously able to connect as a client. Therefore, if you are experiencing Kerberos authentication issues, it is advised to import a keytab for each hostname to which the site might canonicalize.
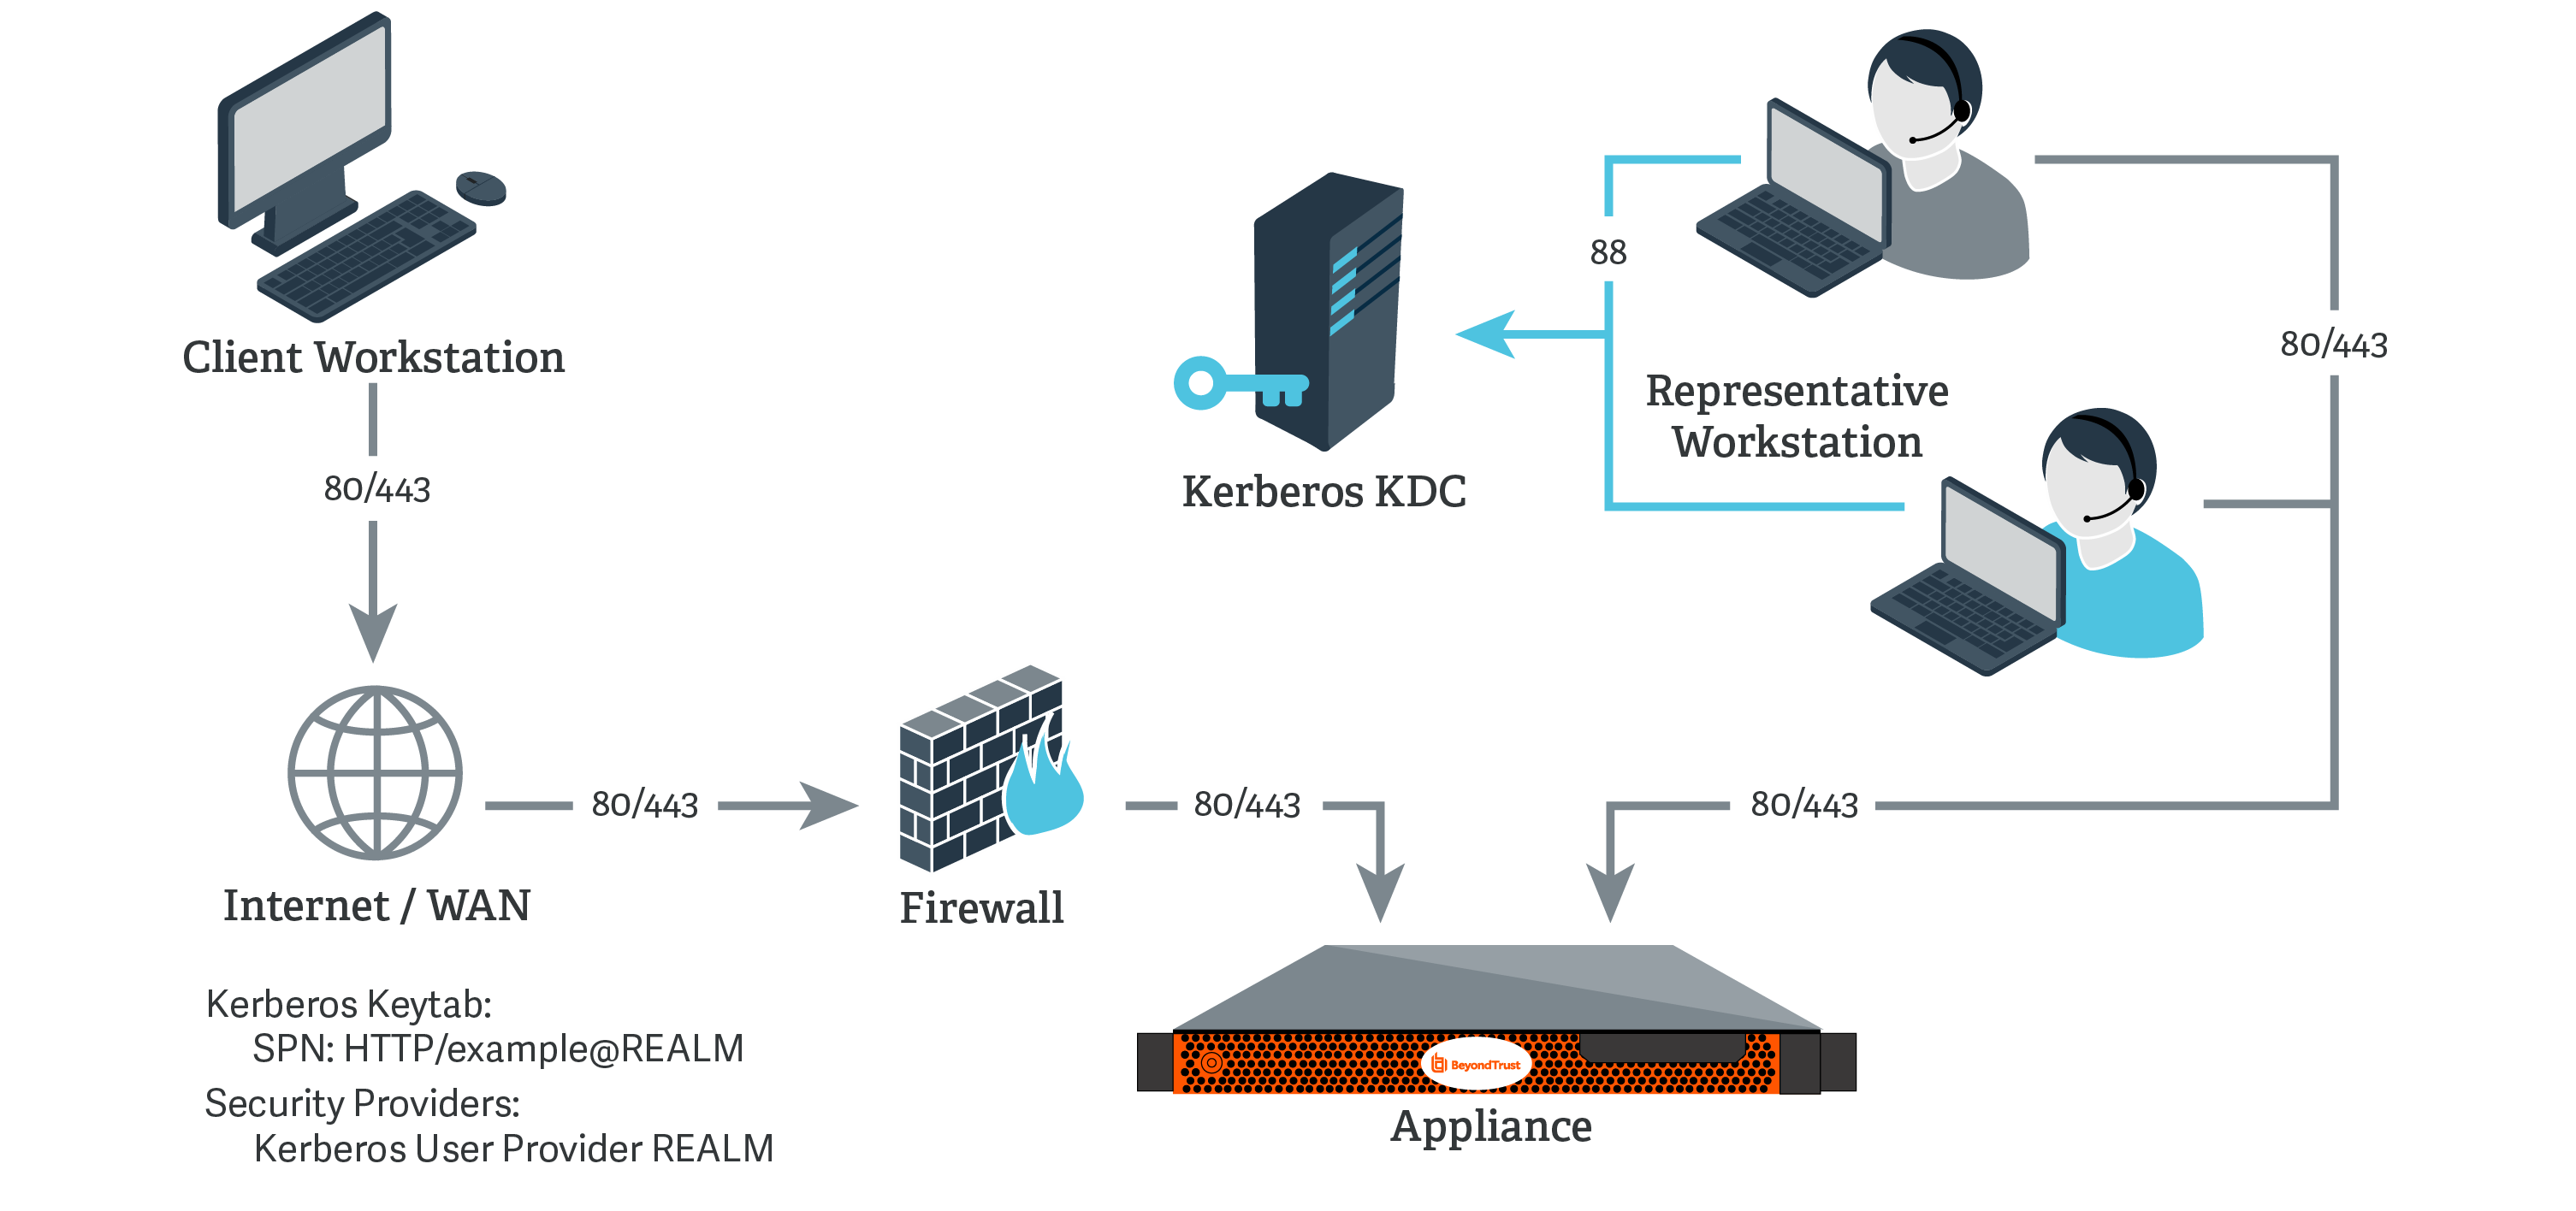
Kerberos: Network setup examples
Kerberos KDC
> ℹ️
For this example:
- The appliance may or may not be located behind a corporate firewall.
- Representatives may or may not be on the same network as the appliance.
- Representatives belong as members to a Kerberos realm.
- Representatives can communicate with their KDC (typically over port 88 UDP).
-
On the Kerberos KDC, register an SPN for your appliance hostname and then export the keytab for this SPN from your KDC.
-
Log in to your admin interface.
-
Go to Users & Security > Kerberos Keytab.
-
Under Import Keytab, click Choose File, and then select the exported keytab to upload. You should now see this SPN under the list of Configured Principals.
-
Go to Users & Security > Security Providers. Click Add. From the dropdown, select Kerberos.
-
Create a unique name to help identify this provider.
-
Be sure to check the Enabled box.
-
Choose if you want to synchronize display names.
-
Optionally, select to remove the REALM portion from the User Principal Name when constructing the BeyondTrust username.
-
For User Handling Mode, select Allow all users.
-
For SPN Handling Mode, leave the box unchecked in order to allow all SPNs.
-
You may also select a default group policy for users who authenticate against this Kerberos server.
-
Click Save to save this security provider configuration.
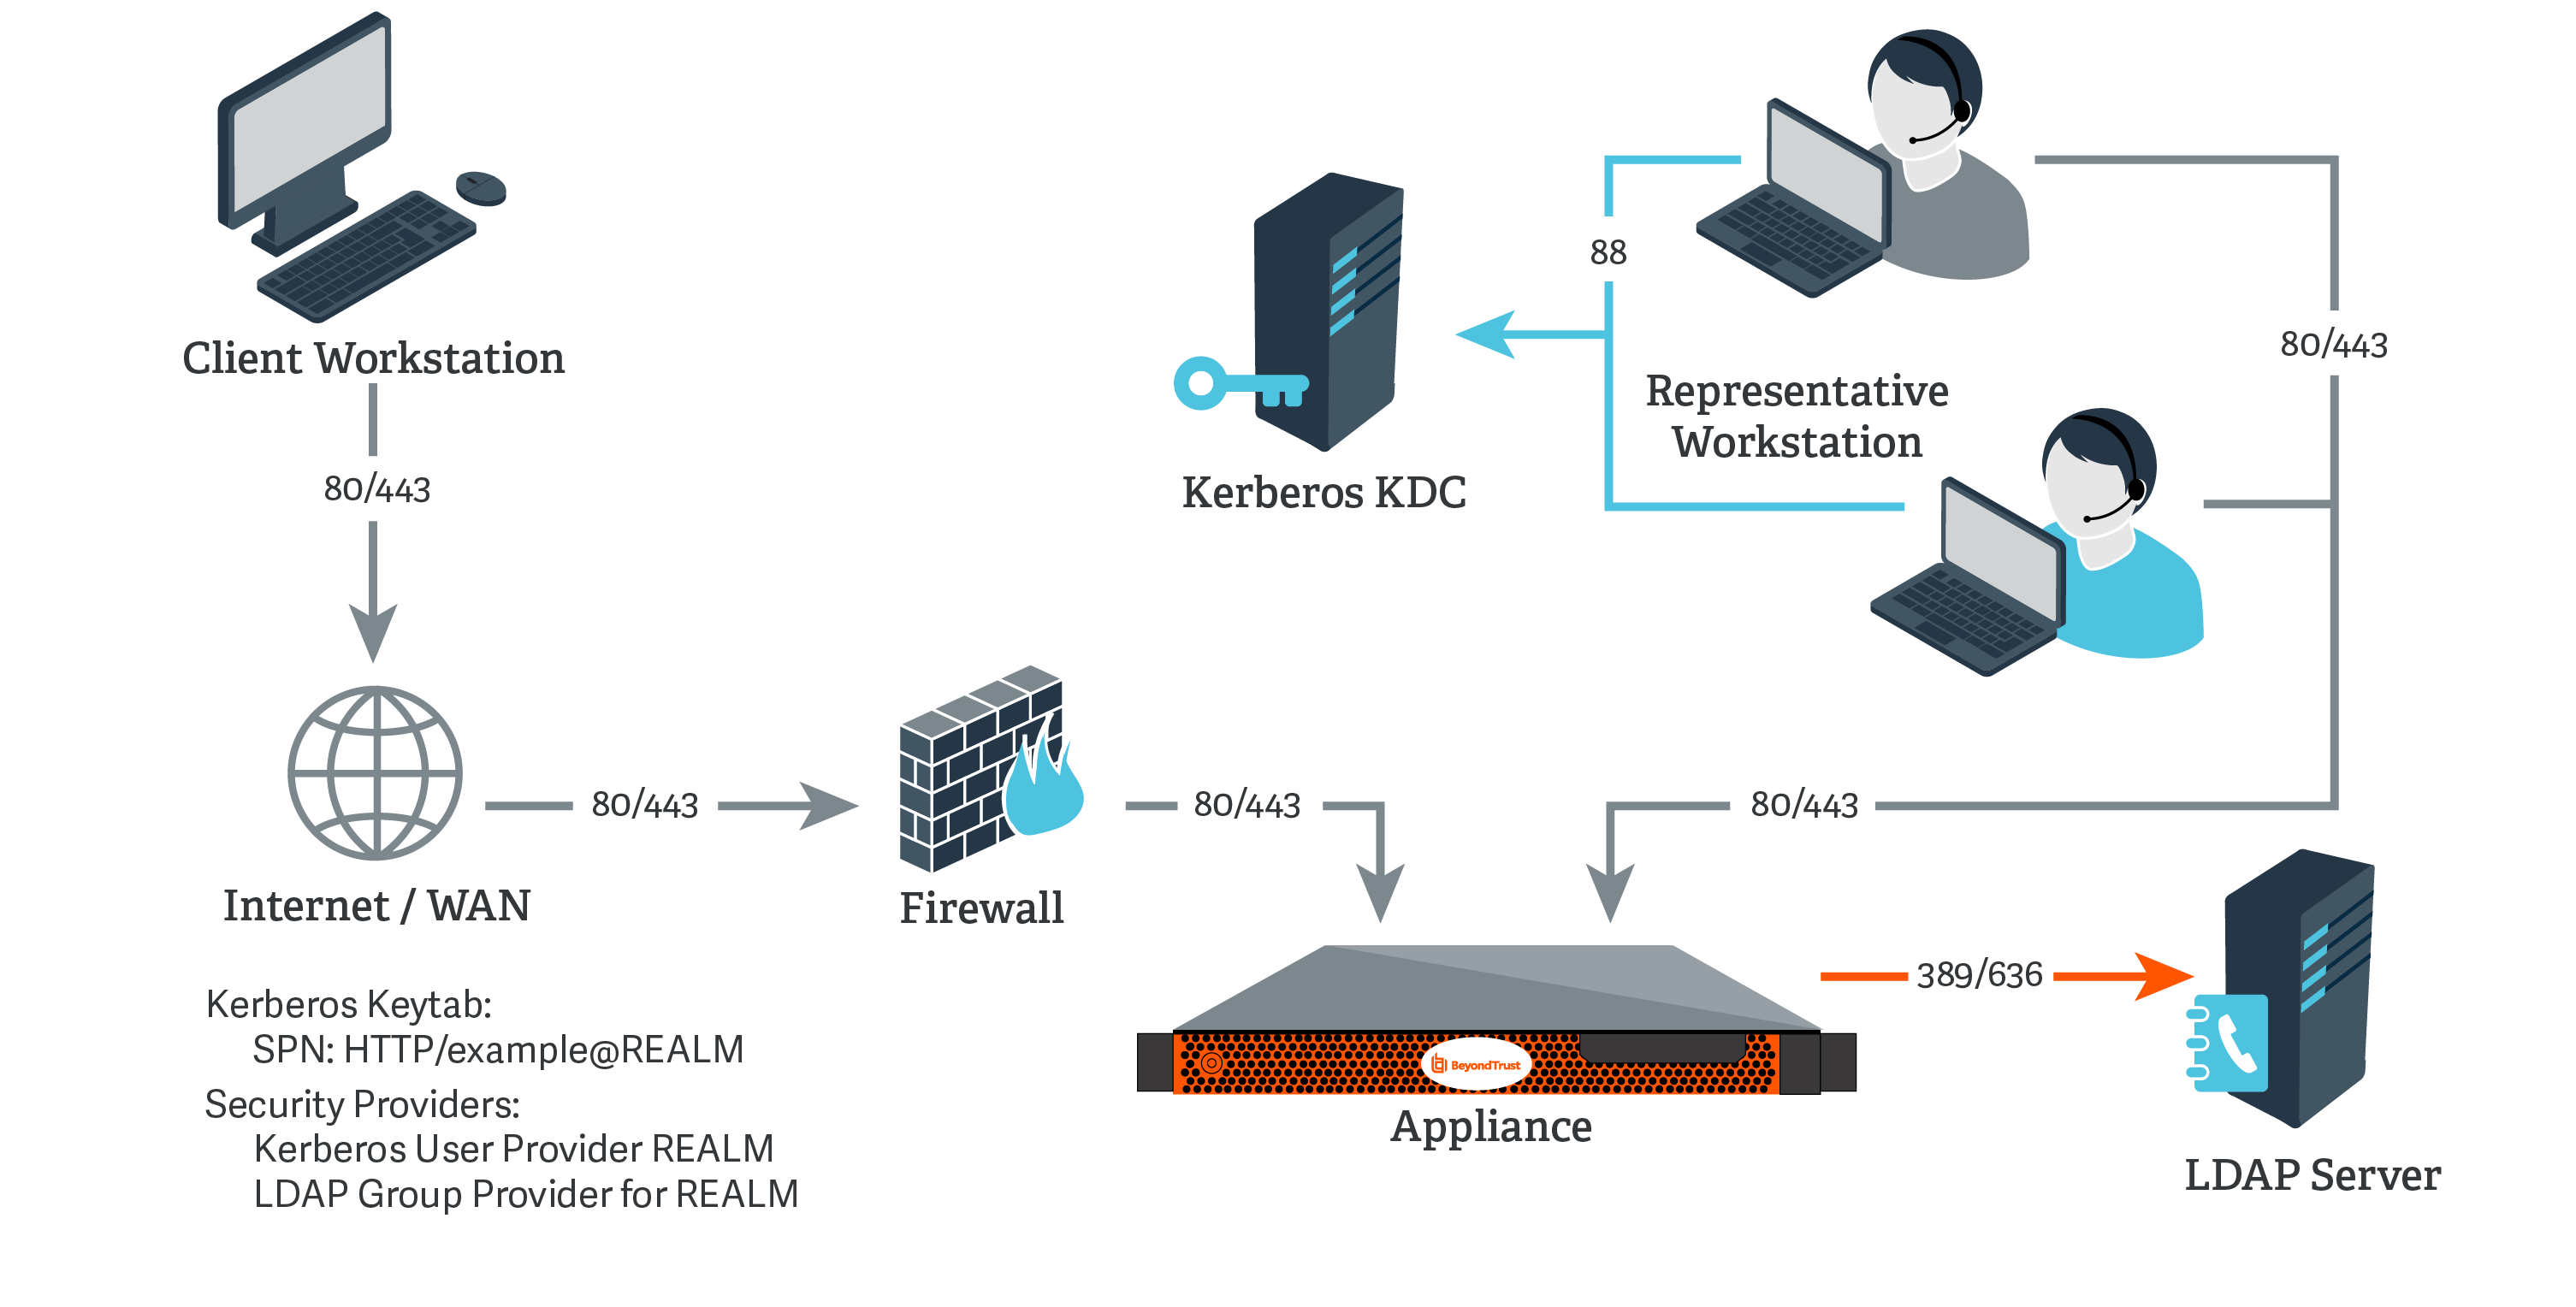
Kerberos KDC and LDAP Server on the Same Network
> ℹ️
For this example:
- The appliance may or may not be located behind a corporate firewall.
- Representatives may or may not be on the same network as the appliance.
- Representatives belong as members to a Kerberos realm.
- Representatives can communicate with their KDC (typically over port 88 UDP).
- An LDAP server exists (which may or may not be the same machine as the KDC) that maps user principal names to groups to which the users may belong.
- Your appliance can directly communicate with the LDAP server.
-
On the Kerberos KDC, register an SPN for your appliance hostname and then export the keytab for this SPN from your KDC.
-
Log in to your admin interface.
-
Go to Users & Security > Security Providers. Click Add. From the dropdown, select LDAP.
-
Create a unique name to help identify this provider.
-
Be sure to check the Enabled box.
-
Choose if you want to synchronize display names.
-
For Lookup Groups, select either Only perform group lookups or Allow user authentication and perform group lookups.
-
Continue to configure the settings for this LDAP server.
-
For the User Query, enter a query that can tie the User Principal Name as supplied in the user's Kerberos ticket to a single entry within your LDAP directory store.
-
Click Save to save this security provider configuration.
-
Go to Users & Security > Kerberos Keytab.
-
Under Import Keytab, click Choose File, and then select the exported keytab to upload. You should now see this SPN under the list of Configured Principals.
-
Go to Users & Security > Security Providers. Click Add. From the dropdown, select Kerberos.
-
Create a unique name to help identify this provider.
-
Be sure to check the Enabled box.
-
Choose if you want to synchronize display names.
-
Optionally, select to remove the REALM portion from the User Principal Name when constructing the BeyondTrust username.
-
For User Handling Mode, select Allow all users.
-
For SPN Handling Mode, leave the box unchecked in order to allow all SPNs.
-
In LDAP Group Lookup, select the server configured in this process and add it to the Group Providers In Use list.
-
You may also select a default group policy for users who authenticate against this Kerberos server.
-
Click Save to save this security provider configuration.
Kerberos KDC and LDAP Server on Separate Networks
> ℹ️
For this example:
- The appliance may or may not be located behind a corporate firewall.
- Representatives may or may not be on the same network as the appliance.
- Representatives belong as members to a Kerberos realm.
- Representatives can communicate with their KDC (typically over port 88 UDP).
- An LDAP server exists (which may or may not be the same machine as the KDC) that maps user principal names to groups to which the users may belong.
- Your appliance cannot directly communicate with the LDAP server.

-
On the Kerberos KDC, register an SPN for your appliance hostname and then export the keytab for this SPN from your KDC.
-
Log in to your admin interface.
-
Go to Users & Security > Security Providers. Click Add. From the dropdown, select LDAP.
-
Create a unique name to help identify this provider.
-
Be sure to check the Enabled box.
-
Choose if you want to synchronize display names.
-
For Lookup Groups, select either Only perform group lookups or Allow user authentication and perform group lookups.
-
Continue to configure the settings for this LDAP server.
-
Because the LDAP server does not have direct communication with the appliance, check the option Proxy from appliance through the Connection Agent.
-
Create a password for the connection agent.
-
Click Download Connection Agent to install the agent on a system behind your firewall. When installing the connection agent, provide the name and password you created for this LDAP server.
-
For the User Query, enter a query that can tie the User Principal Name as supplied in the user's Kerberos ticket to a single entry within your LDAP directory store.
-
Click Save to save this security provider configuration.
-
Go to Users & Security > Kerberos Keytab.
-
Under Import Keytab, click Choose File, and then select the exported keytab to upload. You should now see this SPN under the list of Configured Principals.
-
Go to Users & Security > Security Providers. Click Add. From the dropdown, select Kerberos.
-
Create a unique name to help identify this provider.
-
Be sure to check the Enabled box.
-
Choose if you want to synchronize display names.
-
Optionally, select to remove the REALM portion from the User Principal Name when constructing the BeyondTrust username.
-
For User Handling Mode, select Allow all users.
-
For SPN Handling Mode, leave the box unchecked in order to allow all SPNs.
-
In LDAP Group Lookup, select the server configured in this process and add it to the Group Providers In Use list.
-
You may also select a default group policy for users who authenticate against this Kerberos server.
-
Click Save to save this security provider configuration.
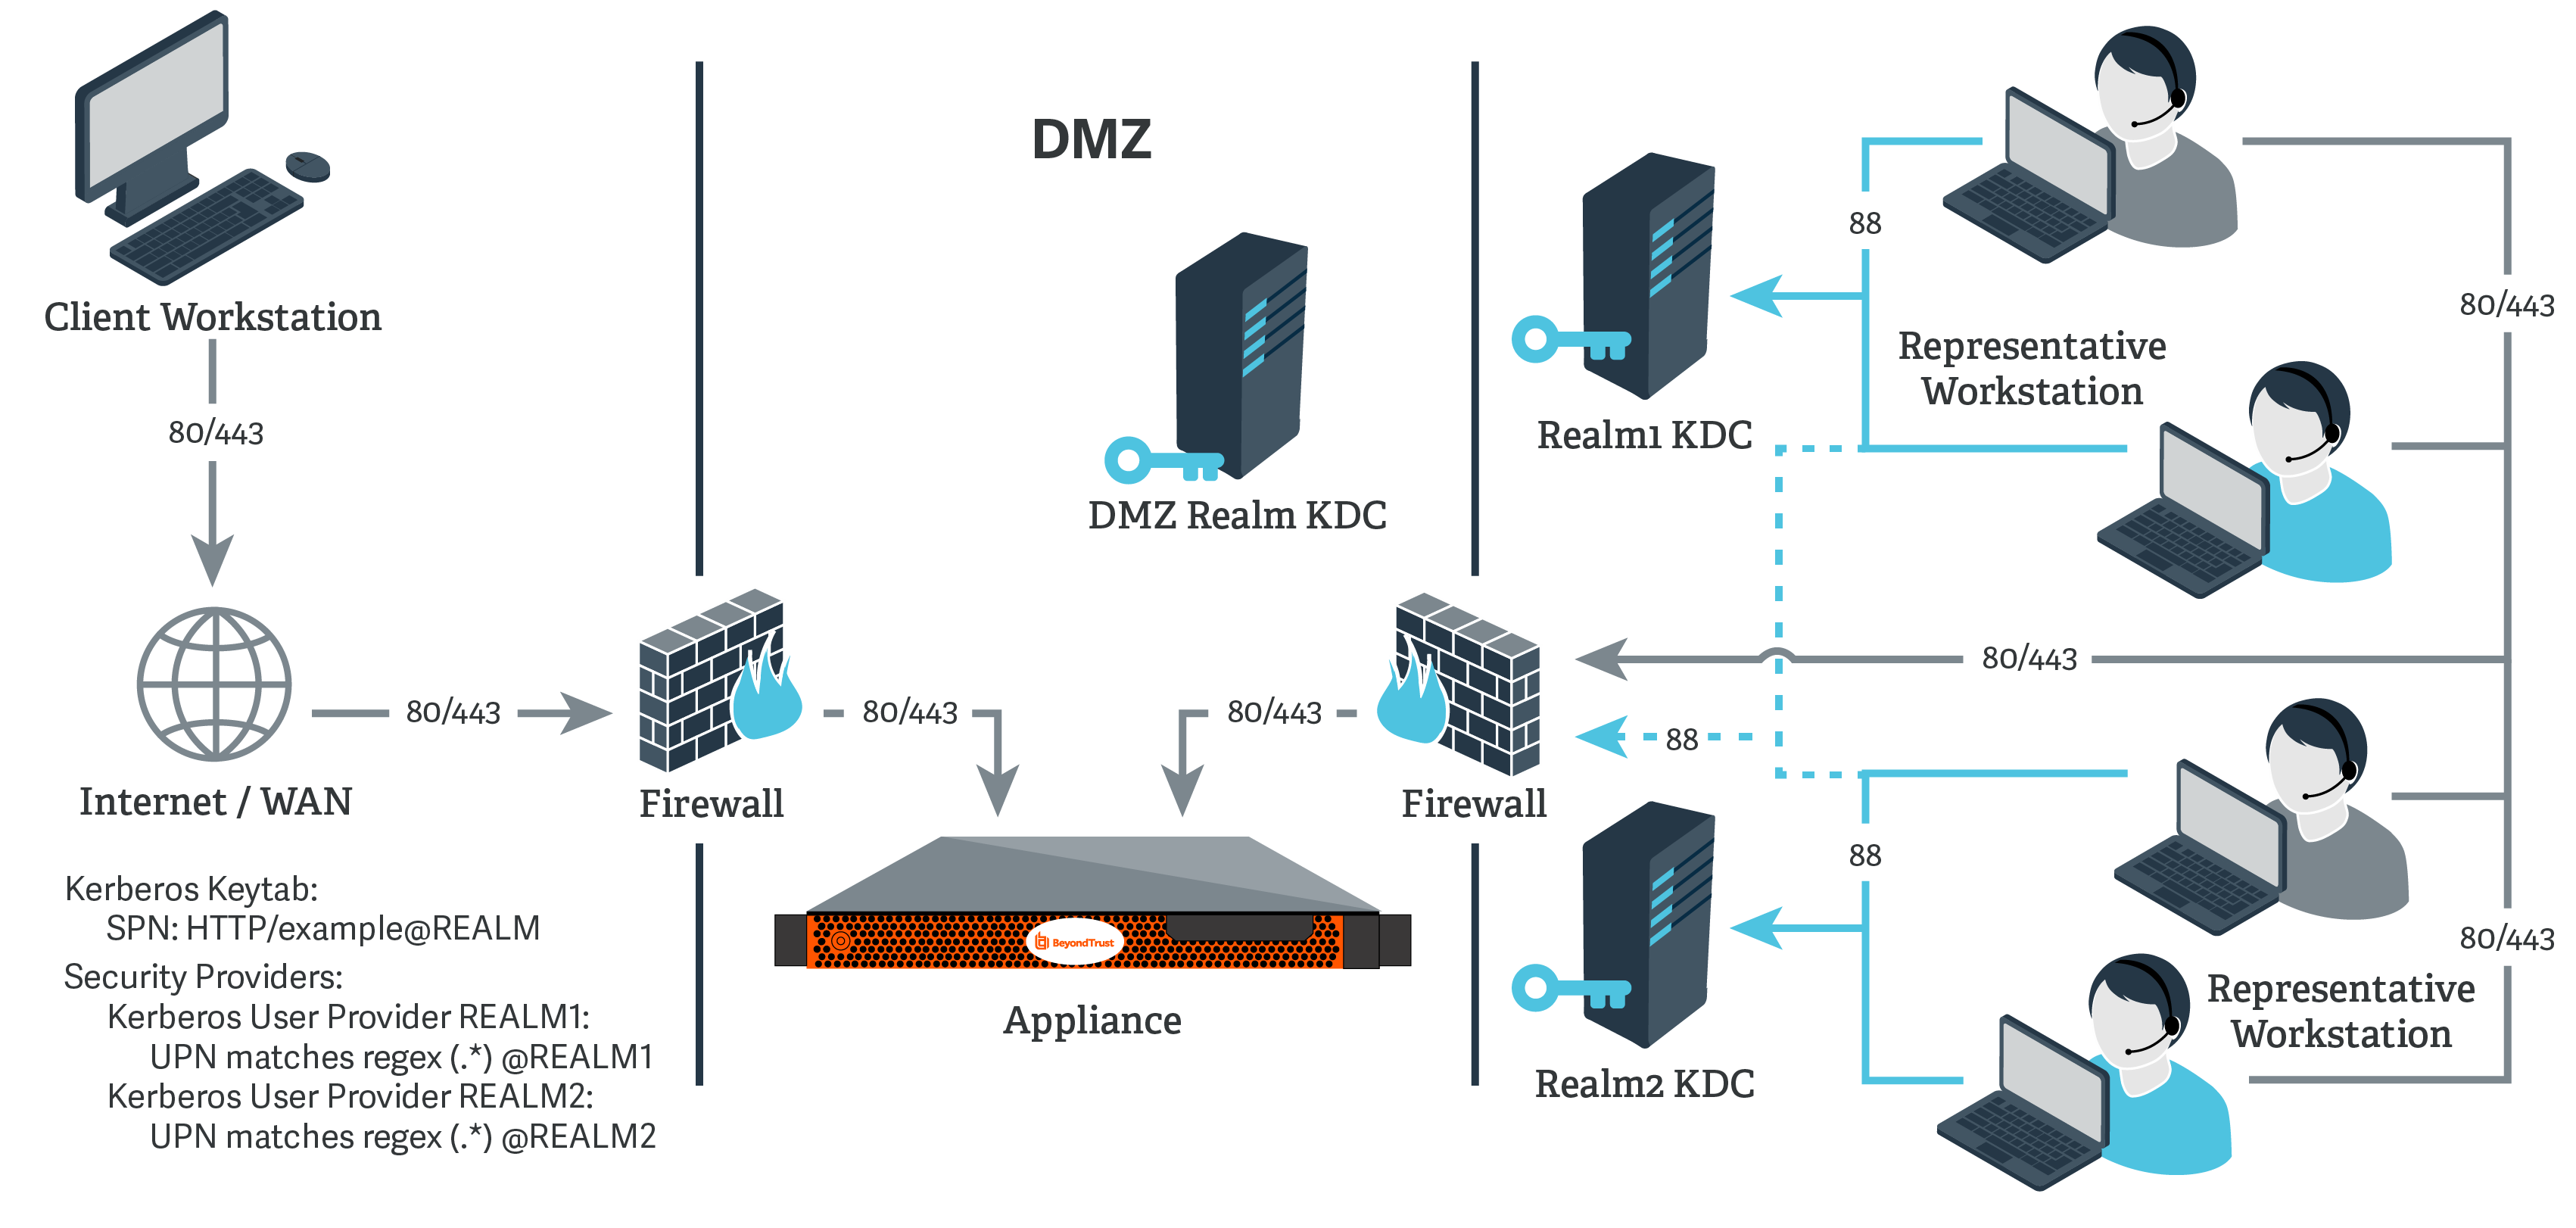
Kerberos KDC in multiple realms
> ℹ️
For this example:
- The appliance may or may not be located behind a corporate firewall.
- Representatives may or may not be on the same network as the appliance.
- Representatives may belong as members of multiple Kerberos realms existing in the corporate infrastructure (traditionally, a multi-domain hierarchy in Windows).
- If a DMZ realm exists, the representatives' realms may have inbound trusts with that DMZ realm, allowing principals in the trusted realms to obtain tickets for services in the DMZ realm.
-
Register one or more of the SPNs according to the following rules:
- If a DMZ Kerberos realm is involved, register a unique SPN within the DMZ realm.
- If no DMZ Kerberos realm is involved and no trust exists between the two realms, register a unique SPN in each realm.
- If no DMZ Kerberos realm is involved and trust exists between the two realms, register a unique SPN in a realm of your choosing.
-
Export all registered SPNs.
-
Log in to your admin interface.
-
Go to Users & Security > Kerberos Keytab.
-
Under Import Keytab, click Choose File, and then select the exported keytab to upload. You should now see this SPN under the list of Configured Principals.
-
Repeat the previous step for each exported keytab.
-
Go to Users & Security > Security Providers. Click Add. From the dropdown, select Kerberos.
-
Create a unique name to help identify this provider.
-
Be sure to check the Enabled box.
-
Choose if you want to synchronize display names.
-
Optionally, select to remove the REALM portion from the User Principal Name when constructing the BeyondTrust username.
-
If using a DMZ realm or using the same SPN for multiple realms, you will want to match on user principle name to identify users from the first realm.
-
If you registered multiple SPNs, choose the SPN that users from the first realm will use.
-
You may also select a default group policy for users who authenticate against this Kerberos server.
-
Click Save to save this security provider configuration.
-
Repeat steps 7 through 15 for each realm from which users will authenticate, substituting the UPN or SPN rule for each realm as appropriate.
Kerberos: Troubleshoot the integration
Failed logins
If a user cannot log in to BeyondTrust using valid credentials, check that at least one of the following sets of criteria is met.
- The user has been expressly added to an existing group policy.
- A default group policy has been set for the security provider configuration created to access the server against which the user is authenticating.
- The user is a member of a group that has been expressly added to an existing group policy, and both user authentication and group lookup are configured and linked.
Error 6ca and slow logins
1. A 6ca error is a default response signifying that the appliance has not heard back from the DNS server. It may occur when attempting to log in to the representative console.
2. If users are experiencing extremely slow logins or are receiving the 6ca error, verify that DNS is configured in your /appliance interface.
Troubleshooting individual providers
When configuring an authentication method tied to group lookup, it is important to configure user authentication first, then group lookup, and finally group policy memberships. When troubleshooting, you will want to work in reverse.
- Verify that the group policy is looking up valid data for a given provider and that you do not have any @@@ characters in the Policy Members field.
- If a group provider is configured, verify that its connection settings are valid and that its group Search Base DN is in the proper format.
- If you want to use group lookup, verify that the security provider is set to look up group memberships of authenticated users.
- To test the user provider, set a default policy and see if your users are able to log in.
