ServiceNow ITSM Basic | RS
Service desks and customer support organizations using ServiceNow can integrate with BeyondTrust Remote Support to improve service levels, centralize support processes, and strengthen compliance. Features of the BeyondTrust Remote Support and ServiceNow integration are summarized below. Full details, how to obtain and install the integration, and implementation instructions are covered in this guide.
- Outbound Support Sessions: Technicians can launch Remote Support sessions from within ServiceNow incidents using the Generate Session Key button.
- Session Updates: Remote Support session chat transcripts are written back to ServiceNow and are associated with the incidents from which they were started.
The ServiceNow ITSM Basic Integration is available for free.
Requirements
Outlined below are requirements for the basic version of the BeyondTrust Remote Support ServiceNow integration. If any of the integration requirements are not yet met, they must be in place prior to starting the integration setup process unless the associated features of the integration are not required.
Base integration requirements
A current version of a ServiceNow release, including:
- A working Customer Service Management application
- A working email configuration
A current release of BeyondTrust Remote Support including:
- At least one usable representative console capable of generating session keys
- A functional Remote Support site through which users can connect to representatives
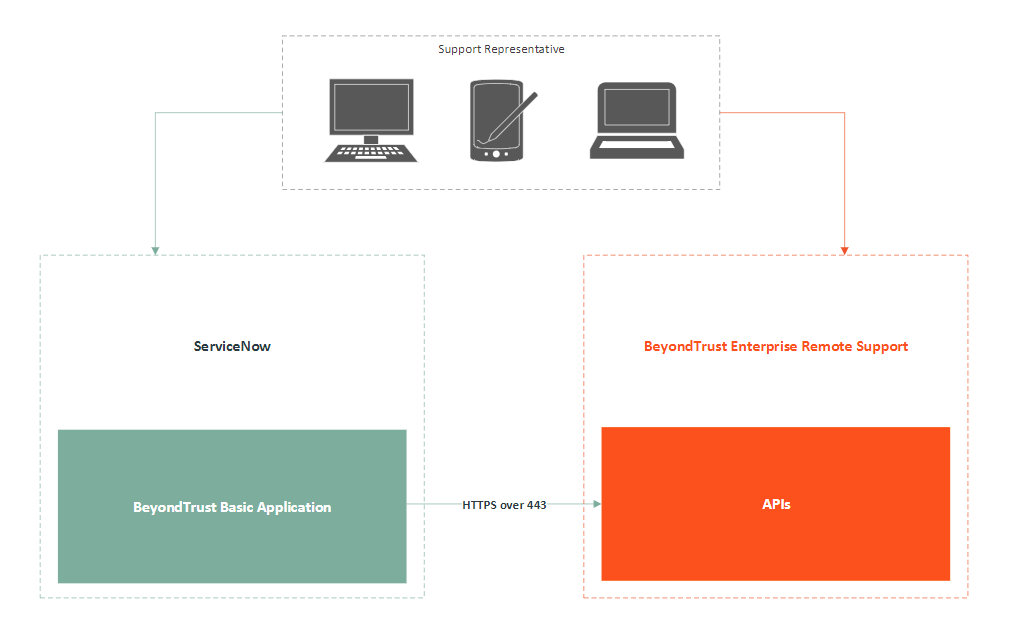
To configure network firewall rules for this integration, do the following:
- Allow TCP 443 traffic from the B Series Appliance to the appropriate ServiceNow instance.
- Allow TCP 443 traffic from the appropriate ServiceNow instance to the B Series Appliance.
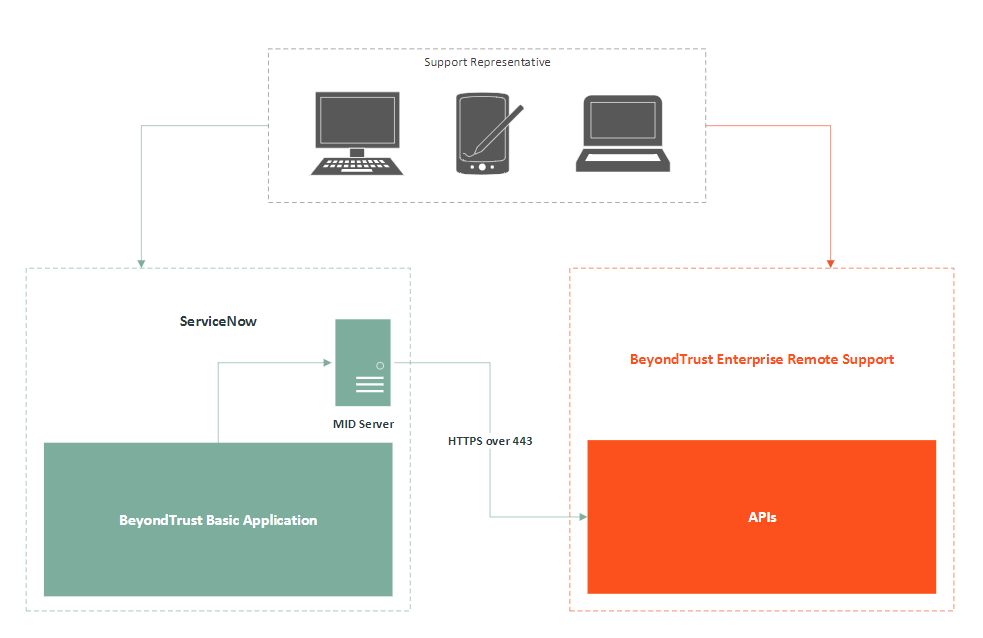
- Optionally, use ServiceNow MID Servers for this integration.
For more information on MID Servers, see MID Server Configuration.
Test the firewall
It is important to test all requirements of the integration before beginning setup. Most of these can be tested by the Remote Support and ServiceNow administrators within their respective systems, but to test the network firewall, the BeyondTrust admin should take the following steps to confirm that the necessary rules are in place.
- Log in to a machine either external to the B Series Appliance's network or in the same VPN as the ServiceNow instance, depending on how ServiceNow is connecting to the B Series Appliance's network.
- Log in to the B Series Appliance's /appliance interface.
- Browse to Support > Utilities :: TCP Connection Test.
- Enter the hostname of the ServiceNow instance, enter the port number of 443, and then click Test. A successful result is a Connected status message.
Do not enter the protocol when entering the ServiceNow instance (https://servicenow.example.com, for example). Instead, use only the fully qualified domain name (servicenow.example.com). In most environments, BeyondTrust Remote Support resides in a DMZ network and has a public DNS address which ServiceNow contacts over the public internet. In some environments, Remote Support is not publicly accessible. In these cases, contact ServiceNow about implementing a VPN connection to your internal network for ServiceNow. For more information, see Virtual Private Network (VPN).
Configure Remote Support
All of the steps in this section take place in the BeyondTrust /login administrative interface. Access your Remote Support interface by going to the hostname of your B Series Appliance followed by /login (e.g., https://support.example.com/login).
Verify the API is enabled
The Remote Support integration requires the Remote Support XML API to be enabled. This feature is used from within the integrating software to communicate with the Remote Support APIs.
Go to /login > Management > API Configuration and verify that Enable XML API is checked.
Create a ServiceNow OAuth API account
The ServiceNow API account is used from within ServiceNow to make Remote Support Command API calls.
- Go to /login > Management > API Configuration.
- Click Add to create a new API account. Name it ServiceNow or something similar.
- Set Command API to Full Access.
- Under Reporting API, check all options.
- The OAuth Client ID and OAuth Client Secret are used during the OAuth configuration step in ServiceNow. Make note of these and store them in a secure location.
- Click Save.
Configure ServiceNow
Unless otherwise noted, all of the steps in this section take place in the ServiceNow interface. We recommend that you initially use development or test instances of ServiceNow before installation in the production instance so that the integration can be thoroughly tested.
Install BeyondTrust integration
The Integration must be obtained directly from BeyondTrust. After it is obtained, it is installed via the ServiceNow Store. There is no mechanism to obtain the integration at the ServiceNow Store. Follow the steps below to request and install the integration.
- Log in to your ServiceNow platform with your corporate account. Contact your company Now Support (HI) admin if you do not have credentials.
- Search for BeyondTrust Remote Support Basic Integration, or go to the app's page.
- Click Request App.
- Request Remote Support Basic.
- Within a business day, BeyondTrust approves the request with a $0 purchase price and sends a copy of these installation instructions to the requester.
- Once you receive the confirmation, return to the app's page in the ServiceNow store.
- Click Complete Purchase.
- Review the contract details.
- If you agree, check Accept the Site Terms of Use.
- Click Complete Purchase.
- The app is ready for installation on your ServiceNow instance(s).
- Repeat the steps below for each instance.
- Login to the ServiceNow instance on which you want to install the app.
- Navigate to System Applications > All Available Applications > All.
- Search for the app you want to install.
- Click Install.
For more information on installing applications, see ServiceNow's Help Page.
Create local update set
Local update sets are used in ServiceNow to capture configuration changes. They can be used to quickly transfer these configuration changes to other environments.
-
Browse to System Update Sets > Local Update Sets and click the New button above the list of update sets to create a new local update set.
-
In the Name field, enter BeyondTrust - ServiceNow Integration Configuration (or an equivalent).
-
Click Submit and Make Current. This update set captures any changes you make during the configuration process. Just make sure that the BeyondTrust - ServiceNow Integration Configuration update set is selected in ServiceNow's update set dropdown for the following steps.
-
Make sure the Application is set to BeyondTrust Remote Support Enterprise Integration. If it is not, use the settings in the upper right of the screen to switch to the aforementioned scope.
-
After configuration is complete and tested, the local update set can be imported or promoted to new instances of ServiceNow (e.g., the production instance) to quickly replicate the integration. This must be done after transferring the BeyondTrust - ServiceNow retrieved update set.
For more information, see Transfer the BeyondTrust-ServiceNow Basic Integration Update Sets.
Configure Remote Support properties
Remote Support properties allow the integration to connect ServiceNow with a B Series Appliance.
- Browse to BeyondTrust Integration.
- Click Properties.
- Hostname of the BeyondTrust Appliance B Series: The hostname or IP address of your BeyondTrust site. This determines the address that ServiceNow will use for outbound access to BeyondTrust. An example of this access is when a user in ServiceNow clicks the BeyondTrust Session Key button. ServiceNow will then make an outbound connection to the B Series Appliance to retrieve the key.
- OAuth Client ID: The client ID for the authentication account that was set up in BeyondTrust.
- OAuth Secret: The secret for the authentication account that was set up in BeyondTrust.
- Enable the ability to Generate a BeyondTrust Session Key from an incident: If checked, users can generate a BeyondTrust Session Key from within a ServiceNow incident.
- Enable pulling sessions into ServiceNow from BeyondTrust: If checked, BeyondTrust sessions will be imported into ServiceNow at the end of sessions that are initiated from within ServiceNow.
Configure Remote Support session-related lists
Related lists are used in ServiceNow, in this case, to provide a list of Remote Support sessions that are associated with an incident.
-
Browse to Incident.
-
Click Open to see a list of open incidents.
-
Select an incident by clicking the Incident Number.
-
Right-click the Incident title bar and select Configure > Related Lists.
-
Ensure that Session > Incident has been moved to the Selected column.
-
Click the Save button.
-
The BeyondTrust Sessions list should appear towards the bottom of the incident form once these steps are complete.
Configure incident states
Incident states are used in the Remote Support integration, specifically UI actions (like Generate Session Key) to control when the button shows up on incident forms.
-
Browse to Incident.
-
Click Open to see a list of open incidents.
-
Select an incident by clicking the Incident Number.
-
Right-click the label State and select Show Choice List.
-
Filter the list by Table=incident. Take note of the different incident choices, specifically the value of incidents with a label of Resolved or Closed and any custom incident states for which BeyondTrust Session Key should not appear.
-
Go back to the incident and right-click on the BeyondTrust Session Key button located in the Incident title bar.
-
Select Configure > UI Actions.
-
In the UI Actions list, click BeyondTrust Session Key.
-
Focus the Condition field and ensure current.incident_state is configured to include the IDs of the incident states for which the Session Key button should not appear.
-
If the Resolved and Closed fields you took note of earlier have values of 6 and 7, then the Condition field mentioned above should include the code current.incident_state < 6 so as not to show a Remote Support Session Key button on resolved or open incidents. If there are custom incidents (e.g., Complete), then the condition field may require logic such as && current.incident_state != 8.
For example, if the button should not appear for incident states 6, 7, and 10, while it should appear for states 1-5, 8, and 9, then the following can be used: gs.hasRole('itil') && current.incident_state != 6 && current.incident_state != 7 && current.incident_state != 10.
Configure Remote Support username and authentication
- Log in to your BeyondTrust /login interface with the same credentials as a ServiceNow user who is expected to use BeyondTrust.
- Download and install a BeyondTrust representative console from the /login > My Account tab.
Troubleshoot login failure
If the login fails, check the following:
- Make sure that BeyondTrust and ServiceNow are checking credentials against the same LDAP server(s), if appropriate. Check the LDAP server in the BeyondTrust interface under /login > Users & Security > Security Providers.
- If LDAP authentication is not being used, log in to ServiceNow. Select User Administration > Users, and then select the user to be used for testing and focus on the BeyondTrust Username field.
- If this field does not exist while viewing a user, hover over the icon next to User on the title bar, and then select Configure > Form Layout and move the BeyondTrust Username field from the Available list to the Selected list. Once done, enter the name of a known-working BeyondTrust user account in this field and save.
For more information on how to check the LDAP server for ServiceNow, see LDAP Integration.
Set up a scheduled job
- Browse to System Definition > Scheduled Jobs.
- Click the New button at the top of the list.
- Click the link titled Automatically run a script of your choosing.
- Provide the following values:
- Name: Import BeyondTrust Sessions
- Run: Periodically
- Repeat Interval: 5 minutes
- Run this script: (new x_bmgr_bomgar_inte.Bomgar()).pullPendingBomgarReports();
- Click Submit to save the job.
Assign users appropriate roles
Give ITIL users who will provide technical support using this integration the x_bmgr_bomgar_inte.itil role.
You need to elevate the admin's role in order to make the following change.
- Browse to User Administration > Users.
- Select a user, then find the Roles tab and click the Edit... button.
- Add the x_bmgr_bomgar_inte.itil role from the Collection list to the Roles list
- Click the Save button.
Use ServiceNow MID server option
It is possible to avoid direct connection between ServiceNow and Remote Support by using a MID server for internal Remote Support deployments.
To configure the integration to use a MID server for API requests to a Remote Support site, specify the MID server to use on the individual outbound REST messages:
- In ServiceNow, navigate to System Web Services > Outbound > REST Message.
- Filter to show only messages for the BeyondTrust application being configured.
- Click the Name of one of the messages to edit its properties.
- In the HTTP Methods related list at the bottom, select the Name of the method (typically post).
- On the resulting form, select the HTTP Request tab and select your MID server in the Use MID Server field.
- Click Update to save the changes.
Repeat these steps for each outbound REST message that is a part of the application.
For more information on MID servers, see MID Server.
Test integration
The following steps take place in ServiceNow and BeyondTrust Remote Support are provided to ensure that the integration is working properly. Troubleshooting suggestions are provided with each step in case of failure.
Test session key generation
- Log in to the Remote Support representative console, and then log in to ServiceNow with the same account. If Remote Support and ServiceNow use different authentication systems, manually assign your Remote Support user to your ServiceNow user as described in Configure Remote Support Username and Authentication.
- Open a test incident in ServiceNow. Confirm the State field matches one of the values for which the Remote Support Session Key button should appear, and make sure the button appears as expected. Remember that the incident must be saved before the button will appear.
- Under BeyondTrust > Integration > Properties, click the BeyondTrust Session Key button. This launches the BeyondTrust representative console, subsequently opening the Session Key dialog box.
Test Remote Support session import
- Log in to ServiceNow as an ITIL user or an admin.
- Use the Remote Support Session Key button as described above to start a Remote Support session.
- End the session from the representative console and close any surveys and/or session end messages on the representative and/or customer sides of the session.
- Give the scheduled job you created earlier enough time to run, and then refresh the ServiceNow incident from which the session key was generated, scroll to the bottom of the page, and check the Remote Support Sessions list. There should be an entry for the recent session. If not, make sure the API User Connection test works correctly as described above.
Transfer update set
The steps below are typically used after the integration has been imported and configured in a test/development instance of ServiceNow and is being transferred to a production instance. However, they are also applicable to transferring the integration between any ServiceNow instances.
- Follow the steps in the ServiceNow documentation to transfer the BeyondTrust - ServiceNow Integration update set(s) into the destination instance of ServiceNow.
This is typically achieved by retrieving the update sets from the destination instance or by exporting the update sets from the original instance as XML files. For details, see Export and Import XML files.
- Follow the same steps to transfer the BeyondTrust - ServiceNow Integration Configuration update set.
Use cases
Service desk and customer support organizations using ServiceNow Basic can integrate with BeyondTrust Remote Support to improve service levels, centralize support processes, and strengthen compliance. Use cases addressed by the Remote Support and ServiceNow Basic integration are listed below.
Generate session key
From within an incident, technicians can generate a session key for a customer to initiate a support session.
Once the session ends, a detailed report of the session is imported into ServiceNow Basic and becomes associated with the incident from which the session key was generated.
Import Remote Support session chat transcript into ServiceNow Basic
Once the Remote Support session ends, the ServiceNow incident is automatically updated with a chat transcript gathered during the session.
Network diagrams
ServiceNow Basic integration network diagram
ServiceNow Basic integration mid server network diagram