Networking | RS On-prem
What is the Networking page?
The Networking page in the B Series Appliance /appliance web interface allows administrators to manage the appliance's network settings, including IP addresses and DNS configurations. It provides controls to configure both static and dynamic IP address settings to ensure the appliance is properly connected to the network.
How is it useful to my organization?
This page is essential for ensuring your B Series Appliance is properly integrated into your network infrastructure. By managing IP configurations, you can ensure seamless communication between the appliance and other devices, enhance security with appropriate network settings, and support the overall network stability of your organization.
How do I access the Networking page?
- Use a Chromium-based browser to sign in to your B Series Appliance. The URL is provided in the BeyondTrust welcome email and includes your site URL followed by /appliance.
- From the top menu, click Networking.
The IP configuration page opens and displays by default.
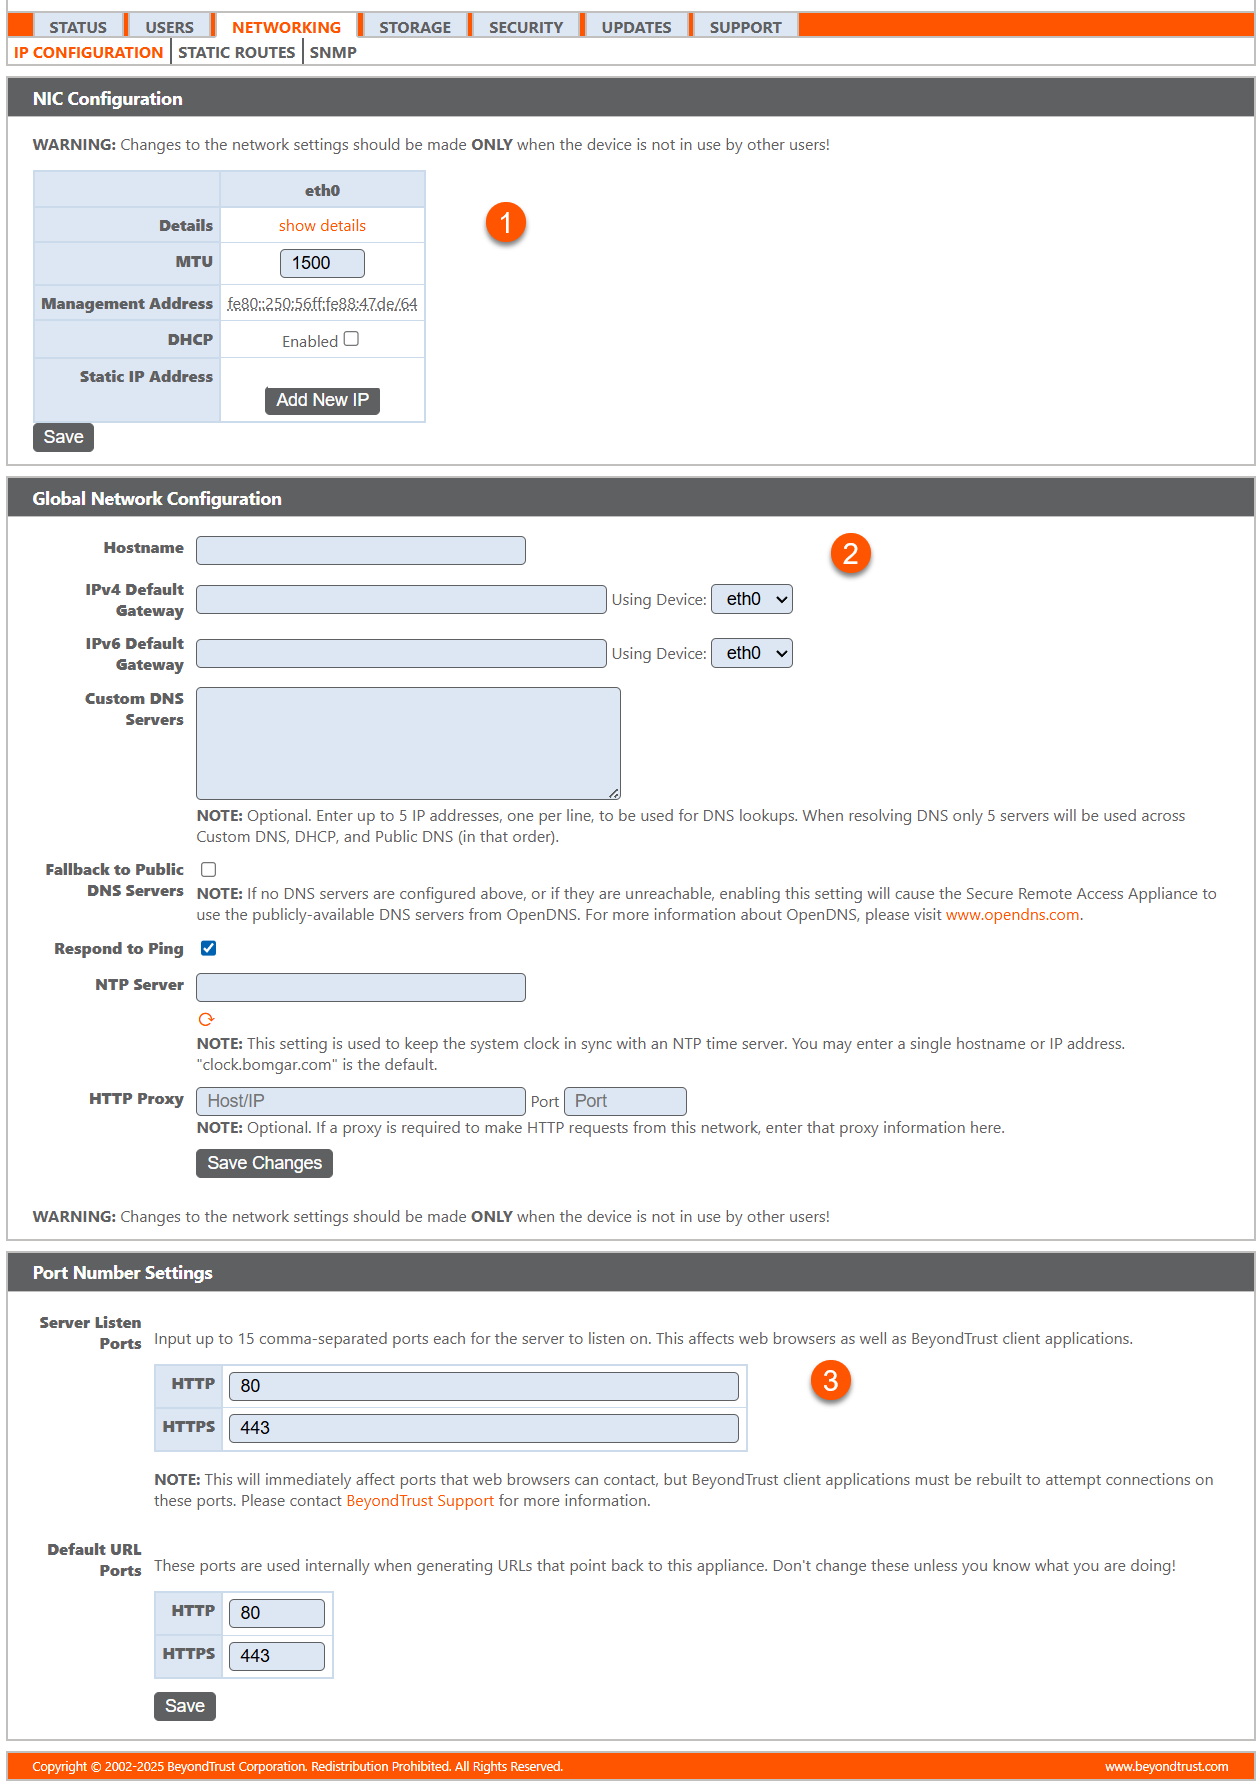
NIC configuration
Companies with advanced network configurations can configure multiple IP addresses on the B Series Appliance's ethernet ports. Using multiple ports can enhance security or enable connections over non-standard networks. For example, if employees are restricted from accessing the internet but need to provide off-network support, using one port for your internal private network and another for the public internet allows users worldwide to access systems without breaching your network security policies.
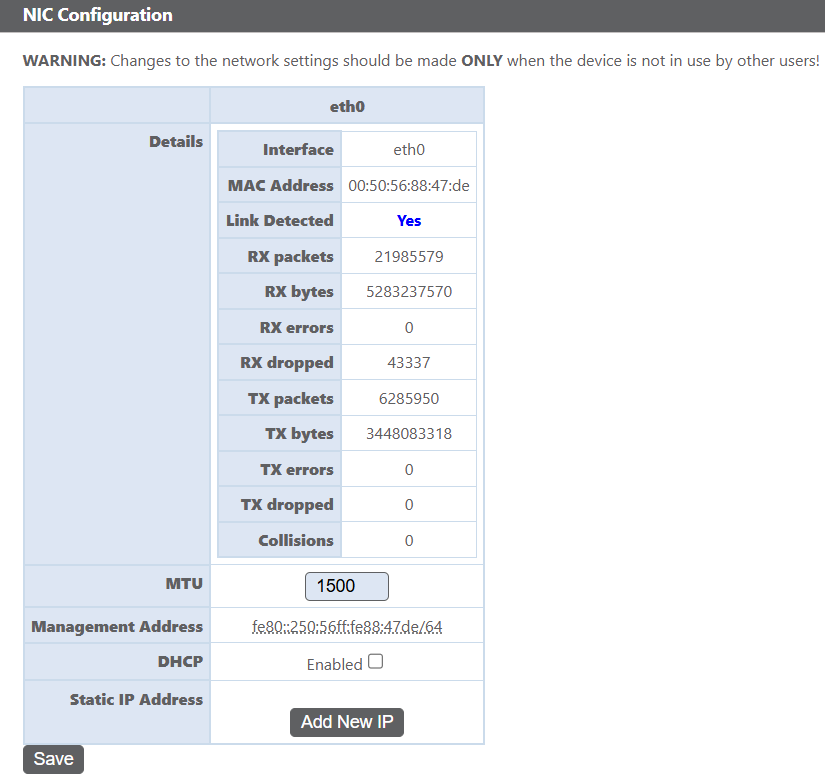
- Details: Click Show details to see information about this NIC.
- Interface: The network connection point on the appliance, representing a physical or virtual network adapter used for communication within the system.
- MAC address: The hardware address used to uniquely identify the network interface.
- Link detected: Whether a network connection is established (Yes) or not (No).
- RX packets: The number of received data packets on the interface.
- RX errors: The number of errors encountered while receiving data packets on the interface.
- RS dropped: The number of received data packets dropped by the interface.
- TX packets: The number of transmitted data packets from the interface.
- TX bytes: Total amount of data transmitted from the interface.
- TX errors: Number of errors encountered during transmission.
- TX dropped: Number of transmitted packets dropped.
- Collisions: Number of packet collisions during transmission.
- MTU: Set the Maximum Transmission Unit for the interface.
- Management address: The IP address used to manage the appliance.
- DHCP: Enable or disable DHCP to automatically assign IP addresses to devices on the network.
DHCP is a network protocol that allows systems to automatically request network parameters, such as IP addresses, from a DHCP server, eliminating manual configuration. When enabled, the system obtains an IP address from the DHCP server, removing it from the available pool.
To learn more about DHCP, see Dynamic Host Configuration Protocol (DHCP).
- Static IP address: The fixed IP address assigned to the appliance, manually configured to remain constant.
Click Add New IP to enter a new IP address for the B Series Appliance, discussed below.
- Enable NIC teaming: Configure and enable NIC teaming for network interface cards.
NIC teaming combines your system's physical network interface controllers (NICs) into a single logical interface. NIC teaming operates in "Active-Backup" mode. One of the NICs is used to carry all network traffic. If the link on that NIC is lost for any reason, the other NIC becomes active. Before activating NIC teaming, ensure that both NICs are connected to the same network segment (subnet) and that you have IP addresses configured on only one of the existing NICs.
Although multiple IP addresses can be assigned to each NIC, do not configure either NIC such that it has an IP address that is in the same subnet as an IP address on the other NIC. In this scenario, packet loss occurs with packets originating from the IP on the NIC that does not have the default gateway. Consider the following example configuration:
- eth0 is configured with the default gateway of 192.168.1.1
- eth0 is assigned with 192.168.1.5
- eth1 is assigned with 192.168.1.10
- Both eth0 and eth1 are connected to the same subnet switch
Given this configuration, traffic from both NICs is sent to the default gateway (192.168.1.1) regardless of which NIC received traffic. Switches configured with dynamic Address Resolution Protocol (ARP) send packets randomly to either eth0 (192.168.1.5) or eth1 (192.168.1.10), not both. When eth0 receives these packets from the switch destined for eth1, eth0 drops the packets. Some switches are configured with static ARP. These switches drop all packets received from eth1 since this NIC does not have the default gateway and is not present in the static ARP table of the gateway. If you wish to configure redundant NICs on the same subnet, use NIC teaming.
Add an IP address
- From the NIC configuration section click Add new IP.
- Enabled: Choose whether the IP address should be enabled or disabled when adding or editing.
- Network port: Select the network port for the IP address to function on.
- IP version: Select either IPv4 or IPv6 for the IP address configuration.
- IP address: Enter the IP address that the B Series Appliance will use to respond to network requests.
- Subnet mask: Enter the subnet mask to define the network range, enabling the B Series Appliance to communicate with other devices within the same network.
- Primary: When editing an IP address on the same subnet as another, select this option to designate the address as the primary for that subnet. This ensures that network traffic from the B Series Appliance on the subnet complies with firewall rules.
- Access Type: Select the access type to restrict or allow traffic over the IP. Choose Allow Both to permit both web and session traffic from the public site and all clients (including mobile and web consoles).
You can separate web and session traffic by adjusting the network configuration. The specific steps depend on your current network setup. For further assistance, contact BeyondTrust Technical Support.To limit access to the /login interface, configure network restrictions under /login > Management > Security. To restrict access to the /appliance interface, configure network restrictions under /appliance > Security > Appliance Administration.
- Telnet server: When viewing the management IP address (do not delete or modify the management IP address), select one of the three options in the Telnet Server dropdown: Full, Simplified, or Disabled. These options determine the functionality of the telnet server, which is accessible only on the private management IP for emergency recovery. The telnet feature is exclusive to the built-in private IP and does not appear for other configured IP addresses.
| Setting | Function |
|---|---|
| Full | Enables the telnet server with full functionality |
| Simplified | Provides four options: View FIPS Error, Reset to Factory Defaults, Shutdown, and Reboot |
| Disabled | Disables the telnet server completely |
Global network configuration
- Hostname: The name assigned to a device or system on a network for identification. Enter the desired hostname in the text field to assign it to the system.
The Hostname field does not need to meet any technical requirements. It does not affect what hostname client software or remote users connect to. (To make these changes, see /login > Status > Information > Client Software Is Built to Attempt. If the hostname attempted by the client software needs to change, notify BeyondTrust Technical Support of the needed changes so that Support can build a software update.)
The Hostname field exists primarily to help you distinguish between multiple B Series Appliances. It is also used as the local server identifier when making SMTP connections to send email alerts. This is useful if the SMTP Relay Server specified at /appliance > Security > Email Configuration is locked down. In this case, the configured hostname might have to match the reverse-DNS lookup of the B Series Appliance's IP address.
- IPv4 default gateway: Specify the default IPv4 gateway address to define the primary route for outbound network traffic.
- Using device: Select the Ethernet network interface to associate with this configuration.
- IPv6 default gateway: Specify the default IPv6 gateway address to define the primary route for outbound network traffic.
- Using device: Select the Ethernet network interface to associate with this configuration.
- Custom DNS servers: Enter the IP address of one or more DNS servers for the Ethernet network. If DHCP is enabled, the DHCP lease supplies a default gateway and a prioritized list of DNS servers. Any statically configured DNS servers in the Custom DNS servers field take precedence and are used first, with the DNS servers received from DHCP serving as backups.
- Fallback to public DNS servers: Enable this option to allow the B Series Appliance to use public DNS servers from OpenDNS if local DNS servers are unavailable. This ensures continued functionality for DNS resolution in cases where the configured DNS servers cannot be reached, providing a reliable fallback for name resolution.
For more information about OpenDNS, visit www.opendns.com.
- Respond to ping: Enable this option to allow the B Series Appliance to respond to ping requests, useful for testing the host's functionality.
- NTP server: Specify the hostname or IP address of a Network Time Protocol (NTP) server for synchronizing your B Series Appliance.
- HTTP proxy: Enter the hostname or IP address of your HTTP proxy server if your B Series Appliance requires one for outbound traffic.
- Port: Enter the port number for the HTTP proxy server that your B Series Appliance will use for outbound traffic.
Click Save changes to apply and save your modifications.
Port number settings
Two settings are available in the Port number settings area: Server listen ports and Default URL ports. When configuring these, keep in mind that connections made to valid ports may be rejected by network restrictions set in /appliance > Security > Appliance administration and in /login > Management > Security. The opposite is also true: connections made to invalid ports are rejected even if such connections satisfy network restrictions.
- Server listen ports: Configure the ports on which the B Series Appliance listens for connections. You can specify up to 15 comma-separated ports for both HTTP and HTTPS. Each port must appear only once in its respective field—HTTP or HTTPS—and cannot be duplicated across both fields. The B Series Appliance responds to HTTP connections on the ports listed under HTTP, and to HTTPS connections on the ports under HTTPS. The default ports (80 for HTTP and 443 for HTTPS) cannot be changed.
To access the B Series Appliance on a specific port, enter the port number in the URL (e.g.,support.example.com:8200). The ports used by client software can be found on the /login > Status > Information page under Client software is built to attempt. These ports are preset and not configurable via the web interface. To change them, you must contact BeyondTrust Technical Support, who can provide a custom update to configure new ports. - Default URL ports: Specify the ports to use in URLs generated by the B Series Appliance, such as those created from session keys in the representative console. If the default ports (80 for HTTP and 443 for HTTPS) are blocked or likely to fail, you can set alternative ports to ensure generated URLs use the correct ones. The ports you enter must also be listed in the Server listen ports section; otherwise, the default ports will be used. You can only enter one port per field, and the same port cannot appear in both the HTTP and HTTPS fields. For example, if you enter 8080 for Default URL port: HTTP, ensure that 8080 is also specified in Server listen port: HTTP.
Updated 7 days ago
