Support Buttons | RS Cloud
What are Support Buttons?
Support Buttons are customizable, web-based buttons that can be embedded in a website or application to provide users with a simple way to request support.
How are Support Buttons useful?
Support Buttons allow customers to request assistance directly from their computers, connecting them to a designated representative or team, thereby streamlining the support process and enhancing efficiency.
Depending on its configuration and the support site, clicking the Support Button will:
- connect the customer to a previously defined representative or team.
- allow the customer to enter a session key.
- allow the customer to submit an issue submission form.
How do I access the Support Buttons page?
- Use a Chromium-based browser to sign in to your Remote Support URL.
This URL is provided in the BeyondTrust welcome email and includes your site URL followed by /login. - From the left menu, click Configuration.
The Support Buttons page opens and displays by default. - At the top of the page, click Configuration.
The Support Buttons page displays.
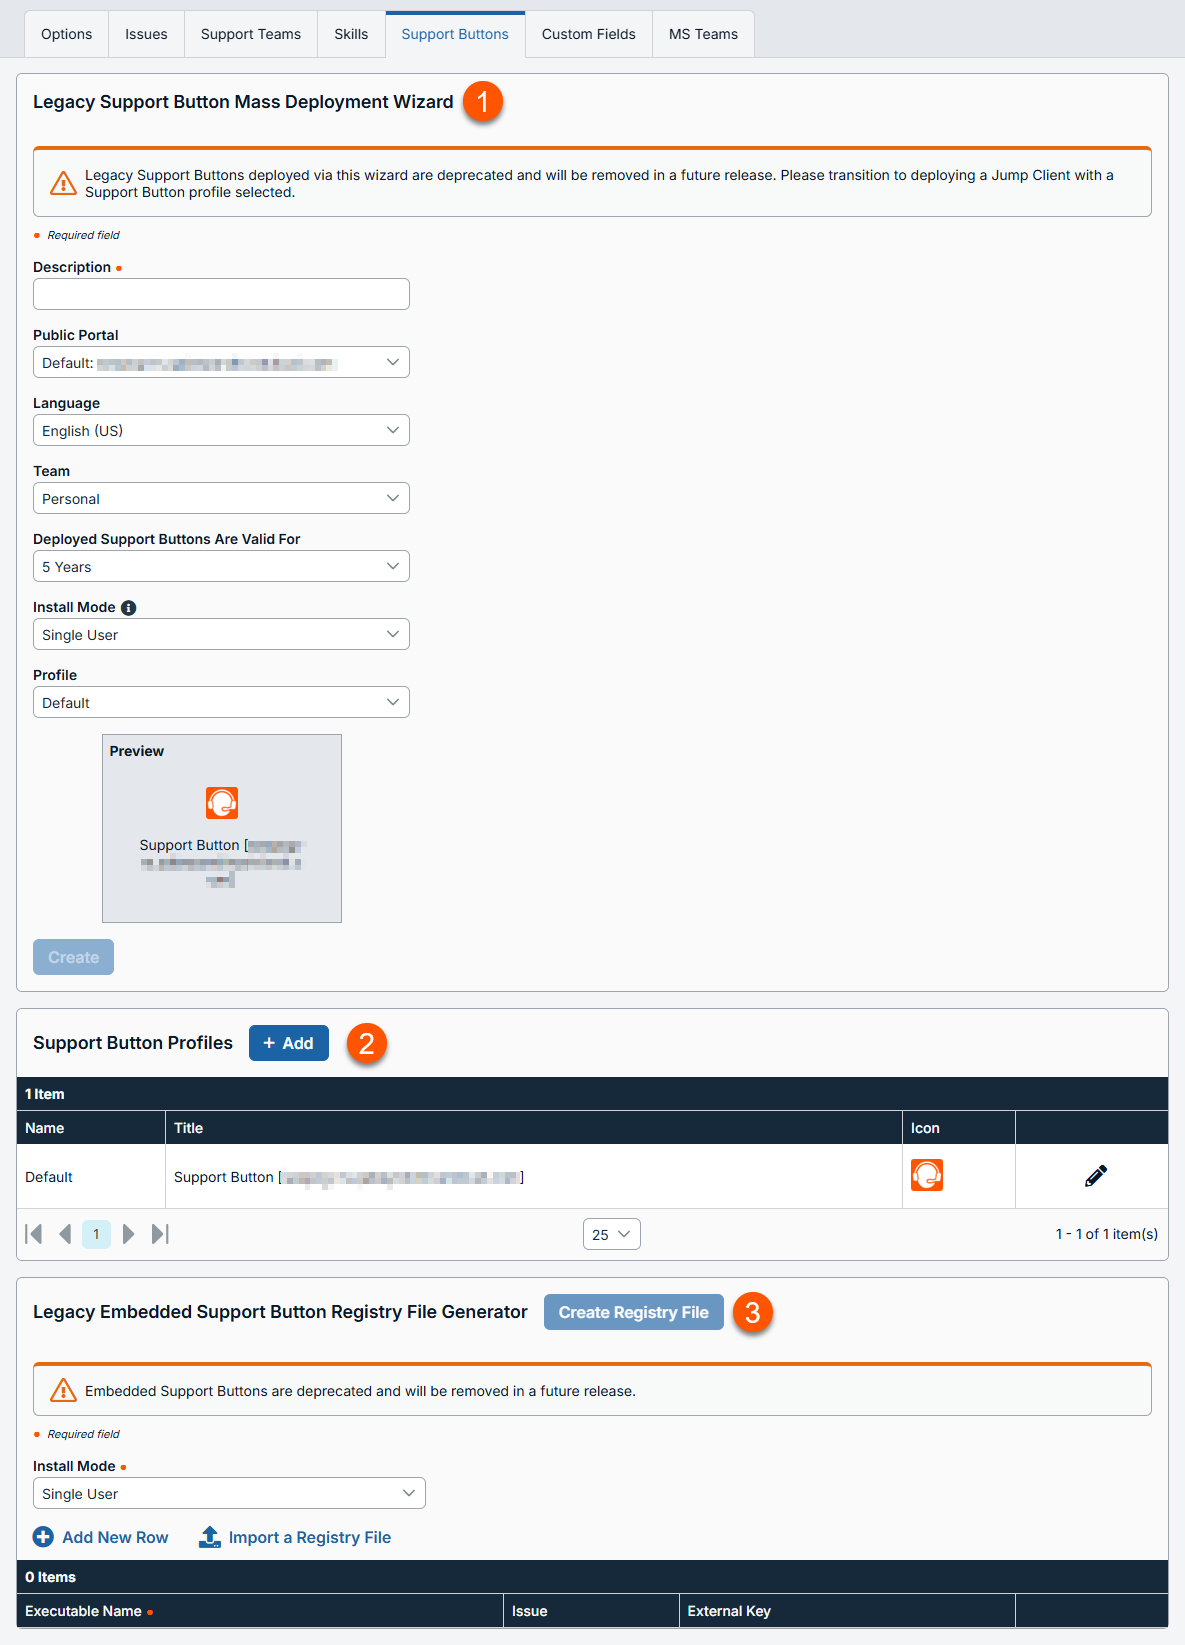
The Support Buttons page
-
Legacy Support Button Mass Deployment Wizard: A tool to create a support button.
-
Support Button Profiles: Adds a support button profile.
-
Support Button Profiles columns: List of Support Button columns.
Support Button Profiles columns
- Name: Unique name of the profile.
- Title: Select a title name for the profile.
- Icon: Displays the logo for the profile.
-
Legacy Embedded Support Button Registry File Generator:Creates a support button that is linked to a registry file.
Legacy Support Button mass deployment wizard
Important infoLegacy Support Buttons deployed via this wizard are deprecated and will be removed in a future release. Transition to deploying a Jump Client with a Support Button profile selected. For more information, see Support Button profiles.
This tool helps administrators quickly deploy the Support Button across multiple websites or systems. It simplifies the process by allowing bulk installation of the Support Button, making it easy to implement on various platforms without needing to configure each one manually.
Support Buttons can be installed on Windows, Mac, and Linux computers.
This feature is not supported for ARM-based Windows systems.
Create Support Buttons
To create and deploy Support Buttons, go to Configuration > Support Buttons.
- Description: Insert a unique name to help identify this Support Button.
- Public Portal: Select which public portal this Support Button should link to.
- Language: If more than one language is enabled on this site, set the language this Support Button should use.
Support Buttons do not detect the local language when they are run, but rather use the default language assigned during deployment.
- Team: Select whether starting a session from this Support Button should place the customer in your queue or a team queue.
- Deployed Support Buttons are valid for: Set how long this button should be active.
If the customer clicks this button after it has expired, an invalid session key message will display, and the browser will refresh your support portal.
This time does not affect how long the installer remains active or how long a session can last.
- Install mode: Set whether to install this button for a single user or all users on the remote system.
- If you make any changes to a Support Button profile, a single-user Support Button will automatically incorporate those changes the next time it connects, while an all-user Support Button will have to be redeployed to receive those changes. For the best experience, redeploy all user Support Buttons each time you upgrade your BeyondTrust software.
- All-user Support Buttons may not be removed from within the representative console. They must be uninstalled directly from the target computer.
- Deploying a Support Button for all users is available only for Windows Platforms
- Profile: Select a Support Button Profile to apply to this Support Button.
- Click Create.
- The next page of the wizard opens with options to download now or deploy to email recipients.
Download now
Download the installer immediately if you plan to distribute it using a systems management tool, or if you are at the computer to which you need later access.
- Select an operating system from the Platform dropdown. This is the OS of the computer where the Support Button will be installed. The default selection is detected by your current operating system.
- Click Download.
MSI options
For system administrators who need to push out the Support Button installer to a large number of systems, the MSI option can be used with your systems management tool of choice. In your command prompt, when composing the command to install the Support Button using an MSI, change to the directory where the MSI was downloaded and enter the command included on the Support Button page.
Unlike the representative console, Support Buttons installed from an MSI do auto-update.
When installing a Support Button executable on remote Windows machines, you can specify a custom install directory path where you want the Support Button to install. If the install directory you specify does not exist, it will be created, assuming the installation has sufficient permissions on the local system. You can specify the install directory using either the MSI installation package or the EXE installation package. Installation to custom paths is not supported on Mac or Linux systems.
The syntax for the EXE installation is:
sra-scc-w07dc30w8ff8h51116g785zgh151hdfe8y6z7jgc408c90 --cb-install-dir "C:\Support Button"where sra-scc-w07dc30w8ff8h51116g785zgh151hdfe8y6z7jgc408c90 is the filename of your executable install client and "C:\Support Button" is the path you wish the installation to use.
The syntax for the MSI installation is
msiexec /i sra-scc-win64.msi KEY_INFO=w0hdc301hd18wxj8xjfd8z6jzyefz7wzd1gwwd6c408c90 INSTALLDIR="C:\Support Button"where sra-scc-win64.msi is the name of your MSI installation package, w0hdc301hd18wxj8xjfd8z6jzyefz7wzd1gwwd6c408c90 is the key of your installation package, and "C:\Support Button" is the path you wish the installation to use.
To install a Support Button without displaying any windows, spinners, errors, or other visible alerts, append --silent to the end of the EXE command or /quiet to the end of the MSI command.
Because some browsers require that the installer be saved before it can be run, there may be some confusion about when the Support Button is fully installed. The downloaded sra-scc-{uid}.exe file is not the button itself but rather the installer for the button. This executable file must be run to complete the installation.
Deploy to email recipients
You can email the installer to one or more remote users. Multiple recipients can install the client from the same link.
- Click Email. An draft email with the installation link opens in your system mail.
- When the end user clicks the link, the installer downloads to their computer, where they will run it.
Support Button profiles
A Support Button profile allows you to configure the appearance, placement, and behavior of a Support Button on a customer’s machine.
Add Support Button profiles
- Go to Configuration > Support Buttons > Support Button Profiles.
- Click +Add.
- Enter values in the fields:
- Name: A unique name to help identify this profile. This name should help a representative decide which profile to assign to a Support Button.
- Code name: This code name can be used to reference this profile when interacting with the Jump Client Configuration API.
- Icon: Upload the file containing the customized button icon. The file must be a PNG file, no larger than 150KB and with a minimum height and width of 128 pixels. The height and width must be equal.
- Title: This is the title of the desktop icon. Customers will see this title.
- Short title: A short title that is used when the customer's settings limit the title length.
- Deployment locations: Select if a shortcut should be deployed to the desktop, the menu, or both. The menu option is only supported on Windows, Mac, and Linux systems.
- Allow direct access to the queue: Allow the customer to use a Support Button to connect to a specific queue. You can specify this queue in the Support Button Mass Deployment Wizard.
- Click Save.
Edit Support Button profiles
-
Go to Configuration > Support Buttons > Support Button Profiles.
-
Find the profile you want to edit in the table.
-
Click the Edit
 icon.
icon. -
Make the desired edits.
-
You can click Revert to Factory Default to reset any customizations.
ErrorReverting to factory default removes all customizations other than the name and code name. It also saves automatically.
-
Click Save.
Delete Support Button profiles
- Go to Configuration > Support Buttons > Support Button Profiles.
- Find the profile you want to remove in the table.
- Click the Delete
 icon.
icon. - Confirm the deletion.
You cannot delete the default Support Button profile.
Deploy a Jump Client with a Support Button profile enabled
Support Button functionality is being migrated from a stand-alone software deployment to a configuration option for Jump Clients. This change lets admins deploy a single application on the remote system, simplifying deployment and ongoing management.
To deploy a Jump Client that allows a local user to initiate a session using a Support Button, configure these two settings in the Jump Client Mass Deploy Wizard:
- Support Button Profile: Defines the appearance and some of a Support Button’s behavior.
- Support Button Direct Queue: Allows the Support Button to start a session directly in the queue to which it is deployed. (The selected profile must have the Allow direct access to the queue option enabled.)
After deployment, both properties can be added or edited from the Representative Console, provided that the representative has an Asset Role that permits editing them.
To deploy a Jump Client with a Support Button profile:
-
From the left menu, click Remote Support > Asset Management.
The Jump Client page opens and the Jump Client page displays by default. -
Under Jump Client Installer List, click Add.
-
For Asset Group, select an Asset Group you want to associate with this Support Button. This is the only required field.
-
For Support Button Profile, select a profile you previously create on the Configuration > Support Buttons page.
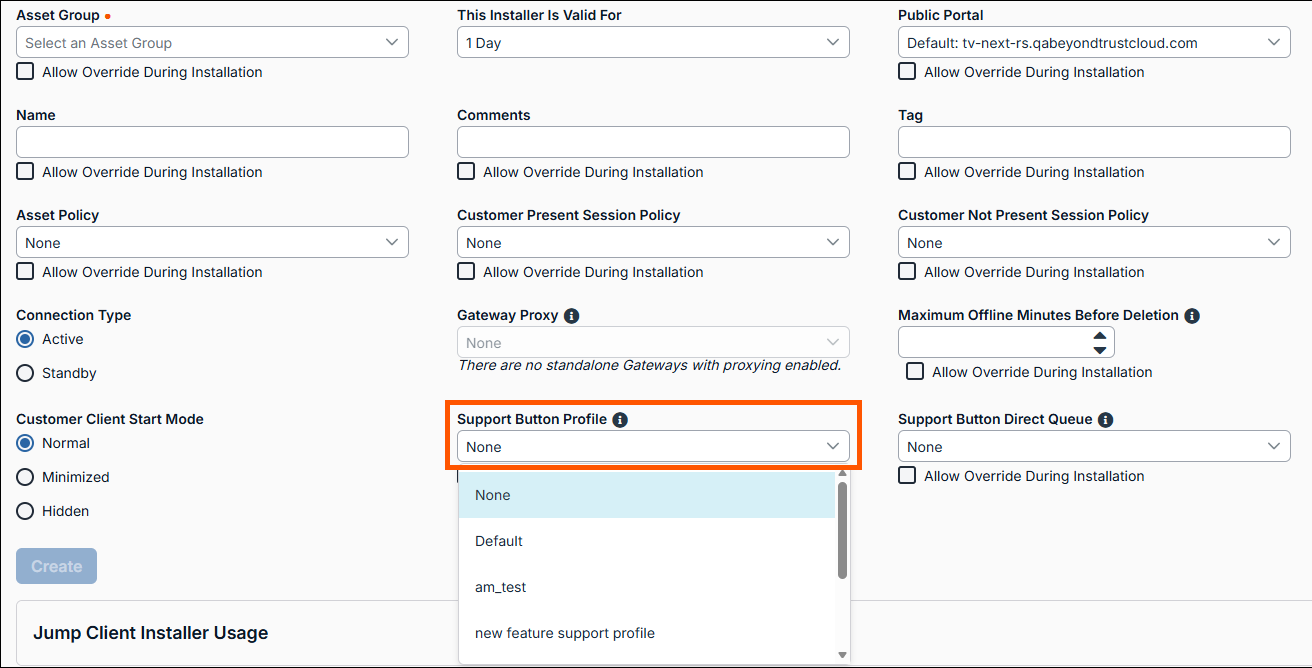
-
Use Support Button Direct Queue to specify the queue where users can initiate a session. For this option to work, the selected Support Button Profile must have Allow Direct Access to Queue enabled.
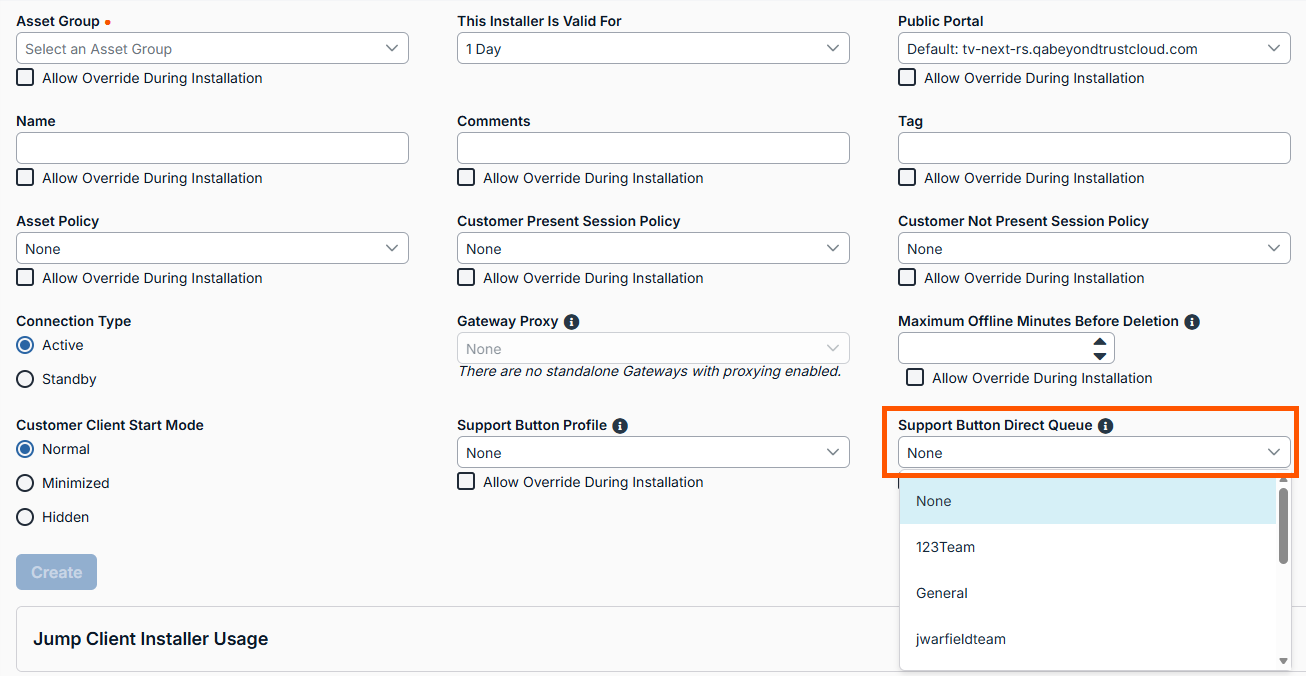
-
Click Create.
For more information about creating Jump Clients, see Jump.
Migration from Legacy Support buttons
How to migrate to 25.2
Important infoExisting Support Buttons continue to function for now, but this legacy functionality will be removed in a future release.
On endpoint systems, we advise you to replace your existing Support Buttons with Jump Clients that have a Support Button Profile configured. Or, if an endpoint already has a Jump Client deployed to it, uninstall its Support Button and edit its Jump Client properties to have a Support Button Profile.
Important infoYour Remote Support deployment may not allow enough Active Jump Client licenses to support conversion of all your Support Buttons. Or your network infrastructure may be strained by a large number of continuous TCP connections as maintained by Active Jump Clients.
In either case, Standby Jump Clients may be deployed in place of the typical Active Jump Client:
- Standby Jump Clients do not allow a representative to initiate a remote session.
- They do allow a Support Button Profile, allowing the local user to initiate a session
- A Standby Jump Client does not maintain a continuous TCP connection to the server, nor does it consume one of your purchased Active Jump Client licenses.
For more information about Standby Jump Clients, see Standby Jump Clients.
Elevation use cases
The following table describes the different cases and the result of each one:
| Use case prior to 25.2 | What happens in 25.2 ? |
|---|---|
| Use Automated Elevation Services (AES) with version 24.1 or below. | Any deployed Passive Jump Clients become Active Jump Clients. New Support Button functionality is used with Standby Jump Clients instead of AES, which is removed after you upgrade to 25.2. |
| Currently using Support Button with mid-session elevation. | Any deployed Passive Jump Clients become Active Jump Clients and provide the option to the new Support Button functionality. There is no longer a need for mid-session elevation. |
Legacy embedded Support Button registry file generator
Important infoEmbedded Support Buttons are deprecated and will be removed in a future release.
Use the Legacy embedded Support Button registry file generator to create registry files which will embed the Support Button into the title bar of an application. An embedded Support Button gives support providers the ability to streamline the support path for specific applications. For example, if your support team frequently handles issues with Microsoft Outlook, you can embed a Support Button within Outlook. You can configure this embedded Support Button to point to a specific issue so that when a customer clicks the button, a session will immediately start with the team best suited to handle Outlook problems. Embedded Support Buttons are a Windows-only feature.
Create registry file
To create an embedded Support Button, a Support Button must first be deployed on the remote system. You may wish to define the Support Button profile so that neither the desktop shortcut nor the menu shortcut is created.
- Go to Configuration > Support Buttons > Embedded Support Button Registry File Generator.
- Select an option from the Install Mode drop-down.
- All Users: install for all users on a system
- Single Users: installs for a single user
- In the Executable name field, enter the program where you want to embed a Support Button. Do not include the file path.
- Select an issue type from the Issue drop-down. Any sessions started with this Support Button will be categorized as a network, server, or general issue. Or, select No Issue Assigned.
- Optionally, add an External Key to assign to sessions started from this embedded Support Button.
- Check Show Front End Survey to prompt customers to describe their issue before starting a session. Uncheck to start sessions without customer input.
- To add multiple applications to one registry file, click Add New Row and repeat the above steps.
- To delete an application from a registry file, click the Delete icon.
- Click Create Registry File.
This prompts you to save a registry file to your system. Using Active Directory or a deployment tool, deploy the registry file to all remote systems which should use these embedded Support Buttons. After running the registry file, the remote user will have to log off and back on for the Support Button registry entry to be created.
Now, when one of the designated applications is run, a Support Button will appear in the top right corner, beside the minimize button. Clicking this embedded Support Button will start a session as defined by its profile and its registry file settings.
It is a best practice to save a copy of any generated registry files. Registry file information is not saved on the BeyondTrust Appliance B Series.
Edit registry file
To edit an embedded Support Button's functionality, you can import the registry file and modify its entries. Running the registry file overwrites any existing registry entries.
To add the Support Button to a new application while keeping it in an existing one, the new registry file must include both executable names. If only the new executable is listed, the Support Button will appear only in the new application.
Remove embedded Support Buttons
To remove an embedded Support Button from a specific application without adding it to another application, you must edit the registry. Using Notepad or a similar editor, open the registry file you initially deployed and insert a hyphen in front of each registry key you wish to delete. Save the registry file and redeploy it to remove the registry entry. An example of a registry entry marked for deletion is presented below.
[-HKEY_LOCAL_MACHINE\Software\Test]
- For more information about registry entries, see https://support.microsoft.com/kb/310516.
- Uninstalling the Support Button will remove it from all embedded programs but will not delete the registry entries. Thus, if another Support Button is installed for the same site, it will inherit the previous registry entries and will appear embedded in the same programs. For more information, see Manage Support Buttons.
