ServiceNow CSM | RS
Customer service organizations using ServiceNow and the ServiceNow Customer Service Management (CSM) application can integrate with BeyondTrust Remote Support to improve service levels, centralize support processes, and strengthen compliance. Features of the Remote Support Remote Support and ServiceNow CSM integration are summarized below.
- Outbound Support Sessions: Technicians can launch Remote Support sessions from within ServiceNow case records using the Generate Session Key button.
- Session Updates: Remote Support session data is written back to ServiceNow ases. This includes chat transcripts and basic Remote Support session information, which is written in the case's work notes.
- Automatic Case Creation: Cases can be automatically or manually created or associated with an ongoing Remote Support session, and linked to the session for session updates after the session. By default, the auto-create functionality is disabled and not available to users of the integration. There is no additional cost to customers who wish to use the feature.
The ServiceNow application is available at the ServiceNow Store.
Requirements
Outlined below are the requirements for the BeyondTrust Remote Support and ServiceNow CSM integration. If any of the integration requirements are not yet met, they must be in place before starting the integration setup process, unless the associated features of the integration are not required.
Base integration requirements
A current version of a ServiceNow release, including:
- A working Customer Service Management application
- A working email configuration
A current release of BeyondTrust Remote Support including:
- At least one usable representative console capable of generating session keys
- A functional Remote Support site through which users can connect to representatives
To configure network firewall rules for this integration, do the following:
- Allow TCP 443 traffic from the B Series Appliance to the appropriate ServiceNow instance.
- Allow TCP 443 traffic from the appropriate ServiceNow instance to the B Series Appliance.
- Optionally, use ServiceNow MID Servers for this integration.
For more information on MID Servers, see MID Server Configuration.
Test the firewall
It is important to test all requirements of the integration before beginning setup. Most of these can be tested by the Remote Support and ServiceNow administrators within their respective systems, but to test the network firewall, the BeyondTrust admin should take the following steps to confirm that the necessary rules are in place.
- Log in to a machine either external to the B Series Appliance's network or in the same VPN as the ServiceNow instance, depending on how ServiceNow is connecting to the B Series Appliance's network.
- Log in to the B Series Appliance's /appliance interface.
- Browse to Support > Utilities :: TCP Connection Test.
- Enter the hostname of the ServiceNow instance, enter the port number of 443, and then click Test. A successful result is a Connected status message.
Do not enter the protocol when entering the ServiceNow instance (https://servicenow.example.com, for example). Instead, use only the fully qualified domain name (servicenow.example.com). In most environments, BeyondTrust Remote Support resides in a DMZ network and has a public DNS address which ServiceNow contacts over the public internet. In some environments, Remote Support is not publicly accessible. In these cases, contact ServiceNow about implementing a VPN connection to your internal network for ServiceNow. For more information, see Virtual Private Network (VPN).
Configure Remote Support
All of the steps in this section take place in the BeyondTrust /login administrative interface. Access your Remote Support interface by going to the hostname of your B Series Appliance followed by /login (that is, https://support.example.com/login).
Verify that the API is enabled
The Remote Support integration requires the Remote Support XML API to be enabled. This feature is used from within the integrating software to communicate with the Remote Support APIs.
Go to /login > Management > API Configuration and verify that Enable XML API is checked.
Create a ServiceNow OAuth API account
The ServiceNow API account is used from within ServiceNow to make Remote Support Command API calls.
- Go to /login > Management > API Configuration.
- Click Add to create a new API account. Name it ServiceNow or something similar.
- Under Reporting API, check:
- Allow Access to Support Session Reports and Recordings.
- Allow Access to Presentation Session Reports and Recordings.
- The OAuth Client ID and OAuth Client Secret are used during the OAuth configuration step in ServiceNow. Make note of these and store them in a secure location.
- Click Save.
Add outbound events and links
Important informationOptions 1 and 2 apply to integration without case creation. If using case creation, you cannot use Option 1 and Option 2 or 3 simultaneously, as Option 1 is automatic and options 2 and 3 are manual. You must choose one or the other based on their use cases and process. You may, however, use options 2 and 3 simultaneously.
Option 1: add outbound events
Outbound events are used to notify ServiceNow that a Remote Support session has finished and is ready to be imported into ServiceNow, or that a representative has joined a Remote Support session and a create case request can be sent to ServiceNow.
- Go to /login > Management > Outbound Events.
- Click Add to create a new event. The event names provided below are suggestions. You may use something different, depending on your ServiceNow instance.
- For session import, name it ServiceNow Integration.
- For case creation, name it ServiceNow Integration Auto-Create.
- Set the URL.
- For session import: https://example.service-now.com/api/x_bmgr_crm/outbound_event/session_end, where example.service-now.com is the ServiceNow instance name.
- For case creation: https://example.service-now.com/api/x_bmgr_crm/outbound_event/case?auto_create=true, where example.service-now.com is the ServiceNow instance name.
- Scroll to Events to Send and check the box labeled Support Session End
- At the top of the page, click Save.
Option 2: set up the custom link
Remote Support custom links can be configured to allow representatives to access or create ServiceNow records from within the Remote Support representative console.
- Browse to Rep Console > Custom Links.
- Click Add to create a new custom link.
- Enter a name for the link.
- Set the URL.
- For access: https://example.service-now.com/nav_to.do?uri=sn_customerservice_case.do?sys_id=%SESSION.CUSTOM.SNOW_CASE_ID%>, where example.service-now.com is the ServiceNow instance name.
- For case creation: https://example.service-now.com/now/nav/ui/classic/params/target/x_bmgr_crm_auto_create_select.do?lsid=%SESSION.LSID%&username=%REP.USERNAME%&auto_create=true, where example.service-now.com is the ServiceNow instance name.
- If needed, you can use any of the available macros to customize the link according to your specifications.
If the customer is using External Key to store the case sys_id, then use the macro %SESSION.CUSTOM.EXTERNAL_KEY% instead.
- Click Save to save the new link.
Option 3: set upan advanced custom link
Remote Support custom links can be configured to allow Representatives to launch a page in ServiceNow where they can choose to Associate the session with an existing case, or Create a new case by clicking a button.
- Browse to Rep Console > Custom Links.
- Click Add to create a new custom link.
- Enter a name for the link, then set the URL to https://example.service-now.com/nav_to.do?uri=x_bmgr_crm_auto_create_link.do?lsid=%SESSION.LSID%%26username=%REP.USERNAME%%26auto_create=true, where example.service-now.com is the ServiceNow instance name. If needed, you can use any of the available macros to customize the link according to your specifications.
- Click Save to save the new link.
Create custom fields
BeyondTrust custom fields are used to map ServiceNow Tasks (tasks, change requests, problem records, and service catalog requests), call records, and configuration items to BeyondTrust sessions.
- Browse to Configuration > Custom Fields.
- Click Add to create a new custom field.
- Enter the following values:
- Display Name: ServiceNow Case ID
- Code Name: snow_case_id
- Show in Rep Console: checked
- Click Save to save the new field.
Custom fields for automatic case creation
There are a number of custom fields that are available to use in an auto-create scenario. These fields can be used to populate values when the session starts, and then configured in ServiceNow to be mapped to case values.
- Browse to Configuration > Custom Fields.
- Click Add for each of the following custom field code names.
The Code Names must match, but the Display Name is arbitrary.
- customer_email
- customer_username
- snow_case_id
The snow_case_id field should already have been created with the base ServiceNow ERS CSM Integration configuration.
- custom_field_1
- custom_field_2
- custom_field_3
Configure ServiceNow
Unless otherwise noted, all of the steps in this section take place in the ServiceNow interface. We recommend that you initially use development or test instances of ServiceNow before installation in the production instance, so that the integration can be thoroughly tested.
Install BeyondTrust integration
The Integration must be purchased directly from BeyondTrust. After the purchase, it is installed via the ServiceNow Store. There is no mechanism to purchase the integration at the ServiceNow Store. Follow the steps below to request and install the integration.
- Log in to your ServiceNow platform with your corporate account. Contact your company ServiceNow Support (HI) admin if you do not have credentials.
- Search for BeyondTrust Remote Support CSM Integration, or go to the app's page.
- Click Request App.
- Request Remote Support with CSM.
- Within a business day, BeyondTrust approves the request and sends a copy of these installation instructions to the requester.
- Once you receive the confirmation, return to the app's page in the ServiceNow store.
- Click Complete Purchase.
- Review the contract details.
- If you agree, check Accept the Site Terms of Use.
- Click Complete Purchase.
- The app is ready for installation on your ServiceNow instance(s).
- Repeat the steps below for each instance.
- Login to the ServiceNow instance on which you want to install the app.
- Navigate to System Applications > All Available Applications > All.
- Search for the app you want to install.
- Click Install.
For more information on how to install applications, see ServiceNow's Help Page.
Set up ServiceNow integration with Remote Support
Follow these steps in ServiceNow to connect ServiceNow to Remote Support.
- Browse to BeyondTrust CSM Appliances.
- Click New to add a new Remote Support appliance record and enter the following values:
- Name: Must be Default.
- Hostname: Host name of the Remote Support deployment.
- OAuth Client ID: The OAuth client ID that is used to authenticate to the Remote Support deployment. This is obtained in a previous step, Create a ServiceNow OAuth API Account.
- OAuth Client Secret: The OAuth client secret that is used to authenticate to the Remote Support deployment. This is obtained in a previous step, Create a ServiceNow OAuth API Account.
- Integration Enabled: Check this box to enable the integration.
- Outbound Event Token: The token that is used as an added security measure to confirm outbound events are coming from the Remote Support deployment that is sending the same token. If left blank, this outbound event token process is ignored. If a value is provided, however, the same value must be sent from all outbound events coming from BeyondTrust as a parameter named outbound_event_token.
- Accepted IP Addresses: A comma-separated list of IP addresses from which this integration accepts outbound events.
Additional steps are required to configure automatic ticket creation. See Configure Auto-Create Feature in ServiceNow.
Assign users appropriate roles
Give the x_bmgr_crm.agent role to ITIL users who provide technical support using this integration.
You must elevate the admin's role in order to make the following change.
- Browse to User Administration > Users.
- Select a user.
- Click the Roles tab, and then click the Edit button.
- Add the x_bmgr_crm.agent role from the Collection list to the Roles list.
- Click Save.
Configure case states
Case states are used in the Remote Support Integration, specifically UI Actions like Session Key, to control when the button shows up on case forms.
- Browse to Case and click Open to see a list of open cases.
- Click Case Number to select a case.
- Right-click the label for the State field or any other field which uses a dropdown or choice list, and click Show Choice List.
- Filter the list by Table=sn_customerservice_case and Element=state.
- Take note of the different sn_customerservice_case choices, specifically the value of cases with a label of Resolved or Closed, and any custom case states for which the Remote Support Session Key button should not appear.
- Go back to the case, right-click the Session Key button located in the Case title bar, and select Configure > UI Actions.
- In the UI Actions list, click Remote Support Session Key, select the Condition field, and ensure current.state is configured to include the IDs of the case states for which the session key button should not appear.
The following code in the UI Action condition field controls which states the Session Key button displays for. By default, the Session Key button displays for cases whose states are set to New, Open, or Awaiting Info, for example, cases with states set to 1, 10, or 18 respectively.
x_bmgr_crm.BomgarUtil.showSessionKeyOnCaseForm('Default', current.getUniqueValue(), [1,10,18])For example, if you had a custom state of 27, which represented a Pending Case, and you wanted the Session Key button to also display for that state, you would modify the code above to the following:
x_bmgr_crm.BomgarUtil.showSessionKeyOnCaseForm('Default', current.getUniqueValue(), [1,10,18,27])Configure chat now form in Service Portal
- Browse to Service Portal and click Service Portal Configuration to open the configuration landing page.
- Click Designer to launch the Service Portal Designer.
- Scroll down the list of pages and click the Service Portal index page (or whichever page is marked with the home icon).
- In the Widgets menu on the left, find the Bomgar Chat widget. Drag it onto the page, and place it where you'd like it to display.
ServiceNow MID server option
It is possible to avoid direct connection between ServiceNow and Remote Support by using a MID server for internal Remote Support deployments.
To configure the integration to use a MID server for API requests to a Remote Support site, specify the MID server to use on the individual outbound REST messages:
- In ServiceNow, navigate to System Web Services > Outbound > REST Message.
- Filter to show only messages for the BeyondTrust application being configured.
- Click the Name of one of the messages to edit its properties
- In the HTTP Methods related list at the bottom, select the Name of the method (typically post).
- On the resulting form, select the HTTP Request tab and select your MID server in the Use MID Server field.
- Click Update to save the changes.
Repeat these steps for each outbound REST message that is a part of the application.
For more information on MID servers, see MID Server.
Configure auto-create
Unless otherwise noted, all of the steps in this section take place in the ServiceNow interface. We recommend that you initially use development or test instances of ServiceNow before installation in the production instance so that the integration can be thoroughly tested.
Enable auto-create functionality
- Browse to BeyondTrust CSM and click Appliances.
- Select the appliance record you are configuring.
- Right-click on the title bar, and then select Configure > Form Layout.
- Drag the field labeled Auto Create Enabled from the Available list to the Selected list.
- Click the Save button.
- The Auto Create Enabled check box displays on the form. Check this box, and then click the Update button on the title bar. The form reloads.
Auto-case creation fields
A section just below the main (top) section of the form labeled Auto-Case Creation contains the following fields:
- Auto-Create For These Portals (comma-separated list): Auto-creates cases for sessions whose public portal is listed in this field.
- Required Auto-Create Custom Fields (comma-separated list): Auto-creates cases for sessions only if all of the custom fields listed are populated with a value.
- Auto-Create for Attended Sessions (check box): Auto-creates cases for sessions that are attended by a customer when this box is checked.
- Auto-Create for Unattended Sessions (check box): Auto-creates cases for sessions that are unattended when this box is checked.
Auto-case creation-related lists
The following Related Lists fields at the bottom of the form are used to configure additional auto-create functionality:
- Static Case Fields
- Dynamic Case Fields
- Case Lookup Fields
- Dynamic Case Lookup Fields
Update BeyondTrust Record fields
BeyondTrust Record fields are used when mapping BeyondTrust data to ServiceNow case fields during the auto-creation of cases. This step updates the database with all the available event types.
Browse to BeyondTrust Remote Support and click Update BeyondTrust Record Fields. This loads all of the available BeyondTrust Record Fields into the database, in preparation for field mapping.
Setup auto-create field mappings
Browse to BeyondTrust Remote Support and click Appliances. Click the desired appliance record. Scroll down to the related list section. There are four related lists, each representing a type of field mapping:
- Static Record Fields: maps a static, default value to a ServiceNow field.
- Dynamic Record Fields: maps a Remote Support Session value to a ServiceNow field.
- Record Lookup Fields: maps a static, default value to a ServiceNow lookup field.
- Dynamic Record Lookup Fields: maps a Remote Support Session value to a ServiceNow lookup field.
Static Record Fields
Use this type of mapping when you want to assign the same static value to the same ServiceNow text field or option list for every Case created.
ExampleFor every case that is auto-created, the customer wants the State field to be set to Resolved. The record field for State is selected from the menu and the value for Resolved is 6, so the following values are set:
- Record Field = State (selected from the menu)
- Default Value = 6
Record Field Label is arbitrary.
- Record Field Label: An arbitrary value used to identify the mapping.
- Record Field: The record field that is populated upon auto-creation.
- Default Value: The static value that is populated in the selected record field.
Dynamic Record Fields
Use this type of mapping when you want to assign a field from the Remote Support session to the same ServiceNow text field or option list for every case created.
ExampleFor every case that is auto-created, the customer wants the Short Description field to be set to the value contained in the Remote Support Session's External Key field. The record field for Short Description is selected from the Record Field menu and the Remote Support External Key field is selected from the Remote Support Field menu, so the following values are set:
- Record Field: Short Description (selected from the menu)
- BeyondTrust Field: External Key (selected from the menu)
The Field Label is arbitrary.
- Record Field Label: An arbitrary value used to identify the mapping.
- Record Field: The case field that is populated upon auto-creation.
- BeyondTrust Field: The Remote Support session value that is populated in the selected case field.
Record Lookup Fields
Use this type of mapping when you want to assign the same static value to the same ServiceNow field, which requires a lookup, for every case created.
ExampleFor every case that is auto-created, the customer wants the Assigned To field to be set to a specific user whose username is bob.ross. The record field for Assigned To is selected from the Record Field menu. The Lookup Table ID is set to the table to search and the Lookup Field ID is set to the field in the lookup table to compare the static value with. Default Value is to the static value with which to lookup the user, so the following values are set:
- Record Field: Assigned To (selected from the menu)
- Lookup Table ID: sys_user
- Lookup Field ID: user_name
- Default Value: bob.ross
The Field Label is arbitrary.
- Field Label: A value used to identify the mapping.
- Record Field: The case field that should be populated upon auto-creation.
- Lookup Table ID: The ServiceNow table to lookup the value for this field.
- Lookup Field ID: The field in the lookup table to search when looking up the value for this field.
- Default Value: The static value to use when looking up the value for this field.
Dynamic Record Lookup Fields
Use this type of mapping when you want to assign a field from the Remote Support session to the same ServiceNow field, which requires a lookup, for every case created.
ExampleFor every case that is auto-created, the customer wants the Caller field to be set to a specific user, whose name we will get from the Remote Support session. The record field for Caller is selected from the Record Field menu. The Lookup Table ID is set to the table to search and the Lookup Field ID is set to the field in the lookup table to compare the BeyondTrust value with. Customer Name field is selected from the BeyondTrust Field menu, so the following values would be set:
- Record Field: Caller (caller_id) (selected from the menu)
- BeyondTrust Field: Customer Name (selected from the menu)
- Lookup Table ID: sys_user
- Lookup Field ID: name
The Field Label is arbitrary
- Field Label: A value used to identify the mapping.
- Record Field: The field that is populated upon auto-creation.
- Lookup Table ID: The ServiceNow table in which to look up the value for this field.
- Lookup Field ID: The field in the lookup table to search when looking up the value for this field.
- BeyondTrust Field: The BeyondTrust session value to use when looking up the value for this field.
Common lookup fields
The following information is provided to help when creating lookup field mappings. A Lookup Field is populated by looking in another ServiceNow table to retrieve a value.
ExampleThe Caller field on a Case is a lookup field. The name of the ServiceNow table that is used is sys_user. You can lookup a user by querying the user_name field with a value of john.doe. This populates the Caller field with the sys_user record for John Doe.
Below are some common ServiceNow record lookup fields that you may encounter in an auto-create scenario.
| Case Field | Case Field Name | Table | Common Query Fields |
|---|---|---|---|
| Account | account | customer_account | name |
| Asset | asset | alm_asset | display_name |
| Assigned To | assigned_to | sys_user | x_bmgr_support_ent_bomgar_usernamenameuser_name |
| Assignment Group | assignment_group | sys_user_group | name |
| Configuration Item | cmdb_ci | cmdb_ci | name |
| Contact | contact | customer_contact | nameuser_name |
Configure other ServiceNow environments
The steps below are typically used after the integration has been installed and configured in a test or development instance of ServiceNow, and is being transferred to a QA or production instance.
Configure production outbound event
- Go to /login > Management > Outbound Events.
- Click Add and name the new HTTP recipient ServiceNow Integration or something similar, depending on your ServiceNow instance.
- In the URL field, paste and replace the name of the original ServiceNow instance with that of the new one, such that /api/x_bmgr_crm/outbound_event/session_end is preserved at the end. The result should be similar to https://example.service-now.com/api/x_bmgr_crm/outbound_event/session_end, as opposed to https://example-dev.service-now.com/api/x_bmgr_crm/outbound_event/session_end.
- Scroll to Events to Send and check Support Session End.
- In the URL field, paste and replace the name of the original ServiceNow instance with that of the new one, such that /api/x_bmgr_crm/outbound_event/session_end is preserved at the end. The result should be similar to https://servicenow_prod.example.com/api/x_bmgr_crm/outbound_event/session_end, as opposed to https://servicenow_dev.example.com/api/x_bmgr_crm/outbound_event/session_end.
- Locate the outbound event created during testing and click Edit. Check the Disabled box and save.
Configure custom link
- Go to /login > Rep Console > Custom Links.
- Click Add to create a new custom link.
- Enter a name for the link, and then set the URL to https://example.service-now.com/nav_to.do?uri=sn_customerservice_case.do?sys_id=%SESSION.CUSTOM.SNOW_CASE_ID%, where example.service-now.com is the ServiceNow instance name. If needed, you can use any of the available macros to customize the link according to your specifications.
- Test the integration setup in its new location following the same steps used to test the original instance.
Test integration
The following steps take place in ServiceNow and Remote Support and are provided to ensure that the integration is working properly. Troubleshooting suggestions are provided with each step in case of failure.
Test session key generation
- Log in to the Remote Support representative console, and then log in to ServiceNow with the same account.
- Open an active case in ServiceNow. Confirm the State field matches one of the values for which the Session Key button should appear, and make sure the button appears as expected. Remember that the case must be saved for the button to appear.
- Click the Session Key button. This launches the Remote Support representative console, subsequently opening the Session Key Dialog box.
Test Remote Support session import
- Log in to ServiceNow as a customer service agent or an admin. Use the Session Key button as described above to start a Remote Support session.
- End the session from the representative console.
Refresh the ServiceNow case from which the session key was generated, scroll to the work notes section of the form, and check that an entry for the completed session is shown. Basic session details should be shown, as well as any chat dialogue. If not, make sure the following items are true:
- The API User Connection test works correctly as described above.
- There are no Remote Support errors reported for your ServiceNow instance in the Remote Support Outbound Events list. Your Remote Support admin can check this in Remote Support from the /login web interface under Management > Outbound Events.
- The IP address is set up correctly, following the steps below:
- Log in to ServiceNow as an admin.
- Browse to System Logs > Transactions, remove all existing filters, and add a URL filter of /x_bmgr_support_ent_bomgar_post.do.
- Click one of the results and make sure the originating IP address of the transaction is included in the IP Address field of the integration appliance configuration record settings under BeyondTrust CSM > Appliances > Default.
Test case creation
- You can quickly test the case creation with a URL such as https://beyondtrust.example.com/api/start_session?issue_menu=1&customer.name=Bob&customer.company=BobCoInc&customer.details=Credentials&codeName=issue_4&session.custom.customer_username=b.smith&c2cjs=1.
- If using the Outbound Event approach Option 1, after the representative joins the session a new case appears when you refresh the case list in ServiceNow. Additionally, the ServiceNow Case ID is populated in the representative console after a few seconds with the sys_id of the newly created case.
- If using the Custom Link approach, Options 2 or 3, after the representative clicks the Create Case custom link, a new case appears when you refresh the case list in ServiceNow. Additionally, the ServiceNow Case ID should be populated in the representative console after a few seconds with the sys_id of the newly created case.
Use cases
Customer support organizations using ServiceNow Customer Service Management (CSM) can integrate with BeyondTrust Remote Support to improve service levels, centralize support processes, and strengthen compliance. Use cases that are addressed by the BeyondTrust Remote Support and ServiceNow CSM integration are listed below.
Generate session key
Technicians can generate a session key from within a case and give the customer the key to initiate a support session.
The integration provides support for case records.
Once the session ends, basic session data, along with the chat dialogue from the session, are imported into ServiceNow and written to the work notes of the case record from which the session key was generated.
Import Remote Support session data into a ServiceNow record
Once the Remote Support session ends, the associated case record in ServiceNow is automatically updated with information gathered during the session, including:
- Chat transcript
- Basic session information
Customer initiated chat from service portal
Customers can request a support session with a representative from a ServiceNow Service Portal where the Remote Support Get Support Now widget has been added. This includes any context within a case, like the case form, or any context outside the scope of a case, like the CSM homepage.
This functionality allows customers an expedient path to resolution, while also providing the technician with the necessary context to effectively assist the customer.
Sessions initiated using Remote Support's click-to-chat functionality can be elevated to full support sessions if the technician deems it necessary.
Access ServiceNow records from the Representative Console
Using Remote Support's custom links ability, a representative can access the associated ServiceNow case record directly from within the representative console. This saves time searching for the case record in ServiceNow and provides the representative with any available issue details, history, or other context to help quickly resolve the issue.
Associate sessions with ServiceNow records manually
Whether a representative has just created a case for the current session or has found that one already exists, even sessions originating outside the scope of a ServiceNow record can be manually associated with the appropriate item, allowing session details to be automatically added to the case when the session ends.
To make this association, the representative enters the numeric ID of the case record into the External Key field while in session.
Technicians can use the human-readable record number from ServiceNow to easily make this association.
Automatic or manual case creation
For customers who have applicable processes, the integration can be configured to automatically create a ServiceNow case based on Remote Support sessions, either when the representative joins the session or manually via a Remote Support representative console custom link. This process can simplify workflows and reduce the number of clicks necessary for support representatives.
Troubleshoot
This section is designed to assist members of implementation and support teams who are either installing or supporting the ServiceNow integration with Remote Support. The items listed here cover potential issues you may encounter when working with the integration, along with steps to take to investigate and alleviate those issues.
Throughout this section you'll see a reference to ServiceNow application logs. This refers to the application logs in ServiceNow, which can be found in System Logs > System Log > Application Logs.
ServiceNow has other logs that are also helpful. Those include:
- Transaction Logs, found at System Logs > Transactions
- All Logs, found at System Logs > System Log > All
- Warning Logs, found at System Logs > System Log > Warnings
- Error Logs, found at System Logs > System Log > Errors
Using this troubleshooting guide requires knowledge of both ServiceNow and Remote Support.
Support sessions are not written to ServiceNow
If support sessions aren't written in ServiceNow, there could be a communication issue. First, check to ensure communication is open from Remote Support to ServiceNow.
- Log in to the Remote Support /login interface and ensure the Support Session End option is checked on the HTTP Recipient for the Outbound Event. If Support Session End is not checked, check the box, save the HTTP recipient, then run another support session and see if the record is written to ServiceNow.
- If the Outbound Event looks good, log in to the /appliance interface and run a TCP test to the hostname of the customer's ServiceNow instance on port 443. If the TCP test yields a non-200 response, involve your network team to determine if there is a network block in place, such as a firewall or network rule.
- If the TCP test yields a 200 response, then start another session from ServiceNow, end the session, then open the ServiceNow transaction logs and filter by records that are Created on Today (or Last 15 minutes for fewer results) AND URL starts with /api/x_bmgr_support_ent/outbound_event/session_end. If you don't see a record for the session you just ran, then there is a communication issue from Remote Support to ServiceNow and you should recommend the customer involve their network team to determine if there is a network block in place such as a firewall or network rule.
- If you see the transaction record in the Transaction Logs, then double-check and reset the OAuth Client ID and OAuth Client Secret fields on the appliance configuration record in ServiceNow. Commonly, this OAuth Client Secret value is copied to the clipboard, but the API Account record is never saved in Remote Support**/login**. We recommend that you copy the value and immediately save the API Account, then paste the value in the appliance configuration record in ServiceNow. Run another support session. If the Support Session record still does not show up in ServiceNow, check the ServiceNow application log to see if any errors may explain why the record isn't being written.
Session key button is not showing on the case form
If the Session Key button is not showing on the case form, a few things can be checked.
- Check to see if there were any adjustments or customizations made to any of the integration's UI actions. Because these UI actions render the buttons, we recommend that these not be edited.
- If no customizations to the UI actions were made, ensure the appliance configuration record is named Default, with a matching case and no white space. Any name other than Default causes the Session Key button to be hidden.
- If the name of the appliance configuration record is Default, view the customer's case states and ensure that the Condition field in the UI Action displays the button for the proper case states.
For more information about case states, see Configure Case States.
Session key button gives an "Unknown host" message
If you get an Unknown host error, there is essentially a communication issue from ServiceNow to the Remote Support deployment, unless the hostname is set incorrectly on the appliance configuration record.
Double-check the hostname on the appliance configuration record in ServiceNow. If it looks correct, contact your network team to determine if there is a network block in place, such as a firewall or network rule.
"Invalid custom field code name" message
An invalid custom field code name error can occur when there is an attempt to generate a session key, but a custom attribute with that code name doesn't exist in the system. This can happen if a step is missed in the initial integration configuration.
Create the missing custom field and try to start another support session from ServiceNow.
"Error validating parameter 'snow_case_id': the session attribute is invalid" message
An error validating parameter 'snow_case_id': The session attribute is invalid message can occur when there is an attempt to generate a session key, but a custom attribute with that code name doesn't exist in the system. This can happen if a step is missed in the initial integration configuration.
Create the missing custom field and try to start another support session from ServiceNow.
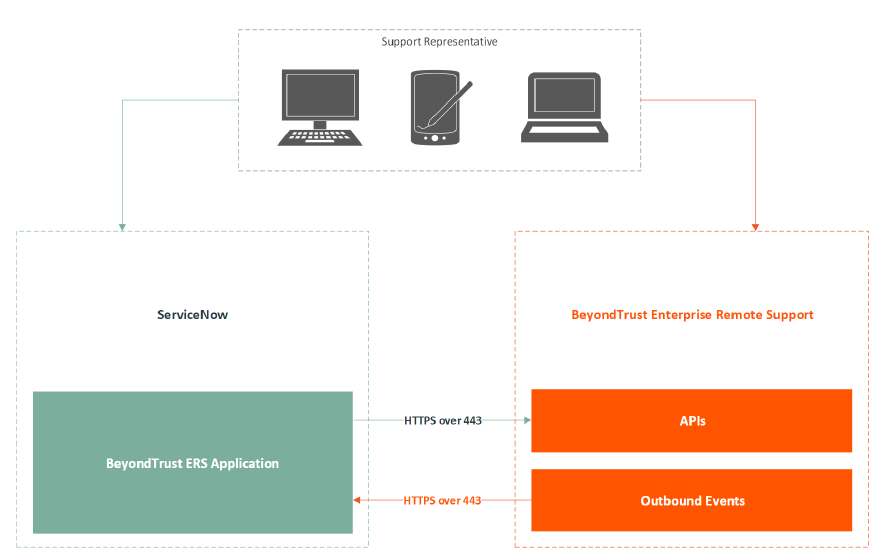
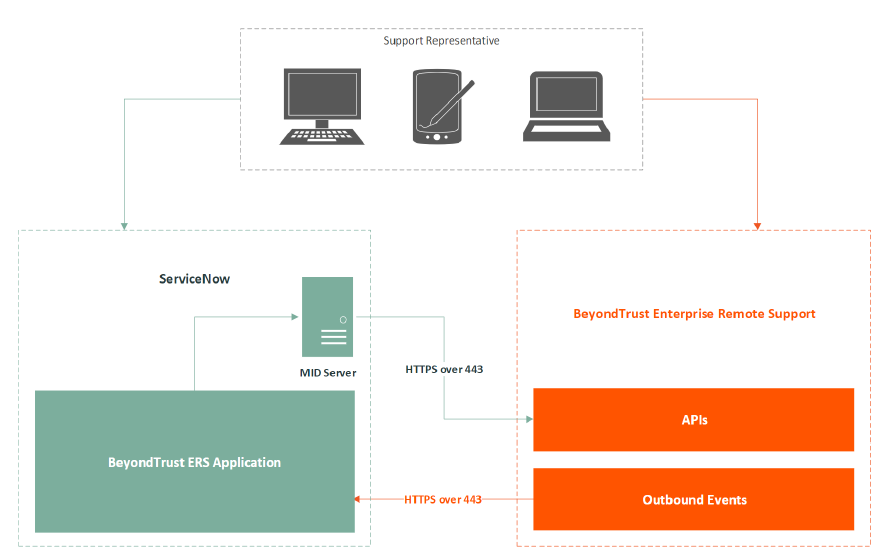
Network diagrams
ServiceNow and Remote Support integration
ServiceNow and Remote Support integration with a MID server
Updated 12 days ago
