SAML | RS
Benefits of SAML integration
BeyondTrust Remote Support integrates with SAML identity providers for secure single sign-on. This enables users to authenticate once and access Remote Support alongside other enterprise applications.
- Connect to enterprise SAML providers.
- Provide seamless single sign-on.
- Centralize authentication management.
How do I access the Security Providers page?
- Use a Chromium-based browser to sign in to your Remote Support URL.
This URL is provided in the BeyondTrust welcome email and includes your site URL followed by /login. - From the left menu, click Users & Security.
The Users page opens and displays by default. - At the top of the page, click Security Providers.
The Security Providers page displays.
Add a security provider
- On the Security providers page, click + Add, and then select SAML for representatives or SAML for public portals from the list.
The Add Security Provider page displays. - Configure the security provider following the steps below.
SAML for representatives
SAML fields
-
Name: Enter a unique name to help identify your provider.
-
Enabled: If checked, your appliance can search this security provider when a user attempts to log in to the representative console or /login. If unchecked, this provider will not be searched.
-
Associated email domains: This setting applies only when more than one SAML provider is active. Otherwise, it is ignored.
Enter the email domains you want to associate with this SAML provider, one per line. During authentication, users enter their email address, and the domain is checked against this list. If it matches, they are redirected to the corresponding identity provider for authentication.
If multiple SAML providers are configured and the user’s email domain does not match any provider’s associated domains, the user will not be allowed to authenticate.
-
Identity provider settings
-
Metadata: The metadata file contains all the information needed for the initial setup of your SAML provider and must be downloaded from your identity provider. Save the XML file, and then click Upload Identity Provider Metadata to select and upload the selected file.
-
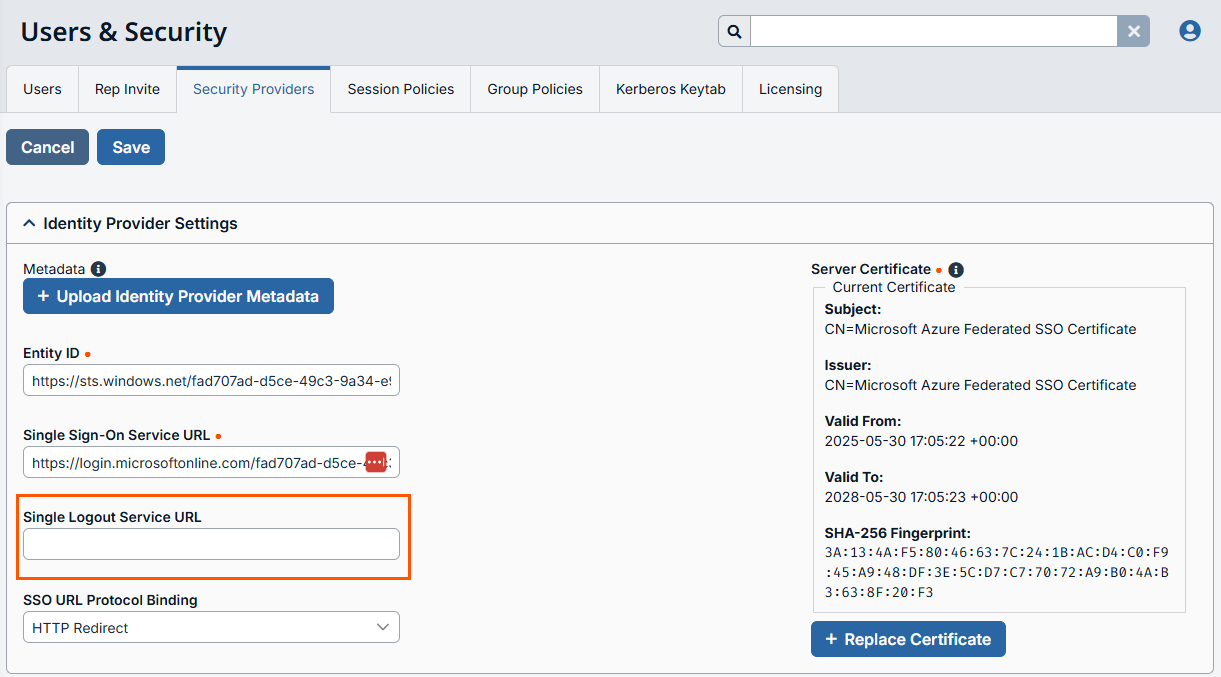
Entity ID: The unique identifier for the identity provider you are using.
-
Server certificate: This certificate will be used to verify the signature of the assertion sent from the identity provider.
The fields for Entity ID, Single sign-on service URL, Single Logout Service URL, and Certificate are automatically populated from the identity provider's metadata file. If you cannot get a metadata file from your provider, this information can be entered manually. For metadata files with multiple identity providers, enter the Entity ID of the desired Identity Provider in the field below before uploading the metadata.
-
Single sign-on service URL: When you want to log in to BeyondTrust using SAML, this is the URL where you are automatically redirected so you can log in.
-
Single Logout Service URL: When selected, users authenticated with SAML are automatically signed out of the Identity Provider when they log out of Remote Support.
-
SSO URL protocol binding: Determines whether a user posts or is redirected to the sign on URL. This should be left defaulted to redirect unless otherwise required by the identity provider. If request signing is enabled (under Service Provider settings), protocol binding is limited to redirect only.
-
-
Service provider settings
-
Download service provider metadata: Download the BeyondTrust metadata, which must then be uploaded to your identity provider.
-
Entity ID: This is your BeyondTrust URL. It uniquely identifies the service provider.
-
Private key: If necessary, you can decrypt messages sent by the identity provider, if they support and require encryption. Click Choose File to upload the private key necessary to decrypt the messages sent from the identity provider.
-
AuthnRequest signing certificate: This is the certificate used for signing AuthnRequests. The following formats are accepted: .cert, .cer, .crt, .der, .pem, .x-x509-ca-cert, .x-x509-user-cert, .x-pem-file.
-
Signed AuthnRequest: Check to enable request signing. If enabled, SSO URL protocol binding is limited to redirect only. The SSO URL protocol binding field is updated automatically, if necessary. A private key and signing certificate is required for request signing.
-
-
User attribute settings: SAML attributes are used to provision users within BeyondTrust. The default values match BeyondTrust-certified applications with various identity providers. If you are creating your own SAML connector, you may need to modify the attributes to match what is being sent by your identity provider.
-
Username: The SAML attribute that contains the user’s unique username or login ID.
-
E-mail: The SAML attribute that contains the user’s email address.
-
Use case-insensitive comparison for NameIDs: If your identity provider requires case-insensitivity for the NameID attribute, select this option.
-
Display names: The SAML attribute that contains the user's display name.
-
Use the same attribute for public and private display names: If this option is checked, you may specify separate values for the user's private and public display names.
-
-
Authorization settings
-
Lookup groups using this provider: Enabling this feature allows faster provisioning by automatically looking up groups for this user, using Group Lookup Attribute Name and Delimiter. We recommend enabling this feature.
If not used, SAML users must be manually assigned to group policies after their first successful authentication.
-
Group lookup attribute name: Enter the name of the SAML attribute that contains the names of groups to which users should belong. If the attribute value contains multiple group names, then specify the Delimiter used to separate their names.
If left blank, SAML users must be manually assigned to group policies after their first successful authentication.
-
Delimiter: If this field is left blank, then the attribute value may contain multiple XML nodes with each one containing a different name.
-
Available groups: This is an optional list of SAML groups always available to be manually assigned to group policies. If left blank, a given SAML group is made available only after the first successful authentication of a user member of such group. Enter one group name per line.
-
Default group policy: Each user who authenticates against an external server must be a member of at least one group policy in order to authenticate to your appliance, logging into either the /login interface or the representative console. You can select a default group policy to apply to all users allowed to authenticate against the configured server.
If a default policy is defined, any allowed user who authenticates against this server might have access at the level of this default policy. Therefore, we recommend you set the default to a policy with minimum privileges to prevent users from gaining permissions you do not wish them to have.If a user is in a default group policy and is then specifically added to another group policy, the settings for the specific policy always take precedence over the settings for the default, even if the specific policy is a lower priority than the default, and even if the default policy's settings are set to disallow override.
-
-
Test settings: You can test the SAML configuration from this page. The provider must be saved before it can be tested. Click Save at upper left area of the screen, then scroll down and click Test. The configuration is tested against the identity provider, and a test results page shows the SAML response and a formatted version of the assertion XML. The responses can be copied to other tools if further review is required.
See Additional setup and tips to learn how to:
- Sign in to the representative console
- Sign in to the admin interface
- Sign in to the public portal
- Sign in to Remote Support from the identity provider side
- Sign in directly to the web rep console
- Integrate SAML with third-party apps
SAML for public portals
SAML fields
-
Name: The name for your SAML provider is auto-generated and cannot be edited at this time.
-
Enabled: If checked, your appliance can search this security provider when a user attempts to log in to the public portal. If unchecked, this provider is not searched.
-
Identity provider settings
-
Metadata: The metadata file contains all the information needed for the initial setup of your SAML provider and must be downloaded from your identity provider. Save the XML file, and then click Upload Identity Provider Metadata to select and upload the selected file.
The fields for Entity ID, Single sign-on service URL, Single Logout Service URL, and Server certificate are automatically populated from the identity provider's metadata file. If you cannot get a metadata file from your provider, this information can be entered manually. For metadata files with multiple identity providers, enter the Entity ID of the desired Identity Provider in the field below before uploading the metadata.
-
Entity ID: The unique identifier for the identity provider you are using.
-
Single sign-on service URL: When you want to log in to BeyondTrust using SAML, this is the URL where you are automatically redirected so you can log in.
-
Single Logout Service URL: When selected, users authenticated with SAML are automatically signed out of the Identity Provider when they log out of Remote Support.
-
SSO URL protocol binding: Determines whether a user posts or is redirected to the sign on URL. This should be left defaulted to redirect unless otherwise required by the identity provider. If request signing is enabled (under Service Provider settings), protocol binding is limited to redirect only.
-
Server certificate: This certificate is used to verify the signature of the assertion sent from the identity provider.
-
-
Service provider settings
-
Download service provider metadata: Download the BeyondTrust metadata, which must then be uploaded to your identity provider.
-
Entity ID: This is your BeyondTrust URL. It uniquely identifies the service provider.
-
Private key: If necessary, you can decrypt messages sent by the identity provider, if they support and require encryption. Click Choose file to upload the private key necessary to decrypt the messages sent from the identity provider.
-
AuthnRequest signing certificate: This is the certificate used for signing AuthnRequests. The following formats are accepted: .cert, .cer, .crt, .der, .pem, .x-x509-ca-cert, .x-x509-user-cert, .x-pem-file.
-
Signed AuthnRequest: Check to enable request signing. If enabled, SSO URL protocol binding is limited to redirect only. The SSO URL protocol binding field is updated automatically, if necessary. A private key and signing certificate is required for request signing.
-
-
User attribute settings: SAML attributes are used to provision users within BeyondTrust. The default values match BeyondTrust-certified applications with various identity providers. If you are creating your own SAML connector, you may need to modify the attributes to match what is being sent by your identity provider.
-
Username: The SAML attribute that contains the user’s unique username or login ID.
-
E-mail: The SAML attribute that contains the user’s email address.
-
Display names: The SAML attribute that contains the user's display name.
-
See Additional setup and tips to learn how to:
- Enable authentication on a public site
- Integrate SAML with third-party apps
- Click Save at the top of the page.
Change priority order of security providers
- At the top of the Security providers page, click Change Order.
- Drag and drop security providers to set their priority. You can drag and drop servers within a cluster; clusters can be dragged and dropped as a whole.
- Click Save Order for prioritization changes to take effect.
Disable a security provider
Disable this security provider connection. This is useful for scheduled maintenance, when you want a server to be offline but not deleted.
- On the Security providers page, locate the security provider you want to disable.
- Click
 > Disable.
To re-enable the security provider, click ![]() > Enable.
> Enable.
View the log for a security provider
View the status history for a security provider connection.
- On the Security providers page, locate the security provider you want to view.
- Click > View Log.
Edit a security provider
If you edit the local security provider and select a default policy that does not have administrator permissions, a warning message appears. Ensure other users have administrator permissions before proceeding.
- On the Security providers page, locate the security provider you want to edit from the list.
- Click
 .
.
The Edit security provider page displays. - Edit the security provider details. The details available are the same as the Add security provider page details.
- Click Save at the top of the page.
Delete a security provider
- On the Security providers page, locate the security provider you want to delete.
- Click
 to delete the security provider.
Additional setup and tips
SAML: Sign in to the representative console
1. Select SAML Credentials from the dropdown menu.
2. If you have not yet signed in to your identity provider, you will be redirected using the default browser.
Representatives can access the mobile representative console using SAML for mobile.
SAML: Sign in to the admin interface
> ℹ️
If you are already signed into your identity provider when you click Use SAML Authentication, you are taken directly to the /login interface.
- From the /login interface, select Use SAML Authentication. If you have not yet signed in to your identity provider, you will be redirected to their site to enter your credentials.
- Click Sign In. You are taken to the /login interface.
SAML: Sign in to the public portal
A customer can access the public support portal using the URL provided by a representative. If SAML authentication is configured and enabled for the public site, the customer is presented with the Portal Login window. The customer must click Login and then provide credentials to authenticate with the identity provider.
The customer is then taken to the support portal page where they can submit their request for support. The customer's name and any custom fields that are configured, such as email, are automatically populated and are not editable.
A green check mark displays next to the customer's name in the representative console chat window to indicate the user is public portal authenticated.
SAML: Sign in to Remote Support from the identity provider side
Depending on your identity provider, you can opt to sign in to your BeyondTrust representative console, public portal, or /login interface from the provider's web site. In this example, the provider has icons for BeyondTrust applications. Simply sign in to your provider's site, and then click on the application you want to use.
SAML: Sign in directly to the web rep console
It is possible to configure an application or tile in a SAML identity provider (IdP), (like the tiles used to sign in to Okta and similar applications) that takes you directly to the web rep console rather than to /login.
To configure this, you must:
- Set up application in the IdP as you would for /login
- Change the RelayState parameter. To obtain the correct parameter, copy the entire string shown for RelayState in the SAML request in SP-initiated login into the /console page, and paste this value into the SAML SP provider configuration for RelayState on the IdP side. This enables IdP-initiated login to be to the /console page instead of to the default /login page.
There are two parts to the SAML configuration: the IdP and service provider (SP). In this instance you are the SP, and the SAML service is the IdP (OneLogin, Okta, and similar). Currently, you can export metadata from the SAML security provider on /login (in the Service Provider section), which you can then import into the IdP to help configure the SAML side. If, as part of this configuration, you set the RelayState parameter to console, then any login initiated from the IdP (for example, clicking the tile in Okta) sends you to the web rep console rather than to /login.
SAML: Enable authentication on a public site
Once SAML for Public Portals settings have been configured, you can enable SAML authentication on a public site in /login as follows:
- Go to Public Portals > Public Sites.
- Click Edit next to the desired public site.
- Select Require SAML Authentication.
- Click Save.
SAML: Integrate with third-party applications
Each third-party product has its own configuration requirements for SAML authentication. To assist with integration, product-specific guides provide detailed instructions.
Updated 5 months ago
