Start a support session | RS for Desktop
What is a support session?
A support session is a secure connection established between a representative and a customer’s device, enabling real-time troubleshooting and issue resolution.
How are support sessions useful to my organization?
Support sessions provide representatives with tools to communicate with customers, view or control their screens, transfer files, run diagnostics, and perform actions to resolve technical issues efficiently.
How do I start a support session?
To start a support session, representatives can:
- Use a session key or email link: Share a session key or email a session link to the customer, who can use it to join the session.
- Connect through a public portal: Customers can request help via a public portal, and representatives can accept the request to start the session.
- Utilize Jump Technology: Use Assets or Jump Clients to directly connect to a remote system.
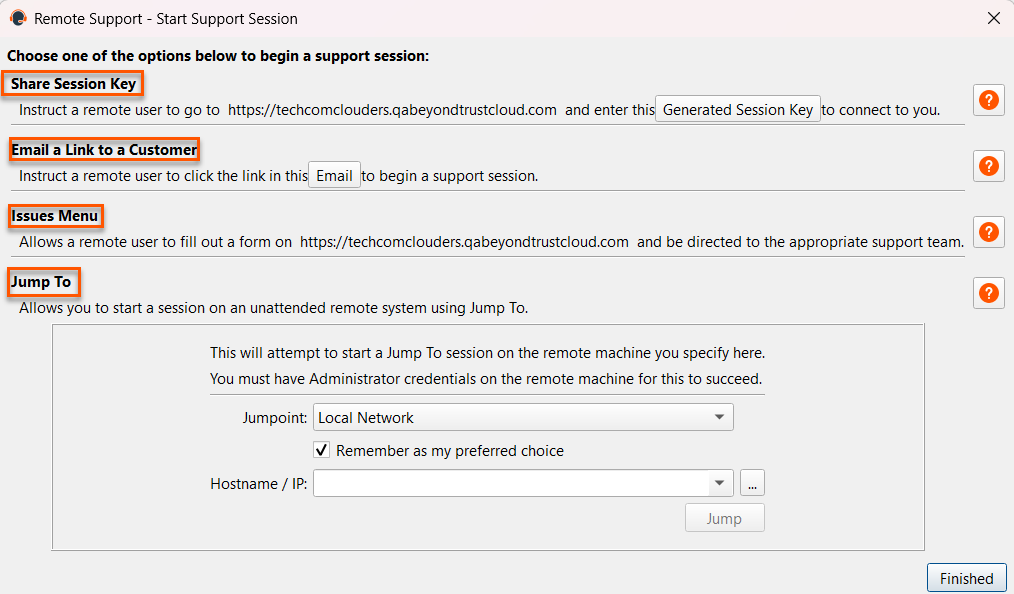
For a quick reference of the ways to start a session, click the Start button at the top of your representative console.
The available options vary depending on your site configuration and account permissions.
Customer-initiated sessions
There are multiple ways for customers to initiate a remote support session with a rep.
Email
Reps can generate an email message containing a hyperlink. To receive support, the recipient of the email clicks the link, triggering the customer client to download on their system. This establishes a secure connection to the rep who issued the invitation.
URL
Reps can generate a hyper linked URL for the remote user through a variety of methods such as a text chat.
BeyondTrust web portal
BeyondTrust allows you to create web support portals, or public web sites, for your BeyondTrust Appliance B Series. These portals allow your customers to request support utilizing BeyondTrust's remote support software. Each support portal can be configured to support your organization's branding and support processes. This includes customizing logos and allowing customers to start a BeyondTrust session using click-to-chat.
For more information about support portals, see Support portal customization guide.
- Representatives: You can present a list of logged-on reps, allowing customers to click on a rep's name to begin the customer client download. When the download is complete, a session is started with the rep.
- Session Key: A rep may generate an alphanumeric session key to share with a customer. From there, the customer visits the support portal and enters the session key into the text entry field. This triggers the customer client to download and establishes a secure connection to the rep who issued the invitation.
- Issue Submission: The support portal page can be configured to offer a selection of issues which the customer can choose from when seeking support. Customers may select an issue from the dropdown to trigger the customer client to download. This action generates a request in the team queue associated with that specific issue. For example, if the user selects Email Problems, the request is routed to a team of reps skilled in supporting email systems.
Support Button
The Support Button is a desktop shortcut previously installed on a customer's workstation that triggers the customer client. When the user clicks the Support Button, they are prompted to enter a session key or describe their issue. Additionally, they may be able to directly join the queue configured for the Support Button. This specific session initiation method may be pre-installed to a standard image and does not require the customer client to be downloaded.
A Support Button cannot be deployed from a session that was started from a SAML authenticated public portal and a Support Button cannot be used to start a session with a public portal that requires SAML authentication.
For more information about Support Buttons, see Support Button.
Rep-initiated session
BeyondTrust Jump Client (pre-installed running agent)
The BeyondTrust Jump Client is a running service that allows a rep to initiate a support session to a specific remote system through the representative console. This can be used to initiate sessions to unattended systems where no user is present, or can be used as the default method for providing support to customers. Although the session is rep-initiated, permissions within BeyondTrust allow flexibility on whether or not reps need to prompt the customer for access and can even check for the presence of a logged-on user. Furthermore, access to the individual Jump Clients can be controlled individually or by group membership within BeyondTrust, and different groups can have different permissions.
For more information on Jump Clients, see Jump Client guide.
connect to (ad-hoc)
The second rep-initiated method for starting a support session is BeyondTrust connect to Connect to allows reps to use the representative console to push the customer client to a remote workstation to initiate a support session. Like downloading the client from a portal page, this is an ad-hoc session in which no items are pre-installed and everything is removed once the session is completed. Unlike most of the other methods, there are several dependencies for this session initiation method. First of all, it is available for Windows only. Secondly, it depends on several Windows services to execute, and there are several remote TCP ports that must be accessible on the remote machine. For that reason, BeyondTrust offers a technology called Gateways which can help initiate sessions on a remote network.
For more information about Gateways, see Gateway guide.
Generate a session key
Dependent upon your account permissions, one method of starting a support session is through the use of one-time, randomly generated session keys. Session keys are not used for authentication. They simply route the customer to the appropriate team or rep and are valid for a limited time. The methods by which the B Series Appliance generates session keys are proprietary information. When your customer calls with a support request, generate a new session key from:
- The Support menu of the representative console
- The Start button at the top of the representative console
- The Session Key button at the top of the representative console
- Pressing Ctrl + F4 or Command + F4
Set how long you want this session key to remain valid. The expiration time applies only to the length of time the key can be used to start a session and does not affect the length of the session itself.
For more information, see "Maximum Session Key Timeout" in Security.
You also can select the public portal through which you want your customer to enter the session, from the portals made available to you by your administrator. The representative console remembers your choice the next time you generate a session key.
Depending on the options selected by your administrator, you may be able to send the invitation from your local email, from a server side email, or by SMS.
Direct your customer either to go to the unique URL or to enter the session key on your public site. After running the customer client, your customer will appear in your personal queue.
Session queues
Session queues provide information about and access to customers who are waiting for support. The Personal queue contains customers with whom you are currently in session or who are waiting for a session with you specifically. A waiting session appears in your personal queue if it was transferred to you, or if the customer initiated it by entering a session key you generated, by selecting your name from the public site, or by clicking a Support Button tied to you. This queue also contains invitations for you to join a shared session.
You also have queues for any teams of which you are a member. If a customer initiates a session by selecting an issue type from an issue submission form, that customer enters a specific team queue based on which team owns that issue. A customer also enters a team queue if they click a Support Button tied to a team. A session may also enter a queue if it is transferred intentionally or due to waiting session rules, or if the representative's connection is lost in the middle of a session. These queues also contain invitations for any representative in the team to join a shared session.
Click the star to the left of a team name to mark that queue as a favorite. If a team chat message is sent, an orange chat bubble appears in place of the star.
Customers can also request assistance directly from a web page which contains a help link. This initiates a browser sharing session, which allows a representative to chat and view the customer's web page. Administrators can generate custom links in order to direct browser sessions to the correct representative or team queue. In the queue, browser sharing sessions are identified by the [Browser] prefix next to the customer's name.
Sort your queues by several criteria, including the length of time the customer has been in queue, the customer’s name, issue category, etc. All criteria may not be available depending on the manner in which the customer initiated the session. You can also search for an active session. Click on an item in queue to view its details. Click it again to close the details pane. The representative console remembers the column order and the sort order of the session queue the next time the representative console is launched.
Once the customer is in queue, either double-click the customer entry or select the entry and click the Accept button. Accepting a session opens a new tab for that session at the top of the representative console. You can run multiple sessions simultaneously. A new tab will be created for each session.
Accept a session to start support
Once the customer is in queue, there are several ways you can accept the session. If the session is in your personal queue or if you have permission to manually accept sessions from a team queue, either double-click the customer entry or select the entry and click the Accept button. If allowed to use the feature, start supporting the oldest queued session from among your team queues by selecting to get the next session from:
- The Support menu of the representative console
- The Get Next button at the top of the representative console
Session assignment rules
You can also accept sessions that are assigned using Equilibrium. When a session enters a queue that has Equilibrium enabled, that session is automatically assigned to the best qualified and least busy representative, based on matching skills, the number of sessions that representative is supporting, and how long they have been available.
When a session is assigned to you, you are given a prompt to accept or reject the session, along with an audible alert if enabled. When the invitation is about to expire, visual and audible alerts warn you. If you reject the invitation or the invitation times out, the session is reassigned to the next best qualified and least busy representative in that queue.
A rejected session is never assigned to the same representative twice unless it is manually transferred into another queue for which that representative is available. If a session cycles through all available representatives for the queue and is not accepted, it remains in queue until someone manually accepts or transfers it.
Alternatively, if your administrator has set up a waiting session rule for this queue, the session gives out an audible and visual alert when it is overdue, or it is transferred to an overflow queue. If that overflow queue has a waiting session rule set up that transfers the session back to the first queue, the session could potentially bounce back and forth between the queues until it is accepted.
A session is not assigned to a representative if that representative is unavailable. If you lock your computer or switch to the login screen, you are marked as unavailable. Also, rules within the user permissions mark you as unavailable if you are participating in more than a set number of sessions or have been idle longer than a specified length of time. Finally, if you have permission to opt out of session assignments, you may choose not to receive automatic session assignments.
Accepting a session opens a new tab for that session at the top of the representative console. You can run multiple sessions simultaneously. A new tab is created for each session.
Session tabs can be moved and reordered to help you organize and prioritize your workload. Simply click and drag a session tab to a new position. Session tabs can also be detached from the main representative console window.
iOS profile access key
To distribute your BeyondTrust-enabled public and private profiles to Apple iOS device customers, generate an Apple iOS profile access key from the Support menu of the representative console.
The setting iOS Configuration Profiles Link Enabled must be selected in /login > Public Portals > iOS Configuration for this option to be available.
Click Generate Apple iOS Profile Access Key to launch the Apple iOS Profile Selection interface.
The Apple iOS Profile Selection interface contains available public or private profiles previously configured in the /login interface.
While the public site can be made to show public iOS profiles to anyone who knows the URL, generating an access key is the only way to give a customer access to a private iOS profile.
Here you may select any public or private profiles to securely distribute to your Apple iOS device customers via your iOS-browsable support portal. Click the Generate Access Key button.
When you click the Generate Access Key button, a unique Access Key Generated screen launches containing special options for sending an email invitation to your Apple iOS device customer. Depending on the options selected by your administrator, you may be able to send the invitation from your local email, from a server side email, or by SMS.
