Canned messages | RS Pathfinder
What are canned messages?
Canned messages are pre-written responses that representatives can use in chat sessions to save time and provide consistent communication. These messages are categorized for easy access and can be filtered by category or team.
How are canned messages useful to my organization?
Canned messages help reduce response time and ensure standardization in communication between representatives and customers. By using predefined responses, support teams can address common queries efficiently and maintain consistent messaging across sessions.
How do I access the Canned Messages page?
- Sign into app.beyondtrust.io.
The BeyondTrust Home page displays. - From the left menu, click Remote Support > Console Settings.
The Rep Console Settings page opens. - At the top of the page, click Canned Messages.
The Canned Messages page displays.
The Canned Messages page
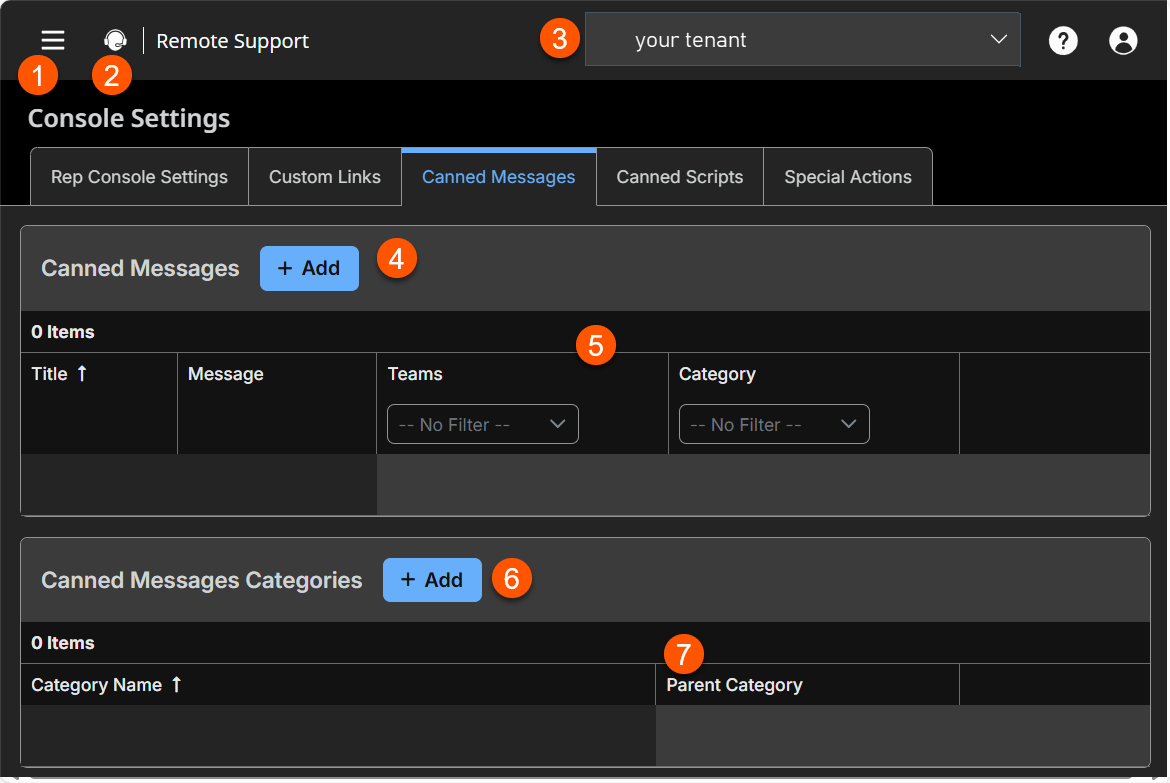
- Left menu: Easy access to all pages in Remote Support, including Status, Consoles & Downloads, My Account, Configuration, Asset Management, Vault, Console Settings, Users & Security, Reports, Public Portals, Dashboards, Management, and Appliance pages.
- Status: Opens the Status page.
- Header: Change your tenant site, manage your profile, and access documentation.
-
Add: Adds a new canned message.
-
Canned Messages columns: List Canned Messages columns.
Canned Messages columns
- Title: Unique name of the message.
- Message: Text that appears in the message chat.
- Teams: Use to filter.
- Category: Use to filter.
-
Canned Messages Category: Creates a category.
-
Canned Messages Categories columns: List the Canned Message Category columns.
Canned Messages Categories columns
- Category Name: Create a unique name to help identify this category. This name should help representatives locate the message they wish to send.
- Parent Category: Use to nest categories.
Add a canned message
- From the left menu, click Console Settings.
The Rep Console Settings page opens and displays by default. - At the top of the page, click Canned Messages.
The Canned Messages page displays. - Click + Add above the canned messages list.
The Add a Canned Message page displays. - Enter a unique Title to help identify this message. This name should help representatives locate the message they wish to send.
- Enter the Message to create the text that will display in the customer chat. You can use BBCode to do some low level formatting, such as adding bold, colors, or hyperlinks. Click on Supported BBCode Formatting to display a list of codes and their resulting applications.
Messages should be relatively short so they can be viewed without much scrolling in the customer client windows. This applies to both the native client and click-to-chat modes.
-
Select the Category under which this item should be listed.
-
Select the Team availability which support teams should be able to use this item.

Edit a canned message
- From the left menu, click Console Settings.
The Rep Console Settings page opens and displays by default. - At the top of the page, click Canned Messages.
The Canned Messages page displays. - Locate the canned message you want to edit from the list.
- Click
 .
.
The Edit Canned Message page displays. - Edit the canned message details. The details you can edit are the same as the Add a Canned Message page detail.
- Click Save at the top of the page.
Delete a canned message
- From the left menu, click Console Settings.
The Rep Console Settings page opens and displays by default. - At the top of the page, click Canned Messages.
The Canned Messages page displays. - Locate the canned message you want to delete.
- Click
 to delete the canned message.
Add canned messages categories
- From the left menu, click Console Settings.
The Rep Console Settings page opens and displays by default. - At the top of the page, click Canned Messages.
The Canned Messages page displays. - Click + Add above the canned messages categories list.
The Add Category page displays. - Create a unique Name to help identify this category. This name should help representatives locate the message they wish to send.
- Optionally, select a Parent category to nest categories.
- Click Save at the top of the page.
Edit canned messages categories and view linked child categories and messages
- From the left menu, click Console Settings.
The Rep Console Settings page opens and displays by default. - At the top of the page, click Canned Messages.
The Canned Messages page displays. - Locate the canned message category you want to edit.
- Click .
The Edit Category page displays. - Edit the canned message details. The details you can edit are the same as the Add Category page details.
- View names of and links to any child categories.
- View links to any messages in this category.
- Click Save at the top of the page.
Delete a canned message
- From the left menu, click Console Settings.
The Rep Console Settings page opens and displays by default. - At the top of the page, click Canned Messages.
The Canned Messages page displays. - Locate the canned message category you want to delete.
- Click to delete the canned message category.
