Atlas cluster guide | RS
BeyondTrust Atlas Technology is intended for large enterprise customers performing more concurrent sessions than can be effectively or efficiently handled by a single existing B Series Appliance model. Atlas Technology allows a support organization to be effectively dispersed over different geographical locations and to support a global user base. Essentially, Atlas Technology enables large support organizations to scale horizontally across multiple B Series Appliances rather than vertically on a single B Series Appliance.
Creating a clustered Remote Support environment introduces new terminology: the primary and traffic node concept. The primary node serves as the main point of configuration for the site and also serves as the session initiation point of presence for the entire Remote Support deployment.
A Remote Support administrator accesses the primary node to create a cluster and define the structure of the traffic nodes and method of choosing a traffic node for a client connection. In addition, all configuration of the Remote Support site is handled on the primary node. So even though a cluster consists of multiple B Series Appliances, the /login administrative interface resides on the primary node and propagates most configuration settings to the traffic nodes automatically. The traffic nodes retain a /login interface on each respective B Series Appliance; however, the respective B Series Appliance has limited configuration settings available.
Licenses are designated for the site as a whole, and license utilization is not affected by the fact that there are multiple B Series Appliances involved.
All reporting is handled by the primary. The session recordings reside on the respective traffic node where a customer client connects; however, when requesting to view any of the recordings, a dynamic link allows expected Remote Support reporting behavior just as if the recording resided on the primary itself.
For information on Atlas in the Cloud, see Use BeyondTrust Atlas in the cloud.
Benefits
A key benefit of clustering via BeyondTrust Atlas Technology is the ability to distribute a site geographically. This is especially valuable for organizations with users across multiple regions or a global presence. For example, if a customer support request originates in Sydney and a traffic B Series Appliance residing in Australia handles the support session, then the support experience is more responsive and efficient. This is because most session traffic remains local to the B Series Appliance in Australia, rather than being routed through a traffic node in New York, which would increase latency by requiring data to travel back and forth between locations.
Technical impact
In a clustered environment, all Remote Support traffic originates by first talking to the primary node. The representative console is downloaded from the primary node, and authentication into the representative console takes place against the primary node. Thus, any external authentication providers that need to be configured in your environment are done at the primary node level.
Initiating an attended support session is still done in the same method as a non-clustered environment. The public portal for your support site resides on the primary node B Series Appliance. From here, a customer can choose from the representative list, enter a session key, or use issue submission. Session initiation always occurs through the primary node and then bridges with the appropriate traffic node once the session is initiated.
Administrators control and define how a traffic node for a representative or customer client is chosen. The representative and customer independently bind to their own traffic nodes. Each may bind additionally to the other's traffic node depending on what is occurring within the session. If screen sharing is initiated, then the representative binds to the traffic node that the customer client is bound to, in order to receive the traffic stream that contains the actual screen sharing information.
Likewise, if the representative shares their screen within the session and chooses to send a file from their machine to the customer via the chat interface, then the customer client binds to the traffic node of the representative in order to receive the incoming file or to view the representative’s screen. When a representative transfers a session or if a session is shared between representatives, then the incoming representative binds to the traffic node of the customer in order to view the customer’s screen. All of this coordination between traffic nodes and clients is controlled by the primary node and happens automatically in the background.
When deploying Jump Clients in a clustered environment, the Jump Clients are initially deployed from, and communicate with, the primary node. Once deployed, they resolve a priority list of traffic nodes based on the site's currently set connection method. Jump Clients reconnect and use a traffic node to obtain future updates and to proxy communications to the primary node. This allows more Jump Clients to upgrade at once, and additionally allows the primary node to handle sessions and normal traffic with less customer impact during the process. If a Jump Client is unable to connect to its preferred traffic node, either due to capacity or an outage event, it falls back to another traffic node, or to the primary node if no traffic nodes are available.
As mentioned, all reporting is done from the primary node /login interface. The actual session recordings reside on the traffic node B Series Appliance that the customer client had bound to. If an aggregate, off-B Series Appliance session log store including session recordings is needed, a BeyondTrust Integration Client must be configured to talk to the primary node B Series Appliance and must be able to reach all traffic node B Series Appliances in the cluster.
Representatives using a mobile console to provide support always bind to the primary node. Similarly, customers using a mobile customer client always bind to the primary node.
Prerequisites
You must meet certain prerequisites before you can set up your BeyondTrust cluster.
-
Two B300, B400, or RS Virtual Appliances
These B Series Appliances act as the primary nodes. One will be designated the primary node and the other will be a backup primary node. Both primary nodes must match same B Series Appliance type: B300 to B300, B400 to B400, or RS Virtual Appliance to RS Virtual Appliance. Your need for scalability, capacity, and redundancy will determine B Series Appliance needs.
-
One B300/B400/RS Virtual Appliance traffic node per geographic region in a minimum of two regions
Traffic nodes can be a mix of B300, B400, and RS Virtual Appliances, as long as they are appropriately sized to handle the traffic. For recommended sizing, see Virtual Appliance licensing and sizing conditions.
-
Support site hostname
This is the hostname that customers will visit to initiate support. This hostname must route to the primary node in the cluster.
-
Canonical node hostnames
You must have a unique and unchanging hostname for each primary and traffic node. For geographic deployments, consider using the geographic region as part of the hostname. These hostnames should be registered in both the internal and external DNS. Here is an example:
- Primary : primary1.support.example.com
- Backup Primary : primary2.support.example.com
- Traffic Node 1: us-traffic1.support.example.com
- Traffic Node 2: us-traffic2.support.example.com
- Traffic Node 3: asia-traffic1.support.example.com
-
Valid SSL certificate for the BeyondTrust Remote Support site and for each traffic node
- The appliances only verify communication from a commercial CA-signed SSL certificate. The use of an internal CA certificate is not supported.
- The certificate needs to be identical between appliances and cover all nodes, so either a certificate with all nodes names in the SAN or a wildcard certificate.
- If a new node is added and they do not use a wildcard they need to update the certificate with the new node hostname and upload it to all appliances.
-
TCP port 443 open bi-directionally on all B Series Appliances
All B Series Appliances must be able to communicate over TCP port 443.
Considerations
Public vs internal hostnames
You may optionally configure different hostnames for public traffic and private traffic per cluster node. This means you need two different hostnames for each node in the cluster, one for the Public Address and one for the Internal Address. All client connections (e.g. representative console, customer client, etc.) use the public address. All appliance-to-appliance communications (e.g. cluster data syncs) use the internal address. This is useful if you want to keep traffic among B Series Appliances on a different network route than session traffic.
Network address prefixes
If you plan to use the Network Address Prefixes on the /login > Management > Cluster > Traffic Nodes page, then you must define the networks that this traffic node will serve.
Glossary
| Atlas | The BeyondTrust technology which enables B Series Appliances to be deployed in a cluster. |
|---|---|
| Cluster | The collective representation of all B Series Appliances that are participating in the same BeyondTrust environment. |
| Primary Node | The node where a majority of the configuration takes place, such as creating users, defining public sites, configuring support teams, defining traffic nodes, etc. Essentially, everything that you would typically do in a single B Series Appliance BeyondTrust installation /login interface will be done through the designated primary node for your clustered environment. |
| Backup Primary Node | This node is in a configured failover relationship with the primary node. In the event of a system failure on the primary node, the backup node can take over the role as primary node. |
| Traffic Node | This node normally handles the bulk of session traffic for the representative console and the customer client. Both the representative console and the customer client bind to a traffic node, as well as the primary node, during a session. The traffic node that is chosen will be determined by the various configuration options. |
| Inter-appliance Communication Pre-shared Key | This is a password that must be set on all of the B Series Appliances participating in a cluster. This key must match between B Series Appliances in order to replicate information between them and to allow them to participate in the cluster. |
Pre-shared key
This step can be performed only after all B Series Appliances are configured.
Perform the following steps on all nodes in the cluster:
- Go to the /login > Management > Security page. Scroll down to the Miscellaneous section.
- Enter a secure password into the Inter-appliance Communication Pre-shared Key field. This password must match among all nodes.
- Click the Save button.
Atlas cluster setup
Primary node
The following steps are required to configure the primary node. First, you must choose which B Series Appliance will serve as the primary node. Unless the deployment is for a small number of representatives, the primary node will ideally be a B400 B Series Appliance. A second, matching backup will need to be used for the pairing of the primary role in a failover relationship. Information on configuring the B Series Appliance for failover is available in the Failover guide document.
Since the primary node will play a role in every support session, the network in which that primary node resides should be a central location in relation to your network as a whole.
Once you have planned where your primary node will reside physically, the next step is to confirm the name of your support site. This hostname will serve as the central hub, essentially, where your customers will come seeking support (e.g., <http://support.example.com>). You will also need to have a canonical hostname registered in your DNS environment for each B Series Appliance in the cluster.
The primary node will also have the capacity to handle support sessions just as does a traffic node. If there are network or environmental conditions disrupting the availability of a traffic node (from a client’s point-of-view) then a support session can fall back to the primary B Series Appliance. In this scenario, the primary B Series Appliance will handle all aspects of the session without utilizing a traffic node. An administrator can set how many concurrent sessions can fall back to the primary B Series Appliance at any given time.
Setup
Perform the following steps on the primary node:
-
Go to /login > Management > Cluster.
-
Look at the Primary Node Configuration section.
-
Enter the following information in the Primary node section:
-
Name: Enter a name that you will use to remember this node in the cluster. This name must be unique among all nodes in the cluster.
-
Public Address:
- Enter the node hostname that you set up in DNS for this node. This should be the canonical hostname unique to the primary node, not the primary hostname for the entire cluster (e.g., primary.example.com, not support.example.com).
- Enter the port over which clients will communicate with the node. This will usually be port 443.
-
Internal Address: This can be the same as the public address. Advanced configurations can optionally set this to a different hostname for inter-appliance communication.
While IP addresses are recommended for failover setups, BeyondTrust does not currently support IP address usage for Atlas clusters. All primary nodes (primary and failover) as well as traffic nodes should use their unique node hostnames. They should NOT use the primary public hostname of the entire cluster or their unique public and/or private IP addresses.
-
-
Click Create New Cluster.
If the primary B Series Appliance is in a failover synchronization with a backup primary, then the backup primary is added to the cluster automatically. If the primary node is put in failover with a new backup B Series Appliance, the new backup B Series Appliance is added to the cluster automatically, and the cluster settings are synced to the new backup during the process of establishing failover.
Traffic nodes
When adding a traffic node to your clustered environment, you define the name of that node as well as its canonical hostname. Also, you may associate specific networks with the traffic node. This essentially predetermines a client’s traffic node selection based on its network prefix mask. This type of configuration is more relevant for administrators who are deploying a clustered BeyondTrust site in a WAN environment.
One last configuration option available when initially defining a traffic node is the time zone offset of the B Series Appliance. This must be set if you plan to use the time zone offset method (which is discussed in more detail below) for clients deciding which traffic node to connect to.
After defining traffic nodes in your environment, you can decide on what process clients will use to determine which traffic node to connect to. BeyondTrust administrators have the following options to choose from:
Connection methods
| Method | Description |
|---|---|
| Time Zone Offset | The time zone offset process involves detecting the time zone setting of the client machine and using that setting to match the nearest available traffic node. The time zone offset is derived from the client machine’s time zone setting relative to Coordinated Universal Time (UTC). The time zone offset method is good for testing and can be used in production; however, a DNS-based solution would be a preferable method in a production environment. For environments where the time zone offset method is configured and a support session is initiated via the Session Generation API, the primary node redirects the customer client to the closest available traffic node. |
| IP Anycast | The IP Any Cast method uses a shared IP address among all traffic nodes and relies on the network infrastructure to return the "closest" traffic node to the client. If you are part of an organization that already has a global content delivery network in place, this may be a preferable option for you. IP Any Cast is a very robust solution but can be more complicated to implement and maintain. However, if you have this type of infrastructure in place, this will be your best method for customer and representative client traffic node selection. |
| A Record | The A record method instructs clients to attempt to connect to a specified (shared) hostname and rely on the DNS configuration to return the appropriate IP address of the traffic node for connection. This method can be utilized within an environment where you have complete control of the DNS resources that all of your customers will be using. Also, there are third party DNS providers that can provide this service for you. With this method, you could have an A record defined for trafficnodepicker.example.com. For your customers in the US who use DNSserver01, the A record points to IP address 1.1.1.1. For your customers in Europe who use DNSserver02, the A record for trafficnode01.example.com resolves to 2.2.2.2. |
| Random | The random method randomly chooses which nodes a client will connect to. This method will most likely be used if you have taken the time to accurately define all the network prefixes for each respective traffic node. If a client’s network doesn’t match any of the predefined networks on any of the participating traffic nodes, then the client will be assigned a random traffic node at the discretion of the primary node. This method is simple and inexpensive, and it enables you to rely on the network prefix defined for each traffic node. However, if your clustered environment spans multiple regions or the globe and your network prefixes are left undefined, this method could yield less than desirable results. |
| SRV Record | The SRV record method is very similar to the A record process in that traffic node selection relies on the underlying DNS infrastructure to determine which node to connect to. The main difference between the two methods is that SRV records have the ability to assign a weight and priority to a specific host entry. The advantage that this gives you is a method for providing load balancing and backup service at the network level. Note that this method requires that you have control over the DNS infrastructure that your clients will be using. If you are deploying in a WAN environment, the use of SRV records is probably already a common practice which you can leverage to provide an extra layer of redundancy and load balancing to your clustered BeyondTrust environment. |
Setup
For each traffic node that you want to have in your BeyondTrust cluster, perform the following steps on the primary node:
Go to /login > Management > Cluster.
-
Navigate to the Traffic Nodes section.
-
Click Add New Traffic Node.
-
Enter the following information on the Add Traffic Node page:
-
Accepting New Client Connections: Be sure this is checked; otherwise, clients will not use the traffic node. As soon as this option is checked, the new setting takes effect automatically via Ajax scripting, and all new BeyondTrust customer client connections are routed to the affected traffic node per the Atlas cluster configuration.
-
Name: Enter a name that you will use to remember this node in the cluster. This name must be unique among all nodes in the cluster.
-
Timezone Offset: This is used only if the method for choosing traffic nodes is set to Timezone Offset. This process involves detecting the time zone setting of the machine hosting the client and using that setting to match the appropriate traffic node which has the closest time zone offset. The time zone offset is derived from the customer time zone setting relative to Coordinated Universal Time (UTC). For countries or zones that use Daylight Saving Time (DST), enter the currently active time zone for the node in question. The cluster offsets for DST automatically.
-
Public Address:
- Enter the node hostname that you set up in DNS for this node.
- Enter the port over which clients will communicate with the node.
-
Internal Address: This can be the same as the public address. Advanced configurations can optionally set this to a different hostname for inter-appliance communication.
-
Network Address Prefixes: When this field is populated, the primary node attempts to assign a client to this traffic node if the client's IP address matches one of the network address prefixes. If the client's IP address matches more than one traffic node's network address prefixes, the client is assigned to the traffic node with the longest matching prefix. If the matching prefixes are of equal length, one of the matching traffic nodes is chosen at random. If a client's IP address does not match any network address prefixes, the client is assigned using the method configured on the main Cluster page.
Enter network address prefixes, one per line, in the form of ip.add.re.ss[/netmask]. Netmask is optional and can be given in either dotted-decimal format or as an integer bitmask. If netmask is omitted, a single IP address is assumed.
You may leave this field blank.
-
-
Click Save.
Methods for choosing traffic nodes
After defining traffic nodes in your BeyondTrust Atlas Technology environment, you can decide on the process which clients use to connect to them.
Session initiation always occurs through the primary node and then bridges with the appropriate traffic node. Administrators control and define how a traffic node for a representative console or customer client is chosen using the Method for Choosing Traffic Nodes dropdown in the primary node. Once a node is chosen, the primary node usually provides the unique DNS address of the respective traffic node to the client software. The only traffic node setting where an IP address would be specifically provided would be when using the IP Anycast selection method.
If the network prefixes are defined, the Method for Choosing Traffic Nodes setting will be overridden.
The available methods for defining the connection are:
-
Random: Randomly chooses the node to which a client will connect.
This method will most likely be used if you have taken the time to accurately define all network address prefixes for each traffic node. If a client's network does not match any of the predefined networks on any of the participating traffic nodes, then the client will be assigned a random traffic node. Each traffic node's network address prefixes should be well-defined so that client network matching will be automatic.
This method is simple and inexpensive and enables you to rely on the network prefix defined for each traffic node. However, if your clustered environment spans multiple regions and your network prefixes are left undefined, this method could yield less than optimal results.
-
SRV Record Lookup: Similar to A Record Lookup, SRV traffic node selection will rely on the underlying DNS infrastructure to determine the node to connect to. The main difference between the two methods is that SRV records have the ability to assign a weight and a priority to a specific host entry. The advantage that this gives you is a method for providing load balancing and backup service at the network level.
Note that this method requires that you have control over the DNS infrastructure used by your clients. If you are deploying in a WAN environment, the use of SRV records is probably already a common practice which you can leverage to provide an extra layer of redundancy and load balancing to your clustered BeyondTrust environment.
-
A Record Lookup: Instructs clients to attempt connection to a specified (shared) hostname and rely on the DNS configuration to return the appropriate IP address of the traffic node for connection.
This method can be used within an environment where you have complete control of the DNS resources which all of your customers will be using. For instance, you could have an A record defined for traffic1.support.example.com. For your customers in the US who use DNSserver01, the A record points to IP address 1.1.1.1. For your customers in Europe who use DNSserver02, the A record for traffic1.support.example.com resolves to 2.2.2.2.
-
IP Anycast: Uses a shared IP address among all traffic nodes and relies on the network infrastructure to return the nearest traffic node to the client.
If you are part of an organization that already has a global content delivery network in place, this may be a preferable option for you. IP Anycast is a robust solution but can be complicated to implement and maintain. However, if you already have this type of infrastructure in place, this will be your best method for customer and representative client traffic node selection.
-
Timezone Offset: A simple and inexpensive method for configuring a BeyondTrust cluster.
The time zone offset process involves detecting the time zone setting of the machine hosting the client and using that setting to match the appropriate traffic node which has the closest time zone offset. The time zone offset is derived from the customer time zone setting relative to Coordinated Universal Time (UTC). The time zone offset method is good for testing and can be used in production. Specifically, in cases where multiple traffic nodes are located in the same time zone, this method may not be the most effective solution. A DNS-based solution would be the preferable method in a production environment.
For environments where the time zone offset method is configured and a support session is initiated via the Session Generation API, the primary node redirects the customer client to the closest available traffic node.
Example: using a DNS A record for traffic node selection
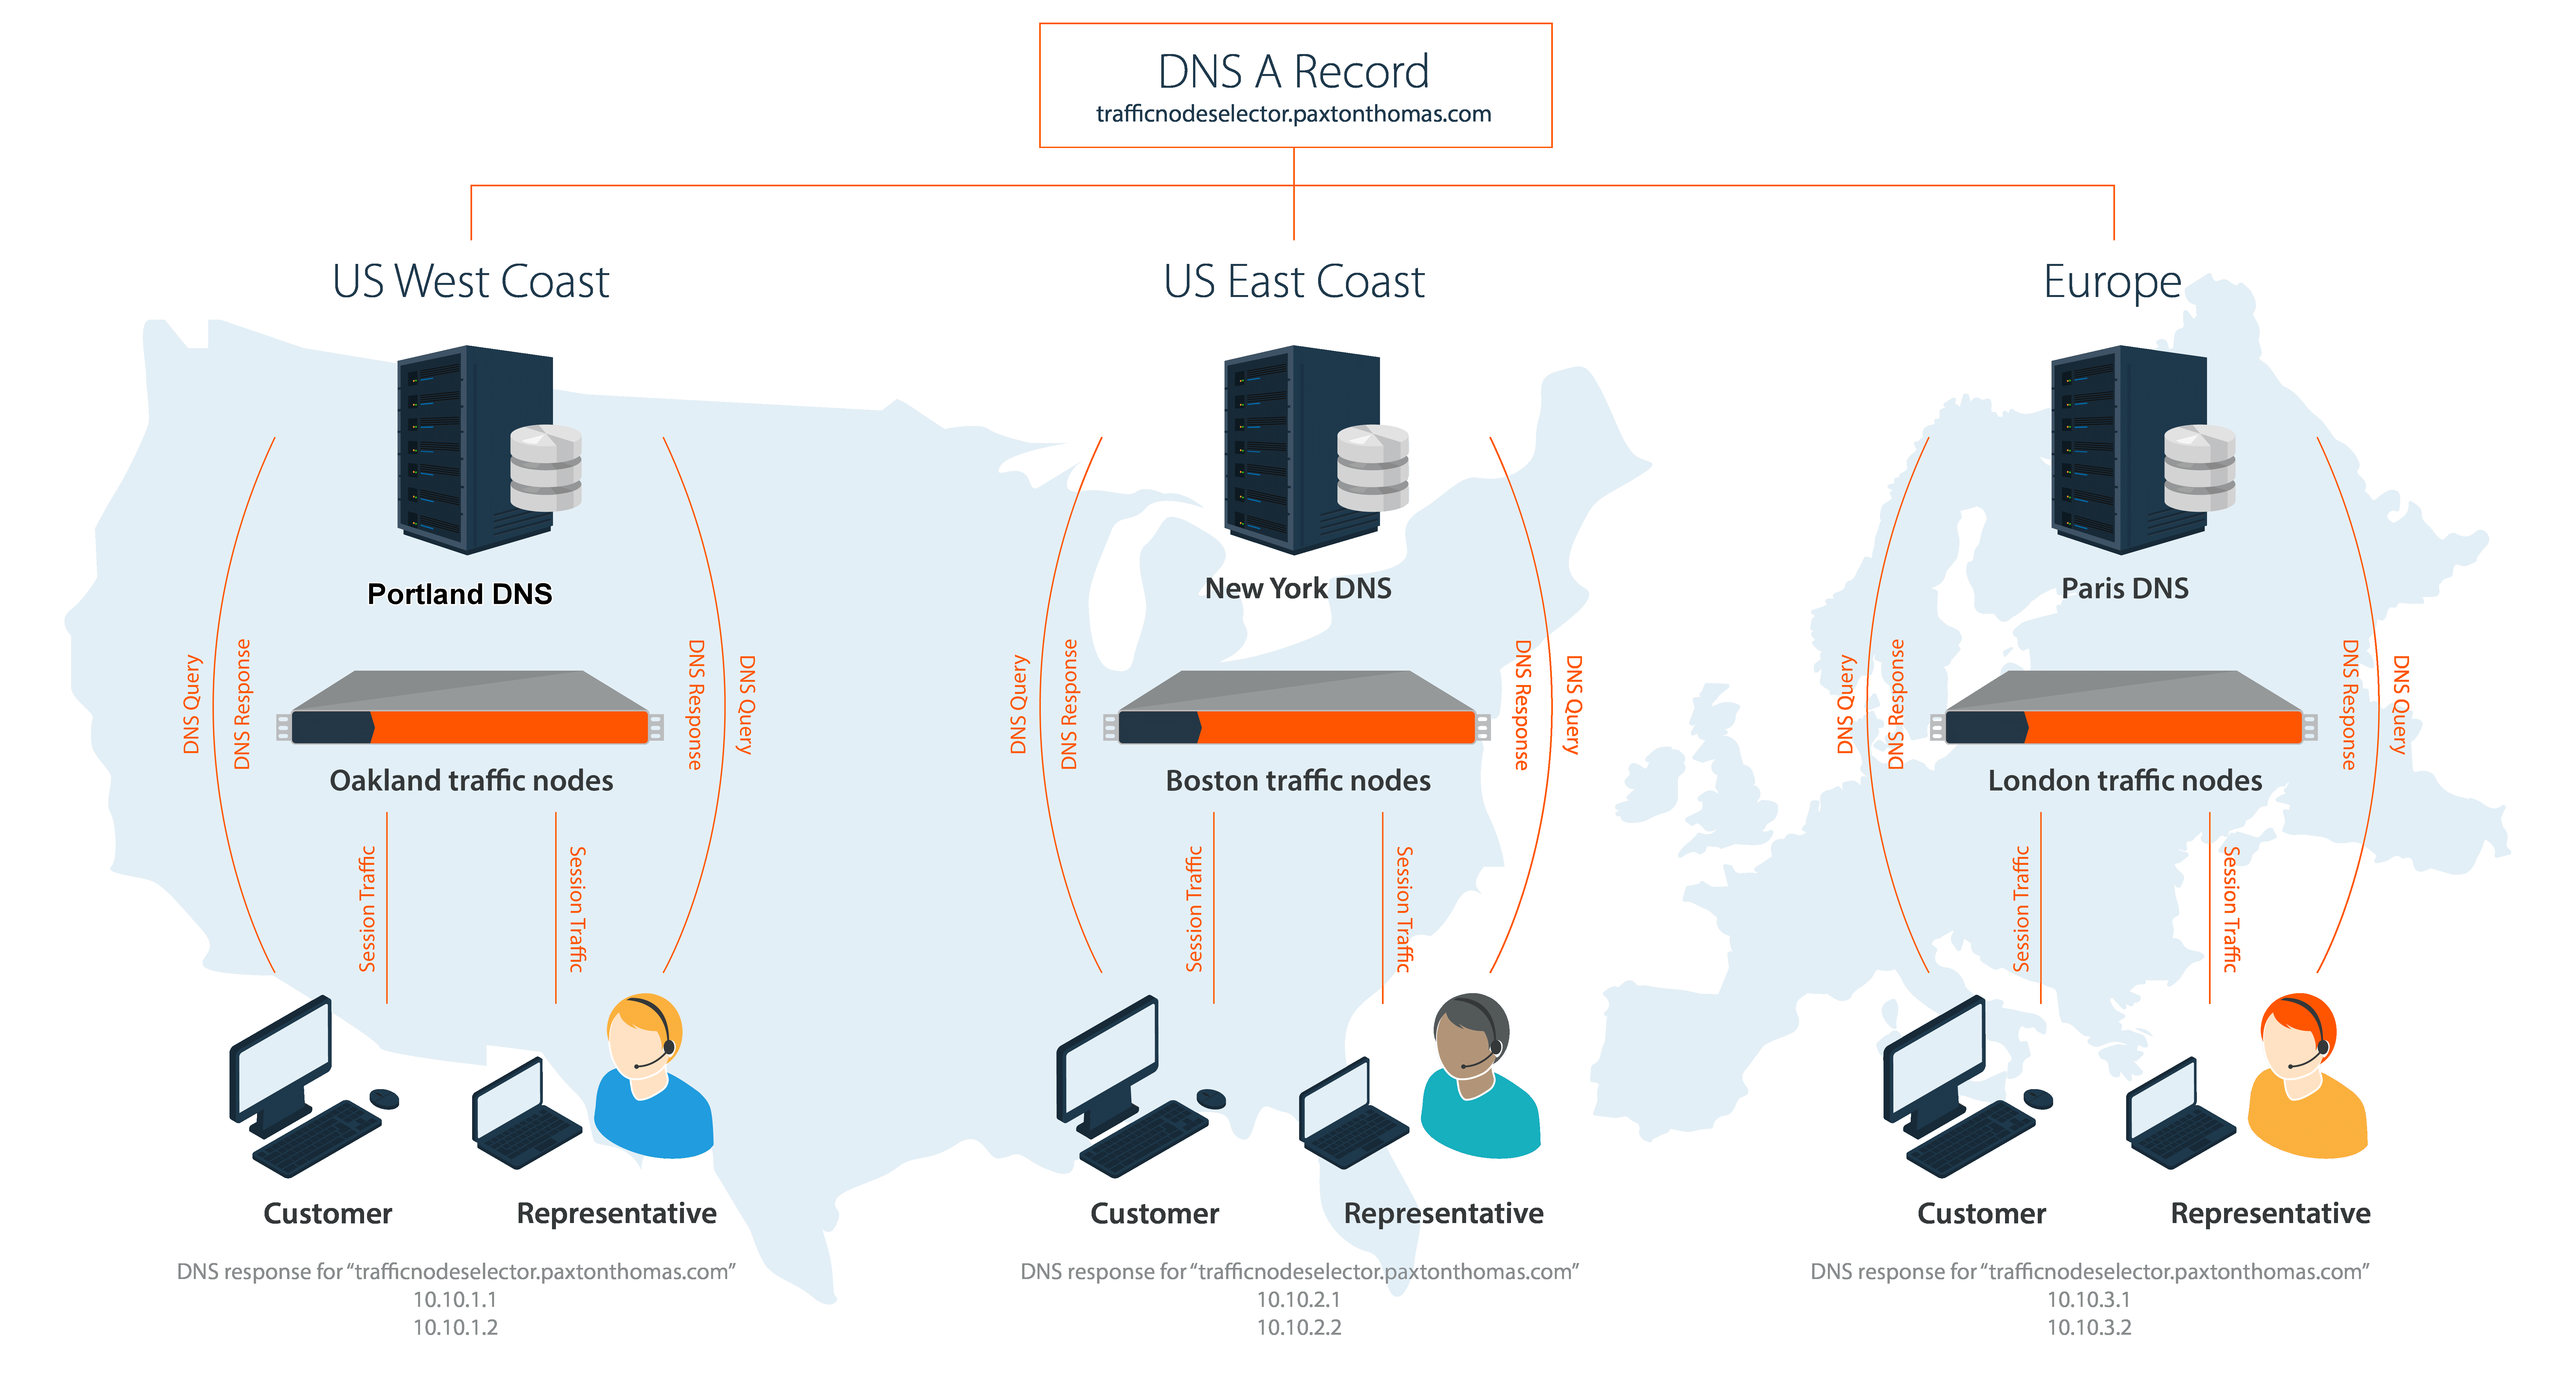
In this example clustered configuration, we use a different traffic node selection method. The Paxton Thomas support organization has subscribed to a third-party DNS solution provider. The DNS provider provides hosting for the paxtonthomas.com domain and also has a special offering that allows Paxton Thomas to create a single A record that utilizes their traffic management functionality, which essentially determines where a DNS request should be routed.
Node selection in action
The third-party DNS provider has DNS servers strategically placed in the different geographic locations throughout the US, Europe, and Asia. BeyondTrust creates an A record for the name of trafficnodepicker.paxtonthomas.com and within the DNS management interface specifies the IP address of each traffic node that is in the specific region for each DNS server.
For example, on the DNS servers that are responsible for the "US East Coast" region and physically reside in New York, the server resolves the DNS name trafficnodepicker.paxtonthomas.com to one of the two IP addresses for the B Series Appliances located in the Boston datacenter. Likewise, the DNS server responsible for regions in Europe and physically residing in Paris resolves the DNS name trafficnodepicker.paxtonthomas.com to one of the two IP addresses for the B Series Appliances located in the London datacenter.
This traffic node selection process works well. However, it does require more administrative overhead to maintain the DNS infrastructure. Also, there exists a potential for additional cost when utilizing a third party to host DNS. So, when choosing which method to pursue for your traffic node selection process, it is important to consider factors external to your BeyondTrust environment, which may increase cost and complexity to maintain your clustered environment.
Example: using time zone offset for traffic node selection
An example of a BeyondTrust clustered deployment that uses time zone offset traffic node selection is the Paxton Thomas support organization, http://support.paxtonthomas.com. Representatives are located in different geographic locations: Boston, Oakland, and London. Paxton Thomas has datacenters in Dallas, Oakland, Boston, and London. Paxton Thomas chooses the Dallas datacenter as the location for the primary node based on its available resources, such as rack space, adequate power and cooling, sufficient bandwidth, and its central location.
Primary node selection and setup
Paxton Thomas chooses a B300 B Series Appliance to serve as their primary node, as they will have less than 300 concurrent logged in representatives at one given time. Paxton Thomas’s failover strategy is to place a second B300 in its Boston datacenter to serve as the backup primary node for the cluster. Therefore, if there is a total outage in the Dallas datacenter, operations can fail over to the backup primary located in Boston. Since the primary and backup B Series Appliances reside on different network segments, Paxton will be required to use either the DNS or NAT swing approach as part of its failover process.
Traffic node considerations
After deciding where the primary and backup nodes will reside, Paxton Thomas then examines where the majority of the customers being supported are located. After reviewing historical trends of closed support tickets, it is evident that a majority of the sessions are confined to either the east or west coast, with the remaining sessions located in either the central US or in Europe.
Based on this information, Paxton Thomas decides to place two traffic nodes in the Oakland data center, two traffic nodes in the Boston data center, and finally two nodes in the London data center. Each traffic node is assigned a unique hostname, and the time zone offset for each respective B Series Appliance is set according to its physical location. Once the traffic nodes are deployed, configured, and have joined the cluster, the setup is complete.
Node selection in action
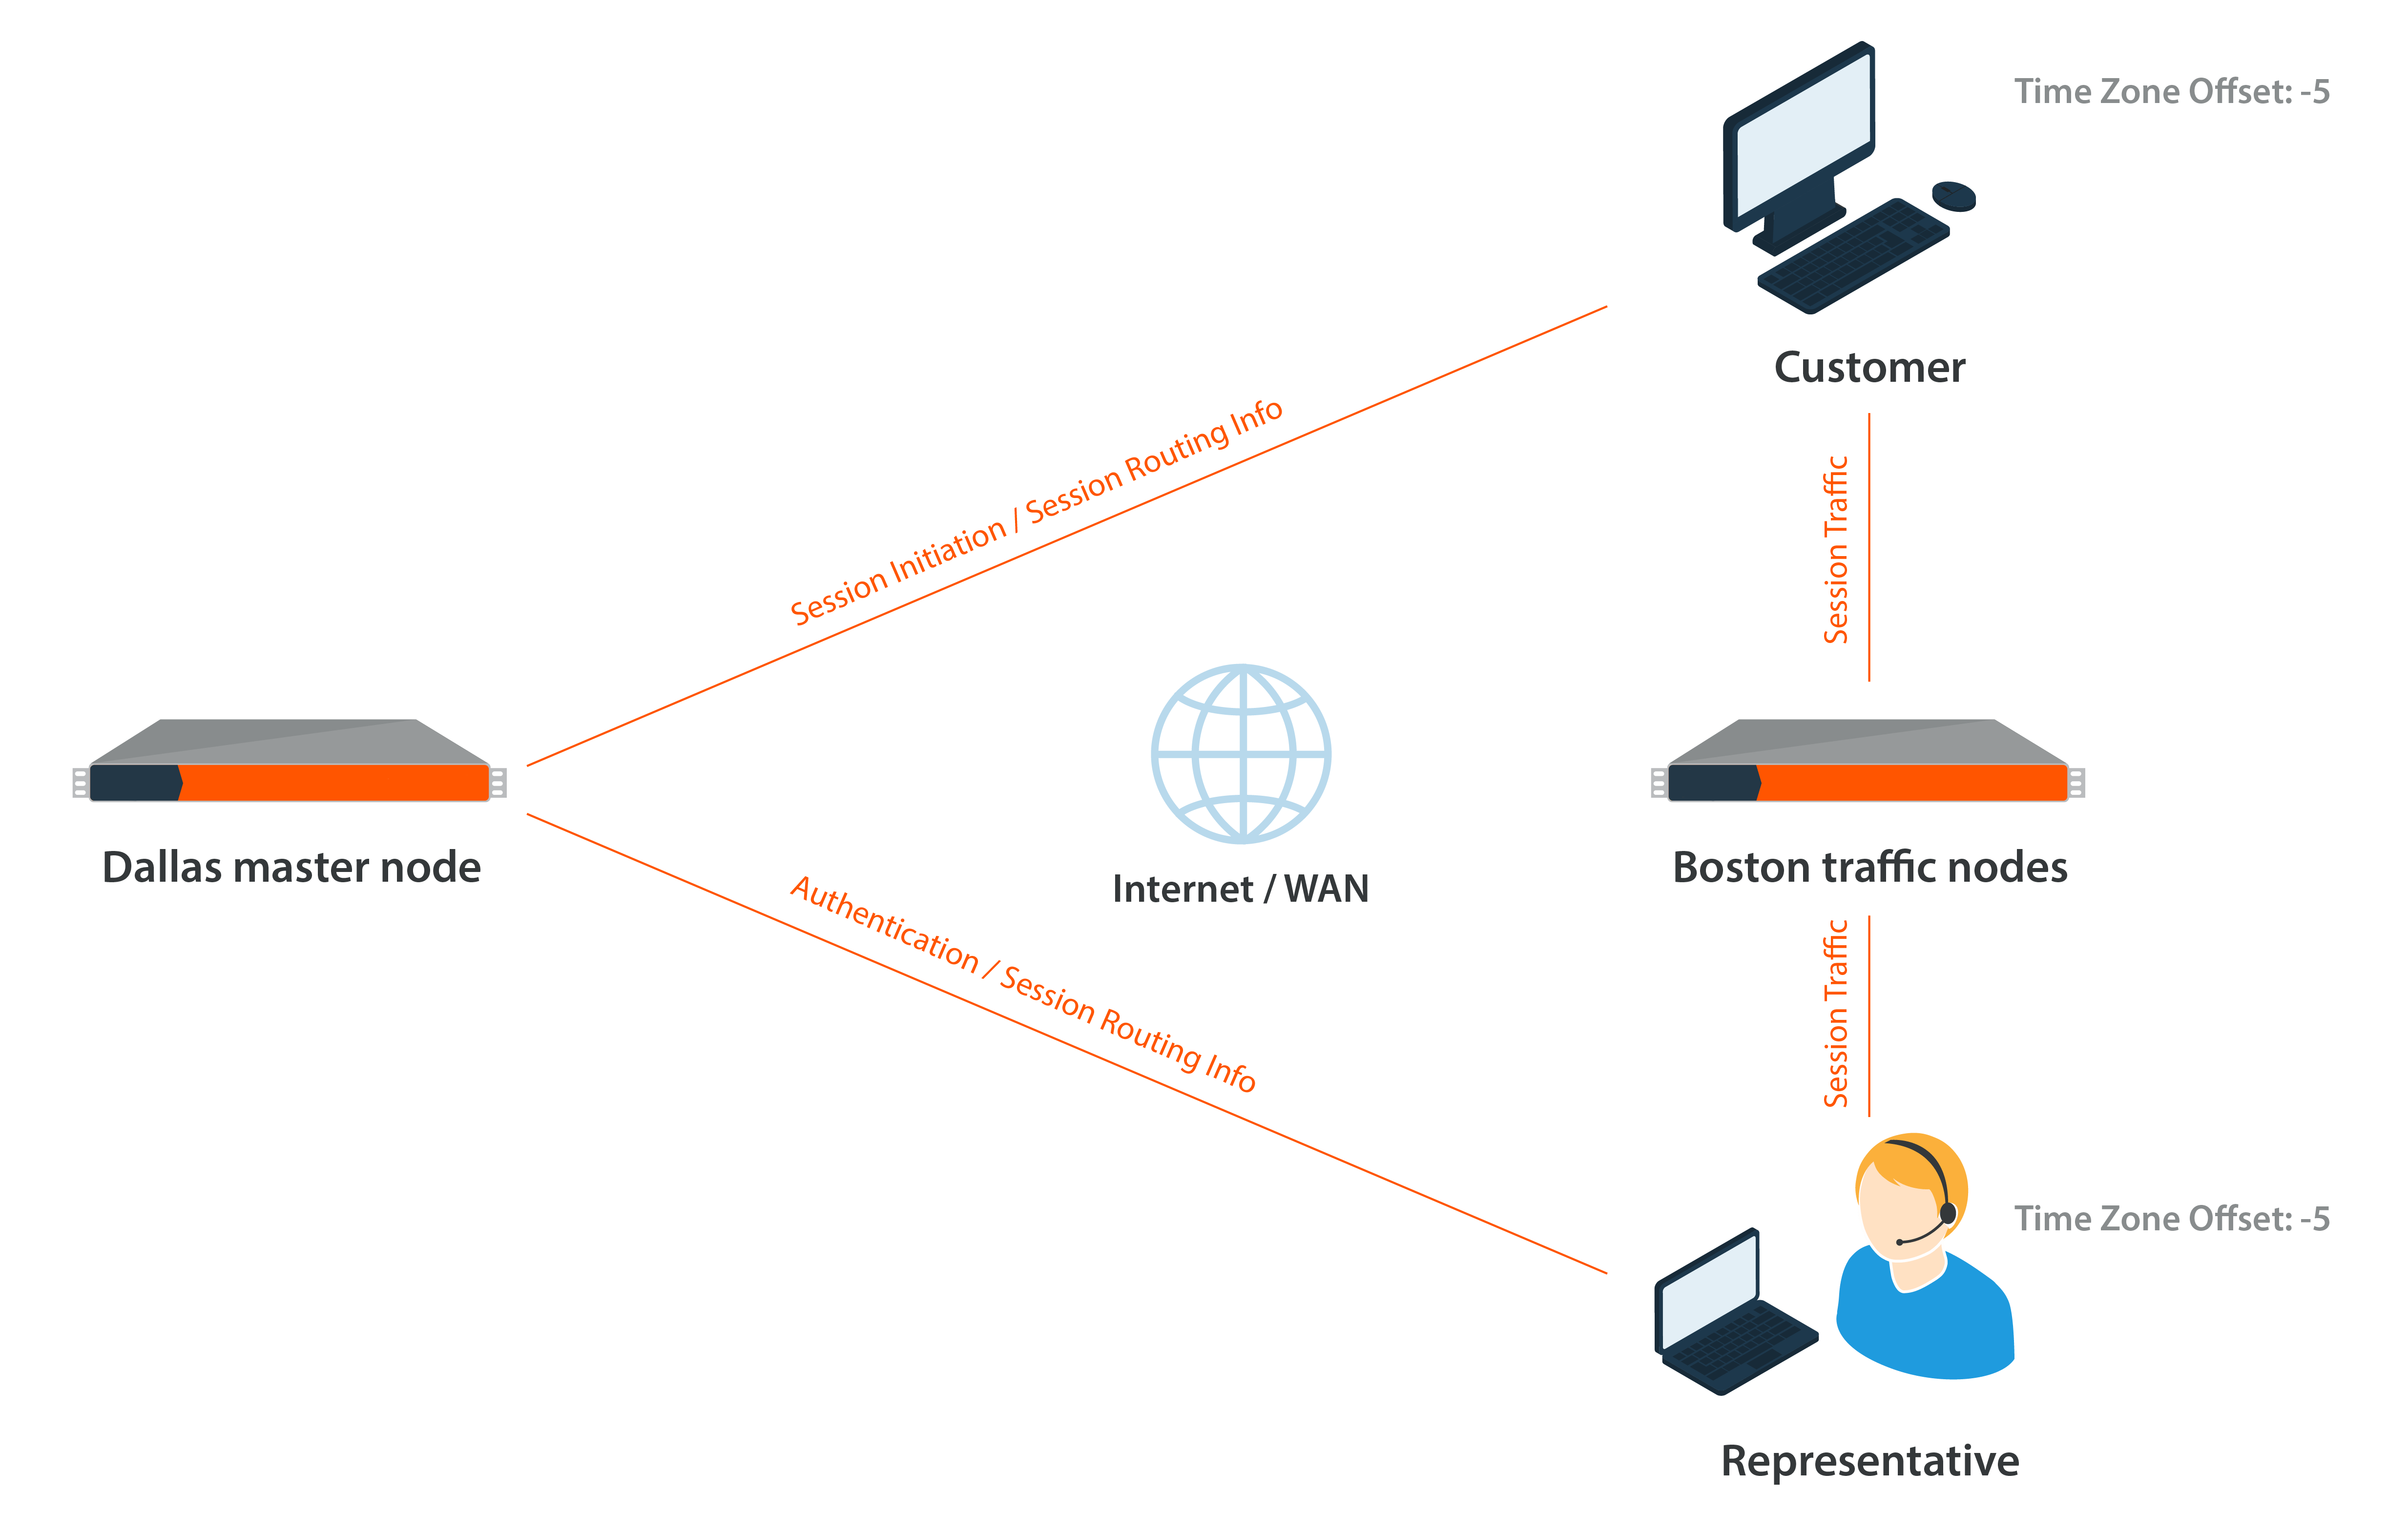
With the clustered configuration completed, the Paxton Thomas support organization is now ready to take support sessions. A Paxton Thomas support representative logs into the representative console (authentication is taking place against the primary), and the console detects that the time zone offset on the representative’s computer is -5, which means this representative is in the eastern time zone and, for this example, is based out of the Boston office. The primary tells the representative console to connect to one of the two traffic nodes in the Boston datacenter using the hostname for one of the two traffic nodes. Both of these nodes have the same time zone offset setting as the representative (-5), so the primary directs the representative to the less busy node.
The logged in representative now receives a call from a customer in Atlanta. The representative emails a session key to the customer, taking them to the http://support.paxtonthomas.com site, which resides on the primary node B Series Appliance in Dallas. Prior to the installation of the customer client, the time zone offset of the customer is determined (in this scenario, it is -5). The primary node determines that the closest traffic node for this specific customer is one of the two traffic nodes in the Boston datacenter, as they also have a -5 time zone offset. Therefore, the primary node chooses one of the two Boston traffic nodes from which to download the customer client, the client connects to that traffic node, and the session is initiated.
In this scenario, the representative has a connection to the primary node and the designated traffic node in Boston. The customer client has a connection to the primary B Series Appliance in Dallas as well as connection to a traffic node in Boston. Throughout the session, the primary node coordinates the traffic between the traffic nodes being used to conduct the session. The bulk of the session traffic takes place at the traffic node level, such as screen sharing and file transfer, while the connections from both the representative and the customer to the primary contain small pieces of information that coordinate the actions between traffic nodes and create the session log. The video of the session recording resides on the traffic node that the customer client is connected to. In this example, the video recording resides on the traffic node in Boston.
Atlas cluster data-sync
After you have configured the other settings on the site, you must perform a cluster data sync to make sure the traffic nodes have the same configuration.
When a cluster sync is performed, all configuration data in /login is synced with the traffic nodes, and the failover primary syncs via the failover configuration. The latter is controlled from the failover configuration settings. After the initial sync, subsequent synchronization should be performed when changes are made to the /login > Management > Cluster page and/or the /login sync warning message appears, prompting you to perform the cluster sync.
Perform the following steps on the primary node to do a cluster data sync:
- Go to /login > Management > Cluster.
- Click Sync Now.
- Wait for the sync to finish.
- Check the Status History table to see if the sync succeeded.
After the initial sync, subsequent syncs are also manual. These should be performed as part of regular maintenance.
Atlas cluster test
This step is optional for your deployment.
Given the extreme flexibility of BeyondTrust's Atlas technology, it is impossible to give a detailed and rigorous set of testing steps which will apply in all cases, but a general process with guidelines and expected behaviors should allow administrators to develop more detailed test procedures specific to their environments.
Review the planning process
An Atlas deployment revolves around the primary B Series Appliance routing client traffic to various nodes. Therefore, testing an Atlas cluster involves three basic steps:
- Identify which node should be expected to handle any given client connection.
- Run one or more test connections using BeyondTrust software from the Atlas cluster.
- Check which traffic node a given test client connects with.
The following sections explain how to plan and implement a testing methodology based on these steps.
Identify the expected node
The traffic node chosen to handle any given client connection is based on the Method for Choosing Traffic Nodes setting. The current setting can be checked from the /login > Management > Cluster page of the BeyondTrust interface. The first steps of any test, therefore, are to verify the current settings and status of the cluster. To do this, perform the following steps on all traffic nodes in your BeyondTrust Appliance B Series cluster.
- Log in to the /login interface as an administrator.
- Go to /login > Management > Cluster.
- Verify the configuration details and review the status history.
Depending on the settings, it is possible to artificially route new connections to different traffic nodes by modifying the settings of the client's local host. For example, if Method for Choosing Traffic Nodes is set to Timezone Offset and the local host's timezone setting is modified such that it matches the timezone offset of the desired traffic node, new BeyondTrust client connections made from the modified host will go to the desired traffic node.
Apart from modifying host settings per the Method for Choosing Traffic Nodes setting, it is also possible to simply hard code the network prefixes of the appropriate client hosts into the configuration of the respective traffic node. Once done, clients on the given networks will always route to the traffic nodes assigned to those networks regardless of which method is being used for choosing traffic nodes. This configuration is done from the Edit Node option in the cluster configuration page of the primary node. Simply enter the network prefixes in the Network Address Prefixes field of the traffic node to override the extant method for choosing traffic nodes.
Run test connections
In general, all BeyondTrust Clients are always connected to the primary node while they are online. Once a session is started, the client makes an additional connection to the appropriate traffic node (its home traffic node) based on the cluster configuration logic. In addition, the representative console involved in the session will make a third connection, which is to the home traffic node of the remote client involved in the session. Finally, if the representative uses Show My Screen during the session, the remote client makes a connection to the representative's home traffic node.
For example, if a representative in the US remotely connects to a customer in EMEA, the customer client in EMEA connects to the primary and the EMEA traffic node (its home traffic node). The representative console connects to the primary and the US traffic node (its home traffic node). Once the representative starts screen sharing, the representative console also connects to the customer's traffic node in EMEA in order to receive the incoming stream of the customer's screen. Thus, the representative console is connected to the primary, its own home traffic node, and the customer's home traffic node.
To take the scenario one step further, if the representative starts Show My Screen with the customer, then the customer client in EMEA connects to the representative's home traffic node in the US to receive the stream from the representative.
Check connections
The API command get_connected_clients is the best way to gather details about which sessions are connected to any particular node. For details, see the API guide. However, if the total number of clients is small, you can use the Connected Clients table on the /login > Status > Information page of the BeyondTrust interface.
While all online clients always connect with the primary node, only active sessions show in the connected client list for a traffic node. If the traffic node itself goes offline during the session, then the session must be restarted; the reconnect always is attempted to the same traffic node. This reconnect logic is the same in an Atlas environment as a stand-alone B Series Appliance deployment.
Atlas FAQs
Is peer-to-peer functionality compatible with Atlas?
BeyondTrust Remote Support's peer-to-peer technology is compatible with Atlas deployments.
However, there are a few considerations when attempting to use peer-to-peer with an Atlas architecture.
How can BeyondTrust's peer-to-peer functionality be used in an Atlas-configured environment?
For Atlas deployments, BeyondTrust Remote Support can be configured to use either the BeyondTrust public STUN server, or the BeyondTrust Appliance B Series (primary node) can act as a STUN server for connections.
What impact will the availability of the STUN server have on the deployment?
If the BeyondTrust Appliance B Series (primary node) is used as the STUN server, the clients reach out to the primary node for session initiation. If the public BeyondTrust STUN server is used, the clients reach out to the public BeyondTrust STUN server for session initiation. Peer-to-peer connections are attempted like any non-Atlas deployment; however, the main difference is the connection falls back to a selected traffic node at session start if the connection attempt to the STUN server is unsuccessful.
Are there any special considerations for using the BeyondTrust Appliance B Series as a STUN Server in an Atlas environment?
The same firewall considerations apply for peer-to-peer in an Atlas deployment as in a non-Atlas deployment. The clients need to reach out to a STUN server, and in this case, the primary node acts as the STUN server when the BeyondTrust Appliance B Series is configured for this role.
Updated 10 days ago
