Collaboration and controls | RS for Web
Add a Support Button
From the console window, you can edit a Jump Client session and configure a Support Button to the remote computer, providing a quick method for your customers to request support.
-
From the console window, right-click a Jump Client session in the table grid.
The Edit Jump Client window displays.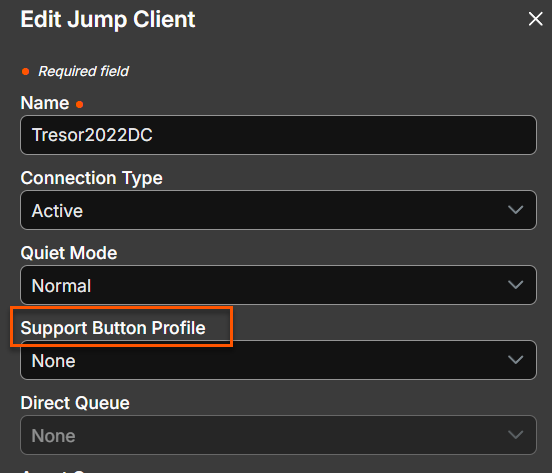
-
Choose a profile to apply to the Support Button Profile. Profiles are configured in /login > Configuration > Support Buttons.
-
Select the queue to which this Support Button should link. Once the Support Button is deployed, your customer can use it to directly enter the specified queue.
-
Set how long this Support Button should last. The customer can use this button to start sessions only as long as this specified time. This does not affect how long the installer remains active or how long a session can last.
-
After you have set the details for this Support Button, click OK. This creates a Support Button on the remote user's system. Your customer can now use the Support Button to quickly request support.
You also may delete the Support Button from the remote system by removing the support profile from the Support Profile Button option. When prompted to confirm that you would like to remove the Support Button from the customer's computer, click OK.
You cannot deploy a support button profile within a support session.
Pin a Jump Client
While in a session, you can pin a Jump Client to the remote computer, enabling later unattended access to that system. T
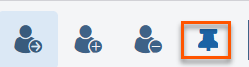
- Click the Pin the Jump Client button. This opens a menu to configure the Jump Client.
- From the list of available Asset Groups, select the group to which you wish to pin the Jump Client. Pinning the Jump Client to your personal list of Assets means that only you can access this remote computer through its Jump Client. You also can choose to pin the Jump Client to a specific Asset Group to allow access only to members of that group.
If you no longer need unattended access to the remote system, remove the Jump Client by clicking the Unpin the Jump Client button. When prompted to confirm that you want to uninstall the Jump Client, click Yes.
Elevate the session
When a session starts in click-to-chat mode, only chat is available. If you wish to have access to more robust support features such as screen sharing, you must elevate the customer client.
Similarly, if the downloaded customer client is running in user mode, you may not have the depth of access you need. You can elevate the customer client to run with administrative rights, as a system service. Elevating the customer client enables switching user accounts, deploying Jump Clients in service mode, and controlling protected windows and UAC dialog boxes. Elevation does not change the user context of the active user and is not the same as logging out the active user and logging back in as an administrator.
To elevate from a click-to-chat session to the full customer client, click the Run Full Remote Support Customer Client button in the center of the screen or the Elevate button at the top of the session window.
The customer is prompted to download and run the full customer client.
To elevate the customer client to have administrative privileges, click the Elevate button at the top of the session window. A prompt for administrative credentials appears.
To request the customer to provide administrative credentials for their computer, select Prompt Customer and then click OK.
Alternatively, if you possess administrative credentials to the remote computer, select Specific User to supply an administrative username and password, yourself. Then click OK.
In a Remote Desktop Services or virtual desktop environment with an elevated session, you can switch between active sessions on the same machine using the Terminal Sessions option in the Special Actions dropdown during a screen sharing session. This option is available in any environment that uses Remote Desktop Services to manage virtual sessions, provided there are other active sessions and the representative has the permission to use elevated special actions.
Transfer a session to another representative or team
If you are the session owner and would like to transfer control of the session to another team or representative:
- Click the Transfer button.
- Select either Support Teams or Representatives. Browse the list of available teams or representatives.
- Choose the location to which you wish to transfer the session and then click Transfer.
When someone accepts the session, you remain in the session as a participant but are no longer the session owner.
Share a session with another team member
Within a session, you can request a team member to participate in a support session.
- Click on the Share Session icon.
- From the menu, select a team name, the Request Help option, or the Representatives option.
- From the team listing, choose the user with whom you would like to share the session or select Any Representative. If you select a representative's name, the invitation is sent to that rep's personal queue. If you select Any Representative, the invitation is sent to the team queue so that any single representative in the selected queue can join the session. You can send multiple invitations if you want more representatives from the team to join your session.
- Alternatively, you can use Request Help to route your request so that it is targeted as a specific support issue. Only issues that have been configured to allow you to request help display on this list.
- Users are listed here only if they are logged into the console or have extended availability enabled.
- If you are permitted to share sessions with users who are not members of your teams, additional teams are displayed, provided that they contain at least one member logged in or with extended availability enabled.
- When you invite a user with extended availability enabled, they receive an email notification.
- Once the rep has accepted the invitation and entered the session, you can chat with them by clicking on the Chat icon at the top of the screen.
- If you have sent an invitation and it is still active, you may revoke the invitation by finding it in the Cancel Invitation menu and clicking the Cancel button.
Only the session owner can send invitations. Invitations do not time out as long as you remain the session owner. Multiple active invitations cannot exist for the same rep to join the same session. The invitation disappears if:
- The inviting user cancels the invitation
- The inviting user leaves or transfers ownership of the session
- The session ends
- The invited user accepts the invitation
- The invited user declines the invitation
When an additional user joins a shared session, they are able to see the entire chat history.
Invite external users
You can invite an external user or vendor to participate in an access session. To share a session, follow the steps outlined below:
- Click the Invite other representatives into this session icon.
- Select Invite External Representative...
- Select a policy, if applicable, and enter a short description for the type of invitation.
- In the Invitation Parameters area, enter the name of the person being invited, plus some comments to include with the invitation.
- Click Create Key.
You can now invite an external user by either clicking on the Copy to Clipboard icon and providing the user with the link to the session URL, or by sending an email invitation.
Remove a member from a shared session
When needed, you can remove another user from a shared support session. To remove a user, click on the Remove Member icon.
From the menu, choose the participant you wish to remove, and then click Remove.
You must be the owner of the session to remove another member.
Close the session
To exit a session, click the X icon in the top-right corner of the screen. A confirmation prompt appears.
If you are the session owner, choosing End Session closes the session in your representative console and removes any additional representatives who may be sharing the session. It also uninstalls the customer client from the remote system. However, it does not delete an installed Jump Client.
If you choose Hold Session, the session closes in your representative console but returns to wait in your personal queue. If any additional representatives are sharing the session, they remain in session.
If you are not the session owner, clicking Leave Session removes you from the session. The session continues to be supported by the session owner.
To log out of the web rep console entirely, select the Logout menu item under the User Menu at the top-right of the screen.
You are immediately logged out, and a message appears confirming this status.
