Canned scripts | RS Cloud
What are canned scripts?
Canned scripts are custom scripts created to be used in screen sharing and command shell sessions. These scripts are displayed in the interface as they are executed, running in the context of the logged-in user or the local system, depending on session elevation.
How are canned scripts useful?
Canned scripts allow representatives to automate tasks during remote sessions, enhancing efficiency and consistency. By running predefined scripts during screen sharing or command shell sessions, users can streamline troubleshooting or configuration tasks, while the scripts maintain proper context based on session elevation.
For more information, see Screen sharing tools and Command shell tools.
How do I access the Canned Scripts page?
- Use a Chromium-based browser to sign in to your Remote Support URL.
This URL is provided in the BeyondTrust welcome email and includes your site URL followed by /login. - From the left menu, click Console Settings.
The Rep Console Settings page opens and displays by default. - At the top of the page, click Canned Scripts.
The Canned Scripts page displays.
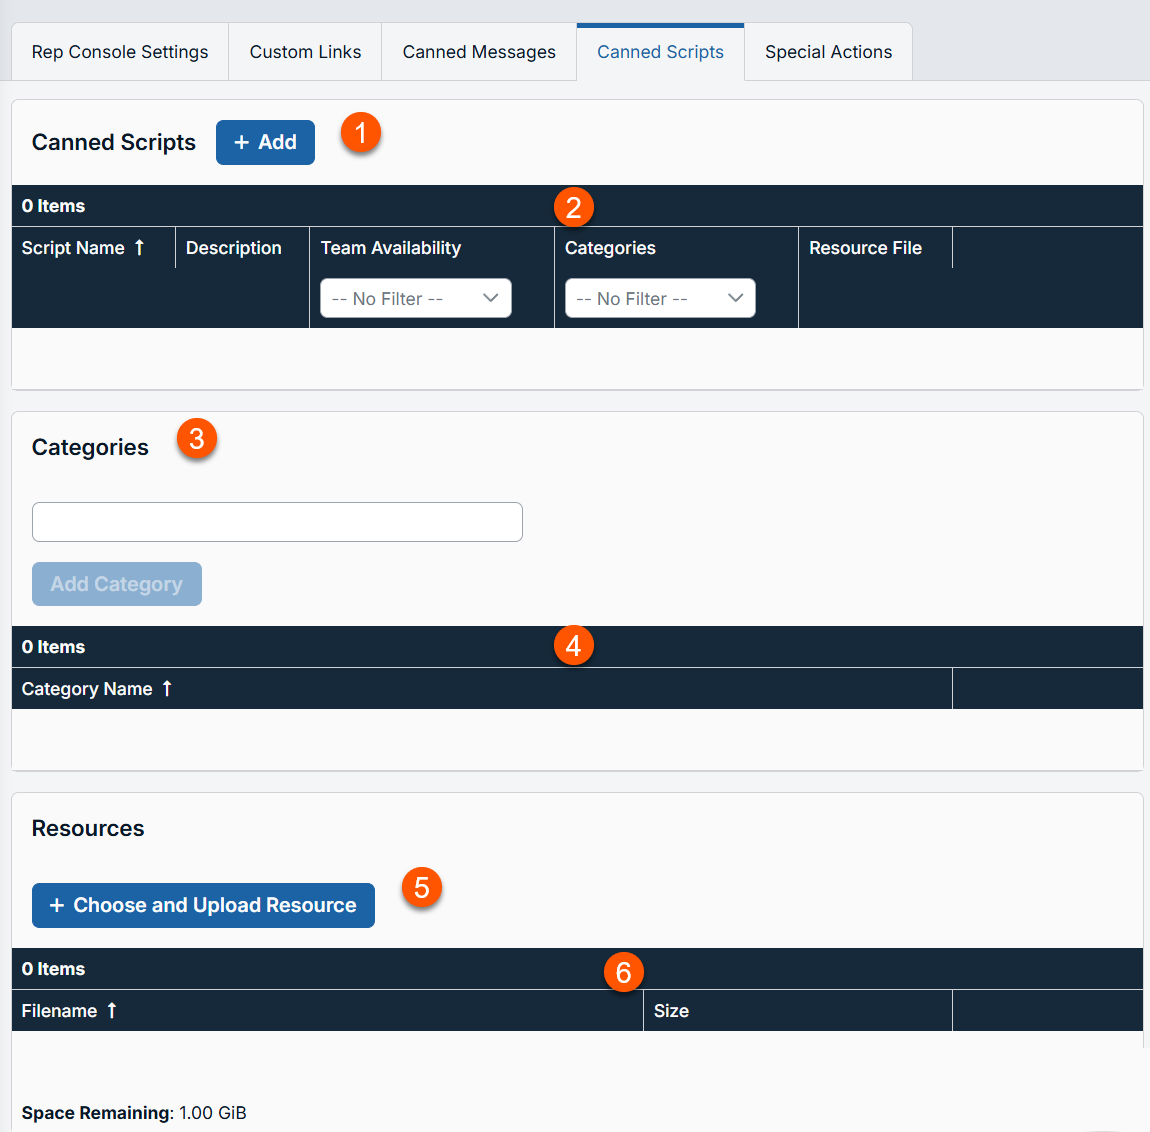
- Add:- Adds a new canned script.
- Script columns: The list of Script columns.
Script columns
- Script Name: Unique name of the account.
- Description: A brief description of the Account Group.
- Team Availability: Set a code name for integration purposes. If you do not set a code name, one is created automatically.
- Categories: Set a code name for integration purposes. If you do not set a code name, one is created automatically.
- Resource File: Set a code name for integration purposes. If you do not set a code name, one is created automatically.
- Script list options: Edit or delete a script.
- Categories: Adds a new category.
- Categories columns: The list of Categories columns.
Categories columns
- Category Name: Unique name of the category.
- Categories options: Deletes a category.
- Resources: Adds a resource file.
- Resources columns: The list of Resources columns.
Resources columns
- Filename: The file name of the resource.
- Size: The size of the resource. The max size of the Resource folder is 100 megabytes (MB).
- Resources options: Deletes a resource file.
Add a canned script
-
From the left menu, click Console Settings.
The Rep Console Settings page opens and displays by default. -
At the top of the page, click Canned Scripts.
The Canned Scripts page displays. -
Click + Add .
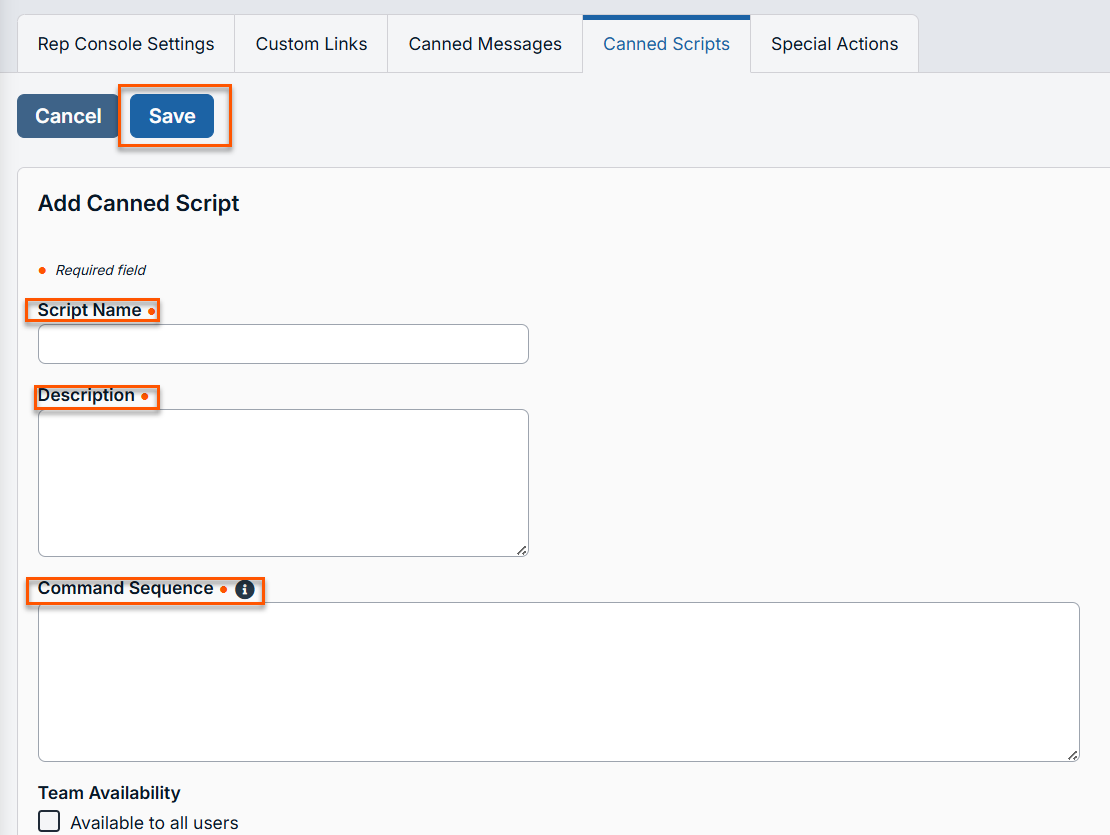
The Add Canned Script page displays. -
Enter a unique Script name to help identify this script. This name should help users locate the script they wish to run.
-
Enter a Description to summarize the purpose of this script. This description is displayed on the prompt to confirm that the user wants to run the selected script.
-
Write the Command sequence. Scripts must be written in command line format, similar to writing a batch file or shell script. Note that only the last line of the script may be interactive; you cannot pause the script or prompt for input in the middle of the script.
Within the script, reference an associated resource file using "%RESOURCE_FILE%", making sure to include the quotation marks. Note that the command sequence is case sensitive.
You can access the resource file’s temporary directory using %RESOURCE_DIR%. When you run a script with an associated resource file, that file will be temporarily uploaded to the customer’s computer.
-
Select Team availability the support teams that should be able to use this item.
-
Select the Categories under which this item should be listed.
-
Select the Resource file to be associated with this script.
-
Select Elevation mode if this script should be available to run in elevated mode only, unelevated mode only, or both. Available in view-only screen sharing as a special action If this option is checked, this script may be run even when the user is allowed only to view and not control the remote computer. Note that when the user is in view-only screen sharing, the customer receives a prompt to allow the script to run.
- If the user is allowed to use canned scripts, all canned scripts are available in full-control screen sharing, regardless of whether this option is checked or unchecked.
- For more information, see Screen sharing tools.
Edit a canned script
-
From the left menu, click Console Settings.
The Rep Console Settings page opens and displays by default. -
At the top of the page, click Canned Scripts.
The Canned Scripts page displays. -
Locate the canned script you want to edit from the list.
-
Click
 .
.
The Edit Canned Script page displays. -
Edit the canned script details. The details you can edit are the same as the Add Canned Script page details.
-
Click Save at the top of the page.
Delete a canned script
-
From the left menu, click Console Settings.
The Rep Console Settings page opens and displays by default. -
At the top of the page, click Canned Scripts.
The Canned Scripts page displays. -
Locate the canned script you want to delete from the list.
-
Click
 to delete the canned script.
Add a category
-
From the left menu, click Console Settings.
The Rep Console Settings page opens and displays by default. -
At the top of the page, click Canned Scripts.
The Canned Scripts page displays. -
Under Categories enter the category name
-
Click Add Category.
Delete a category
-
From the left menu, click Console Settings.
The Rep Console Settings page opens and displays by default. -
At the top of the page, click Canned Scripts.
The Canned Scripts page displays. -
Locate the category you want to delete from the list.
-
Click
to delete the category.
Add a resource file
Add any resource files you want to access from within your scripts. The maximum file size allowed is 250MB, with a maximum resource storage space of 1GB.
-
From the left menu, click Console Settings.
The Rep Console Settings page opens and displays by default. -
At the top of the page, click Canned Scripts.
The Canned Scripts page displays. -
Under Resources, click + Choose and Upload Resource.
-
Navigate to and select the resource file you want to add.
-
If you upload a resource file with the same name as an existing resource file, there is a prompt to confirm replacing the file:
- Click YES to upload the updated resource file and use it for all applicable canned scripts.
- Click NO to cancel the file upload.
Delete a resource file
-
From the left menu, click Console Settings.
The Rep Console Settings page opens and displays by default. -
At the top of the page, click Canned Scripts.
The Canned Scripts page displays. -
Locate the resource file you want to delete from the list.
-
Click
to delete the resource file.
Categories
Add category, delete
Create a new category or remove an existing category.
Resources
Choose and upload resource
Add any resource files you want to access from within your scripts. The maximum file size allowed is 250MB, with a maximum resource storage space of 1GB.
If you upload a resource file with the same name as an existing resource file, there is a prompt to confirm replacing the file.
- If you click YES, the updated resource file is uploaded and used for all applicable canned scripts.
- If you click NO, the file is not uploaded.
Delete
Remove an existing resource file.
