Jump Client guide | RS
With BeyondTrust Jump Technology, authorized users can securely access and control remote computers, attended and unattended, as well as switches and other network devices in any network. Jump Technology is integral to the BeyondTrust software offerings. All sessions are logged for reporting and auditing. Because BeyondTrust Remote Support is licensed per active representative and not per remote system, Jump Technology is a cost-effective way to reach every device in your enterprise.
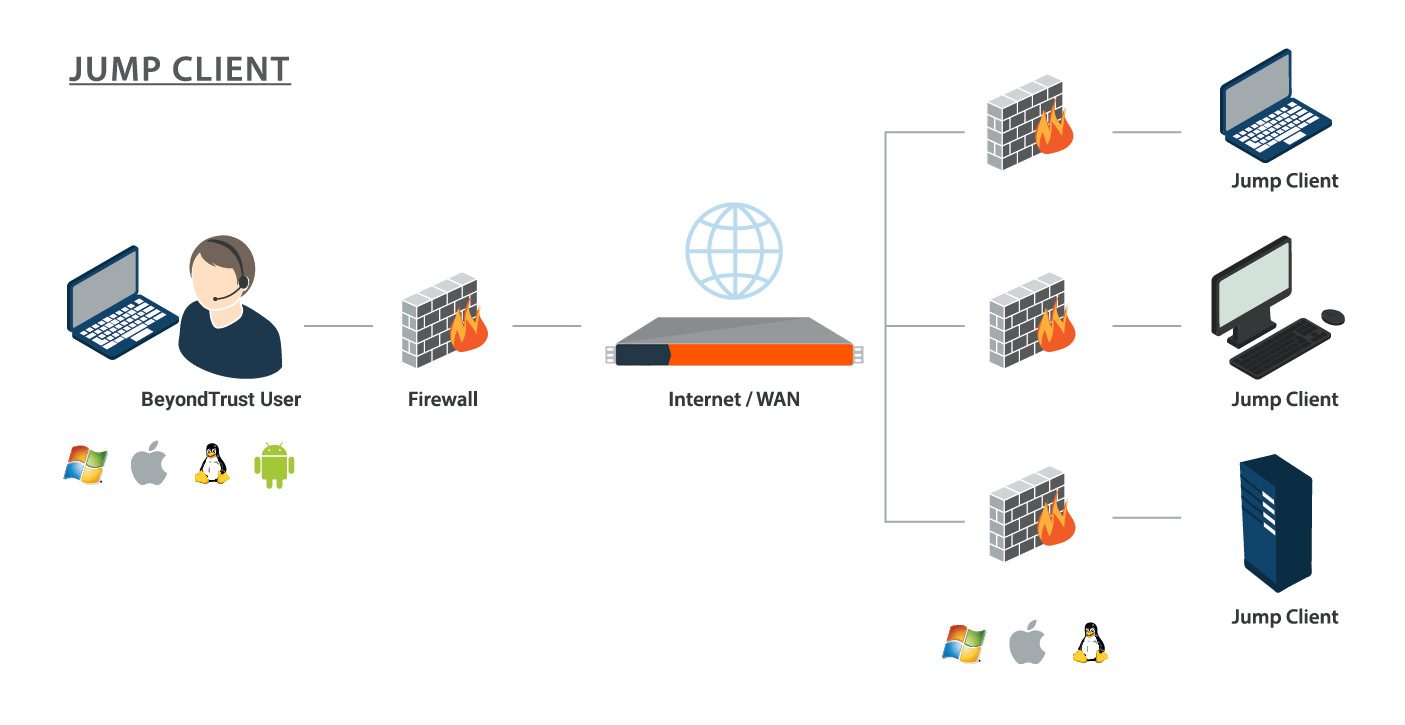
A Jump Client is an installable application that enables a user to access a remote computer, regardless of its location. The remote computer does not need to reside on a known network. Jump Clients are persistently connected to the B Series Appliance, thus helping you reach systems on remote networks anywhere in the world. By preinstalling Jump Clients on remote systems, a user can establish sessions with unattended Windows, Mac, Linux, and Raspberry Pi computers.
System administrators can push the Jump Client installer to a large number of systems. The Windows, Mac, Linux, or Raspberry Pi executable, or the Windows MSI, can be used with your systems management tool of choice. You can override some installation parameters and include a valid custom install directory path where you want the Jump Client to install.
Some of the information in this guide is applicable to Assets. For more information about the differences between Jump Clients and Assets, and the use of other Jump technology terms, refer to the Jump Technology overview.
Although BeyondTrust Jump Clients are not limited by system, they are limited by hardware, as described below:
| Sizing Guidelines | Users | Endpoints | CPU | Memory | Disk 1 | Disk 2 |
|---|---|---|---|---|---|---|
| Small | 1 - 20 | 1 - 1,000 | 2 - 4 | 4 - 8 GB | 8 - 128 GB | 64+ GB |
| Medium | 20 - 75 | 1,000 - 10,000 | 4 - 8 | 16 - 32 GB | 32 - 256 GB | 132+ GB |
| Large | 75 - 150 | 10,000 - 35,000 | 8 - 16 | 64 - 128 GB | 128 - 1024 GB | 1024+ GB |
| Enterprise | 150 - 300 | 35,000 - 50,000 | 16 - 32 | 128 - 512 GB | 512 - 4096 GB | 1024+ GB |
| Atlas | 300 - 3,000 | 50,000 - 250,000 | Enterprise | Enterprise | Enterprise | Enterprise |
If more Jump Clients are needed, contact BeyondTrust Technical Support.
For RS Virtual Appliance, see SRA Virtual Appliance installation.
Recommended steps for implementing BeyondTrust Jump Clients
When working with Jump Technology, there are a lot of moving parts. Here is a recommended order of implementation to make full use of your software.
- Add Asset Roles. Asset Roles determine how users are allowed to interact with Assets. These roles are applied to users by means of individual account settings, group policies, or when added to Asset Groups.
- Add Asset Policies. Asset Policies are used to control when certain Assets can be accessed by implementing schedules. Asset Policies are applied to Assets upon creation and can be modified from the representative console.
- Add Asset Groups. An Asset Group is a way to organize Assets, granting members varying levels of access to those items. Users are assigned to Asset Groups either individually or by means of group policy.
- Deploy Jump Clients. Jump Clients can be deployed to Windows, Mac, Linux, and Raspberry Pi systems. Jump Clients are deployed from /login > Asset Management > Jump Clients or from the representative console during a customer-initiated session. When creating the installer in the Mass Deployment Wizard or during a session, be sure to set the Asset Group and Asset Policy to determine who can access the Jump Client and with what restrictions.
Asset Roles
An Asset Role is a predefined set of permissions regarding Asset management and usage. Asset Roles are applied to users from the Asset Management > Asset Roles page or from the Users & Security > Group Policies page.
If more than one role is assigned to a user, then the most specific role for a user is always used. The order of specificity for Asset Roles, from most specific to least specific, is:
- The role assigned to the relationship between a user and an Asset Group on the Asset Management > Asset Roles page
- The role assigned to the relationship between a user and an Asset Group on the Users & Security > Group Policies page
- The Asset Roles configured for a user on the Users & Security > Users page or the Users & Security > Group Policies page
To create or edit an Asset Role, enter or update the name and description. Then set the permissions a user with this role should have:
- Under Asset Group or Personal Assets, determine if users can create and deploy Assets, move Assets from one Asset Group to another, or delete Assets.
- Check the Start Sessions box to enable users to connect to any Assets they have access to.
- To allow users to edit Asset details, enable any of the options including:
- Start Sessions
- Edit Tag
- Edit Comments
- Edit Public Portal
- Edit Asset Policy
- Edit Session Policy
- Edit Connectivity and Authentication
- Edit Behavior and Experience.
- Click the blue info icons next to the last three options to see exactly what is affected by these fields.
Asset Policies
Asset Policies place additional conditions on access to particular Assets. Asset Policies are used to control when certain Assets can be accessed by implementing schedules.
- From the /login administrative interface, go to Asset Management > Asset Policies.
- Click Add.
An Asset Policy does not take effect until you have applied it to at least one Asset.
-
Create a unique name to help identify this policy. Use a name that clearly identifies this policy when assigning it to Assets.
-
Set a code name for integration purposes. If you do not set a code name, one is created automatically.
-
Add a brief description to summarize the purpose of this policy.
-
If you want to enforce an access schedule, check Enabled. If it is disabled, then any Assets that use this policy can be accessed without time restrictions.
-
Set a schedule to define when Assets under this policy can be accessed. Set the time zone you want to use for this schedule, and then add one or more schedule entries. For each entry, set the start day and time and the end day and time.
If, for instance, the time is set to start at 8 PM and end at 5 PM, a user can start a session using this Asset at any time during this window but may continue to work past the set end time. Attempting to re-access this Asset after 5 PM, however, results in a notification that the schedule does not permit a session to start. If necessary, the user may choose to override the schedule restriction and start the session anyway.
-
If stricter access control is required, check Force session to end when schedule does not permit access. This forces the session to disconnect at the scheduled end time. In this case, the user receives recurring notifications beginning 15 minutes prior to being disconnected.
-
Check to Require a ticket ID before a session starts.
-
For additional security, the Asset Policy can require an end-user to confirm their identity using a multi-factor authentication challenge before starting or elevating a session. Check to require this.
-
-
When you are finished configuring the Asset Policy, click Save.
For more information, see Deploy Jump Clients.
Asset Groups
An Asset Group is a way to organize Assets, granting members varying levels of access to those items. Users are assigned to Asset Groups from this page or from the Users & Security > Group Policies page.
To quickly find an existing group in the list of Asset Groups, enter the name, part of the name, or a term from the comments. The list filters all groups with a name or comment containing the entered search term. The list remains filtered until the search term is removed, even if the user goes to other pages or logs out. To remove the search term, click the X to the right of the search box.
You can create or edit an Asset Group, assigning it a name, code name, and comments. The Group Policies section lists any group policies that assign users to this Asset Group.
In the Allowed Users section, you can add individual users if you prefer. Search for users to add to this Asset Group. You can set each user's Asset Role to make their permissions specific to Assets in this Asset Group, or you can use the user's default Asset Role as set on the Users & Security > Group Policies page or the Users & Security > Users page. An Asset Role is a predefined set of permissions regarding Asset management and usage.
Existing Asset Group users are shown in a table, along with their assigned role and how the role was granted. You can filter the view by entering a string in the Filter by name text box. You can also edit a user's settings or delete a user from the Asset Group.
To add groups of users to an Asset Group, go to Users & Security > Group Policies and assign that group to one or more Asset Groups.
Edit and delete functionality may be disabled for some users. This occurs either when a user is added via group policy or when a user's system Asset Role is set to anything other than No Access.
You can click the group policy link to modify the policy as a whole. Any changes made to the group policy apply to all members of that group policy.
You can click the user link to modify the user's system Asset role. Any changes to the user's system Asset role apply to all other Asset Groups in which the user is an unassigned member.
You also can add the individual to the group, overriding their settings as defined elsewhere.
Jump Client Settings
From the /login administrative interface, go to Asset Management > Jump Clients.
Manage installers with the Jump Client installers list
This list shows all previously installed active Jump Client installers. Administrators and privileged users can view, download, delete, or extend Jump Client installers.
Choose statistics
An administrator can choose which statistics to view for all Jump Clients on a site-wide basis. These statistics are displayed in the representative console and include CPU, console user, disk usage, a thumbnail of the remote screen, and uptime.
The Active Jump Client Statistics Update Interval determines how often these statistics are updated. Managing which statistics are viewed and how often can help to regulate the amount of bandwidth used. The more active Jump Clients you have deployed, the fewer the statistics and the longer the interval may need to be.
Manage upgrades
Regulating bandwidth applies to on-premises installations only.
You can regulate the bandwidth used during upgrades by setting Maximum bandwidth of concurrent Jump Client upgrades. The maximum upgrade bandwidth is 100MiB/s.
Set the maximum number of Jump Clients to upgrade at the same time. Note that if you have a large number of Jump Clients deployed, you may need to limit this number to regulate the amount of bandwidth consumed. The maximum number allowed is 500.
Neither of these settings affects representative console upgrades or Support Button deployments.
Use the radio buttons below to control automatic Jump Client upgrades. You can:
- Permanently disable Jump Client upgrades.
- Temporarily enable Jump Client upgrades for the current upgrade cycle.
- Permanently enable Jump Client upgrades.
When upgrading to a newly built site software package, verify that all certificate stores are managed appropriately and are up to date prior to upgrading to a new BeyondTrust version. Failure to do so may cause a majority of your existing Jump Clients to appear offline.
Choose maintenance options
Global connection rate for Jump Clients determines the maximum rate per second of Jump Clients able to connect to the B Series Appliance at the same time during an upgrade or after a major network outage. The default is 50 connections and the maximum allowed is 300.
If a Jump Client goes offline and does not reconnect to the B Series Appliance for the number of days specified by the Number of days before Jump Clients that have not connected are automatically deleted setting, it is automatically uninstalled from the target computer and is removed from the Asset Management Interface of the representative console.
- This setting is shared with the Jump Client during normal operation so that even if it cannot communicate with the site, it uninstalls itself at the configured time. If this setting is changed after the Jump Client loses connection with the B Series Appliance, it uninstalls itself at the previously configured time.
- The setting must be configured for 15 days or more.
If a Jump Client goes offline and does not reconnect to the B Series Appliance for the number of days specified by the Number of days before Jump Clients that have not connected are considered lost setting, it is labeled as lost in the representative console. No specific action is taken on the Jump Client at this time. It is labeled as lost only for identification purposes, so that an administrator can diagnose the reason for the lost connection and take action to correct the situation.
- To allow you to identify lost Jump Clients before they are automatically deleted, set this field to a smaller number than the deletion field above.
- The setting must be configured for 15 days or more.
Uninstalled Jump Client Behavior determines how a Jump Client deleted by an end user is handled by the representative console. Depending on the option made in the dropdown, the deleted item can either be marked as uninstalled and kept in the list or actually be removed from the list of Assets in the representative console. If the Jump Client cannot contact the B Series Appliance at the time it is uninstalled, the affected item remains in its offline state.
Restrict Local Uninstall/Disable of Jump Clients limits the remote user’s ability to uninstall or disable Jump Clients from the right-click context menu, reducing the need to reinstall Jump Clients that should not have been uninstalled. If this option is enabled, only users with appropriate privileges on the target machine may uninstall the Jump Client via the host system's uninstall programs mechanism.
Manage other options
Allow Representatives to attempt to wake up Jump Clients provides a way to wake up a selected Jump Client by broadcasting Wake-on-LAN (WOL) packets through another Jump Client on the same network. Once a WOL is attempted, the option becomes unavailable for 30 seconds before a subsequent attempt can be made. WOL must be enabled on the target computer and its network for this function to work. The default gateway information of the Jump Client is used to determine if other Jump Clients reside on the same network. When sending a WOL packet, the user has an advanced option to provide a password for WOL environments that require a secure WOL password.
Use screen state to detect Customer Presence sets how customer presence is determined. Customer presence is used when choosing whether to use the Customer Present Session Policy or the Customer Not Present Session Policy. If checked, the customer is determined to be present only if a user is logged in, the screen is not locked, and a screen saver is not running. If unchecked, the customer is considered present if a user is logged in, regardless of screen state.
You can set Jump Clients to allow or disallow simultaneous connections either through an Asset Policy on Asset Management > Asset Policies or by the global setting configured under Asset Management > Assets > Asset Settings. If allowed, multiple users can gain access to the same Jump Client without an invitation to join an active session by another user. If disallowed, only one user can connect to a Jump Client at a time. Only an invitation by the user who originated the session can allow for a second user to access the session.
Allow users to pin Jump Clients
Permission to deploy, remove, and modify Assets always grants the user permission to download and install Jump Clients prior to support, as described in Deploy Jump Clients. However, this does not necessarily mean that the user has permission to pin Jump Clients during a support session. To pin a Jump Client during a support session, the user must have the permission Jump Clients Pinning/Unpinning. This permission can be defined in any of the three following locations in /login:
- Users & Security > Users
- Users & Security > Group Policies
- Users & Security > Session Policies
If you need to assign the permission to only one or two users, do so from the Users page.
If you need to assign the permission to one or two groups of users, do so from the Group Policies page.
If you need to assign the permission to three or more groups of users, to specific Jump Clients, or to one or more of your public portals, do so from the Session Policies page.
Regardless of where you set this permission, the configuration works the same. Locate the Jump Clients Pinning/Unpinning permission and select Allow.
Selecting Deny prevents pinning or unpinning Jump Clients. Selecting Not Defined falls back to a lower priority session policy or the global session policy.
If you allow this permission for a specific user on the Users page, then that user can pin or unpin any session they start.
If you allow this permission for a specific Group Policy, then any members of that group can pin or unpin any session they start.
However, if you allow this permission for a specific Session Policy, no change occurs until you assign this policy to one or more users, group policies, Assets, or public portals.
Assign a session policy to a user or group
To assign a session policy to a user account, group policy, or public portal, set the Availability of the session policy to allow Users.
Making the Jump Clients Pinning/Unpinning permission available to rep invite is meaningless. External representatives cannot have ownership of sessions, and only the owner of a session can pin or unpin Jump Clients.
To assign a session policy to a user, edit the user, scroll down to the Attended and Unattended Session Permissions section, expand the section, and select the appropriate session policy from the dropdown. Click Save.
To assign a session policy for attended sessions to a group policy, edit the group policy, scroll down to the Attended Session Permissions section, and expand the section. Check Defined,and Final if applicable. From the Attended Session Policy dropdown, select Custom to define a policy and complete the options below, or select an existing policy. For an existing policy, the options can be viewed but not changed. Click Save.
Follow the same process to assign a session policy for unattended sessions. Edit the group policy, scroll down to the Unattended Session Permissions, and expand the section. Check Defined,and Final if applicable. For the Unattended Session Policy dropdown, select Custom to define a policy and complete the options below, or select an existing policy. For an existing policy, the options can be viewed but not changed. Click Save. Click Save.
Assign a session policy to an Asset
To assign a session policy to an Asset, set the Availability of the session policy to allow Assets. While Assets include more than Jump Clients, the pin or unpin permission applies only to Jump Clients.
When a session policy with the Jump Clients Pinning/Unpinning permission enabled is assigned to a Jump Client, then any user who starts a session with that Jump Client can unpin it, even if that user is denied permission to unpin Jump Clients in all other sessions.
To assign a session policy to a Jump Client, the user must have permission to change the session policies associated with Assets. This is determined by Asset Role.
When a user has this permission, they can right-click any Jump Client they are allowed to modify, click Properties, and assign a session policy to the Jump Client using the Customer Present Session Policy and Customer Not Present Session Policy dropdowns.
The way customer presence is determined is set by Use screen state to detect customer presence on the /login > Asset Management > Jump Clients page under Jump Client Settings. If the option is enabled, the customer is determined to be present only if a user is logged in, the screen is not locked, and a screen saver is not running. If the option is disabled, the customer is considered present if a user is logged in, regardless of screen state.
Troubleshoot settings with the session policy simulator
If a specific user is unable to pin or unpin Jump Clients during a session, you can use the session policy simulator to troubleshoot the issue.
- Log in to /login as an admin and go to Users & Security > Session Policies.
- Scroll to the Session Policy Simulator section and enter the Representative and Session Start Method in question.
- Click the Simulate button and check the result for the permission Jump Clients Pinning/Unpinning.
If the simulator indicates that the user should be able to pin and unpin for a given session, and yet in practice this is not the case, then verify that the user has permission to modify Jump Clients:
- Log in to /login as an admin and go to Users & Security > Users.
- Edit the user in question and locate their Asset Group Memberships.
- If an Asset Group specifies a specific Asset Role for the user, click on the role to see its settings. If the role is set on the user, scroll down to the user account's Jump Technology section and click Show for the associated Asset Roles.
- At least one of the associated Asset Roles must give the user permission to Create and deploy new Assets.
- If a Asset Group Membership is defined by a group policy, or if the Asset Roles are not editable, or both, then modify the group policy which is controlling these memberships and/or permissions.
- If multiple policies are involved, you might need to check each one.
- If the same permission is defined in multiple policies, you might need to reorder them or change the option Allow this policy to be overridden? for Add To Asset Groups, Remove From Asset Groups, or Representative Permissions.
- If you reorder policies or allow override, remember that a group policy listed further down in the list of policies overrides policies above when the permission in question allows override on the topmost group policy; otherwise, the first group policy takes precedence.
