Customer notices | RS Pathfinder
What are customer notices?
Customer notices are messages displayed on public portals, Support Button start windows, and customer client chat windows to inform users of broadly impacting IT outages or other critical updates.
How are customer notices useful?
Customer notices help reduce support requests during widespread IT outages by proactively informing customers of known issues. They provide clear, timely communication across public portals and during support interactions, ensuring customers are informed before initiating a session.
How do I access the Customer Notices page?
- Sign into app.beyondtrust.io.
The BeyondTrust Home page displays. - From the left menu, click Remote Support > Public Portals.
The Public Sites page opens and the Public Sites tab displays by default. - At the top of the page, click Customer Notices.
The Customer Notices page displays.
The Customer Notices page
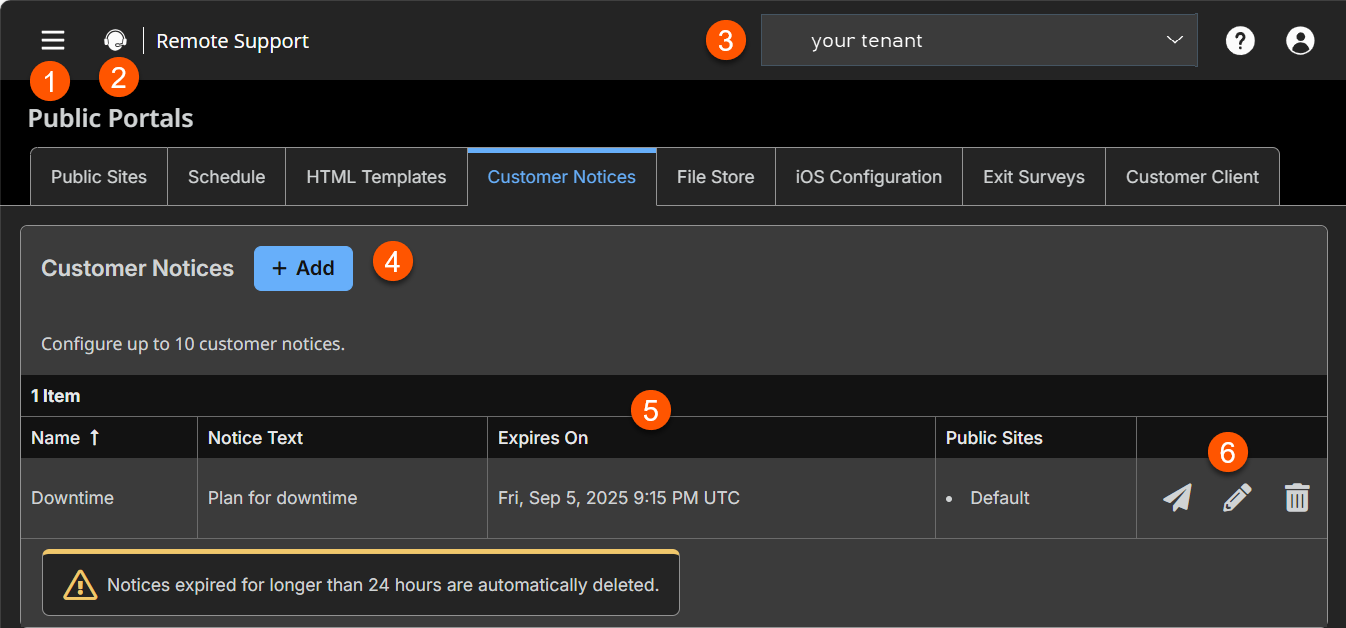
- Left menu: Easy access to all pages in Remote Support, including Status, Consoles & Downloads, My Account, Configuration, Asset Management, Vault, Console Settings, Users & Security, Reports, Public Portals, Dashboards, Management, and Appliance pages.
- Status: Opens the Status page.
- Header: Change your tenant site, manage your profile, and access documentation.
- Add: Adds a new customer notice.
- Customer Notices columns: List the Customer Notices columns.
Customer Notices columns
- Name: Unique name of the notice.
- Notice Text: Text to display in the customer client, on the public portal, and in Support Buttons
- Expires On: Enter a date for the notice expiration
- Public Sites: Select which site displays the notice.
- List options: Send, edit, or delete a notice.
How to configure customer notices
Administrators and authorized representatives can create up to 10 messages per portal, with each message allowed up to 1,020 characters.
Although messages are not configurable per language, you can create different messages for the languages supported on the same portal.
Administrators can create and edit customer notices and also can grant this right to representatives without administrative privileges.
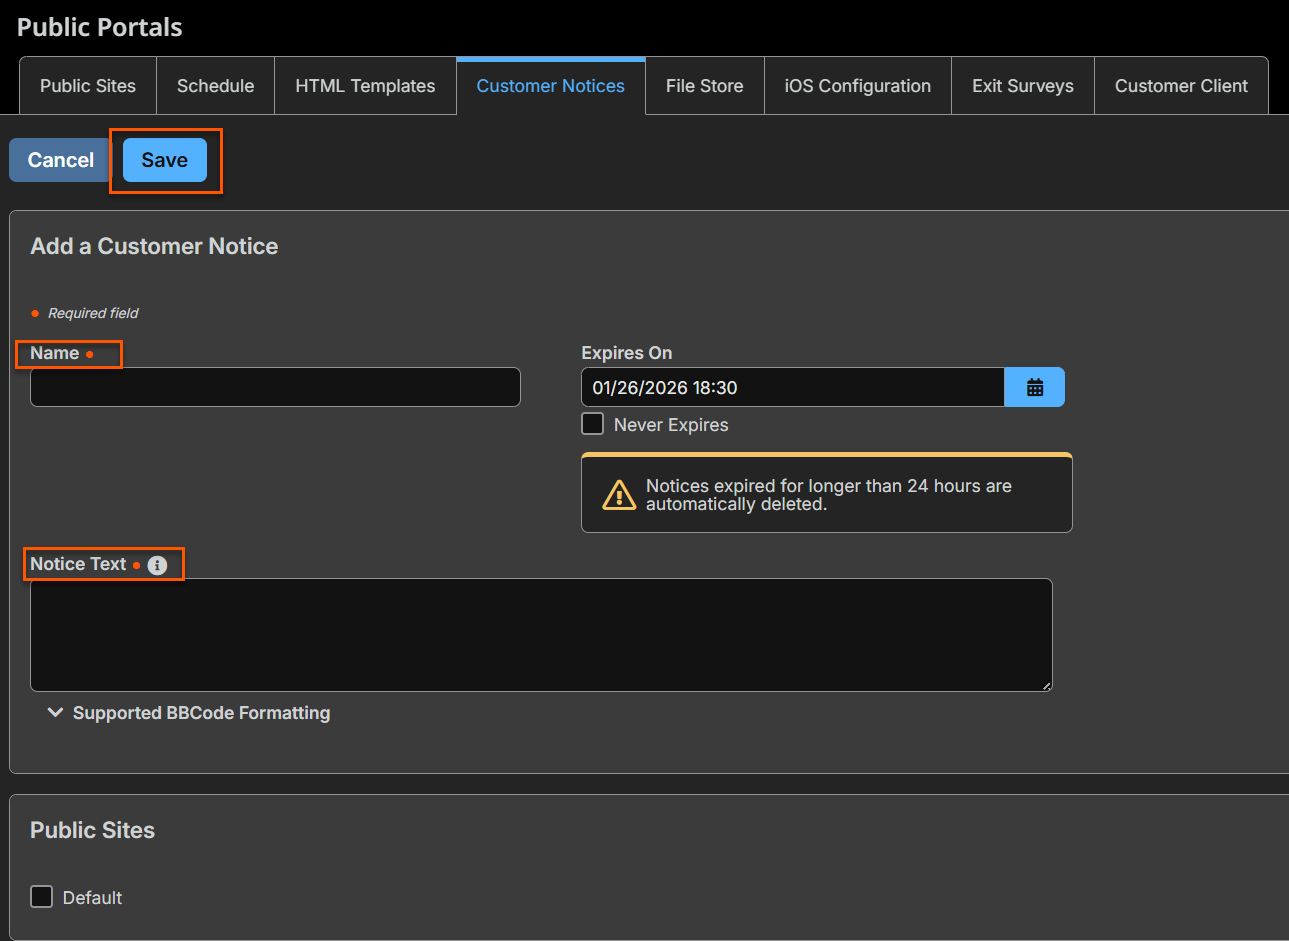
Add a customer notice
- Sign into app.beyondtrust.io.
The BeyondTrust Home page displays. - From the left menu, click Remote Support > Public Portals.
The Public Sites page opens and the Public Sites tab displays by default. - At the top of the page, click Customer Notices.
The Customer Notices page displays. - Click Add.
- For Name, create a unique name to help identify this notice. This name is not displayed to the customer.
- For Notice Text, create the text to display in the customer client, on the public portal, and in Support Buttons. You can use macros, as well as BBCode to do some low-level formatting, such as adding bold, colors, or hyperlinks. Click on Macros or BBCode to display a list of codes and their resulting applications.
Messages should be relatively short so they can be viewed without much scrolling in the customer client windows. This applies to both the native client and click-to-chat modes.
- For Expires On, enter a date for the notice expiration. If you select Never Expires the notice will remain on your site until it is manually deleted.
Important info
Expired notices are automatically deleted 24 hours after their expiration date.
- For Public Sites, select which site displays the notice. You can select multiple portals.
For more information, see Notices and business hours.
Edit a customer notice
- Sign into app.beyondtrust.io.
The BeyondTrust Home page displays. - From the left menu, click Remote Support > Public Portals.
The Public Sites page opens and the Public Sites tab displays by default. - At the top of the page, click Customer Notices.
The Customer Notices page displays. - From the Customer Notice table, select a notice.
- Click the pencil to edit the notice.
- Make the necessary changes, click Save.
Delete a customer notice
- Sign into app.beyondtrust.io.
The BeyondTrust Home page displays. - From the left menu, click Remote Support > Public Portals.
The Public Sites page opens and the Public Sites tab displays by default. - At the top of the page, click Customer Notices.
The Customer Notices page displays. - From the Customer Notice table, select a notice.
- Click the trash can to delete the notice.
- A confirmation dialog box displays, click Yes.
Send a notice
The send button,  sends a notice to all holding sessions.
