Email configuration | RS On-prem
What is the Email Configuration page?
The Email Configuration page in the /appliance web interface allows you to configure email server settings to send notifications, alerts, and reports from the B Series Appliance.
How is it useful to my organization?
This page ensures reliable communication by enabling the appliance to send critical emails, such as system alerts, user notifications, and administrative reports, helping maintain smooth operations and timely responses to issues.
How do I access the Email Configuration page?
- Use a Chromium-based browser to sign in to your B Series Appliance. The URL is provided in the BeyondTrust welcome email and includes your site URL followed by /appliance.
- From the top menu, click Security.
The Certificates page opens and displays by default. - At the top of the page, click Email Configuration.
The Email Configuration page displays.
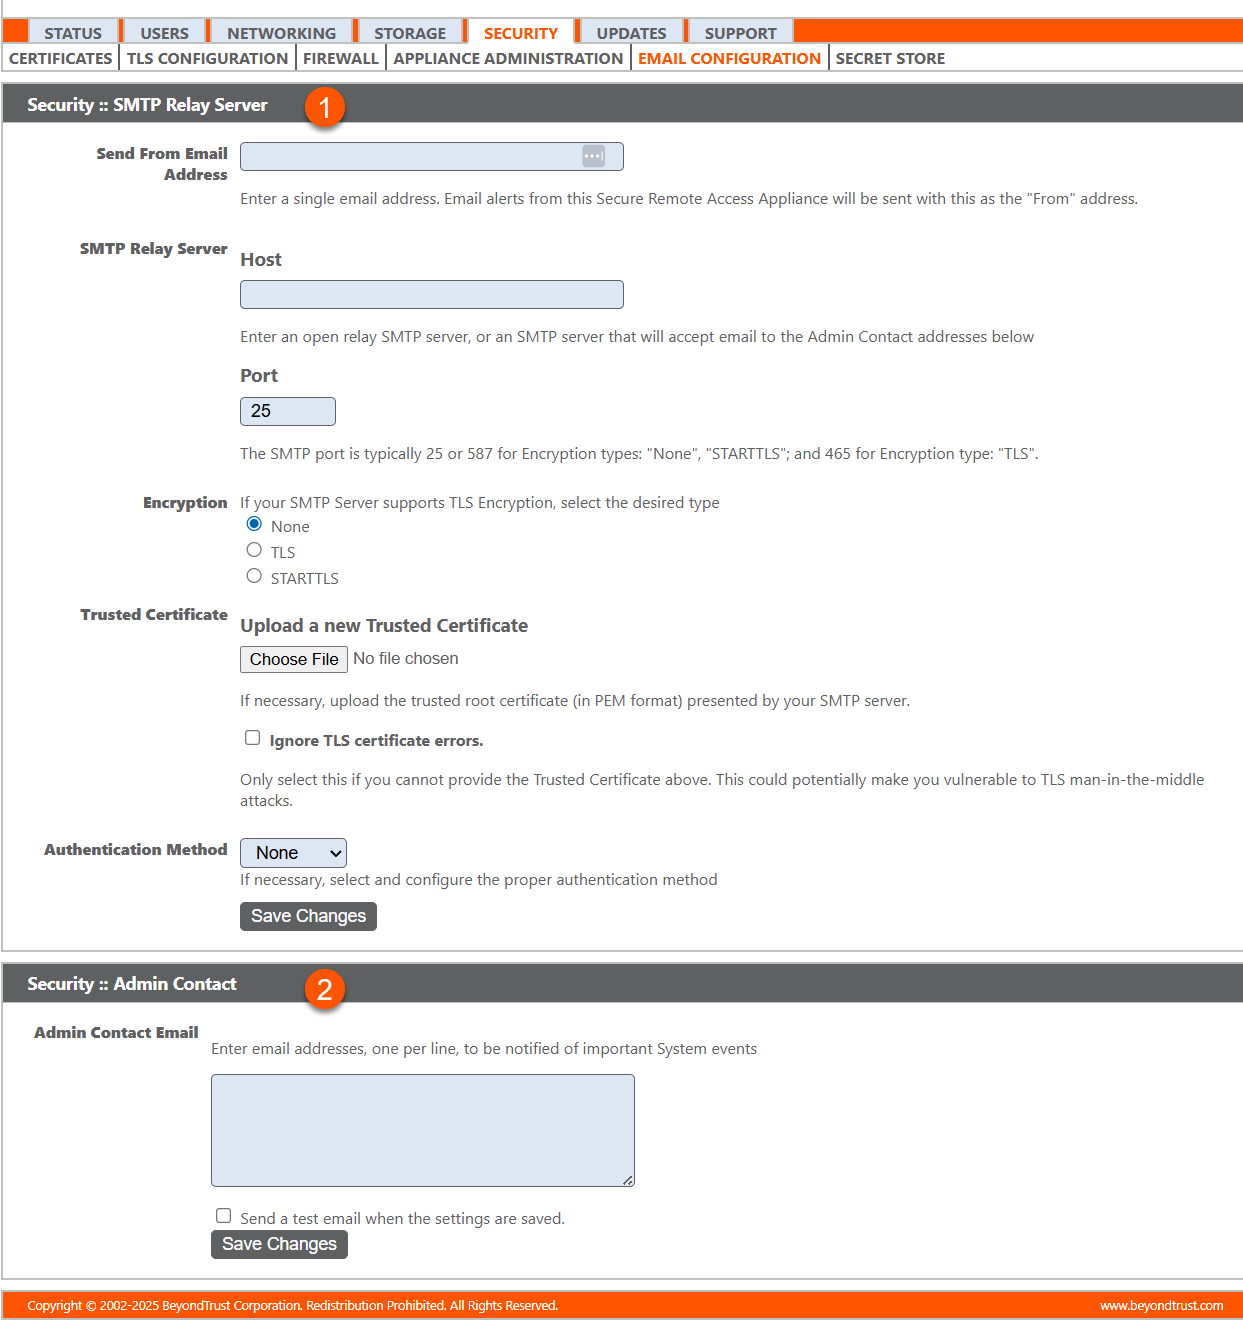
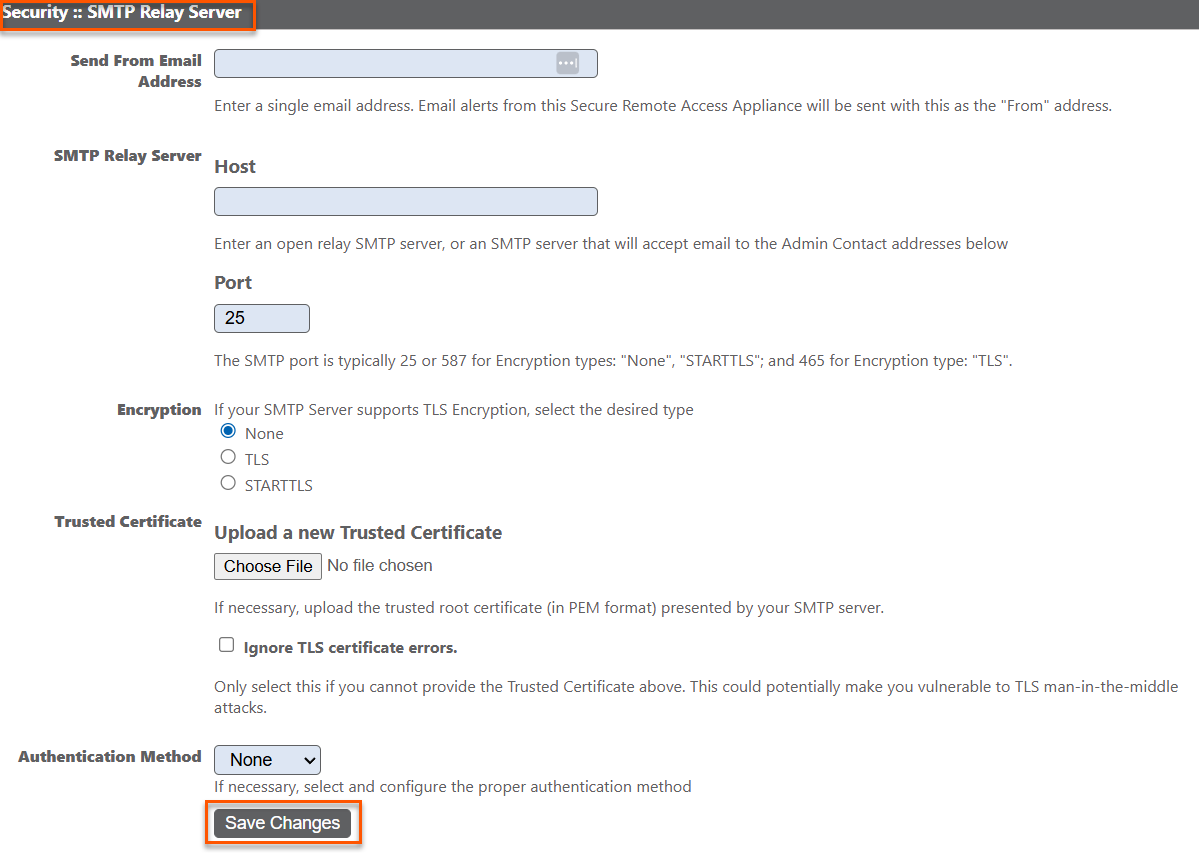
- SMTP Relay Server: Settings for SMTP Server.
- Admin Contact: Email settings for Admin Contact.
Configure email notifications
Your B Series Appliance can send you automatic email notifications. Emails are sent for the following events:
- Syslog Server has been Changed: A user on /appliance has changed the syslog server parameter.
- RAID Event: One or more RAID logical drives is not in Optimum state (Degraded or Partially Degraded).
- SSL Certificate Expiration Notice: An in-use SSL certificate (include either end-entity certificates or any CA certificate in the chain) expires in 90 days or less.
Configure via SMTP
This method does not work for some email services. see Configure via OAuth2 for Microsoft Entra ID or Configure via OAuth2 for Google for alternate configurations.
After entering the email addresses for the administrator contacts, save your settings and send a test email to ensure everything works correctly.
Configure via OAuth2 for Microsoft Entra ID
Configuration requires changing settings on the B Series Appliance and the Microsoft 365 subscription with Entra ID.
Start by changing settings on the B Series Appliance:
- Go to Appliance, click the Security tab and click Email Configuration.
- Change the Authentication Method to OAuth2
- Note the Authorization Redirect URI. It is required later.
Before starting configuration on Microsoft Entra ID, an Azure/Office 365 Administrator must enable Authenticated SMTP for each account on Exchange online. To do this, go to Office 365 Admin Portal (admin.microsoft.com) > Active Users > Mail > Manage Email apps and check Authenticated SMTP.
Once Authenticated SMTP is enabled, perform the following steps in the Entra ID console:
-
Sign in to your console (portal.Azure.com).
-
Go to Microsoft Entra ID.
-
Go to App registrations and select New registration.
-
Enter a name, such as Appliance-OAuth2.
-
Select the types of account you want to be able to log in to the application through OAuth2. Select Single Tenant for internal only.
-
Enter the Redirect URI. This is the Authorization Redirect URI obtained from the B Series Appliance at the start of this process.
-
Click Register.
-
On the Overview Page (selected from the left menu), note the Application (client) ID. It is required later.
-
Click Endpoints (above the Application (client) ID).
-
Note the OAuth2.0 authorization endpoint (v2) URI and the OAuth token endpoint (v2) URI. These are required later.
-
On the Certificates & secrets page (selected from the left menu), note the Client secret. It is required later. If you do not have a Client secret, click New client secret to create one.
The remaining steps are done on the B Series Appliance.
- Go to Appliance, click the Security tab, and click Email Configuration.
- Enter the following information noted earlier:
- Authorization Endpoint
- Token Endpoint
- Client ID
- Client Secret
- Enter the email address for this service as the Send from Email Address and the User email.
These addresses must match and be a valid account for Entra ID. If you have Anonymous Email (Send Email as Anyone) enabled for the Entra ID Tenant, you can add anything in the send email field. If not, use the username of the application owner and the Allowed Users.
- Enter data for the Host, Encryption, and Port fields.
- Host: smtp.office365.com
- Encryption: STARTTLS
- Port: 587
Default data for Entra ID is shown, but your installation may use a different host or encryption method. The port is applicable for STARTTLS, but other encryption methods may use a different port.
-
Upload the SMTP server's Root CA Certificate, if required. This step is not required for most large email vendors.
-
Enter the following for Scopes: https://outlook.office.com/SMTP.Send offline_access
-
Click Save Changes.
-
Click Authorize. At the sign in page that appears, accept the permissions request. The mail setting page reloads, and the authorization button is replaced by an authorized message.
-
To test the configuration:
- Add an Admin Contact Email.
- Check Send a test email.
- Click Save Changes.
Azure AD has been renamed Microsoft Entra ID.
Configure via OAuth2 for Google
Configuration requires changing settings on the B Series Appliance and the Google Cloud Platform.
Start by changing settings on the B Series Appliance:
- Go to Appliance, click the Security tab and click Email Configuration.
- Change the Authentication Method to OAuth2
- Note the Authorization Redirect URI. It is required later.
Now sign in to your Google Cloud Platform console (Google Dev Console) (console.cloud.google.com). Use the correct Gmail account, as only the owner of the project is able to work with the project. If you do not already have a paid account, you may choose to purchase an account by clicking Activate in the top banner. BeyondTrust cannot provide assistance with purchasing an account. Click Learn More in the top banner for information regarding the limitations of free accounts.
-
Click CREATE PROJECT. You can also use an existing project.
-
Accept the default Project Name or enter a name.
-
Accept the default Location or select a folder from those available for your organization.
-
Click CREATE.
-
The APIs and services page appears. Click Library in the left menu.
-
Search or browse for the Gmail API in the library, and click it.
-
The Gmail API appears on its own page. Click ENABLE.
-
The Gmail API Overview page appears. Click APIs & services in the upper left.
-
The APIs and services page appears again. Click OAuth consent screen in the left menu.
-
Select the User Type. Internal allows only users from within the organization, but requires a Google Workspace account.
-
Click CREATE.
-
Enter the App name.
-
Enter a User support email address. This may default to the address you are using to create the project.
-
Enter a logo for the app, if desired. The App domain section is also optional.
-
Add the Authorized domains. For BeyondTrust test appliances, these are:
- qabeyondtrustcloud.com
- bomgar.com
-
Enter the Developer contact information. This is the email address you are using to create the project.
-
Click SAVE AND CONTINUE.
-
Under the Scopes tab, click ADD OR REMOVE SCOPES. This opens the Update selected scopes window.
-
Locate and check the scope https://mail.google.com for the Gmail API.
The API does not appear if it has not been enabled.
- Click UPDATE. The Update selected scopes window closes.
- Click SAVE AND CONTINUE.
- Under the Test users tab, click ADD USERS. This opens the Add Users window. Add the users that have access to the application and click ADD. Note the limits on test user access and related restrictions.
- Click SAVE AND CONTINUE.
- Review the Summary, and make any necessary changes or corrections.
- Click BACK TO DASHBOARD.
- Click Credentials in the left menu.
- Click CREATE CREDENTIALS in the top banner and select OAuth client ID.
- On the create credentials page, select Web application for the Application type. Additional fields appear when this is selected.
- Enter a name for the application.
- Scroll down to Authorized redirect URIs and click ADD URI.
- Enter the Authorization Redirect URI obtained from the BeyondTrust appliance at the start of this process.
- Click CREATE.
- A window confirms creation of the OAuth client, and shows the Client ID and Client Secret. Click to download a JSON file. The file contains information that is needed in the next steps.
- Click OK to return to the APIs and services page.
The remaining steps are done on the B Series Appliance.
- Go to Appliance, click the Security tab and click Email Configuration.
- Enter the following information, found in the downloaded JSON file:
- Authorization Endpoint
- Token Endpoint
- Client ID
- Client Secret
- Enter any email address for this service as the Send from Email Address.
- Enter the User email. This must be an email address entered as a Test user with access to the application, when you completed the OAuth consent screens.
- Enter data for the Host, Encryption, and Port fields.
- Host: smtp.gmail.com
- Encryption: TLS
- Port: 465
Default data for Google is shown, but your installation may use a different host or encryption method. The port is applicable for TLS, but other encryption methods may use a different port.
- Enter your TLS certificate if one is provided by Google. If not, check Ignore TLS certificate errors.
- Enter the following for Scopes: https://mail.google.com
- Click Save Changes.
- Click Authorize. After the sign in page that appears, you may receive the warning Google has not verified this message, if you have not published the application. The consent page reloads, and the authorization button is replaced by an authorized message.
- To test the configuration:
- Add an Admin Contact Email.
- Check Send a test email.
- Click Save Changes.
