Failover guide | RS
BeyondTrust failover enables synchronization of data between two peer B Series Appliances, creating a simplified process for secure swap from a failed B Series Appliance. Two B Series Appliances host the same installed software package for a single site. You can check this from the /login admin web interface. If the Product Version and Product Build match, the same site software package is installed. DNS directs site traffic to one of these peer B Series Appliances, the primary B Series Appliance, where all settings are configured. The backup B Series Appliance synchronizes with the primary, according to your settings configured in the /login interface.
This document describes how to use a second B Series Appliance as a backup and failover device for a Secure Remote Access site and how to switch operations to the backup B Series Appliance in a disaster recovery situation. There are three network configuration methods available with BeyondTrust failover for redirecting network traffic so that your site remains available:
- Shared IP (AWS does not support shared IP)
- DNS Swing
- NAT Swing
Configuration details regarding each of these methods follow in this document, and detailed failover steps are also covered. Your B Series Appliances have a peer relationship, so implementing the Shared IP failover configuration with automatic data synchronization enabled is recommended. Both B Series Appliances must be on the same IP subnet to support Shared IP failover; therefore, it may be necessary to use DNS or NAT swing failover methods. Failover can be further managed and automated using the BeyondTrust API.
Primary/backup failover relationship
BeyondTrust failover enables automatic synchronization of data between two B Series Appliances, creating a simplified, two-way process. To start automatically synchronizing site data between two B Series Appliances, you must first establish a trusted relationship between them. On the B Series Appliance you intend to be primary, go to /login > Management > Failover.
To configure a valid connection, both B Series Appliances must have identical Inter-Appliance keys. See the /login > Management > Security page to verify the key for each B Series Appliance.
Establishing the relationship between the two B Series Appliances occurs on the Failover page of the B Series Appliance intended to be the primary B Series Appliance. The addresses that are entered here establish the relationship and allow either B Series Appliance to connect to each other at any time. The New Backup Site Connection Details tell the primary B Series Appliance how to connect to the B Series Appliance that will become the backup B Series Appliance. The Reverse Connection Details to this Primary Site are given to the backup B Series Appliance and tell it how to connect back to this primary B Series Appliance. You must use a valid hostname or IP address and TLS port number for these fields. When all of these fields are set, click the Establish Relationship button to attempt to establish the relationship.
BeyondTrust recommends using the unique IP address of each B Series Appliance when configuring these settings.
Once the relationship has been established, extraneous tabs are removed from the backup site.
If you are on the primary B Series Appliance, you will see Failover page sections indicating Primary Site Instance. If you are on the backup B Series Appliance, you will only see Failover page sections indicating Backup Site Instance. The Backup Settings section refers to settings enabled only when the site instance you are on is the backup site instance.
On the primary B Series Appliance's Failover page, the top of the page displays the address and status of the host/primary site and the peer/backup site, as well as the date and time of the last status check. Select Status History to expand or collapse a table of status events that have occurred.
When you establish a new failover relationship, an initial data synchronization automatically occurs. It takes about 60 seconds for the first data sync to begin.
Failover synchronization syncs all user accounts, all /login configuration settings, files in the file store, logs, and recordings. All of this information which exists on the backup B Series Appliance will be overwritten by that which resides on the primary B Series Appliance.
If the primary B Series Appliance is the primary node in an Atlas cluster, the backup B Series Appliance will automatically become the new backup primary node in this cluster.
Synchronization itself may take anywhere from a few seconds to a few hours, depending on the amount of data that needs to be synchronized. The Failover page will list the last date and time of data synchronization when synchronization is completed.
Later, you will set up a schedule for automatic data syncs. However, you may also click the Sync Now button to force synchronization and pull the most current information from the primary B Series Appliance into the memory of the backup B Series Appliance.
To manually switch B Series Appliance roles, click Become Backup from the primary site or Become Primary from the backup site.
If you want to synchronize data from the peer B Series Appliance prior to swapping roles, select the checkbox next to the Become Primary or Become Backup button. If this option is selected, all users on the existing primary B Series Appliance will be disconnected during the data sync, and no other operations will be available until the swap is complete.
On the primary site instance, you also have the option to become the backup even if the peer B Series Appliance cannot be contacted. If this option is unchecked, failover will be canceled if both B Series Appliances cannot be kept in sync in terms of their failover roles (one primary and one backup).
For example, if you know the current backup B Series Appliance is online but cannot be reached by the primary due to a network connection issue, you may wish to check this option to make the primary the backup before the network connection is restored. In this example, you would also need to access the current backup and make it the primary.
If you want to break the relationship so that the primary B Series Appliance is no longer linked to the backup B Series Appliance, click the Break Failover Relationship button. Data will no longer be synchronized between the two, and if the primary B Series Appliance goes offline, the other B Series Appliance will not take over.
This will not remove configuration settings and session data that has already been copied from the primary to the backup.
From Primary Site Instance Configuration, control the shared IP address the site instance uses in the event of a failover by selecting the checkbox for the failover IP address. If you change the relationship between the sites, the checked IP addresses will disable when a primary site becomes a backup, and will enable when a backup becomes a primary site. You should manually mirror the setting on the peer site, as the setting is not shared. Select Save Changes when finished.
From Backup Settings, configure how the B Series Appliance should behave when in the backup role. These settings must be configured on both the primary and backup B Series Appliances.
Enable or disable backup operations, such as data-syncs and automatic failovers.
Set how long the primary site must be unreachable before failover occurs.
Set how often data should automatically synchronize, as well as the maximum bandwidth that can be used for data syncs.
Enable or disable automatic failover. If disabled, failover must be performed manually.
In order to use BeyondTrust's built-in automatic failover, your two B Series Appliances must be on the same subnet. If you wish to use automatic failover with B Series Appliances on different networks, you must use the failover API.
You also may enter IP addresses for the backup site to check to determine whether the backup's inability to reach the primary is because the primary is offline or because the backup has lost its network connection.
For more information about failover settings, see Best practices.
After failover is configured, the primary B Series Appliance will send an email alert if no backup B Series Appliance pulls its data for a given length of time. This allows you to be aware if relationships have been disrupted. To activate this alert email, enter connection parameters for a working SMTP server on the primary B Series Appliance's /login > Management > Email Configuration page. The next synchronization will copy the settings to the backup.
If the backup B Series Appliance determines that the primary B Series Appliance is down, it will send a series of emails to the B Series Appliance administrator notifying them of the failure and counting down the time until automatic failover will occur. The backup B Series Appliance will attempt to reach the primary for the length of time specified by the Primary Site Instance Timeout. If it is unable to reach the primary during this time, then the backup will enable the shared IP and will assume the role of primary if automatic shared IP failover is configured; otherwise, you must configure failover manually. As soon as the switch is made, you can resume normal session activity. All requests to your Secure Remote Access site will be served by the backup B Series Appliance.
Best practices
Here are best practices for using failover in the backup environment and planned and unplanned maintenance environments.
Important informationDeviation from these best practices may result in data loss.
In an ideal environment, you should select one B Series Appliance as the normal primary and another B Series Appliance as the normal backup. The normal primary will almost always be primary unless there is a maintenance event, and once the event is over, the original primary will be restored to the role of primary. This practice allows you to select the proper backup options (bottom section of the Management > Failover page in the /login interface) for each site and presents the greatest likelihood that no data is lost. The options are presented in the table below.
Backup options are per-site (not synchronized) settings and are only in use when the site's role is backup. Since you have established each site as normally primary or normally backup, it may be helpful to think of these settings in a categorical framework of normal and maintenance modes, where the Backup Site Settings are in effect during normal operations and the Primary Site Settings are in effect during maintenance. In short, turn off Enable Backup Operations on the normal primary site. Do this because enabling that option will generate administrative emails and could cause a data-sync to start. This, of course, is not helpful while maintenance is being performed and could cause data loss.
| Setting | Primary Site Setting | Backup Site Setting | Reason |
|---|---|---|---|
| Enable Backup Operations | Off | On | Controls probing and data-syncs as well as auto-failover, both of which will be problematic if the normal primary is down. |
| Auto Data-Sync Interval | not applicable | user's choice | Data syncs should generally be at least once a day, but the more frequent the better. The bigger the gap, the more potential for losing data not captured with synchronization. |
| Bandwidth Limiting | user's choice | user's choice | Does not matter what this is set to, as long as data-syncs can occur fast enough not to overlap the next time it is supposed to sync. Remember that the backup site's setting will be the one used when they differ. |
| Enable Automatic Failover | Off | On for Shared IP User's choice for DNS and NAT Swing | Presents the possibility for data loss if a data-sync does not occur before the role change. Obviously, with hardware failure, sometimes this cannot be avoided. |
| Primary Site Instance Timeout | not applicable | user's choice | Depends on user's choice for automatic failover. |
Network configuration
BeyondTrust clients and consoles are built to attempt connection to the B Series Appliance at a specific address. In order to stop the clients from connecting to the normal primary B Series Appliance and instead connect to the backup B Series Appliance, a network change must be made in order to reroute the traffic to its new destination. There are currently three methods supported to achieve this goal, each with advantages and disadvantages.
| Method | Description | Pros | Cons |
|---|---|---|---|
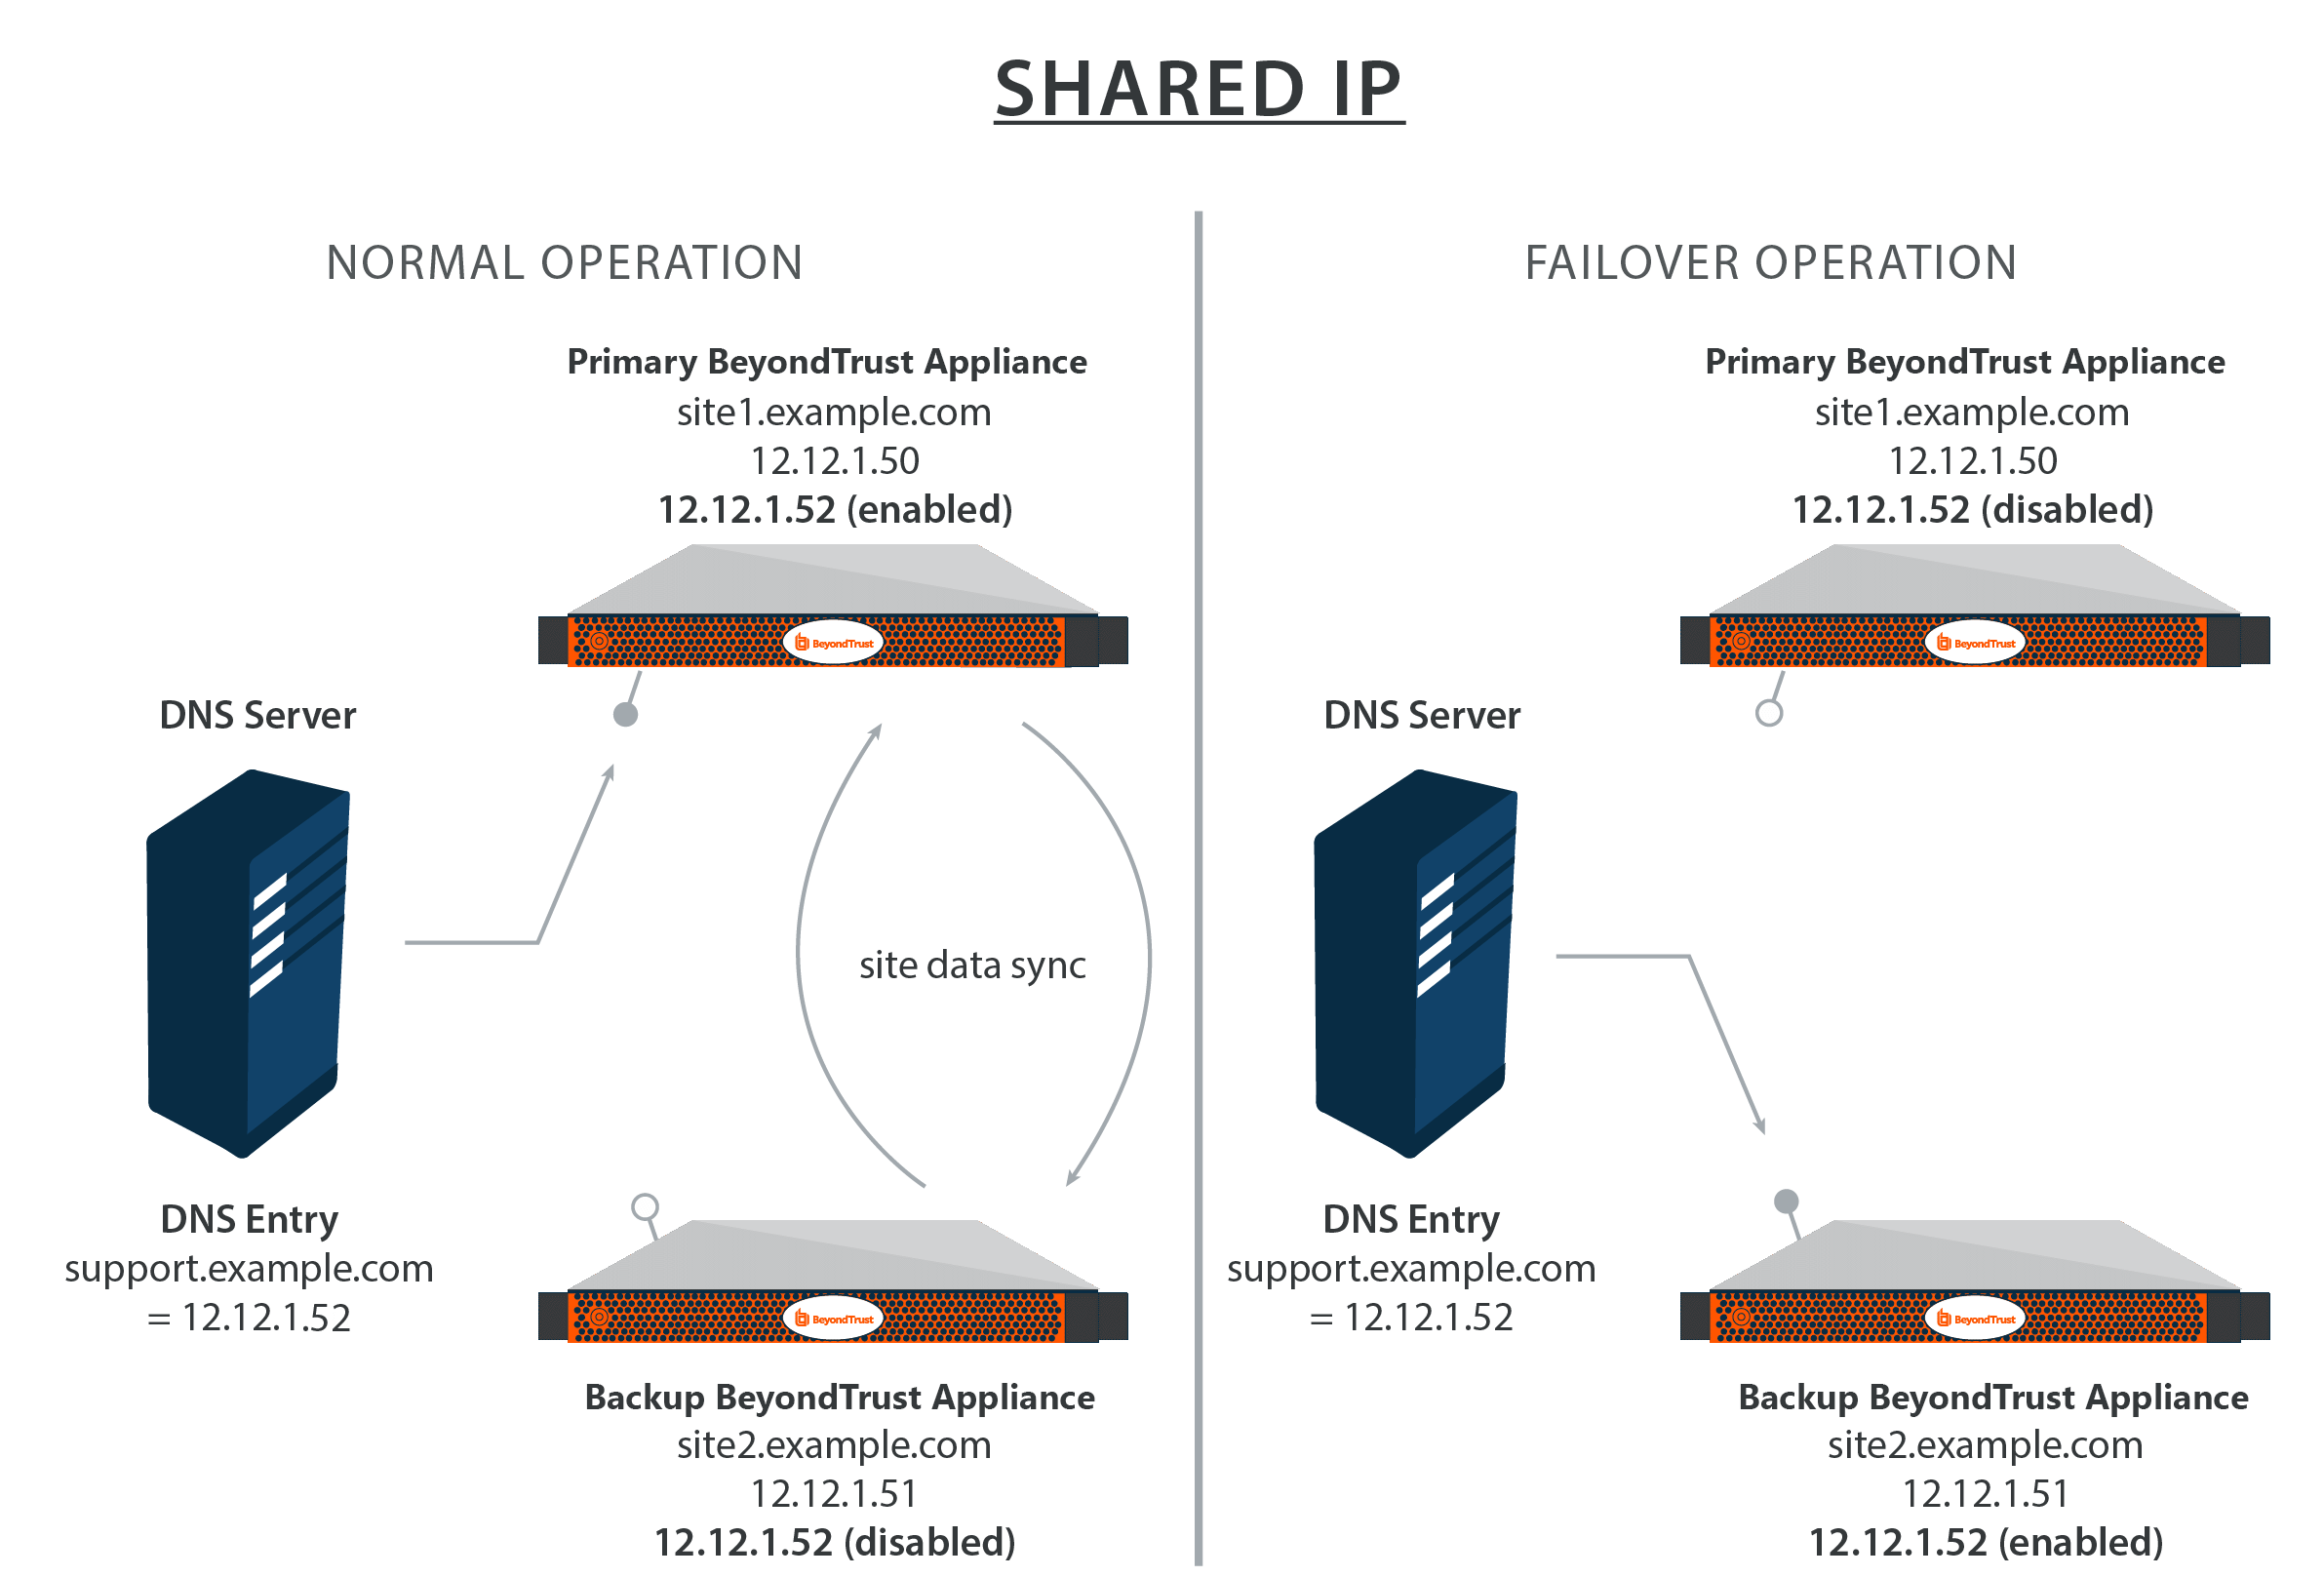
| Shared IP | In this configuration, the hostname of the Secure Remote Access site and IP address that is used to represent it remain constant. Both B Series Appliances share that IP in the /appliance interface, but only the B Series Appliance that is acting as primary has that IP enabled. The backup B Series Appliance will not use that IP unless it becomes primary. | No network equipment configuration change. Links and processes referencing your Secure Remote Access site domain or IP address will be adjusted properly based on roles and will be served by the backup B Series Appliance. Once the backup B Series Appliance is redefined as the primary and the shared IP is enabled, the backup B Series Appliance will take the place of the primary. Does not suffer from the propagation time lag as a DNS entry change would. | Potential for IP conflict if the shared IP is enabled on both B Series Appliances. If both B Series Appliances are online and conflicted, go back to /login > Management > Failover and reconfigure the settings so that the roles are accurately set. |
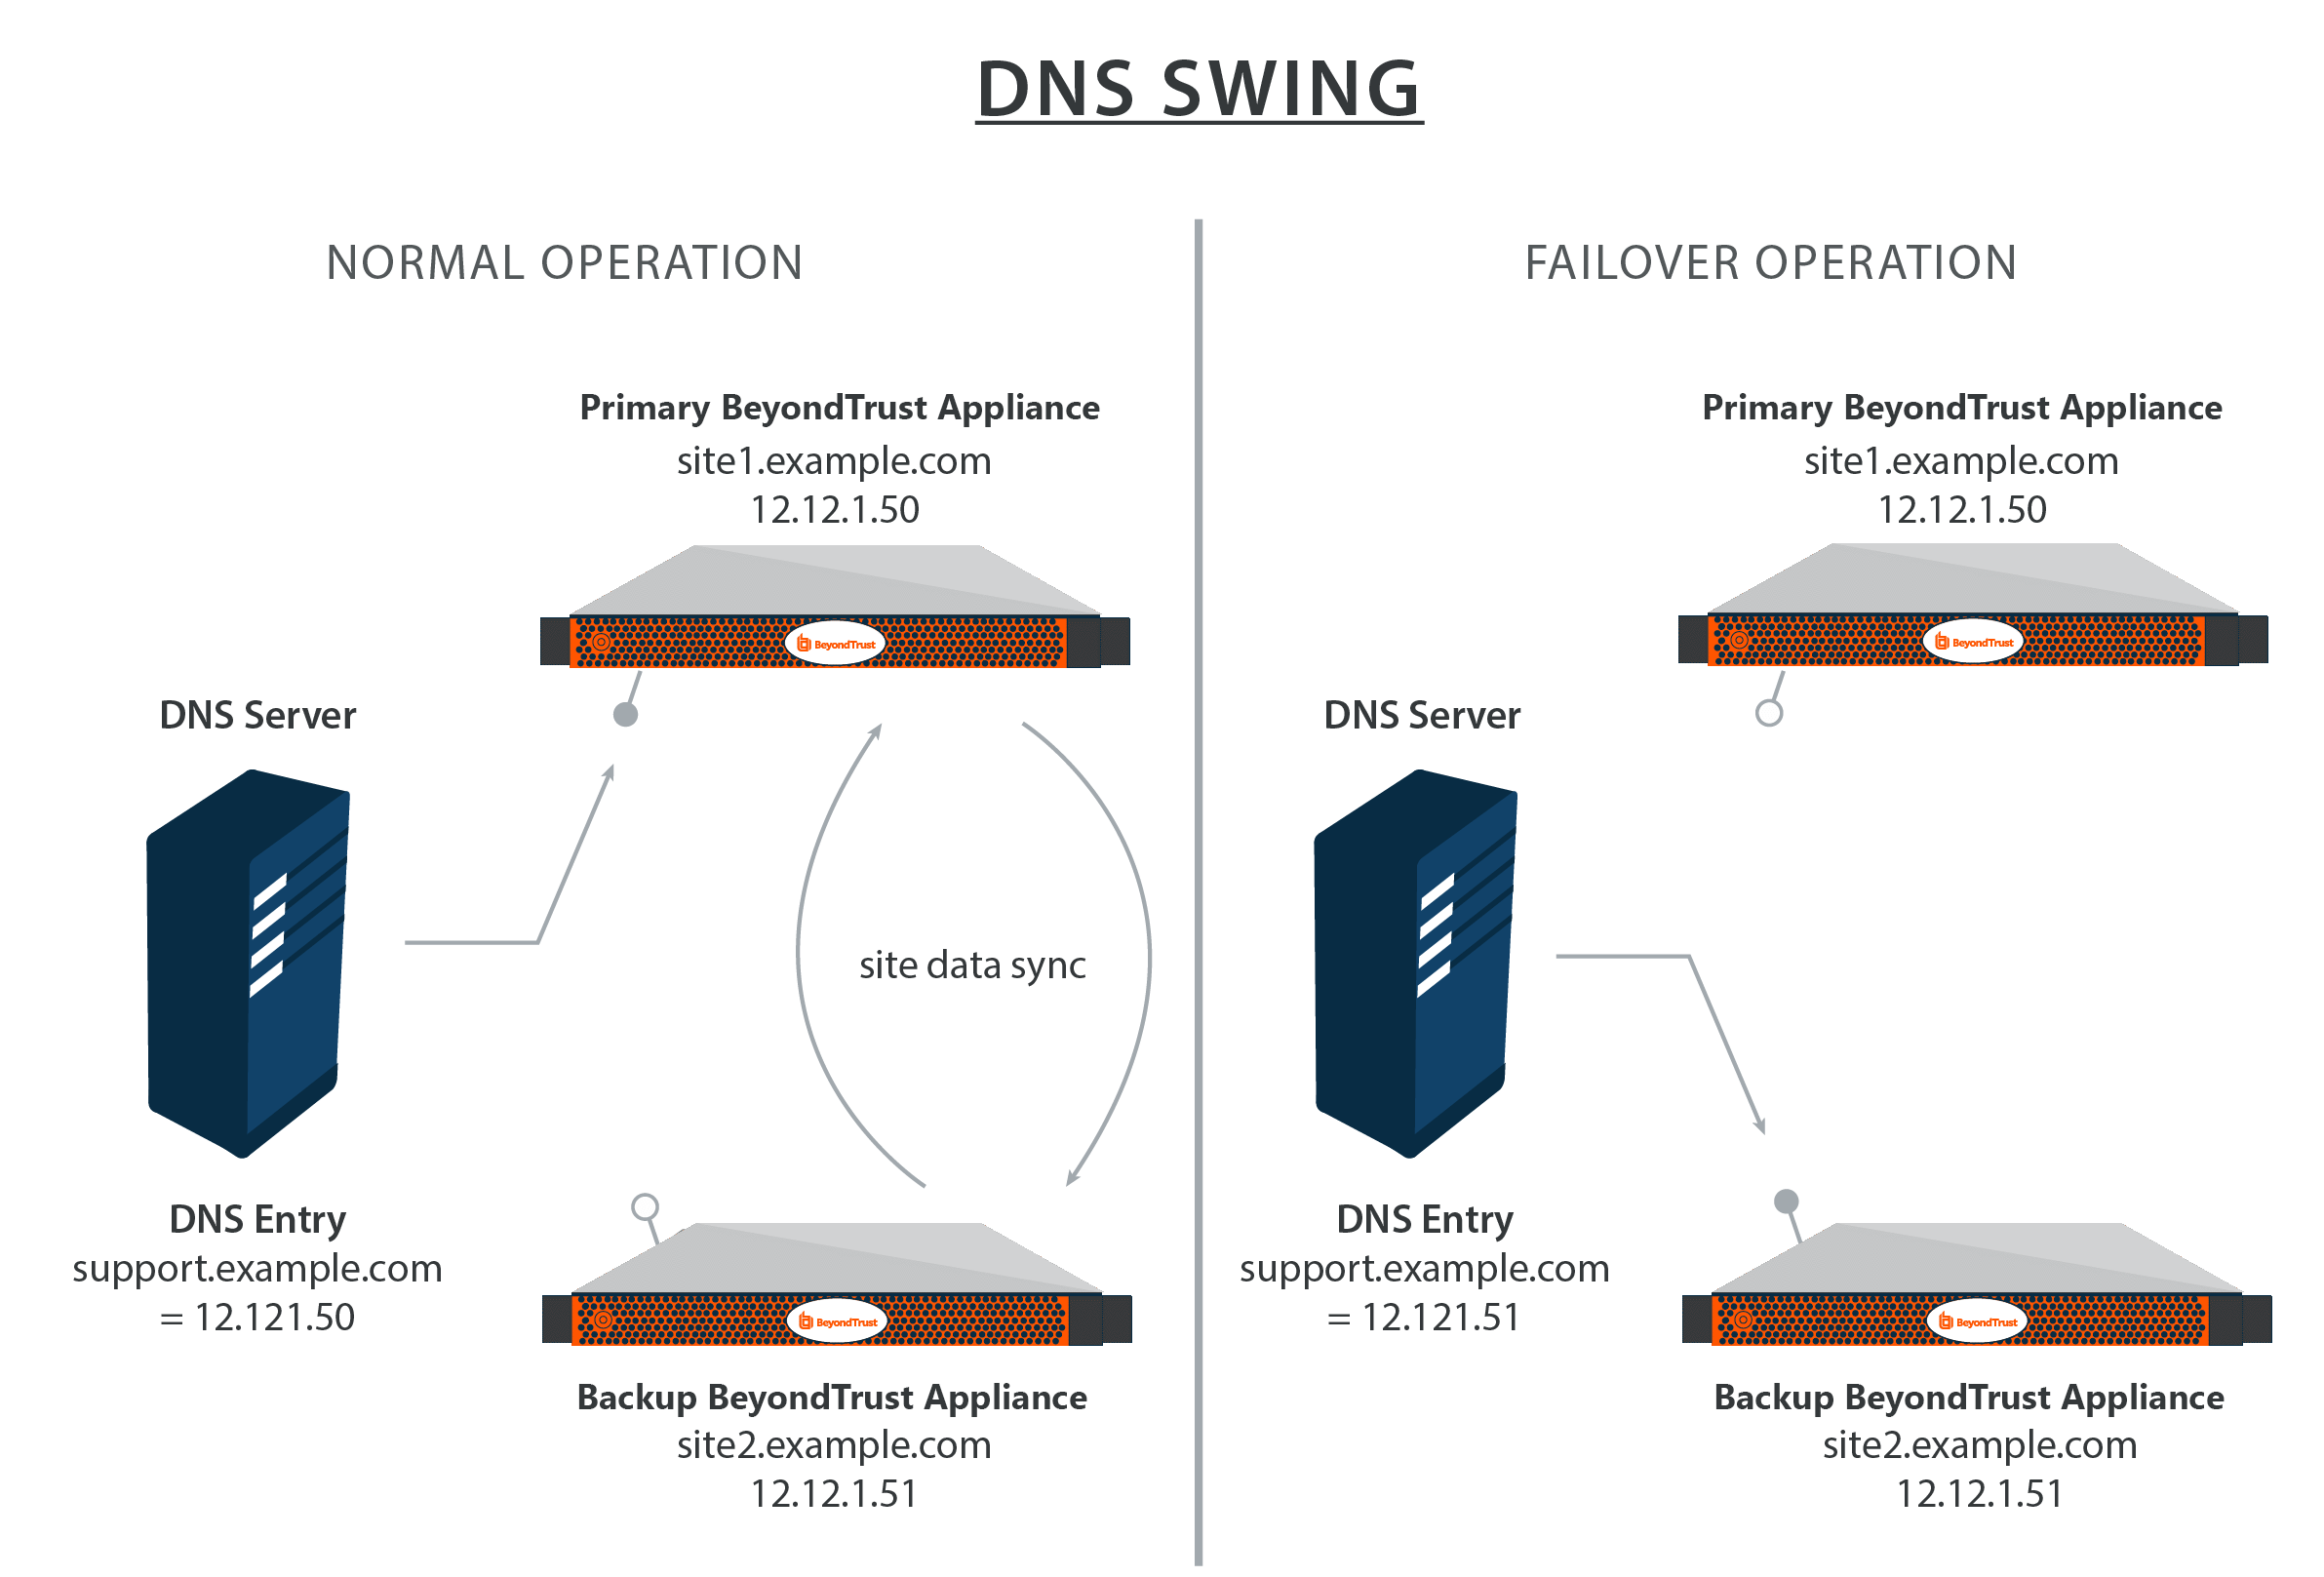
| DNS Swing | Change the DNS entry for your Secure Remote Access site from the IP address for the primary B Series Appliance to the IP address of the backup B Series Appliance. Since DNS changes must propagate through your network, this change might require some time. | Links and processes referencing your Secure Remote Access site domain do not need to be changed and are served by the backup B Series Appliance. Can be used in sites that are on different subnets. | Requires a change to networking equipment configuration that coordinates with changes to the failover roles in the /login interface. The DNS entry change takes some time to propagate depending on the DNS record time to live. Until the new DNS entry is propagated, users may not be able to reach the site. |
| NAT Swing | Change the routing of requests for the Secure Remote Access site at the NAT device from the primary B Series Appliance to the backup B Series Appliance. | Links and processes referencing your Secure Remote Access site domain or IP address do not need to be changed and are served by the backup B Series Appliance. Does not suffer from the propagation time as a DNS entry change would. Can be used in sites that are on different subnets. | Requires a change to networking equipment configuration that coordinates with changes to the failover roles in the /login interface. |
When the primary B Series Appliance in a failover cluster fails and the backup B Series Appliance takes the primary role, any connection agents for the primary B Series Appliance dynamically connect with the new primary, regardless of the failover method. No restart of the client or its host is needed; however, it is important that DNS, network, and firewall systems allow traffic from the connection agent to the backup B Series Appliance in addition to the primary. These agents use the HTTPS protocol over TCP 443 to make their connections.
To configure a valid connection, both B Series Appliances must have identical Inter-Appliance keys. Go to /login > Management > Security to verify the key for each B Series Appliance.
Shared IP address
In this configuration, the hostname of the Secure Remote Access site and IP address that is used to represent it remain constant. Both B Series Appliances share that IP in the /appliance interface, but only the B Series Appliance that is acting as primary has that IP enabled. The backup B Series Appliance does not use that IP unless it becomes primary.
Configure networking on the B Series Appliances
Log in to the /appliance administrative interface for your primary B Series Appliance, accessible from either its unique hostname or IP address (e.g., https://site1.example.com/appliance or https://12.12.1.50/appliance).
Go to the Networking > IP Configuration page, click Add New IP, and enter the IP and subnet mask for the shared IP, keeping the IP Enabled. If the B Series Appliances' hostnames or IP addresses cannot communicate, you must give each B Series Appliance a unique IP address which can reach the other. Unlike the shared IP, the unique IP of each B Series Appliance should remain enabled at all times.
Log in to the /appliance administrative interface for your backup B Series Appliance, accessible from either its unique hostname or IP address (e.g., https:// site2. example.com/appliance or https://12.12.1.51/appliance).
For the backup, go to the Networking > IP Configuration page. If you have not already configured your static IP, click Add New IP and enter the static IP and subnet mask, making sure to keep this IP Enabled. Then click Save Changes. Add the shared IP to this B Series Appliance following these same steps and disable the shared IP for the backup B Series Appliance to prevent an IP conflict on the network.
From the Primary/Backup Site Instance Configuration section in the /login interface, you control the IP addresses which the site instance uses if a failover event occurs. This must be set to the shared failover IP on both the primary and the backup B Series Appliances. Once this is set, the primary site in the failover relationship will enable the IP you selected. The backup site will disable that IP when the roles change.
Because traffic from BeyondTrust security providers can flow out of any IP address on a B Series Appliance, it is important to ensure the network firewall allows access from all BeyondTrust IP addresses on both B Series Appliances in failover to the necessary authentication systems. For example, when two B Series Appliances in shared IP failover are configured to authenticate users on an Active Directory (AD) server using LDAPS port 636, the firewall between the B Series Appliances and the AD server must allow traffic over TCP 636 to pass from any of the IP addresses on either B Series Appliance in order to insure reliable authentication performance.
Example shared IP configuration
| Primary B Series Appliance | Backup B Series Appliance | |
|---|---|---|
| Definition | The B Series Appliance used during normal operations. | The B Series Appliance used during failover operations. |
| Hostname/IP Address | site1.example.com (12.12.1.50) | site2.example.com (12.12.1.51) |
| Site Name/Shared IP | support.example.com (12.12.1.52) | |
DNS swing
Change the DNS entry for your Secure Remote Access site from the primary B Series Appliance IP address to the IP address of the backup B Series Appliance.
Configure networking on the B Series Appliances
Log in to the /appliance administrative interface for your primary B Series Appliance, accessible from either its unique hostname or IP address (e.g., https://site1.example.com/appliance or https://12.12.1.50/appliance).
Because DNS directs the Secure Remote Access site domain, support.example.com, to this IP address, this is the primary B Series Appliance. All session activity will occur on this B Series Appliance.
Log in to the /appliance administrative interface for your backup B Series Appliance, accessible from either its unique hostname or IP address (e.g., https:// site2. example.com/appliance or https://12.12.1.51/appliance).
Go to the Networking > IP Configuration page. If you have not already configured your static IP, click Add New IP and enter the static IP and subnet mask, making sure to keep this IP Enabled. Then click Save Changes.
In the event that you encounter a potential failover situation, try to reserve failing over as an absolute last resort. If the primary B Series Appliance is down, it is often quicker and has less of an impact to bring it back up rather than failing over to the backup B Series Appliance.
To fail over, access the DNS controller and locate the DNS entry for your Secure Remote Access site (e.g., support.example.com). Edit the entry to point to the backup IP. Click Become Primary from the backup B Series Appliance Failover page. Once the DNS entry has propagated, you can resume normal session activity. All requests to your Secure Remote Access site will be served by the backup B Series Appliance. Exact methods for achieving this task vary depending on your DNS provider and software, so consult your DNS documentation for exact steps to do this.
Example DNS swing configuration
| Primary B Series Appliance | Backup B Series Appliance | |
|---|---|---|
| Definition | The B Series Appliance used during normal operations. | The B Series Appliance used during failover operations. |
| IP Address | 12.12.1.50 | 12.12.1.51 |
| Hostname | site1.example.com | site2.example.com |
| Site Name | support.example.com (12.12.1.50 or 12.12.1.51 as determined by DNS Server setting) | |
NAT swing
Configure networking on the B Series Appliances
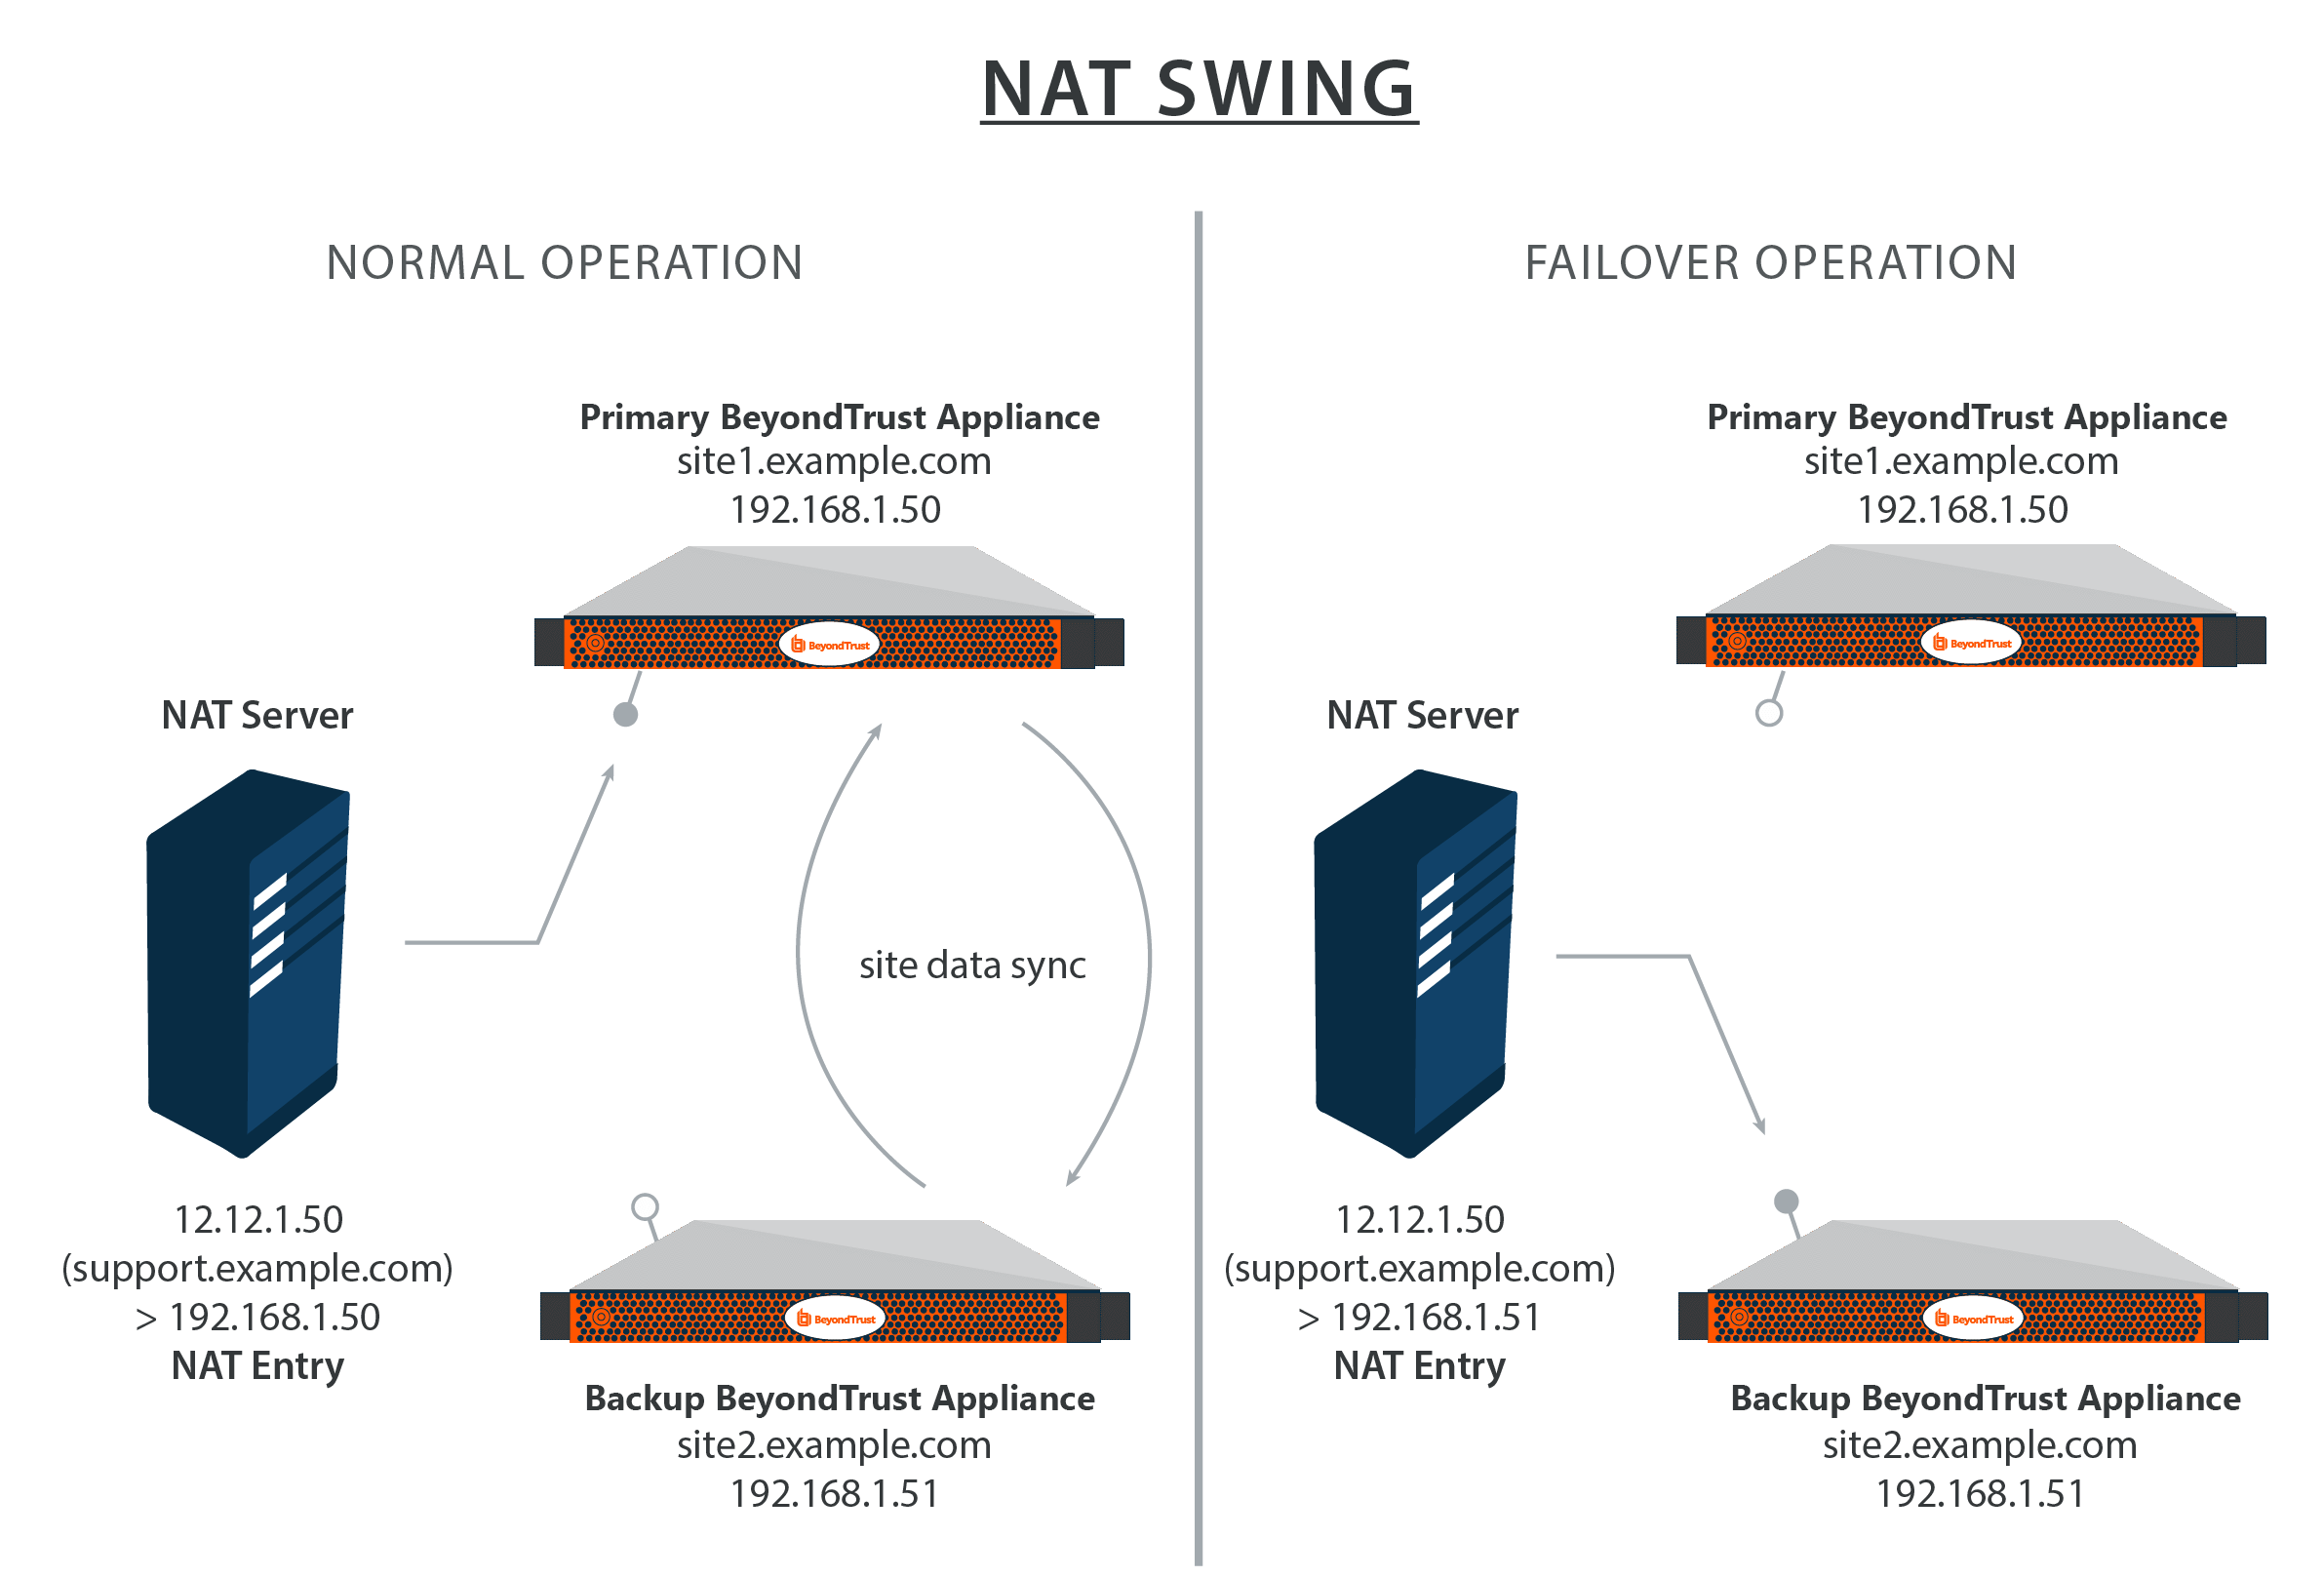
Log in to the /appliance administrative interface for your primary B Series Appliance, accessible from either its unique hostname or IP address (e.g., https://site1.example.com/appliance or https://192.168.1.50/appliance).
Go to the Networking > IP Configuration page. If you have not already configured your static IP, click Add New IP and enter the static IP and subnet mask, making sure to keep this IP Enabled. Then click Save Changes.
Because NAT directs the IP for the Secure Remote Access site domain, support.example.com, to this IP address, this is the primary B Series Appliance.
Log in to the /appliance administrative interface for your backup B Series Appliance, accessible from either its unique hostname or IP address (e.g., https://site2.example.com/appliance or https://192.168.1.51/appliance).
Go to the Networking > IP Configuration page. If you have not already configured your static IP, click Add New IP and enter the static IP and subnet mask, making sure to keep this IP Enabled. Then click Save Changes.
In the event that you encounter a potential failover situation, try to reserve failing over as an absolute last resort. If the primary B Series Appliance, Appliance A, is down, it is often quicker and has less of an impact to bring it back up rather than failing over to the backup B Series Appliance, Appliance B.
To fail over, access the NAT controller and locate the NAT entry for your Secure Remote Access site (e.g., support.example.com). Edit the entry to point to the backup IP. Click Become Primary from the backup B Series Appliance Failover page. As soon as the NAT change is made, you can resume normal session activity. All requests to your Secure Remote Access site will be served by the backup B Series Appliance.
Example NAT method configuration
| Primary B Series Appliance | Backup B Series Appliance | |
|---|---|---|
| Definition | The B Series Appliance used during normal operations. | The B Series Appliance used during failover operations. |
| Private IP Address | 192.168.1.50 | 192.168.1.51 |
| Hostname | site1.example.com | site2.example.com |
| Site Name | support.example.com (Translated to 192.168.1.50 or 192.168.1.51 by NAT Server) | |
Replicate certificate configuration
The primary and backup B Series Appliances must have identically matching SSL certificates for failover to be successful. Otherwise, in the event of failover, the backup B Series Appliance will be unable to connect with any BeyondTrust clients.
Important informationBecause DNS can apply only to one B Series Appliance at a time, and because a B Series Appliance must be assigned the DNS hostname for which it makes a certificate request or renewal request, we recommend that you avoid use of Let's Encrypt certificates for failover B Series Appliance pairs.
To replicate the SSL certificate configuration that is on your primary B Series Appliance, log in to the /appliance web interface of the primary B Series Appliance. Navigate to Security > Certificates and check the box beside the desired certificate. Then, from the dropdown menu, select Export.
Export this certificate, along with its private key and certificate chain. The Passphrase field allows you to protect the certificate export with a passphrase. This is strongly recommended when exporting a private key.
Log in to the /appliance web interface of the backup B Series Appliance. Navigate to Security > Certificates and click the Import button.
Browse to the certificate you just exported from the primary B Series Appliance. If a passphrase was assigned to the file, enter it in the Password field. Then click Upload.
The imported certificate chain will now appear in the table of certificates. Click the name of the newly imported server certificate. The Friendly Name and/or an Alternative Name should match the URL of the B Series Appliance.
For connections that do not supply a Server Name Indication (SNI) or supply an incorrect SNI, select a default SSL certificate from the list to provide for these connections by clicking the button under the Default column. The default SSL certificate cannot be a self-signed certificate nor the default B Series Appliance certificate provided for initial installation.
For more information about SNI, see Server Name Indication.
Failover for planned and unplanned maintenance
Failover for planned maintenance
Important informationThese flows depend on using the backup settings described in the topic Best practices.
This is the preferred method of maintenance. This method provides a path for ensuring that all settings, recordings, and data are migrated from original primary to new primary, then back to the original primary. This method is also sufficient for upgrading B Series Appliances as well.
-
Go to the primary or backup failover page at /login > Management > Failover.
-
Click Check this box to pull a data-sync from the site instance while becoming the backup next to Become <role>.
-
Click Become <role> and wait.
- The page will come back, and a data-sync will be in progress.
- All clients will be disconnected from the B Series Appliance and will not be able to log back in during this time. This ensures no new session data is generated during the sync.
- When the sync is over, the roles will swap, assuming both sides are reachable.
- Do not panic if you refresh the page and the roles are both Backup momentarily. The role swap is handled serially, so it will only be a moment that this occurs. Wait a little longer, and the old backup should become primary.
-
If necessary, swing DNS or the NAT after you see that the roles swap. If configured for Shared IP, skip this step.
-
The original backup B Series Appliance is now the primary B Series Appliance.
-
Perform maintenance on the primary.
During failover sync, /login settings on the currently active primary take precedence over those found on the backup B Series Appliance. This means that in case of conflicts, changes to the /login settings of the current primary will overwrite those of the backup site during failover sync. If you make changes to the backup site, consider noting the changes or downloading a Backup (without logged history) from the Management tab.
- During this time, track any changes made in /login of the new primary site.
- Sessions may be performed normally.
- The settings of the current primary may be modified in the /login interface just as if it were the normal primary. They will not be lost when the original primary takes over again.
-
When the primary is ready to resume its normal duties and is back on the network, repeat steps 1-4, but change the original primary to back to primary.
Instead of going to the /login interface to change roles, you can use the BeyondTrust failover API. For details, see Best practices.
Failover for unplanned maintenance
Important informationThese flows depend on using the backup settings described in the topic Best practices. This method may result in situations where /login interface settings might be lost, but that can be mitigated if you are careful to track what changes were made in /login during the maintenance period.
This flow assumes the normal primary site is already down and unreachable from the backup. If it is reachable, use the failover for planned maintenance. This flow also assumes automatic failover is off. If automatic failover is on and has already occurred, you can skip down to step 3 for the appropriate flow.
If no changes have been made in the /login interface since the last data-sync, use the first flow. Otherwise, use the second flow.
Unplanned maintenance with no recent change in /login
- Go to the backup failover page at /login > Management > Failover.
- Click Become Primary and wait.
- This site will be missing any session data and recordings since the last data-sync.
- Care should be taken to not make changes to settings in /login while the backup is acting as primary. Any changes that are made will be lost when the site is made the backup again. Any session recordings and data will not be lost, however.
- If necessary, perform a DNS or NAT swing after you see that the roles swap.
- Perform maintenance on the primary.
- When the primary is ready to resume its normal duties, repeat steps 1-3 to reverse the roles, but check the Check this box to pull a data-sync from the site instance while becoming the backup BEFORE clicking Become Primary.
Unplanned maintenance with recent changes in /login
- Go to the backup failover page at /login > Management > Failover.
- Click Become Primary and wait.
- This site will be missing any session data, recordings, and /login setting changes since the last data-sync.
- Care should be taken to not make changes to settings in /login while the backup is acting as primary. Any changes that are made will be lost when the site is made the backup again. Any session recordings and data will not be lost, however.
- If necessary, perform a DNS or NAT swing after you see that the roles swap. If configured for Shared IP, skip this step.
- Perform maintenance on the primary.
- During this time, track any changes made in /login of the new primary site with the exception of the failover page.
- When the primary is ready to resume its normal duties, repeat steps 1-3 to swap roles back.
- Re-apply any settings changes in /login from the changes list.
- Perform a data-sync.
Instead of going to the /login interface to change roles, you can use the BeyondTrust failover API. For details, see Best practices.
API to check appliance health and perform failover
The BeyondTrust API includes calls to manage and automate failover. Following the basic flows set forth in failover for planned maintenance and failover for unplanned maintenance you can automate certain parts of these flows using the BeyondTrust API. This section provides some examples of how you can use the BeyondTrust failover API calls. You must modify the examples to fit your environment.
Important informationUsing the built-in failover in /login and the API failover commands together could result in conflict.
To use the BeyondTrust API, ensure that the Enable XML API option is checked on the /login > Management > API Configuration page.
For full instructions on using the BeyondTrust API, see the API guide.
Check B Series Appliance health
To perform a health check on the B Series Appliance, use the API command check_health.
For more information, see Command API check_health.
You can use the XML responses <last_data_sync_time> and <last_data_sync_status> to make sure data syncs are occurring as expected.
If the XML response for the primary B Series Appliance includes <success>1</success>, then the B Series Appliance is functioning normally. You should not need to failover.
If the XML response for the primary B Series Appliance includes <success>0</success>, then you should take into account the time of the last successful health check. Also consider any <error_message> elements that are returned. You should put in place contingencies so that if the issue can be resolved in a reasonable time, then no action should be taken. However, if it is determined that failover is required, then you can use the API to switch failover roles.
In addition to or alternative to using the API command above, you can use https://support.example.com/check_health to check the health of a B Series Appliance. This returns an HTTP status of 200 if the probe is successful and 500 (Server Error) if not. While you will see a simple human-readable message showing success or failure, no other data is exposed.
Set failover roles
To set the failover role on a B Series Appliance, use the API command set_failover_role. (In the API Programmer's Guide, see Command API set_failover_role for full details.)
It is assumed that you will have in place systems for enabling/disabling a shared IP address if your two B Series Appliances are on the same network or else automatically performing a DNS swing or NAT swing.
Once the failover roles have successfully been changed, you should receive an XML response of <success>.
Resolve conflicts
If both B Series Appliances in failover take the same role at once (i.e., both primary or both backup), then the Failover Status page shows this error:
NOTE: There is a conflict in the primary and secondary site instances. Both of them are either primary or backup, which is an unexpected situation. "Fix This Error" command will resolve any configuration problems.
This can happen when network connectivity is lost between the B Series Appliances and one takes on the role of the other. This can also occur automatically if Failover Backup Settings have Enable Automatic Failover enabled.
If both B Series Appliances are in the primary role and you know which B Series Appliance should be the backup, log in to the /login admin web interface of this B Series Appliance, go to Management > Failover, and click Become Backup. Similarly, if both B Series Appliances are in the backup role and you know which B Series Appliance should be the primary, go to Management > Failover and click Become Primary. If you encounter errors during this process, log in to the /appliance admin web interface of each B Series Appliance, go to Support > Utilities, and use the TCP Connection Test to determine if the B Series Appliances can connect over port 443. If not, check the Networking > IP Configuration tab and confirm the settings here are correct.
If you are not sure which B Series Appliance should be primary and which should be the backup B Series Appliance, you can click the Fix This Error button. Clicking this button automatically determines for you which role each B Series Appliance should have based on various criteria such as which B Series Appliance has the shared IP enabled or which has the IP to which the primary DNS address resolves. Fix This Error also implements the necessary role changes automatically.
Whether you resolve the error manually or automatically, the B Series Appliance which takes the backup role will have its configuration settings in /login overwritten by the primary B Series Appliance, with the exception of failover settings. Reports and recording data should be synchronized between both B Series Appliances so that all such data on either B Series Appliance will be extant on both B Series Appliances after synchronization is complete. When in doubt, download a configuration backup from /login using the Download Backup button located in Management > Software Management.
Replace an appliance in a failover scenario
If your BeyondTrust Appliance B Series should experience failure, BeyondTrust Technical Support is prepared to help you return to full functionality as quickly as possible. If you have already set up a failover B Series Appliance, you can continue working with minimal downtime. BeyondTrust Technical Support will work with you to determine if the offline B Series Appliance needs to be replaced. This quick guide gives you the steps to replace a B Series Appliance when you have it set up in a failover scenario.
This document is not comprehensive in its details. Rather, it is a tool to help you assemble the information you need to replace a B Series Appliance. You may need to refer to other BeyondTrust documents during this process. For your convenience, these documents are linked to below:
- B Series Appliance installation
- B Series Appliance in the network
- Appliance web interface
- Upgrade B Series Appliance
Install the new B Series Appliance
-
Install the B Series Appliance and log in.
-
When you receive your new B Series Appliance, remove it from its packaging and connect the B Series Appliance to a switch.
You may wish to save the packaging materials from the replacement B Series Appliance to return the defective B Series Appliance.
-
Set an IP address of 169.254.1.4 on a workstation and connect to a port on the same switch as the B Series Appliance.
-
Browse to 169.254.1.1/appliance in a browser, and log in using the default username and password:
-
Username: admin
-
Password: password
If 169.254.1.1 fails, try browsing to 169.254.1.2/appliance or 169.254.1.3/appliance.
-
-
-
Set up the IP configuration.
- Browse to Networking > IP Configuration.
- Enter the appropriate IP configuration settings for the network.
- Save the changes and test connectivity over the new IP address.
-
Import SSL certificates.
- Log in to the /appliance web interface of the primary B Series Appliance, the B Series Appliance which is currently hosting all of your Secure Remote Access processes.
- Browse to Security > Certificates and export the certificate chain that is assigned to the active IP address.
- Log in to the /appliance web interface of the new B Series Appliance.
- Import the certificates from the primary B Series Appliance and assign the server certificate to the active IP address.
Restore the failover configuration
- Register the B Series Appliance.
- In the /appliance web interface of the new B Series Appliance, browse to the Status > Basics page and take a screenshot.
- Email the screenshot of the Status > Basics page to your BeyondTrust Technical Support representative.
- The BeyondTrust Technical Support team will build a new software package and email you installation instructions when it is ready.
- Refer to the Failover Configuration section of the Upgrade Guide and follow either the synchronous or the asynchronous upgrade steps, depending on the preferred procedure.
- Since the B Series Appliances will not begin in failover, simply skip the Break Failover Relationship step in the Upgrade Guide.
- If you choose to upgrade asynchronously, you must begin by downloading a backup from the primary B Series Appliance's /login > Management > Software Management page. Then restore these settings to the new B Series Appliance.
- Follow the rest of the failover procedure as outlined in the Upgrade Guide.
If you have the original .nss software package that is installed on the primary B Series Appliance, you can simply install that software package on the backup B Series Appliance. You can then proceed to establish failover without installing the new software package mentioned above.
- Notify your BeyondTrust Technical Support representative that the upgrade is complete. BeyondTrust Technical Support will then provide you with the return shipping label and instructions for the failed B Series Appliance.
Return the defective B Series Appliance
- Reset and shut down the defective B Series Appliance.
- Log in to the /appliance web interface of the defective B Series Appliance.
- Browse to the Status > Basics page, and click Reset Appliance to Factory Defaults.
- Wait for the reset to complete, and then click Shut Down This Appliance.
- Use the shipping label and instructions from BeyondTrust Technical Support along with the packaging materials from the replacement B Series Appliance to return the defective B Series Appliance.
Appendix: Administration settings
Below is a list of all the administration settings available when setting up a backup B Series Appliance for failover. These are found in /login > Management > Failover.
Configuration
Setup a failover relationship
New backup site connection details
Host name or IP address
Enter the hostname or IP address of the B Series Appliance you wish to use as the backup in a failover relationship.
Port
Enter the TLS port allowing this primary B Series Appliance to connect to the backup B Series Appliance.
Reverse connection details to this primary site
Host name or IP address
Enter the hostname or IP address of this B Series Appliance, which you wish to use as the primary in a failover relationship.
Port
Enter the TLS port allowing the backup B Series Appliance to connect to this primary B Series Appliance.
Status
This host's status
View the hostname of this site, along with its status of primary site instance or backup site instance.
Peer host's status
View the hostname of this site, along with its status of primary site instance or backup site instance. Also view the date and time of the last status check.
Status history
Expand or collapse a table of status events that have occurred.
Primary or backup site instance status
Text confirms that you are either on the primary or backup site instance for your host site.
Sync now
Manually force a data sync from the primary B Series Appliance to the backup B Series Appliance.
Become backup/primary
Switch roles with the peer B Series Appliance, essentially forcing a failover for planned maintenance or a known failover event.
Check this box to pull a data-sync from the site instance at example.com while becoming the backup/primary
If you want to synchronize data from the peer B Series Appliance prior to swapping roles, select this checkbox. If this option is selected, all users on the existing primary B Series Appliance will be disconnected during the data sync, and no other operations will be available until the swap is complete.
Check this box to become a backup even if the peer site instance at example.com cannot be contacted
On the primary site instance, you have the option to become the backup even if the peer B Series Appliance cannot be contacted. If this option is unchecked, failover will be canceled if both B Series Appliances cannot be kept in sync in terms of their failover roles (one primary and one backup).
For example, if you know the current backup B Series Appliance is online but cannot be reached by the primary due to a network connection issue, you may wish to check this option to make the primary the backup before the network connection is restored. In this example, you would also need to access the current backup and make it the primary.
Break failover relationships
Break the failover relationship, removing each B Series Appliance from its role as primary or backup.
Primary or backup site instance configuration
Shared IPs
Control the shared IP address the site instance uses in the event of a failover by selecting the checkbox for the failover IP address. If you change the relationship between the sites, the checked IP addresses will disable when a primary site becomes a backup, and will enable when a backup becomes a primary site. You should manually mirror the setting on the peer site, as the setting is not shared.
Backup settings
The settings you configure here will be enabled only when the site instance you are configuring is in a backup role.
When on the primary site instance, select Backup Settings to expand or collapse the page displaying the configuration fields.
Enable backup operations
Enable or disable site backups.
Primary site instance timeout
Set how long the primary site must be unreachable before failing over.
Automatic data-sync interval
You can control the timing details of the automatic data-sync interval.
Data-sync bandwidth limit
Set bandwidth parameters for data-sync.
Enable automatic failover
Quickly enable or disable automatic failover.
Network connectivity test IPs
Enter IP addresses for the backup site to check to determine whether the backup's inability to reach the primary is because the primary is offline or the backup has lost its network connection.
Updated 5 days ago
