Session policies | RS Pathfinder
What are Session policies?
Session policies define session security permissions tailored to specific scenarios. They can be applied to users, public sites, and Assets. The Session Policies section lists available policies. When you click the arrow by a policy name it does the following:
- Can quickly see where the policy is being used
- Displays availability for users, access invites, and Jump Clients
- Displays the tools configured.
How are Session policies useful?
Session policies enhance security and flexibility by allowing administrators to control session behavior and permissions for users, public sites, and Assets based on organizational needs.
How do I access the Session Policies page?
- Sign into app.beyondtrust.io.
The BeyondTrust Home page displays. - From the left menu, click Remote Support > Users & Security.
The Users page displays. - At the top of the page, click Session Policies.
The Session Policies page displays.
The Session Policies page
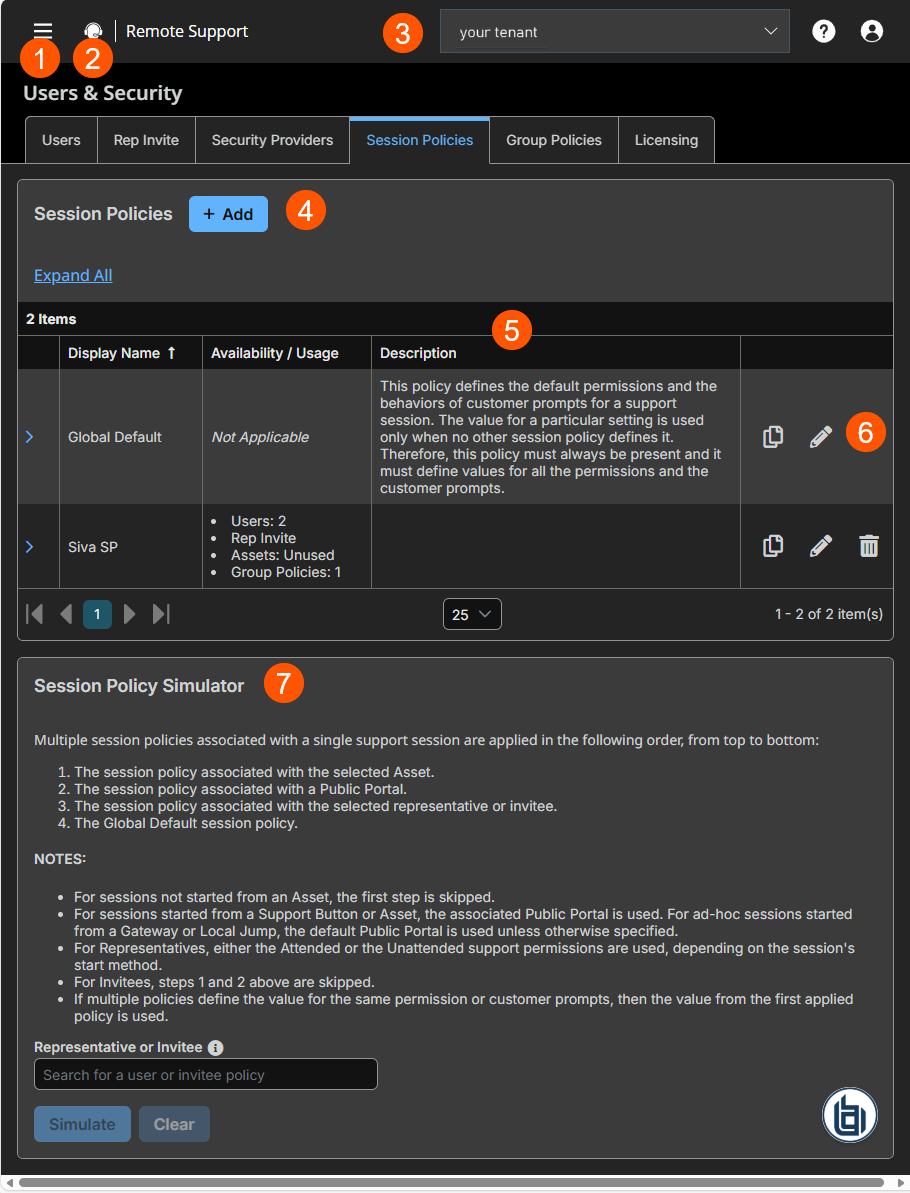
- Left menu: Easy access to all pages in Remote Support, including Status, Consoles & Downloads, My Account, Configuration, Asset Management, Vault, Console Settings, Users & Security, Reports, Public Portals, Dashboards, Management, and Appliance pages.
- Status: Opens the Status page.
- Header: Change your tenant site, manage your profile, and access documentation.
-
Add:- Adds a new session policy.
-
Session Policies columns: The list of Session Policies columns.
Session Policies columns
- Display Name: Unique name of the session policy.
- Availability/Usage: Displays the user and groups as defined in the Availability section.
- Description: Detailed comments of the policy.
-
Special Actions list options: Copy, edit or delete a session policy.
-
Session Policy Simulator: Simulates a session policy and shows how the permissions are used.
Add a session policy
-
Sign into app.beyondtrust.io.
The BeyondTrust Home page displays. -
From the main menu, click Remote Support > Users & Security.
The User & Security page opens and the Users tab displays by default. -
Click the Session Policies tab.
The Session Policies tab displays. -
Click Add.
The Add Session Policy page displays. -
Select the various session policy settings. See Session Policy settings.
-
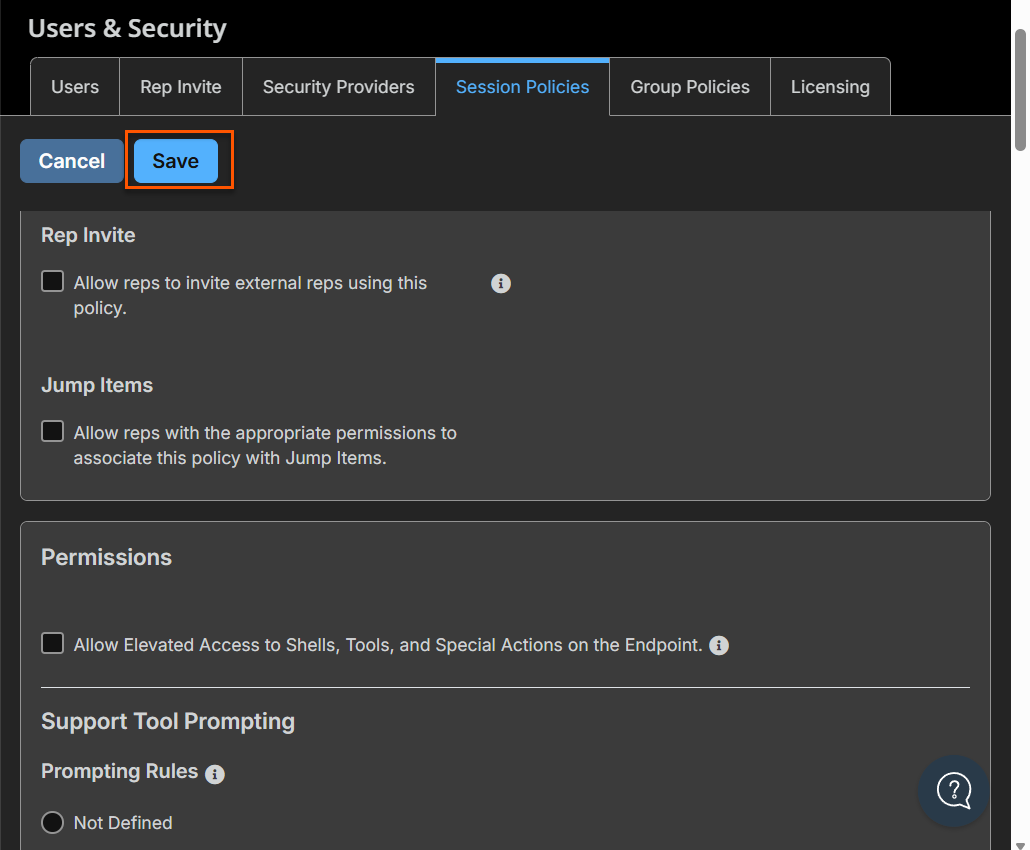
Click Save.
Copy a session policy
- Sign into app.beyondtrust.io.
The BeyondTrust Home page displays. - From the main menu, click Remote Support > Users & Security.
The User & Security page opens and the Users tab displays by default. - Click the Session Policies tab.
The Session Policies tab displays. - Click Copy to create a new policy with identical settings, expediting the creation of similar policies.
- You can then edit this new policy to meet your specific requirements.
Edit a session policy
- Sign into app.beyondtrust.io.
The BeyondTrust Home page displays. - From the main menu, click Remote Support > Users & Security.
The User & Security page opens and the Users tab displays by default. - Click the Session Policies tab.
The Session Policies tab displays. - Find the session policy you want to edit and click Edit
 .
.
Delete a session policy
- Sign into app.beyondtrust.io.
The BeyondTrust Home page displays. - From the main menu, click Remote Support > Users & Security.
The User & Security page opens and the Users tab displays by default. - Click the Session Policies tab.
The Session Policies tab displays. - Find the session policy you want to remove and click Delete
 .
. - When prompted, click Yes.
Session Policy settings
- Display Name: create a unique name to help identify this policy. This name helps when assigning a session policy to users and Jump Clients.
- Code Name: set a code name for integration purposes. If you do not set a code name, one is created automatically for you.
- Description: add a brief description to summarize the purpose of this policy. The description is seen when applying a policy to user accounts, group policies, and access invites.
Availability
- Users: select this to allow users (user accounts and group policies) be assigned to the policy.
- Rep Invite: select this to allow reps to invite external reps to join a session.
- Assets: select this to allow reps with appropriate permissions to assign this policy to Assets.
- Dependents: this field is only displayed if this session policy is already in use. It displays the number of users and Jump Clients using this policy.
Rep Invite
When an invitation for an external representative is created:
- The invitee and global policies are applied to the invited Rep, with the invitee policy taking precedence.
- Asset and Public Portal policies are skipped for external invitees.
- Use the Session Policy Simulator to simulate permissions for the invitee:
- Scroll to the bottom of the Sessions tab.
- Select a User or Invitee policy from the dropdown.
- Click Simulate. A list of policies, permissions, and access for that invitee displays.
Permissions
For all of the permissions that follow, you can choose to enable or disable the permission, or you can choose to set it to Not Defined.
Important infoSession policies are applied to a session in a hierarchical manner, with Jump Clients taking the highest priority, then users, and then the global default. If multiple policies apply to a session, then the policy with the highest priority will take precedence over the others.
If, for example, the policy applied to a Jump Client defines a permission, then no other policies may change that permission for the session. To make a permission available for a lower policy to define, leave that permission set to Not Defined.
You can set which tools should be enabled or disabled with this policy, by selecting any one of the following permissions:
-
Allow Elevated Access to Tools and Special Actions on the Endpoint
- When you select this checkbox, access to elevated functionality is provided in the representative console for this session without needing the explicit rights of a logged in user on the remote endpoint. This setting applies where allowed by the endpoint's platform.
- When you clear the checkbox, it restricts users from gaining full access to the file transfer and command shell functions when they connect to an elevated Asset but do not have elevated rights. To do this, special actions and power control actions are hidden and not available. It also restricts File Transfer, Command Shell, and Registry Access when there is no user present in the session. This setting applies where allowed by the endpoint's platform.
- Elevated Shells - when you select this checkbox and log in to an elevated session, the tab title indicates that the session is elevated and a Add a new elevated shell button displays. When this checkbox is cleared and you log in to an elevated session, the Add a new elevated shell button is no longer available. You can only add a new unelevated shell.
-
Support tool prompting
- Prompting rules: Choose to ask the customer permission to use any of the support features below. Select No Prompting to never prompt, Always Prompt to always prompt, or Prompt for Some Tools to choose which permissions to prompt for. If Prompt for Some Tools is chosen, a Prompt Customer option will appear beside each tool with the options to Never prompt or to Always prompt. If Not Defined, this option will be set by the next lower priority policy.
- Allowed to prompt once: If Screen Sharing is set to View and Control and prompting is enabled, this option appears. Check the box to make the screen sharing prompt request access to all tools during the session, with no further prompts.
- Prompting options: Set how long to wait for a response to a prompt before defaulting to the answer of Deny or Allow. If Not Defined, this option will be set by the next lower priority policy.
- Prompting rules: Choose to ask the customer permission to use any of the support features below. Select No Prompting to never prompt, Always Prompt to always prompt, or Prompt for Some Tools to choose which permissions to prompt for. If Prompt for Some Tools is chosen, a Prompt Customer option will appear beside each tool with the options to Never prompt or to Always prompt. If Not Defined, this option will be set by the next lower priority policy.
-
Screen Sharing
- Screen Sharing Rules: Selects the remote user's access to the remote system. The values are the following:
- Not Defined: This option is set by the next lower priority policy.
- Deny: Disables screen sharing.
- View Only: Allows the representative to view the screen.
- View and Control: Allows the representative to view and take action on the system.
- Clipboard Synchronization Direction: Available only if View and Control is selected above.Selects how clipboard content flows between users and endpoints. The value are the following:
- Not allowed: The user is not allowed to use the clipboard, no clipboard icons display in the representative console, and cut and paste commands do not work.
- Allowed from Rep to Customer: The user can push clipboard content to the endpoint but cannot paste from the endpoint's clipboard. Only the Send clipboard icon displays in the access console.
- Allowed in Both Directions: Clipboard content can flow both ways. Both Push and Get clipboard icons display in the access console.
- Allowed endpoint restrictions: Available only if View and Control is selected above. Sets the option for the user to suspend the remote system's mouse and keyboard input. The user may also prevent the remote desktop from being displayed.
- None does not set any restrictions on the remote system.
- Display, Mouse, and Keyboard disables these inputs.
If this is selected, a check box is available to Automatically request a privacy screen on session start. Privacy screen is applicable only for sessions started from a Jump Client, a Remote Asset, or a Local Asset. We recommend using privacy screen for unattended sessions. The remote system must support privacy screen.
- Application Sharing Restrictions: This option limits access to specified applications on the remote system with either. There are three values:
- None
- Allow only the listed executables: Allows you to specify executables to allow as appropriate to your objectives.
- Deny only the listed executables: Allows you to specify executables to deny as appropriate to your objectives.
- If Allow or Deny is selected, you see the option to Add new executables to the allow or deny list. When you add executables, you have two choices:
- Enter file names or SHA-256 hashes, one per line: Manually enter the executable file names or hashes you wish to allow or deny. Click Add Executable(s) when you are finished to add the chosen files to your configuration.
You may enter up to 25 files per dialog. If you need to add more, click Add Executable(s) and then reopen the dialog. - Browse for one or more files: Choose executable files to automatically derive their names or hashes. If you select files from your local platform and system in this manner, use caution to ensure that the files are indeed executable files. No browser level verification is performed.
Choose either Use file name or Use file hash (advanced) to have the browser derive the executable file names or hashes automatically.
Click Add Executable(s) when you are finished to add the chosen files to your configuration. You may enter up to 25 files per dialog. If you need to add more, click Add Executable(s) and then reopen the dialog.
If Allow or Deny is selected, you may also choose to allow or deny desktop access.- Application sharing restrictions applies only to Windows operating systems.
- The option to add executables to the list is available only in modern browsers, not legacy browsers.
- Enter file names or SHA-256 hashes, one per line: Manually enter the executable file names or hashes you wish to allow or deny. Click Add Executable(s) when you are finished to add the chosen files to your configuration.
- Allowed Endpoint Restrictions: Sets the option for the user to suspend the remote system's mouse and keyboard input. The user may also prevent the remote desktop from being displayed.
- Screen Sharing Rules: Selects the remote user's access to the remote system. The values are the following:
-
System Sound Sharing
-
System Sound Sharing Rules: Allows the user to hear the endpoint's system sound during screen sharing when supported by the client. It does not allow access to the endpoint's microphone. If Not Defined is enabled, this option is set by the next lower priority policy. This setting may be overridden by a higher priority policy.
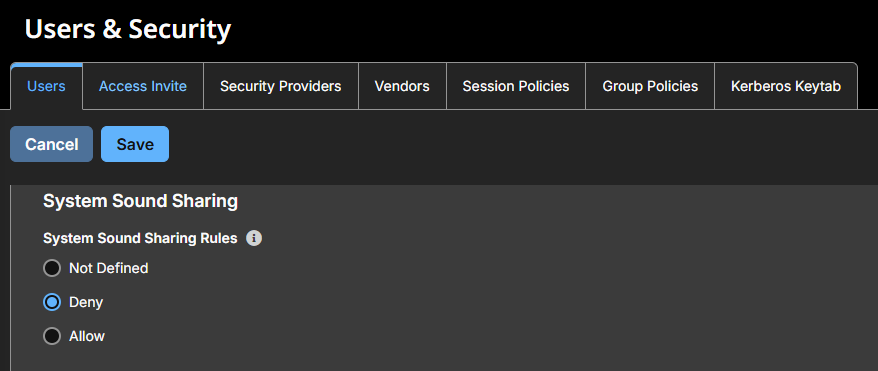
This feature only works if the representative has permissions for sound and if the site has the Peer To Peer option (located under Configuration > Options ) enabled. Enabling this option allows sound to be heard from the endpoint.
-
-
Annotations
- Annotation Rules: Enables the rep to use annotation tools to draw on the remote system's screen. If Not Defined is enabled, this option is set by the next lower priority policy.
-
File Transfer
- File Transfer Rules: Enables the rep to upload files to the remote system, download files from the remote system, or both. If Not Defined is enabled, this option is set by the next lower priority policy.
- Accessible paths on endpoint's filesystem: Allows the rep to transfer files to or from any folders on the remote system or only specified folders.
- Accessible paths on user's filesystem: Allows the rep to transfer files to or from any folders on their local system or only specified folders.
-
Shell
- Shell Rules: Enables the rep to issue commands on the remote computer through a virtual command line interface. If Not Defined is set, this option is set by the next lower priority policy.
- Allowed Executable Command Patterns: Enables the rep to search for a regex pattern that matches a shell prompt. For filtering to work, the Recognized Shell Prompts section on the Asset Management > Asset page must be set and only filter commands in a Shell Session.
Shell access cannot be restricted for Shell Sessions.
-
System Information
- System Information Rules: Enables the rep to see system information about the remote computer. If Not Defined is enabled, this option is set by the next lower priority policy. You also have the option to set system information actions.
- Allowed to use system information actions: Enables the rep to interact with processes and programs on the remote system without requiring screen sharing. Some of the actions you can perform are the following:
- Kill processes
- Start, stop, pause, resume, and restart services
- Uninstall programs
-
Registry Access
- Registry Access Rules: Enables the user to interact with the registry on a remote Windows system without requiring screen sharing. You have the ability to do the following actions:
- View, add, delete and edit keys
- Search and import/export keys
- Registry Access Rules: Enables the user to interact with the registry on a remote Windows system without requiring screen sharing. You have the ability to do the following actions:
-
Canned Scripts
- Canned Script Rules: Enables the rep to run canned scripts that have been created for their teams. If Not Defined is enabled, this option is set by the next lower priority policy.
-
Session Termination Behavior
- When the access session ends, automatically: Controls what action to happen when session ends. The following options are:
- Not Defined
- Do Nothing
- Lock the computer
- Logout the user (Only works on Windows hosts)
- Allow users to override this setting per session: You can allow a rep to override the session termination setting from the Summary tab in the console during a session.
- When the access session ends, automatically: Controls what action to happen when session ends. The following options are:
Export policy
You can export a session policy from one site and import those permissions into a policy on another site.
To export a saved policy file, do the following:
- Sign into app.beyondtrust.io.
The BeyondTrust Home page displays. - From the main menu, click Remote Support > Users & Security.
The Users & Security page opens and the Users tab displays by default. - Click the Session Policies tab.
The Session Policies tab displays. - Edit an existing policy file, click the pencil.
- Scroll to the bottom of the page, click Export Policy, and save the file.
Import policy
You may import those policy settings to any other BeyondTrust site that supports session policy import.
To import a saved policy file, do the following:
- Sign into app.beyondtrust.io.
The BeyondTrust Home page displays. - From the main menu, click Remote Support > Users & Security.
The Users & Security page opens and the Users tab displays by default. - Click the Session Policies tab.
The Session Policies tab displays. - Edit an existing policy file, click the pencil.
- Scroll to the bottom of the page, click + Select Policy File.
- From the Open dialog box, located the exported policy file. The default extension is .bgo.
- Select the exported policy file, click Open.
- Once the policy file is uploaded, the Edit Session Policy page displays, which allows you to make modifications. After the modifications are made, click Save.
Session Policy Simulator
Because layering policies can be complex, you can use the Session Policy Simulator to determine what the outcome will be. Additionally, you could use the simulator to troubleshoot why a permission is not available when you expected it to be.
To use the Session Policy simulator, do the following:
- Sign into app.beyondtrust.io.
The BeyondTrust Home page displays. - From the main menu, click Remote Support > Users & Security.
The Users & Security page opens and the Users tab displays by default. - Click the Session Policies tab.
The Session Policies tab displays. - Go to the Session Policy Simulator section.
- For User, select the representative performing the session. This dropdown includes both rep accounts and external rep invite policies.
- For Session Start Method, select a valid method.
- For Jump Client or Asset, search the client or shortcut by name, comments, Asset Group, or tag.
- Click Simulate.
In the results, the permissions configurable by session policy are displayed in read-only mode. You can see which permissions are allowed or denied as a result of the stacked policies, as well as which policy set each permission.
