Intel vPro | RS for Desktop
Using Intel® Active Management Technology, privileged users can support fully provisioned Intel vPro Windows systems below the OS level, regardless of the status or power state of these remote systems. To use Intel vPro, you must have access to a Gateway with Intel vPro enabled and must have the user account permission Allowed Connection Types: Intel® vPro.
- Remote systems using vPro with AMT version 5 or higher may be supported with BeyondTrust.
- Intel vPro is not supported with clustered Gateways.
To start a session with an Intel vPro system, open the Intel® vPro dialog from:
- The Support menu of the representative console
- The Intel® vPro button at the top of the representative console
-
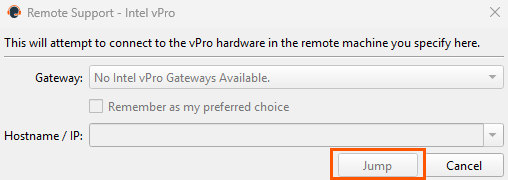
From the Gateway dropdown, select the network that hosts the computer you wish to access. If you generally access the same Gateway, check Remember as my preferred choice. Enter the Hostname / IP of the system you wish to access.
-
Click Jump.
-
Depending on your Gateway setup, you might be prompted to enter a username and password.
-
The Gateway detects the provisioned vPro hardware. If the credentials, provided during either the Gateway configuration or the Jump attempt, match the credentials of the vPro-provisioned system, the connection is initiated.
-
Depending on how the vPro computer is provisioned, you might be prompted to enter a user consent code before performing certain actions.
-
If a consent code is required, a pop-up appears on the remote screen. An end user must provide you with this code before you can gain hardware access.
-
Once the connection is made, you have control of the remote vPro hardware. You can then use the vPro session tools to work on the remote system.
vPro session tools
 Reset the vPro connection
 Power off or power on the host machine. You may also reboot the host machine normally, to BIOS, to PXE, or to a selected disk image.
 Select an ISO or IMG file to mount on the remote system. File location is set during Gateway configuration.
 Start or stop viewing the remote system's display using KVM.
 Send Ctrl-Alt-Delete to the remote computer.
 While screen sharing, capture a screenshot of the remote screen or screens at their full resolution, saved in PNG format. Save the image file to your local system or to your clipboard. The capture action is recorded in the chat log with a link to a locally saved image. The link remains active even after the customer has left the session, but it does not persist in the BeyondTrust session report. You can adjust the directory where screenshots are saved by going to the File > Settings > Support Tools menu in the representative console. This feature works on Mac, Windows, and Linux.
 Select an alternate remote monitor to display. The primary monitor is designated by a P.
 View the remote screen at actual or scaled size.
 Select the color optimization mode to view the remote screen. If you are going to be primarily sharing video, select Video Optimized; otherwise select between Black and White (uses less bandwidth), Few Colors, More Colors, or Full Color (uses more bandwidth). Both Video Optimized and Full Color modes allow you to view the actual desktop wallpaper.
 View the remote desktop in full screen mode or return to the interface view.
- From the Reboot menu, select Reboot and Enter BIOS to start the BIOS boot process on the remote vPro system. You will then have access to the BIOS for troubleshooting purposes.
- Select Reboot Using PXE to boot the remote system using a network interface independently of data storage devices or installed operating systems.
Reboot to a Disk Image uses IDE-R to boot the remote system to a specified ISO or IMG file.
Note that the remote system will display the screen exactly as you see it, even when booting to another image.
Intel vPro shortcuts
Using Intel® Active Management Technology, privileged users can support fully provisioned Intel vPro Windows systems below the OS level, regardless of the status or power state of these remote systems.
Create an Intel® vPro shortcut
- To create an Intel® vPro shortcut, click the Create button in the Asset Management Interface. From the dropdown, select Intel® vPro. Intel® vPro shortcuts appear in the Asset Management Interface along with Jump Clients and other types of Asset shortcuts.
- Organize and manage existing Assets by selecting one or more Assets and clicking Properties.
To view the properties of multiple Assets, the items selected must be the same type (e.g., all Jump Clients, all Remote Jumps, etc.).
- Enter a Name for the Asset. This name identifies the item in the session tabs. This string has a maximum of 128 characters.
- From the Gateway dropdown, select the network that hosts the computer you wish to access. The representative console remembers your Gateway choice the next time you create this type of Asset. Enter the Hostname / IP of system you wish to access.
- Move Assets from one Asset Group to another using the Asset Group dropdown. The ability to move Assets to or from different Asset Groups depends upon your account permissions.
- Further organize Assets by entering the name of a new or existing Tag. Even though the selected Assets are grouped together under the tag, they are still listed under the Asset Group in which each is pinned. To move an Asset back into its top-level Asset Group, leave this field blank.
- Select the Public Portal through which this Asset should connect. If a session policy is assigned to this public portal, that policy may affect the permissions allowed in sessions started through this Asset. The ability to set the public portal depends on your account permissions.
Assets include a Comments field for a name or description, which makes sorting, searching, and identifying Assets faster and easier. - To set when users are allowed to access this Asset, choose a Asset Policy. These policies are configured by your administrator in the /login interface.
Use an Intel® vPro shortcut
- Depending on your Gateway setup, you may be prompted to enter a username and password.
- The Gateway detects the provisioned vPro hardware. If the credentials, provided during either the Gateway configuration or the Jump attempt, match the credentials of the vPro-provisioned system, the connection is initiated.
- Depending on how the vPro computer is provisioned, you might be prompted to enter a user consent code before performing certain actions.
- If a consent code is required, a pop-up appears on the remote screen. An end user must provide you with this code before you can gain hardware access.
Once the connection is made, you have control of the remote vPro hardware. You can then use the vPro session tools to work on the remote system.
Assets can be set to allow multiple users to simultaneously access the same Asset. If set to Join Existing Session, other users are able to join a session already underway. The original owner of the session receives a note indicating another user has joined the session, but is not allowed to deny them access.
For more information on simultanous connections, see Simultaneous connections on the Assets page and the Asset Policies page.
Updated 2 months ago
