
Approval workflows | Entitle Cloud
Overview
Approval workflows define the Just-in-Time (JIT) permissions approval process in Entitle. When a user requests access, the workflow determines whether approval is required, which conditions apply, who must approve, and how long access is granted. A single workflow can support multiple JIT components, including integrations, resources, roles, and bundles. Conditions can match on the requesting user's group membership, on-call schedule, request duration, or IdP attributes.
How approval workflows work
- Rules and evaluation: Each approval workflow contains one or more rules. Every rule includes:
- A condition (if) defines when the rule applies.
- An approval process (then) defines how the request is approved.
Rules are evaluated in order from top to bottom. The first rule whose condition is met determines the approval process for the request.
- Approval steps: The approval process inside a rule can include multiple steps, each representing an approver or approval action. Steps run sequentially. Each step can use one of two operators:
- Any: Any approver in the step may approve.
- All: All approvers in the step must approve.
Avoid assigning specifically named individuals when possible. Use managers, groups, roles, schedules, or other abstract approver types to ensure scalability.
Approver Types
Entitle includes several approver types you can use in workflow steps.
- Team member: Any user who shares the same manager as the requester. For requests made on behalf of another user, this refers to users sharing the manager of the user receiving access. If no direct manager exists, any Entitle admin may approve.
- Direct manager: The manager of the user requesting access. For requests made on behalf of another user, this refers to the manager of the user receiving access.
- Automatic Approval: The step is approved automatically, without human intervention.
- Resource maintainer / integration maintainer: A secondary administrator of the resource or integration. Multiple maintainers may be assigned, including IdP groups. For bundles, this means the maintainer of each included resource or integration.
- Resource owner / integration owner: The primary owner of a resource or integration. For bundles, this means the owner of each included resource or integration.
- Group: Any member of an IdP group at the time of request. If someone requests access on behalf of another user and belongs to the approval group, the step is automatically approved.
- Schedule: Any member of an on-call schedule or on-call group. If someone requests access on behalf of another user and is currently on-call, the step is automatically approved.
- Slack channel: Any member of a selected Slack channel. Channel members can approve or decline the request directly from Slack.
- Specific user: Any user in the tenant. Start typing to see available users.
- Webhook: Third-party code that acts as the approver.
For more information on webhooks, see Webhook-based approvals.
When using Team or Schedule approvers, only users currently on-call can request access. This design ensures that only active responders can request access.
To allow all schedules (not just on-call users) to request access, create a group containing all schedule members and use that group instead.
View and manage approval workflows
Log in to Entitle, and navigate to the Approval workflows screen.
Edit and delete approval workflows
-
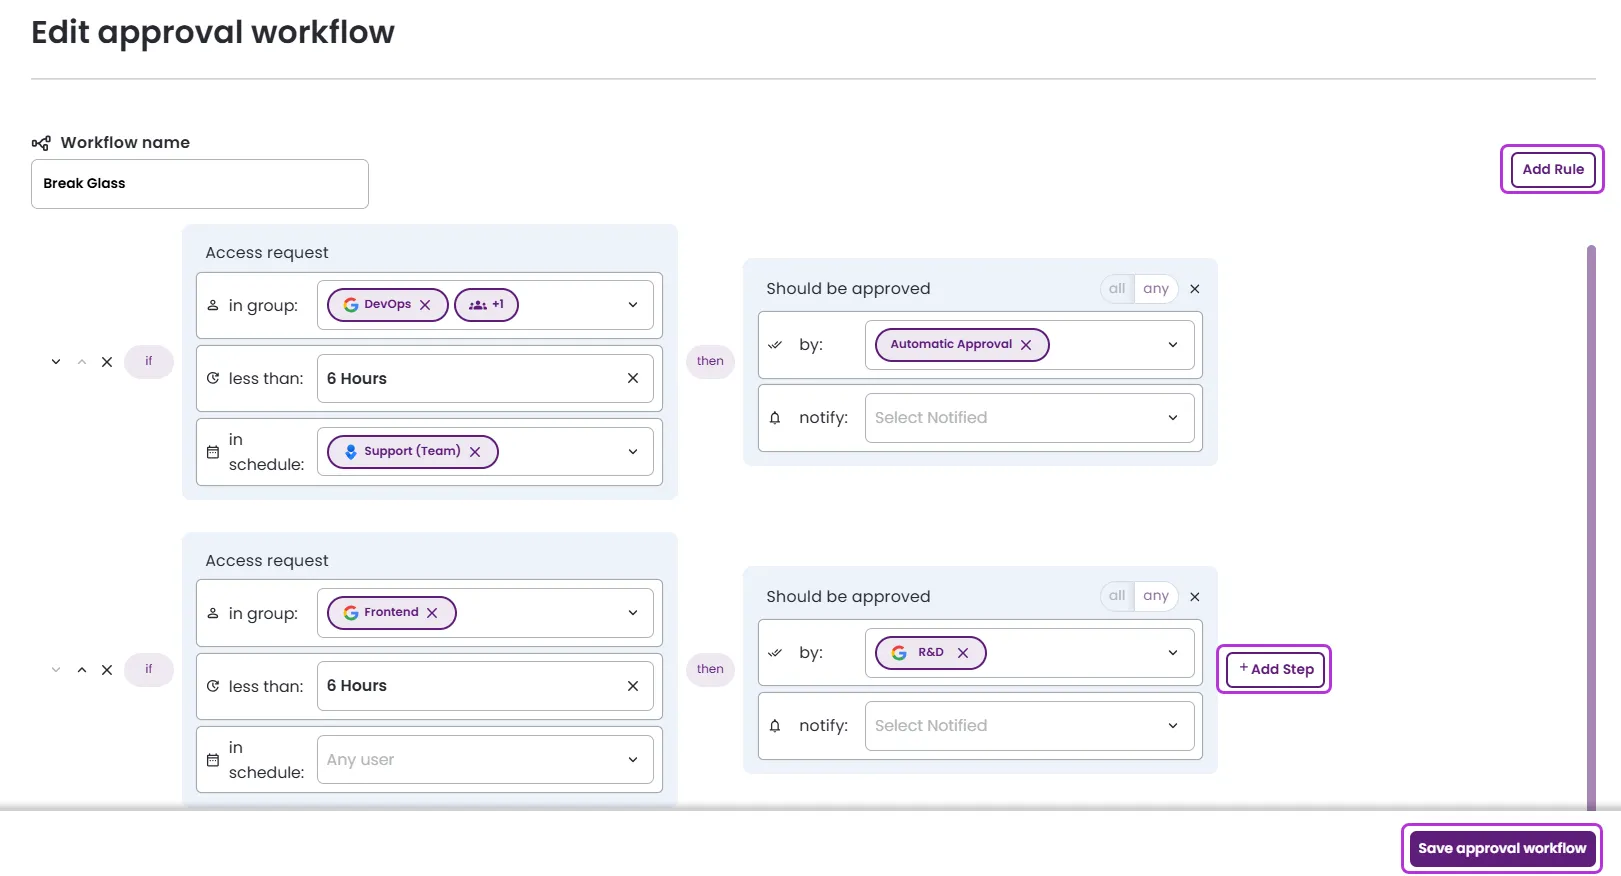
Edit approval workflow: You can modify the workflow name, access request conditions, and approval steps. You can also add or remove rules and steps, and change rule order using the arrows at the left. After making changes, click Save approval workflow.
-
Delete an approval workflow: On the Approval workflows page, locate the workflow you want to remove, then click Delete. Confirm the deletion in the pop-up. If an approval workflow is in use, it cannot be deleted.
Search, sort, and filter approval workflows
- Search by workflow name.
- Sort by any available option.
- Filter by any available options.
Add a new approval workflow
- On the Approval workflows page, click New approval workflow.
- Choose a name for your workflow.
- Define one or more rules, including their conditions and approval steps.
- In group: Select a group from which users must be selected, or default to any.
- Less than: Select a maximum duration for requests.
- In schedule: Select a schedule or on-call group that the selected user must belong to, or default to any.
- With attribute: Select an IdP attribute the requesting user must match, choose an operator, then enter a value. Add more than one attribute condition to a rule if needed. See Use IdP attributes as conditions.
- User risk: Select the identity risk levels the requesting user must match, or leave the field set to Any. See Use user risk as a condition.
- Should be approved by: Select who must approve the request. You can specify one or more users, groups, Slack channels, webhooks, or schedules.
- Notify: Select who should be notified of the request. You can specify one or more users, groups, Slack channels, webhooks, or schedules.
When Slack channels are selected as approvers or notification recipients, notifications are posted as threaded messages. The initial message supports team discussion within the thread before a decision is made. All subsequent updates for the same access request, including approver actions, admin approvals, and automatic approvals, are posted to the same Slack thread to provide a complete history. If a Slack channel is configured as both an approver and a notifier, only a single approval message is posted to avoid duplicate notifications.
- Order the rules as needed.
- Click Save approval workflow.
The newly created approval workflow appears on the Approval workflows main page.
Use IdP attributes as conditions
Rules can match on the requesting user's identity provider (IdP) attributes, such as department, job title, or employee type. Attribute conditions work alongside the group, schedule, and duration conditions in the same rule.
Group membership is a common basis for routing and automatic approval, but anyone with group admin rights in your IdP can add users to a group. For access that approves automatically, that turns group administrators into an unintended path to elevated permissions. Attributes such as employeeType or department come from your authoritative directory data and are harder to change, so they are a safer basis for automatic approval.
Attributes are available as conditions only after an admin selects them for your directory. See Select attributes to sync from your identity provider. If no attributes are configured, the attribute list is empty, and Entitle links you to the directory settings page.
Add an attribute condition
- On the Approval workflows page, click New approval workflow, or click Edit on an existing workflow.
- In the rule you want to change, click With attribute.
- Select an attribute. Attributes appear under the display name your admin assigned, with the original IdP name shown underneath.
- Select an operator. The available operators depend on the attribute's data type.
- Enter a value, if the operator needs one.
- To add another attribute condition to the same rule, repeat steps 3 to 5.
- Click Save approval workflow.
A condition needs an attribute, an operator, and a value before you can save. Entitle highlights incomplete conditions.
Operators by data type
| Data type | Operators | Value |
|---|---|---|
| String | is, is not | Free text, not case-sensitive |
| String | contains, does not contain | Free text |
| String | starts with, ends with | Free text |
| String | is empty, is not empty | None |
| Number | =, ≠, <, >, ≤, ≥ | A number |
| Boolean | is true, is false | None |
| Date | before, after | A date |
| Date | between | Two dates |
| Date | is empty, is not empty | None |
If you change the attribute in a condition to one with a different data type, Entitle clears the operator and value.
How attribute conditions are evaluated
- Entitle uses the values stored from the most recent directory sync, not a live lookup at request time. A user whose attribute changed in your IdP is evaluated on the last synced value.
- If a user's attribute value is empty or missing, any condition testing that attribute does not match. The is empty and is not empty operators are the exception. They are designed to test for a missing value, so is empty matches.
- Rules are still evaluated in order from top to bottom, and the first rule whose condition is met determines the approval process.
Fix a broken attribute condition
If an admin removes an attribute from the directory's synced attribute list, any rule using that attribute breaks.
A broken workflow shows a warning icon next to its name and a red border on the Approval workflows page. The workflow stays active and keeps evaluating its other conditions. The broken condition never matches, so it does not approve requests automatically or route them unexpectedly.
To fix it, click Edit on the workflow, then either point the condition at a synced attribute or remove the condition.
Limitations
- An admin can sync a maximum of 20 attributes per directory, so only those attributes are available as conditions.
- Attribute conditions cannot be created or managed through the Entitle API or the Terraform provider.
Use user risk as a condition
Rules can match on the requesting user's identity risk level, so that a user with active security detections against their accounts follows a different approval path than a user with none. Risk levels come from Identity Security Insights. See Identify risky and sensitive users.
For example, you can approve low-risk requests automatically while routing high-risk and critical-risk requests to an integration owner for manual review.
User risk conditions are an optional feature that must be turned on for your organization. Contact your BeyondTrust representative for details.
Add a user risk condition
- On the Approval workflows page, click New approval workflow, or click Edit on an existing workflow.
- In the rule you want to change, click the User risk field.
- Select one or more risk levels: No risk, Low, Moderate, High, or Critical.
- Click Save approval workflow.
To match every user regardless of risk, leave the field set to Any.
Users who have not been analyzed
No risk applies to users whose accounts have been analyzed and have no active security detections. It does not cover users who have never been analyzed, such as a user added since your last risk analysis sync.
The Any setting is the only setting that matches a user who has never been analyzed. If you select one or more specific levels, including No risk, those users do not match the rule.
This matters when a rule is your automatic approval path. If you set a rule to match No risk so that clean users are approved automatically, a user who has not yet been analyzed does not match it and falls through to your next rule.
To cover users who have not been analyzed, use Any and order your rules so that the more specific risk rules are evaluated first.
How user risk conditions are evaluated
- Entitle uses the risk levels stored from the most recent risk analysis sync, not a live lookup at request time.
- Risk levels are based on the user's identity risk. Resource sensitivity and account-level risk are not evaluated.
- Entitle does not expose numeric risk thresholds. You can match only the named risk levels, not a score or a range.
- Rules are still evaluated in order from top to bottom, and the first rule whose condition is met determines the approval process.
Existing workflows
Adding this condition to your organization does not change how your current workflows route requests. A workflow with no risk levels selected behaves exactly as it did before.
Audit and automation
Changes to a rule's risk levels appear in the workflow's audit history, alongside your other rule changes.
You can also set risk conditions through the Entitle API and the Terraform provider, using the userRiskLevels field on a workflow rule. The field is optional, so existing Terraform configurations continue to work without it.
Set up webhook-based approvals
Configure approvals by webhook (advanced)
Approval workflows support both third-party code approvals and advanced webhook notifications. Approval by webhook allows you to extend Entitle's built-in approver types with your organization's specific approval mechanisms, such as customer approvals or certification services.
-
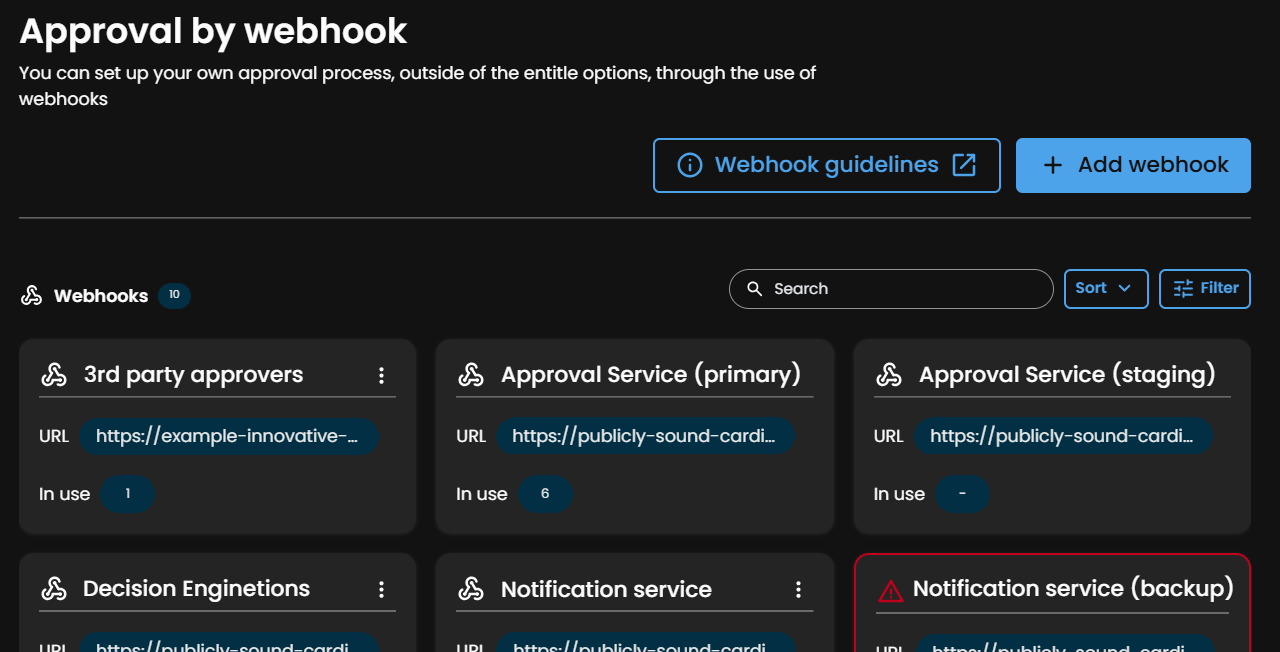
View existing audit log webhooks.
- Search by webhook name or URL.
- Sort by webhook name or created date.
- Filter by webhook name, URL, or usage.
-
To create an webhook, go to the Approval workflows page, then click Approval by webhook.

-
On the Approval by webhook page, click Add webhook.

-
Enter your webhook details.
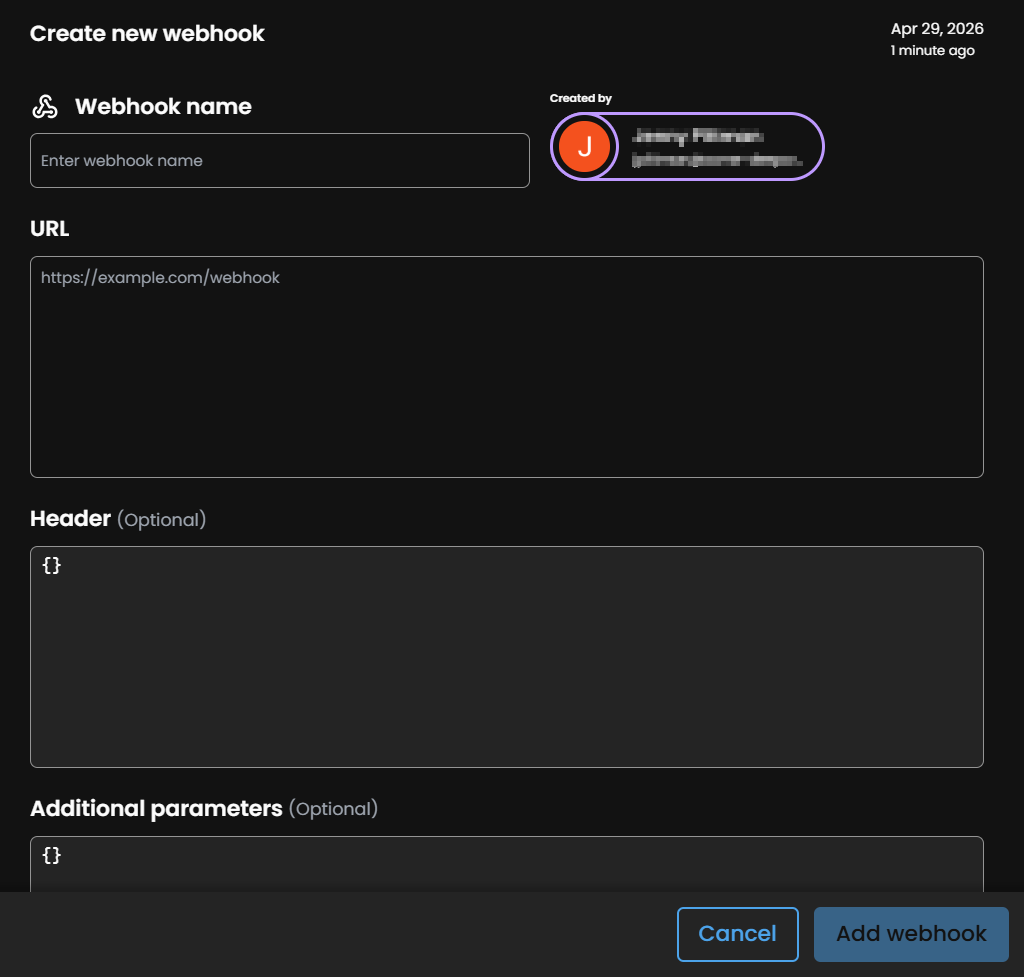
- Name: Enter a name to identify your webhook.
- URL: Insert your webhook URL.
- Headers: Any value set in this field will be added to the request header as is.
- Additional parameters: Any value set in this field will be added to the request body as is.
Important information
The following keys are forbidden:
stageNumber,stageAmount,token, andaccessRequest.
-
Click Add webhook.
-
To edit an existing webhook, click the vertical ellipses, then Edit.
-
To delete a webhook, click the vertical ellipses, then Delete.
Use a webhook in a workflow
- After the webhook is registered, go to the Approval workflows page and either add or edit a workflow.
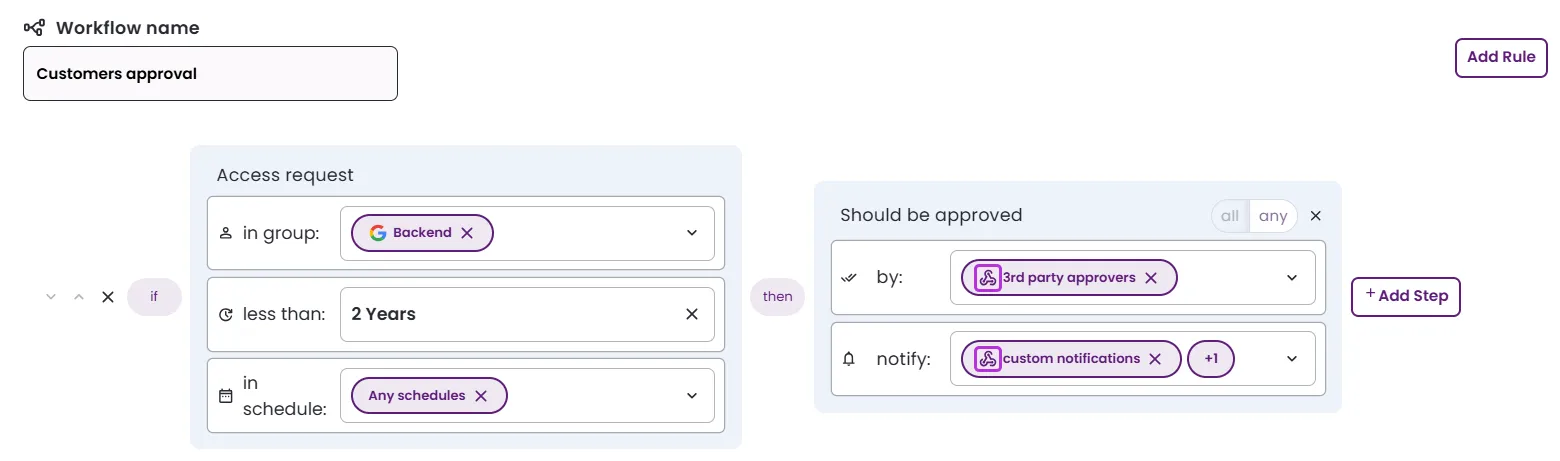
- Add the webhook to the workflow as either an approver or a notification recipient.
- Save the workflow to apply the changes.
This example shows both configurations (indicated by the webhook icon).
Webhook request structure
When a webhook is triggered as part of an approval step, Entitle sends a JSON payload similar to this:
{
  stageNumber: 1,
  stageAmount: 3,
  accessRequest: {
    behalfOf: {
      id: "51907709-306b-4587-a89a-4c1a3f8d081f",
      email: "[[email protected]](mailto:[email protected])",
    },
    duration: 15768000,
    id: "054283fe-f1b4-4bdc-b54e-2adba50f079a",
    justification: "I need it",
    number: 114,
    roles: [
      {
        isPrerequisite: false,
        id: "a7b1e5be-d2bb-4891-a446-406b74ba7b3f",
        name: "role1",
        resource: {
          id: "f40d54f4-1483-431f-bbe1-ce6e19a792eb",
          name: "resource 1 name",
          integration: {
            id: "e5eb6b93-5735-4a65-97fc-5f11e29b9566",
            name: "manuella",
            application: {
              name: "Manual",
            },
          },
        },
      },
    ],
    status: "waitingForApproval",
    targets: [
      {
        type: "role",
        role: {
          id: "a7b1e5be-d2bb-4991-a446-406b74ba7b3f",
          name: "requested role",
        },
      },
    {
    type: "bundle"
    bundle: {
      id: "a7b1e5be-d2bb-4991-a446-406b74ba7b3f",
      name: "requested bundle",
    },
  }
]
Field meanings:
stageNumber– The current step number in the approval process.stageAmount– The total number of approval steps in the access request.token– A unique identifier used to authenticate and link a specific webhook workflow request with its corresponding response. This token is required only when the webhook acts as an approver, not when it is used for notifications.accessRequest– The access request details.
Webhook response structure
Your webhook returns its approval decision – approve or decline – by sending an HTTP POST request to the accessRequests/reply endpoint.
The response should include the following parameters:
{
  "type": "approve" | "decline",
  "token": "token received from webhook data"
}
Example cURLcurl -X POST <https://api.entitle.io/webhooks/v1/approvalRequests/reply> -H "Content-Type: application/json" -d '{ "type": "approve", "token": "c14f9c92-87bd-4a2e-9f13-2e7c4a1d5b8e" }'
Important informationIf Entitle repeatedly fails to deliver webhook requests, the webhook is automatically disabled. While disabled, new approval steps intended for that webhook are escalated to Entitle administrators.
Updated 3 days ago
