ElasticSearch | Entitle
Overview
Elastic Search is a multitenant-capable full-text search and analytics engine, based on Apache Lucene. One of its main services is the Elastic Cloud, which is the best way to consume all of Elastic’s products across any cloud. It allows for building powerful, modern search experiences for applications, websites, and workplaces. In addition, it allows accessing, viewing, and searching across all data.
Entitle manages the Elastic Search roles in Elastic Cloud.
This page will provide you with instructions on how to integrate Entitle and Elastic Cloud.
General guidelines
To integrate your Elastic Cloud in Entitle, you will need to extract the following values for authentication:
- Cloud ID - Must-have.
- You have two options to choose from for the second authentication value:
- Basic Auth (Username and Password).
- Extract an API Key.
Prerequisites
- Make sure that the Elastic Cloud user you wish to integrate with Entitle has Admin permissions.
Should you need to allowlist this integration, these are the IP addresses from which Entitle's service reaches the integration:
- Entitle EU (Cloud deployment)
- 34.243.199.171
- 54.216.133.226
- Entitle US (Pathfinder deployment)
- 52.45.229.219
- 54.88.235.213
- 3.224.15.134
- Entitle CA (Pathfinder deployment)
- 35.182.218.208
- 15.156.179.153
Set up Elastic Cloud to work with Entitle
Stage 1: Extract your Cloud ID
- Log into Elastic Cloud using your preferred method.

- From the Deployment list on your home page, click Manage for the deployment you wish to give Entitle access to.
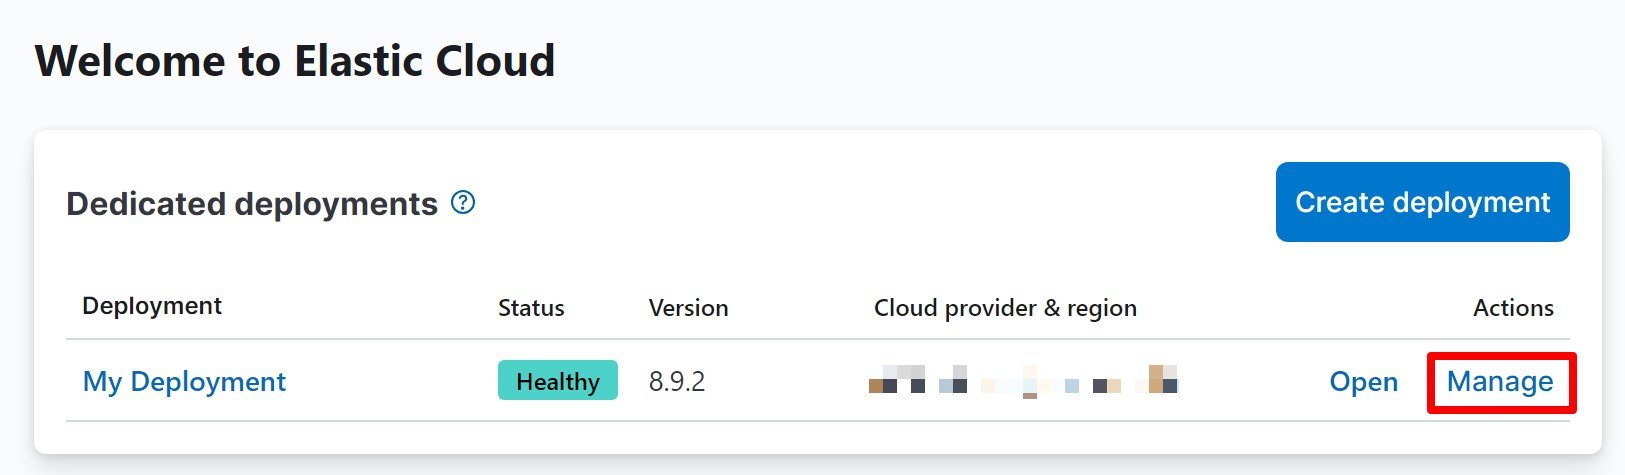
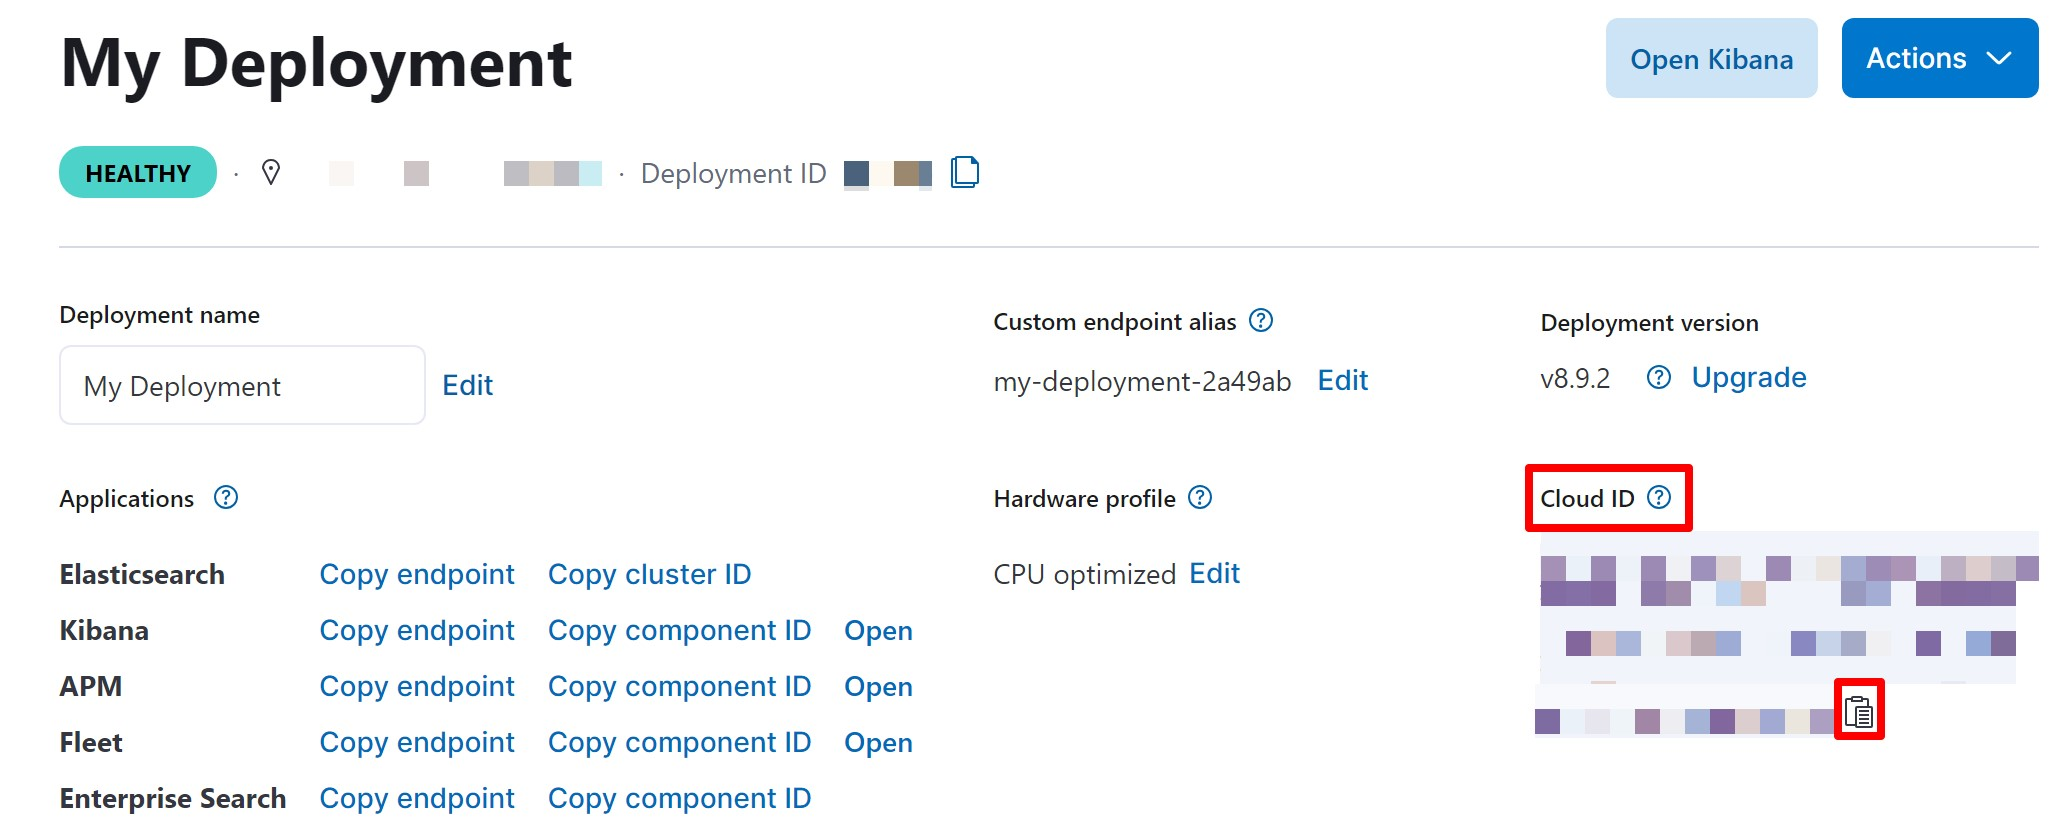
- Copy the Cloud ID on the right side of the page, you will need to insert it later in the configuration.
Stage 2: Extract further authentication values
Once you have extracted your Cloud ID, choose one of the following options for the additional authentication values required.
- Option #1: Extract your Elastic Basic Auth (Username and Password)
This option is faster, yet less secure - copy your Elastic Username and Password, and add them to the configuration later on. - Option #2: Extract an API Key
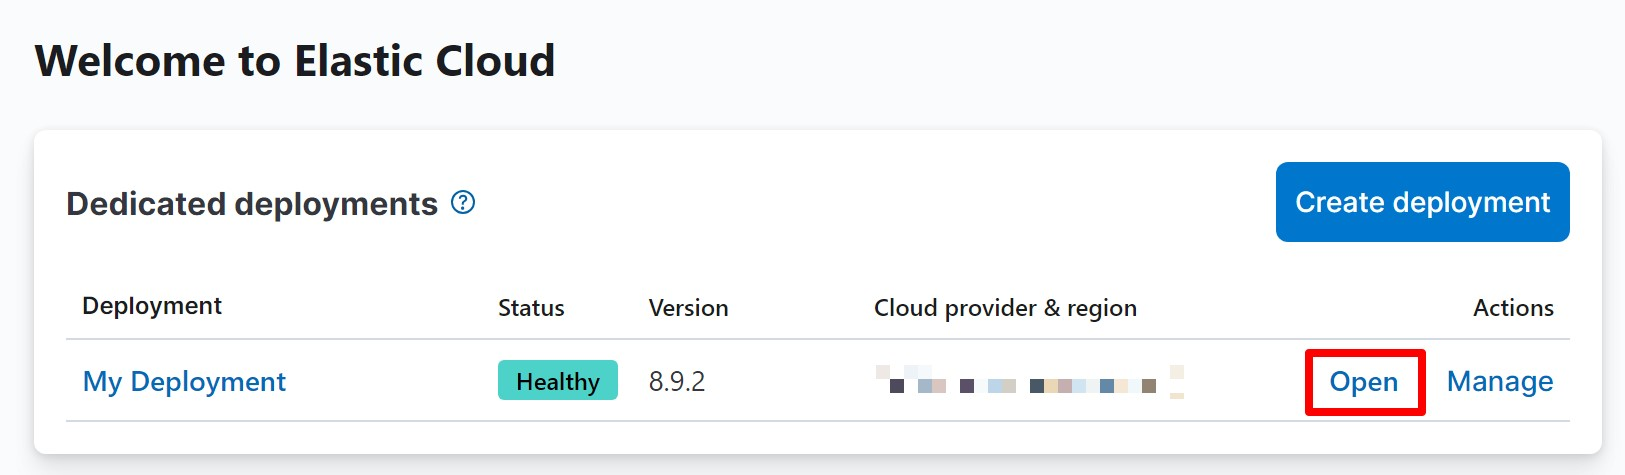
- Go back to the main page and in your chosen deployment click on Open.
- In the new page that opens up, scroll down on the left-side menu and click on the Management drop-down.
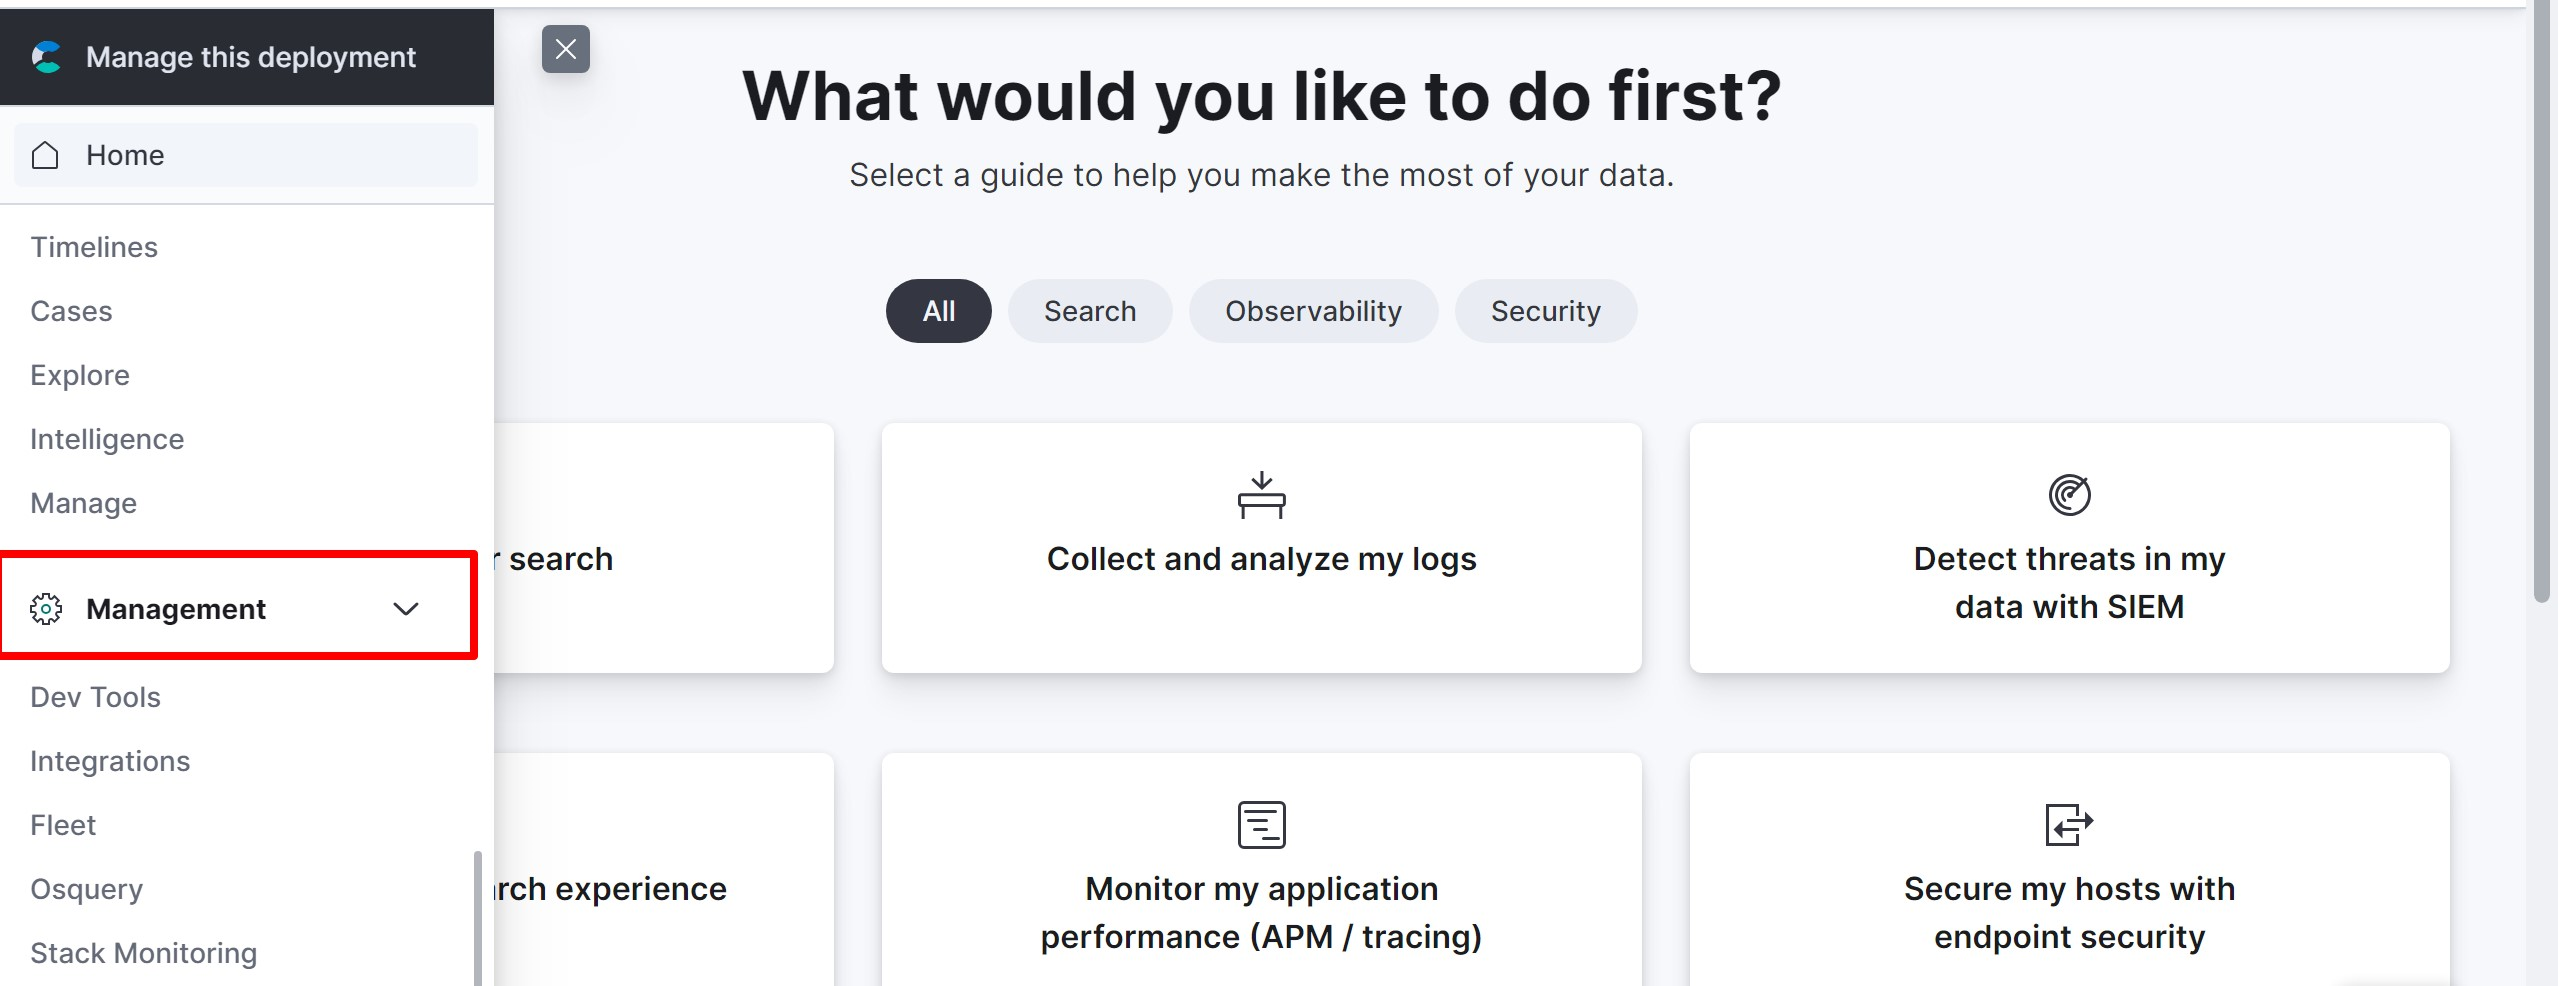
- Under the Security section click on API Keys.

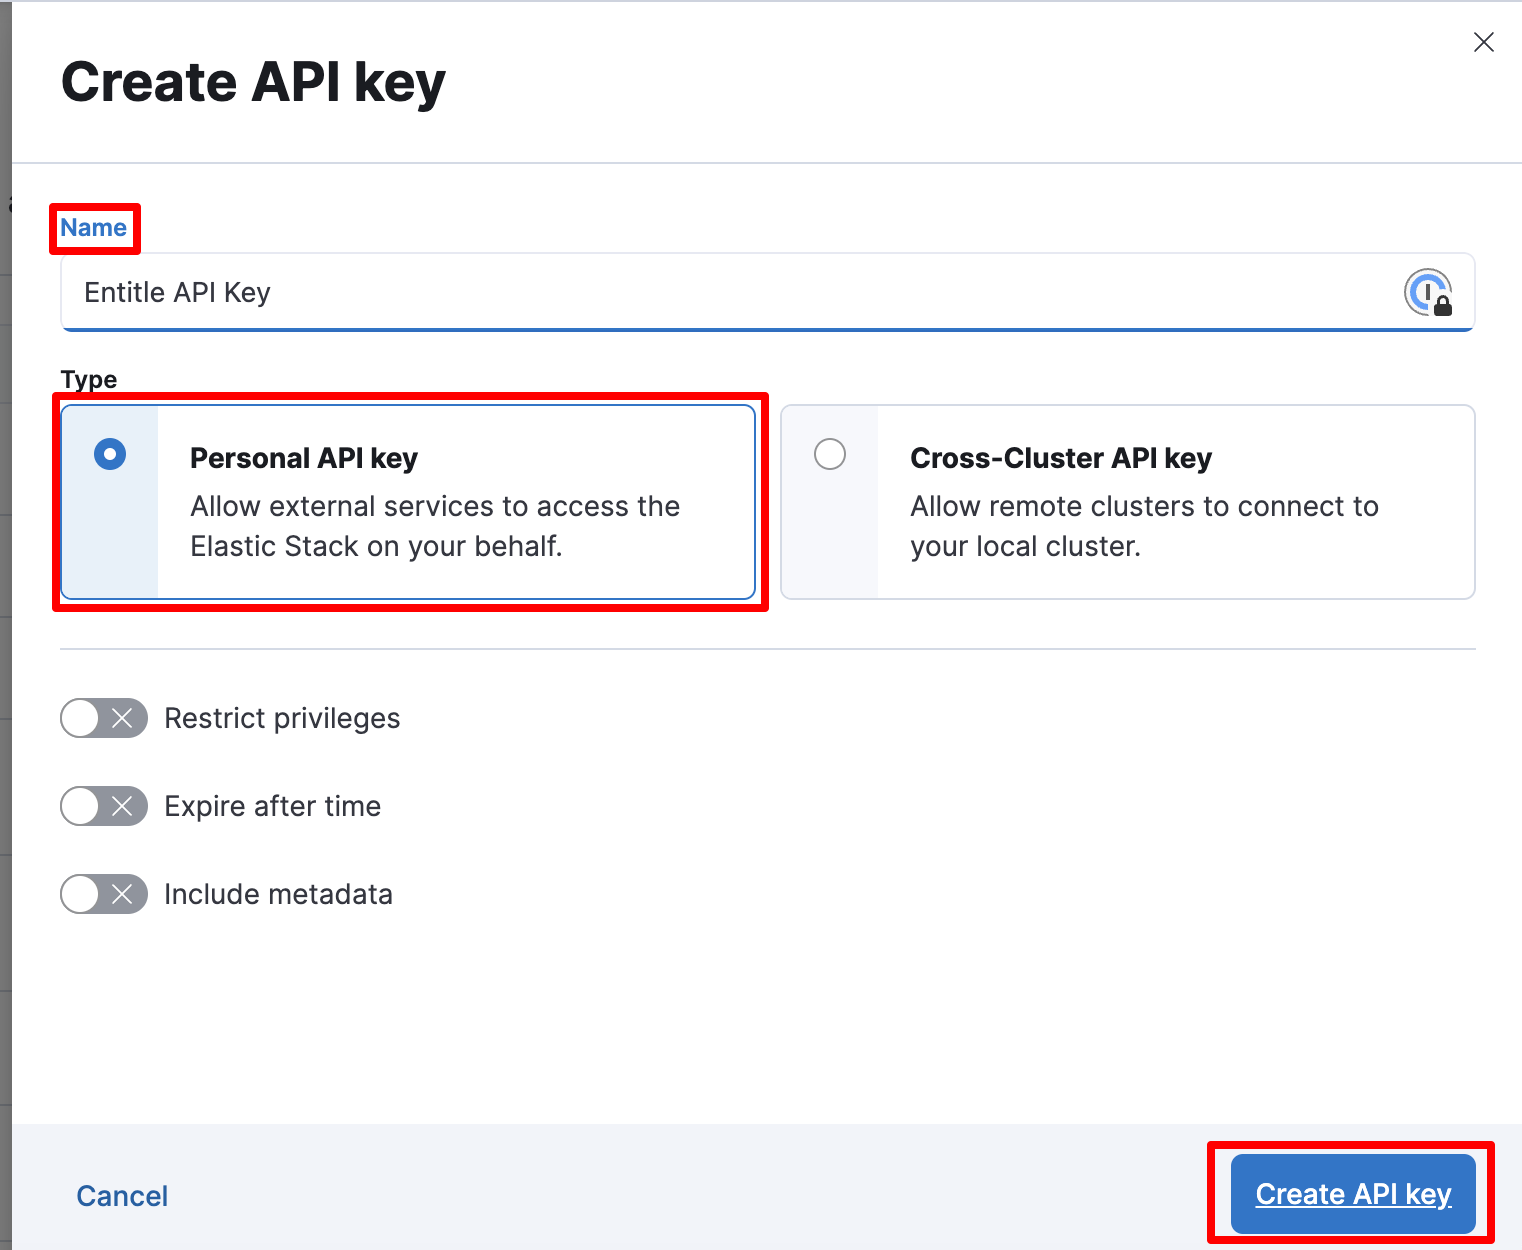
- Click on the blue Create API Key button. In the new window that appears, choose a Name for your API Key and then choose the Personal API Key option under the type section. Finally, click again on the blue Create API Key button.

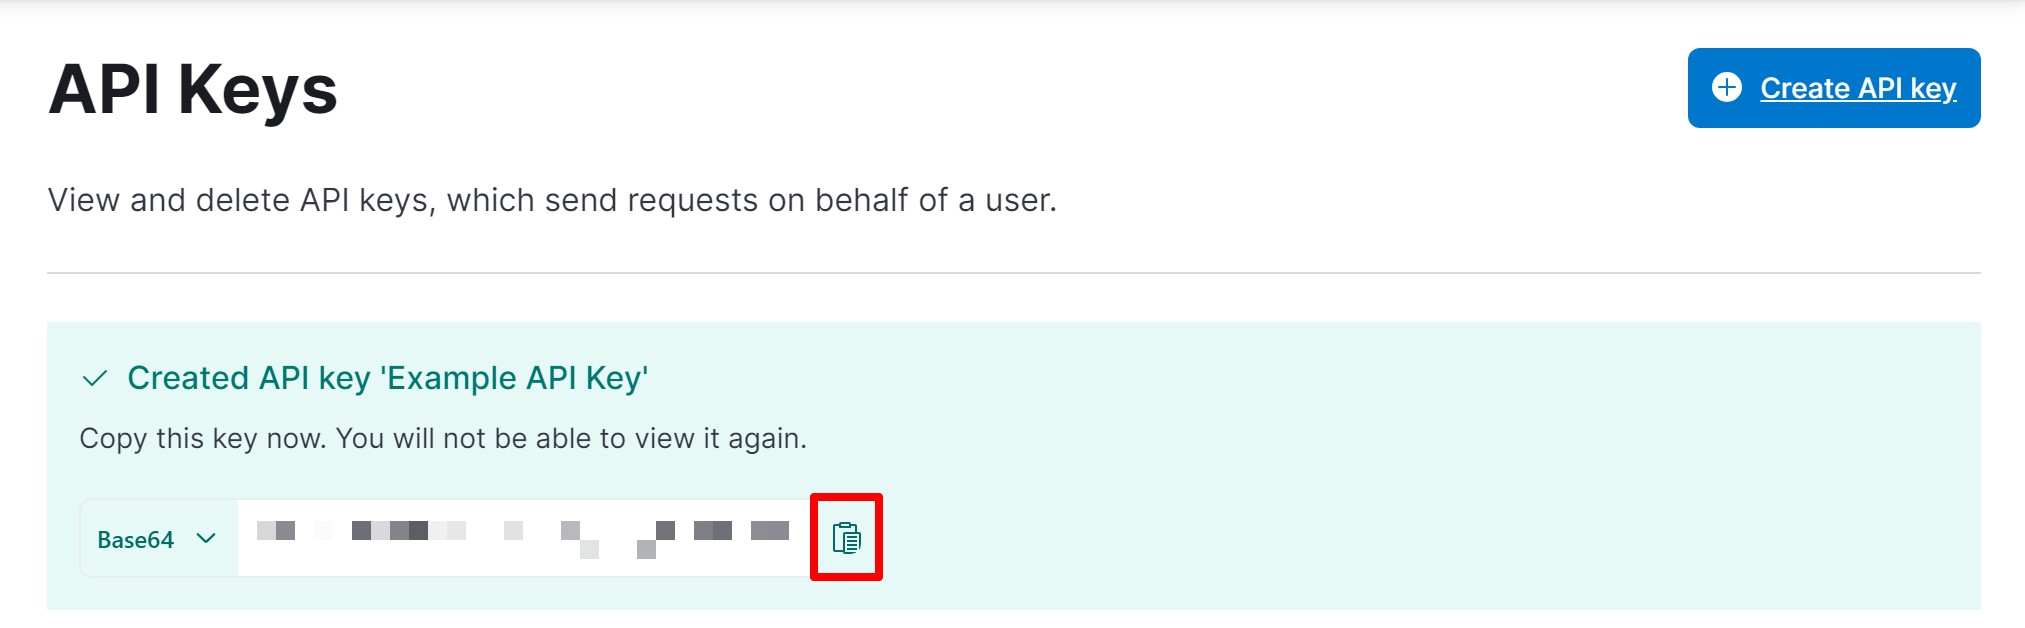
- Once you return to the main API Keys page, copy the new key that you have created and save it for the configuration later.
Creating the integration in Entitle
-
Log in to Entitle and go to the Integrations page.
-
After clicking the Add Integration button, type Elasticsearch in the Application field.
-
Don’t forget to set Save on correctly on your own agent or Entitle’s cloud.
-
In the Connection field, choose either Basic Auth or API Key according to the authentication option you chose in Stage 2.
- In case you chose the Basic Auth connection:
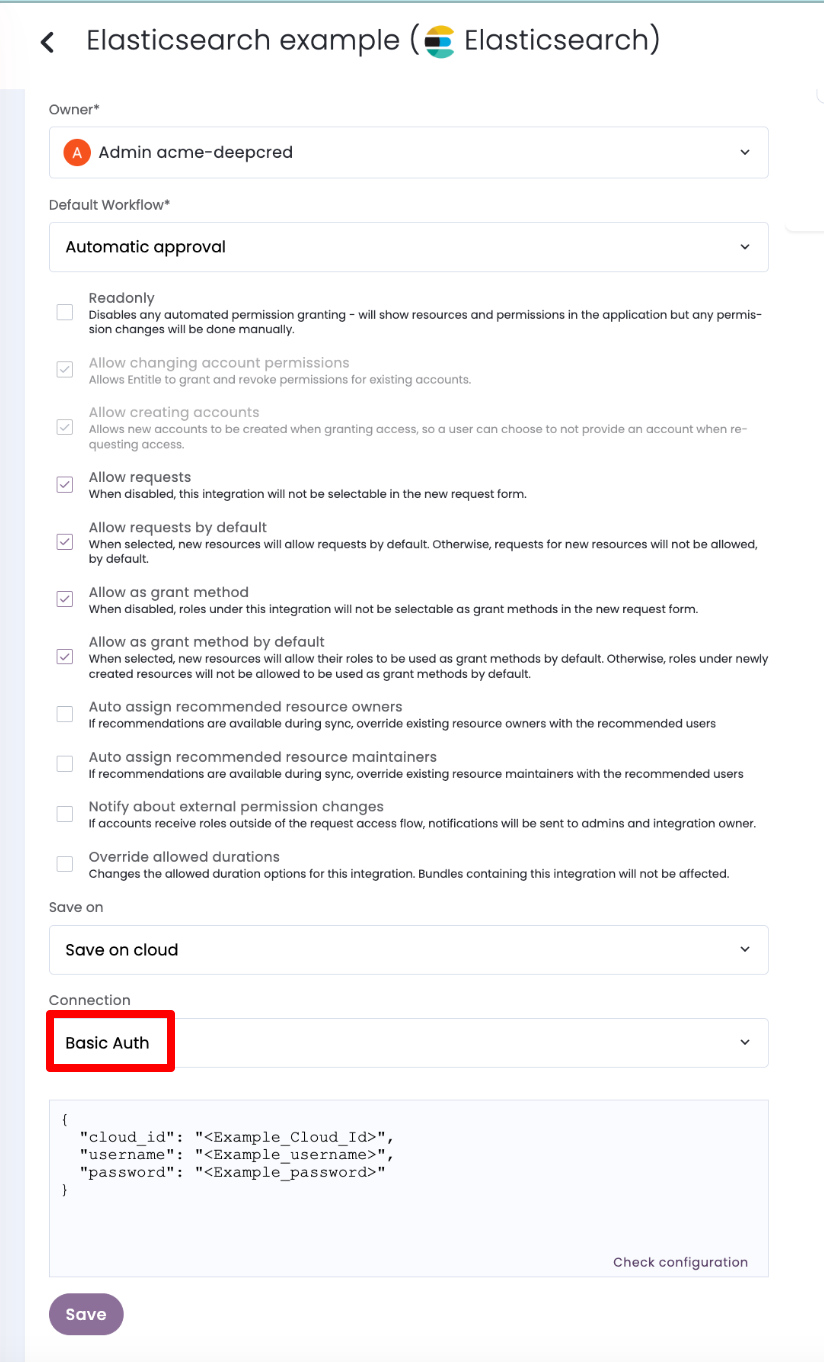
- In the connection section JSON
cloud_idfield, paste the Cloud ID you copied in stage 1.Important informationIf you are using an on-prem agent:
Remember to run Check configuration before saving your integration. It will try to access the URL Elastic Search generated for you (coded into the
cloud_id). If that URL isn't accessible, you will receive an error message showing you the URL value you need to allow outbound communications from your on-prem agent. - In the
usernameandpasswordfields, paste your Elastic Username and Password from Option #1 in stage 2.Example connection JSON{ "cloud_id": "<Example_Cloud_Id>", "username": "<Example_username>", "password": "<Example_password>" }In case you chose the API Key connection:
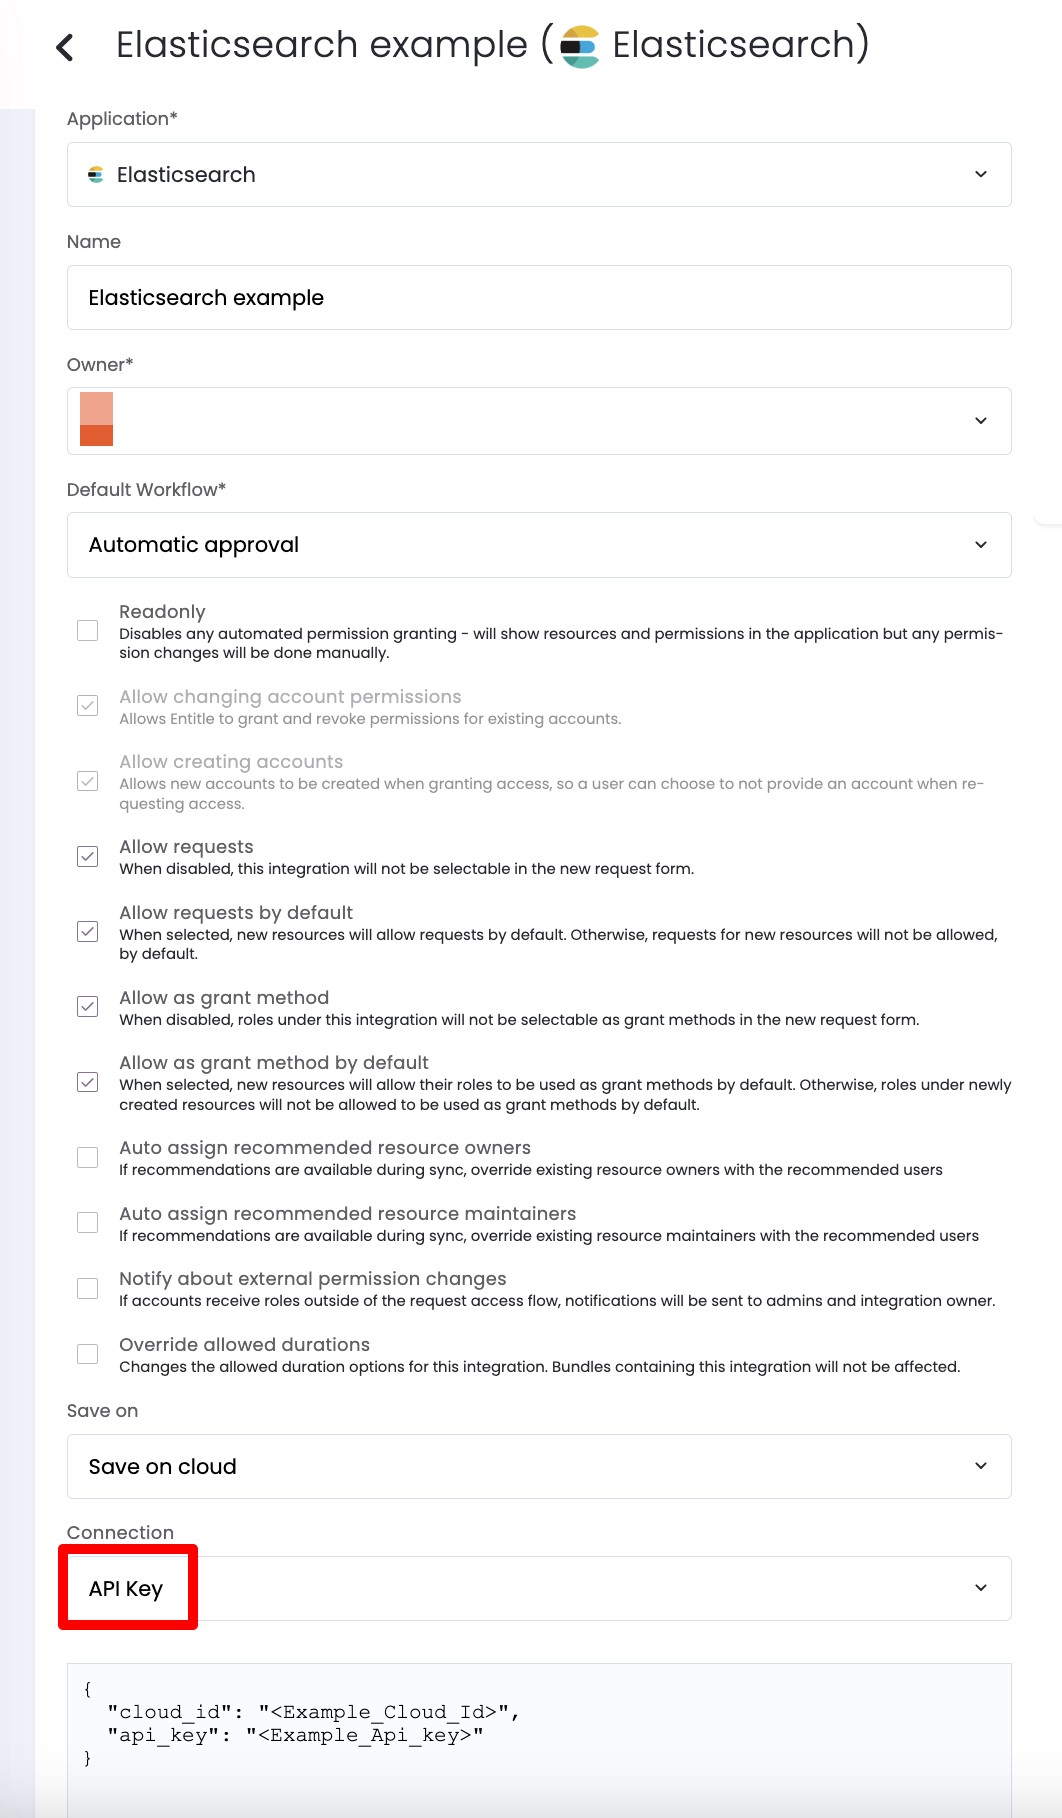
- In the connection section JSON
cloud_idfield, paste the Cloud ID you copied in stage 1.Important informationIf you are using an on-prem agent:
Remember to run Check configuration before saving your integration. It will try to access the URL Elastic Search generated for you (coded into the
cloud_id). If that URL isn't accessible, you will receive an error message showing you the URL value you need to allow outbound communications from your on-prem agent. - In the
api_keyfield, paste your API Key from Option #2 in stage 2.Example connection JSON{ "cloud_id": "<Example_Cloud_Id>", "api_key": "<Example_Api_key>" } - Click Save.
What's next?Make sure your setup is complete by testing your integration.
Updated 3 months ago
