Entra ID (Azure Active Directory) Access Management | Entitle
Overview
Entra ID (Azure Active Directory) is a cloud service that provides administrators with the ability to manage end-user identities and access privileges. Its services include core directory, access management, and identity protection.
Entitle can manage groups in Entra ID.
In the Azure portal, you can see some groups whose membership and group details you cannot manage in the portal:
- Groups synced from on-premises Active Directory can be managed only in the on-premises Active Directory.
- Other group types, such as distribution lists and mail-enabled security groups, can be managed only in the Exchange or Microsoft 365 admin centers. You must sign in to these centers to manage these groups.
- Azure dynamic groups, whose membership is automatically managed by Azure based on attribute-based rules, are not supported for access management in Entitle. Microsoft’s API does not allow modification of dynamic group membership. Only static (assigned) groups can be managed through Entitle.
This page will provide you with instructions on how to integrate Entitle and Entra ID.
General guidelines
To integrate your Entra ID with Entitle, you will need to:
- Create an application on Entra ID, and extract Client and tenant IDs.
- Create a secret, and extract its value.
- Provide Entitle with adequate permissions for the application.
Set up Entra ID to work with Entitle
Stage 1: Create an application
-
Go to the Microsoft Azure portal.
-
Click on Microsoft Entra ID.

-
Click on the App registrations tab in the left-side menu.

-
Then, click on New registration.

-
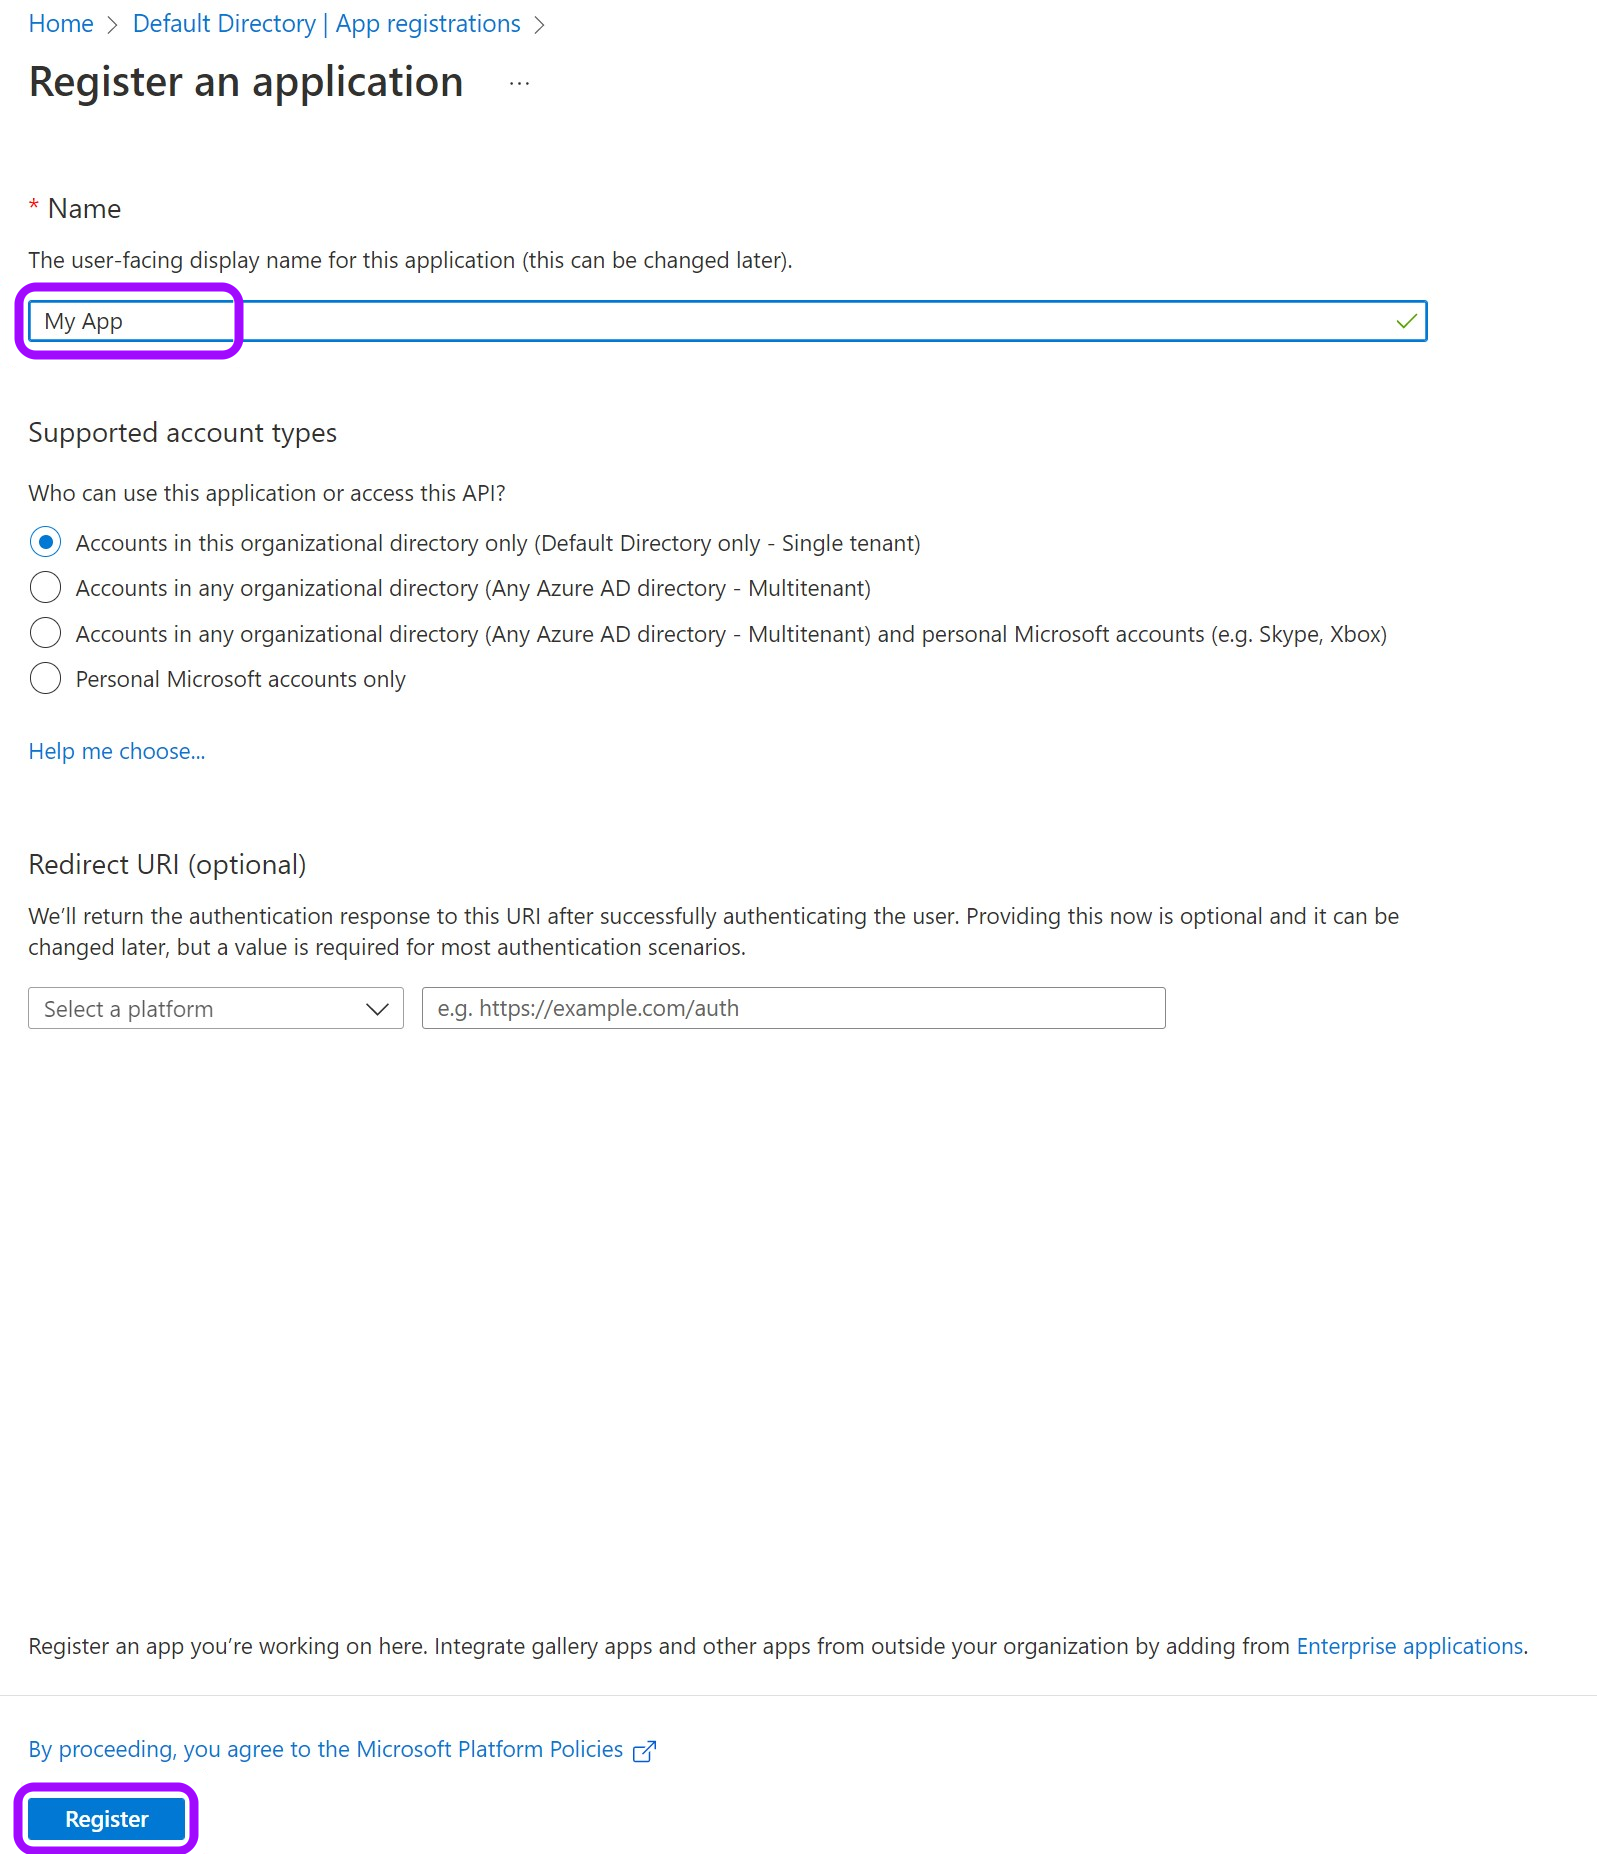
Give your app a Name and leave the rest as is. Then, click on Register.
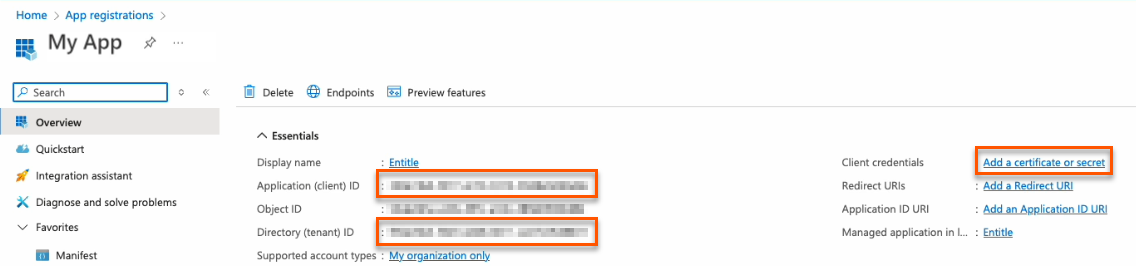
- Keep your Application (client) ID and Directory (tenant) ID for later. Then, click on Add a certificate or secret on the right side.
Choose your authentication methodYou should now choose whether to create a client secret or federated credentials.
- Client secret: The simplest option. Create a secret through the Azure portal user interface. This method works for most cases and takes only a few minutes to set up.
- Federated credentials: A more advanced option that uses Azure identity federation to avoid long-lived secrets and strengthen your security posture.
- Support OIDC-based federation for Azure applications.
- Work alongside existing client-secret methods without affecting current setups.
- Enable access to common Azure resources through role assignments.
- Prevent cross-tenant access by isolating each customer's service principal.
- Automatically remove temporary onboarding credentials after setup.
Federated credentials are supported only for integrations saved on Entitle's Cloud or on an on-premises agent hosted in Amazon Elastic Kubernetes Service (EKS).
Create a client secret
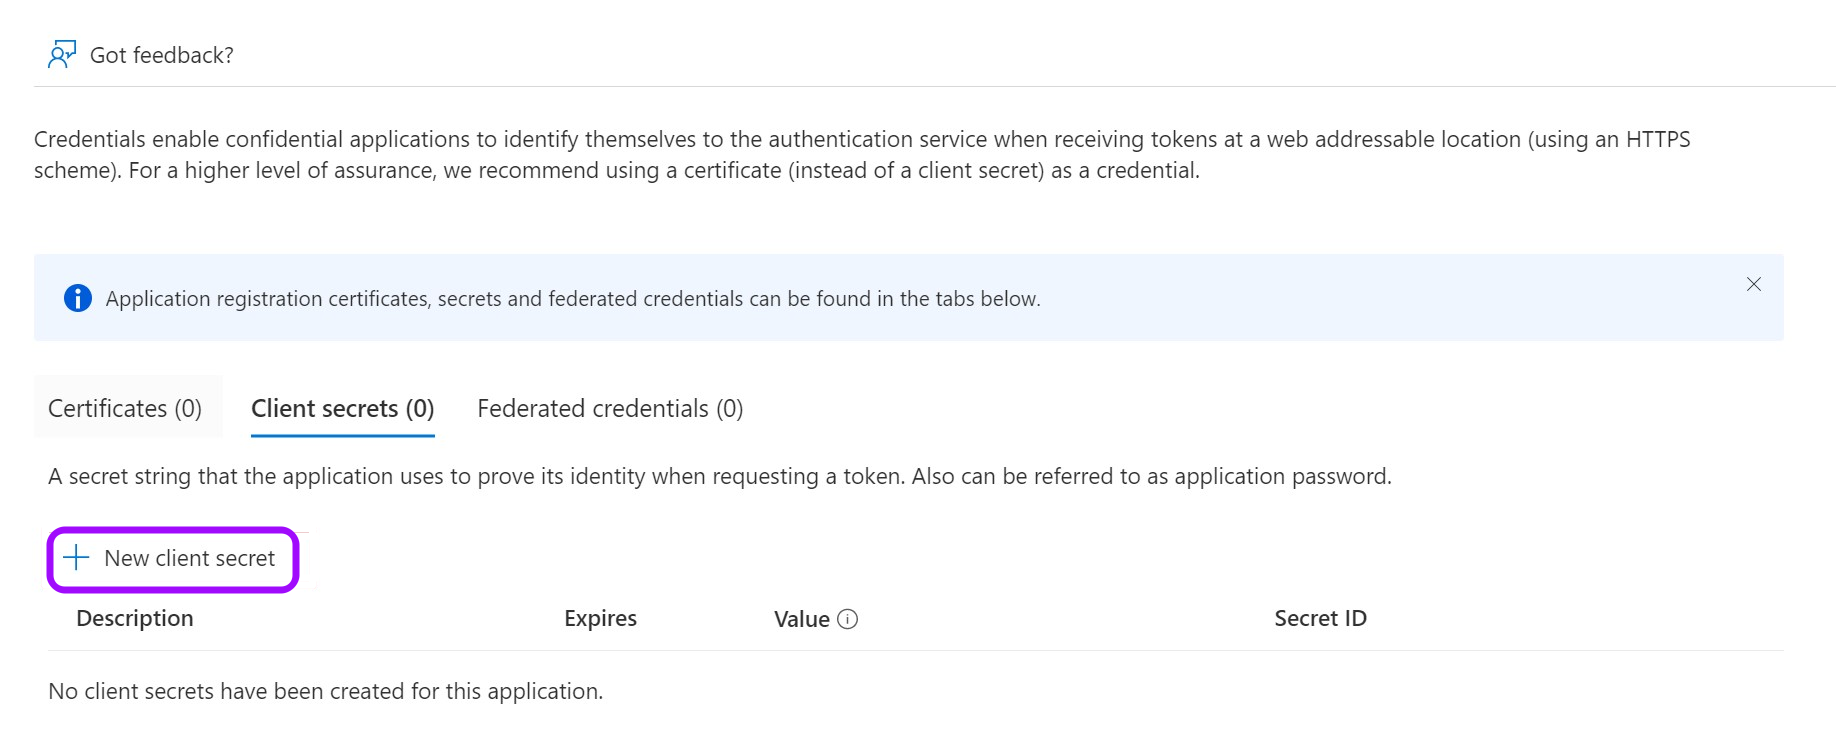
7. Click on New client secret.
-
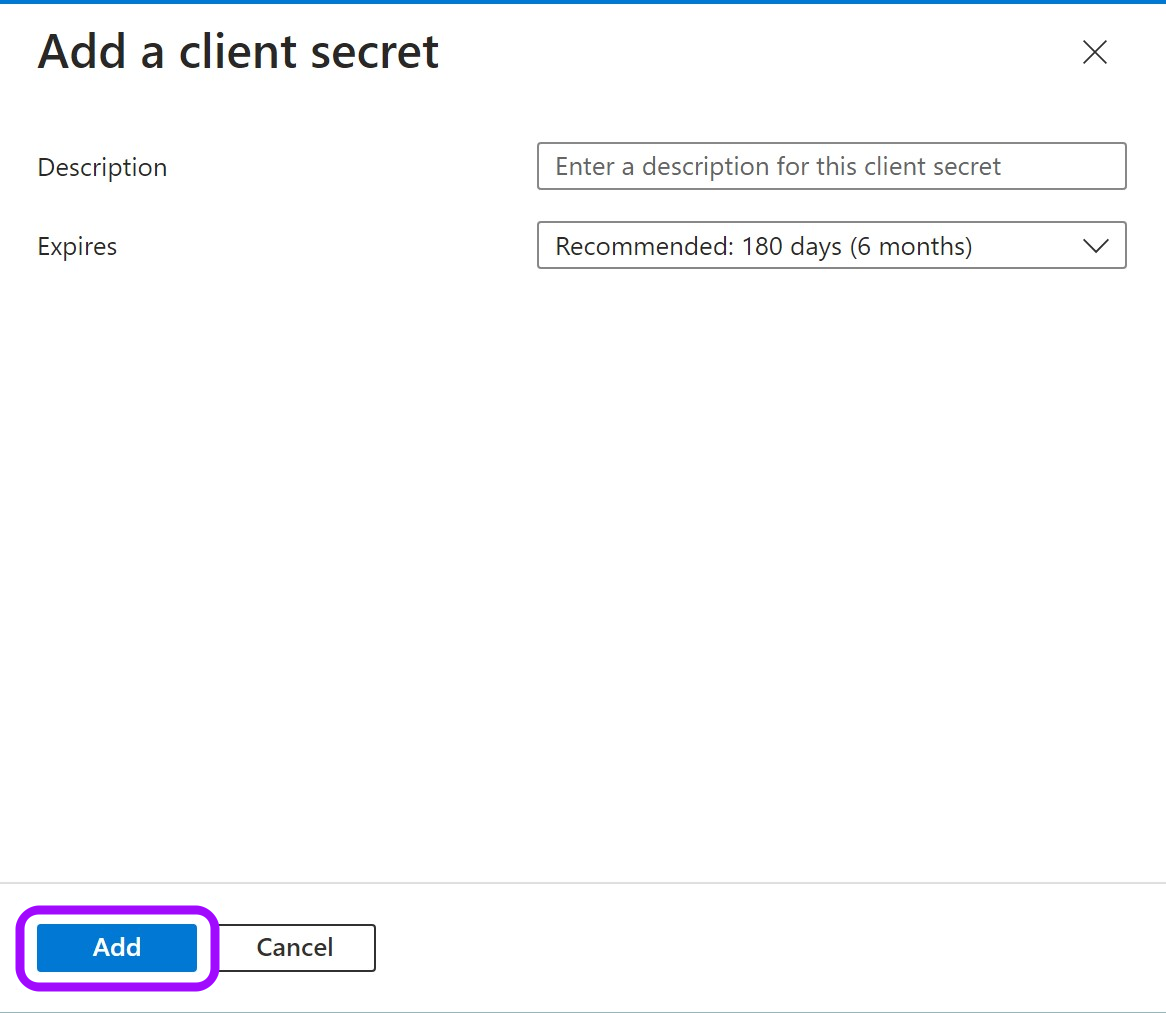
In the pop-up window, choose a Description that you will remember and an expiration time and click Add.
-
Click on the Copy icon to copy your new Client Secret Value and keep it for later.

Create federated credentials for an ephemeral account
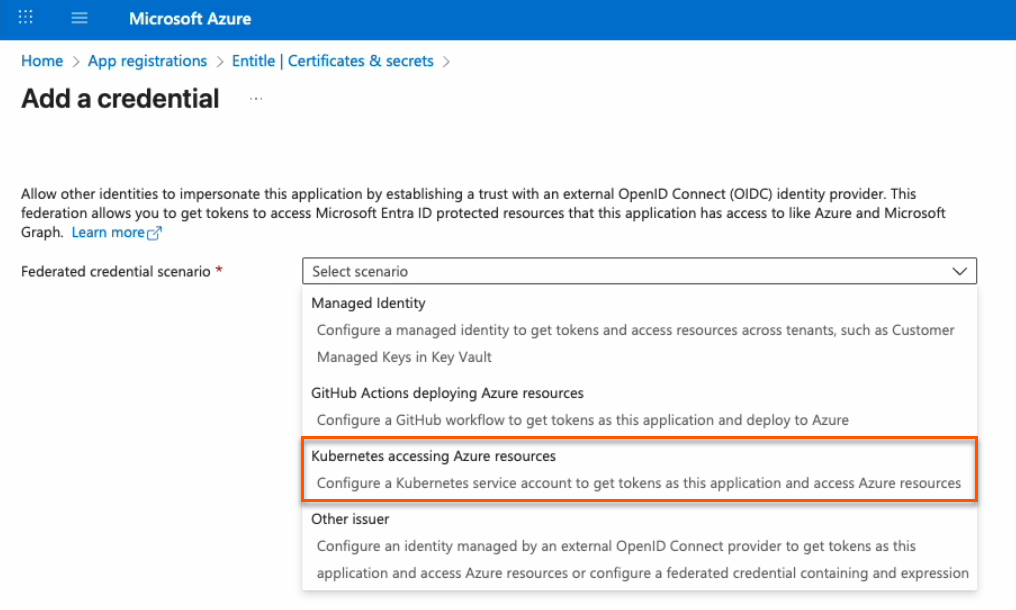
7. Click on the Federated credentials tab, then click Add credential.
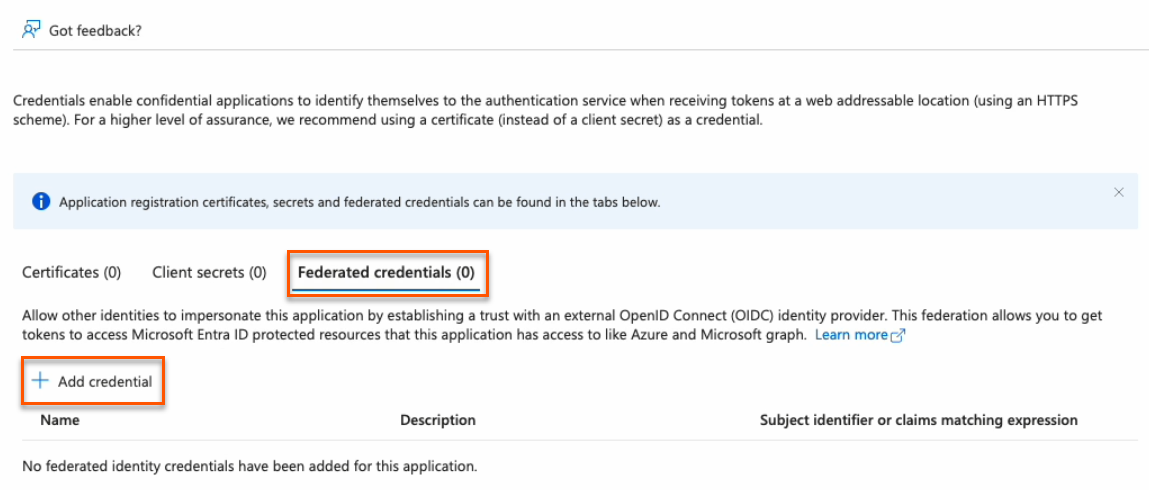
- In the Federated credential scenario dropdown, select Kubernetes accessing Azure resources.
-
On the Add a credential page, fill out the fields as needed.
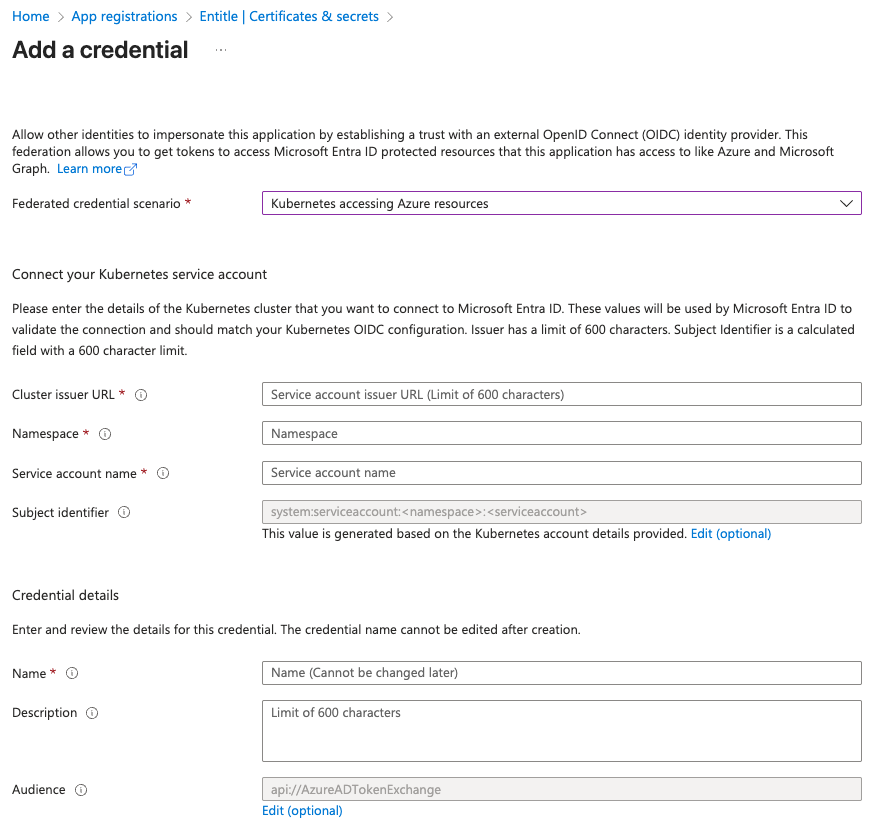
- Cluster issuer URL:
- If you're using Entitle Europe:
https://oidc.eks.eu-west-1.amazonaws.com/id/7104B0E9ED58DCD19AE0DC0EC7D46D5D - If you're using Entitle USA:
https://oidc.eks.us-east-1.amazonaws.com/id/E1F031C91539B03EE726ED530E719F4C - If you're using Entitle Canada:
https://oidc.eks.ca-central-1.amazonaws.com/id/7A1DB459F431A4AFAE24BC244ACE88BB - If you're using an EKS hosted agent on your AWS account, run this command on your cluster and use its output:
aws eks describe-cluster --name <CUSTOMER_CLUSTER_NAME> --query "cluster.identity.oidc.issuer" --output text --region <CUSTOMER_CLUSTER_REGION>
- If you're using Entitle Europe:
- Namespace: Enter entitle.
- Service account name:
- When using a Cloud agent, enter ichilov.
- When using an EKS hosted agent on your AWS account, use entitle-agent-sa.
- Subject identifier: This is automatically generated and should not be edited.
- Name: Enter a name to help identify this credential.
- Description: You may enter a description to help identify the purpose of this credential.
- Audience: Click the Edit link, then enter
sts.amazonaws.com.
- Cluster issuer URL:
-
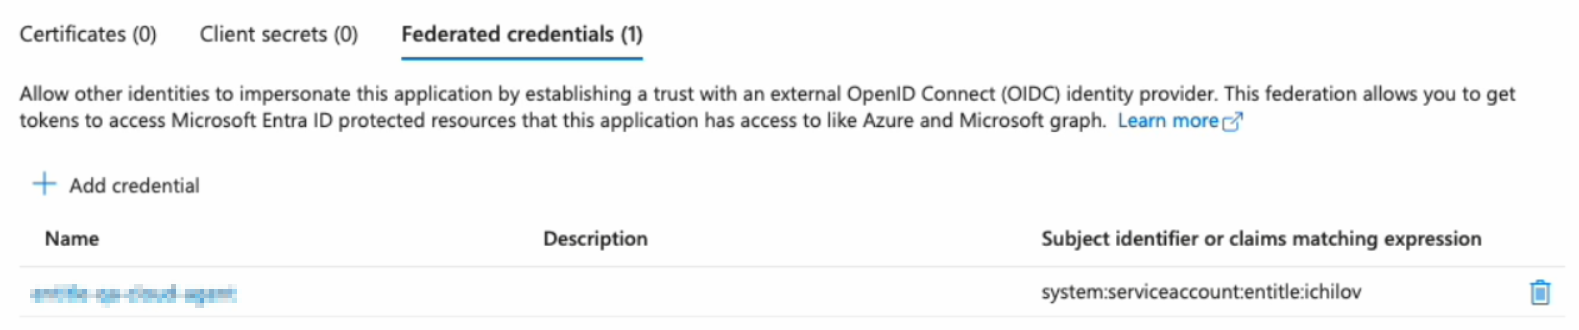
Click Add. Your federated credential now appears on the Certificates & secrets page.
You must now create a temporary secret for onboarding. This secret is short-lived and will be removed automatically after setup.
You can create it either through the Azure portal (easier, but with a minimum lifetime of one day) or using PowerShell commands (slightly more complex, but more secure with a lifetime of two hours or less).
PowerShell method (recommended)
> 🚧 Important information
Using this method deletes all previously issued client secrets for this app registration. Any other integrations or scripts that rely on those secrets will stop working.
This is an intentional security measure. If an unauthorized user were to learn your app ID and tenant ID, they could attempt to create their own integration and misuse your Azure resources.
Entitle uses your new secret only during the first authentication with your Azure tenant and does not store it in the rest of your configuration. The secret is automatically deleted after your setup is complete.
- Go to the Overview page from the left navigation.
- Under Essentials, copy the Application (client) ID to your clipboard.

- Go to Certificates & secrets from the left navigation.
- Click the Cloud Shell icon in the top right bar.

- Run this command, first replacing
<APP_ID>with the Application (client) ID you just copied.
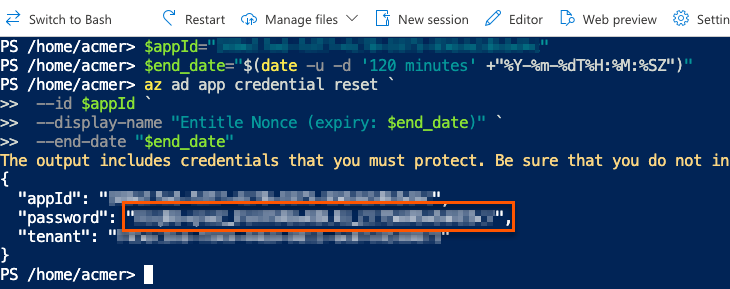
$appId="<APP_ID>"
$end_date="$(date -u -d '120 minutes' +"%Y-%m-%dT%H:%M:%SZ")"
az ad app credential reset `
--id $appId `
--display-name "Entitle Nonce (expiry: $end_date)" `
--end-date "$end_date"- The output gives you the app ID, password, and tenant. The password is your new nonce value. Safely store it for later use.
Azure portal method
11. Click on New client secret.
- In the pop-up window, choose a Description that you will remember and an Expires duration and click Add. The duration should be as short as possible.
- Click on the Copy icon to copy your new Client Secret Value and keep it for later.

Stage 2: Assign permissions to Graph API
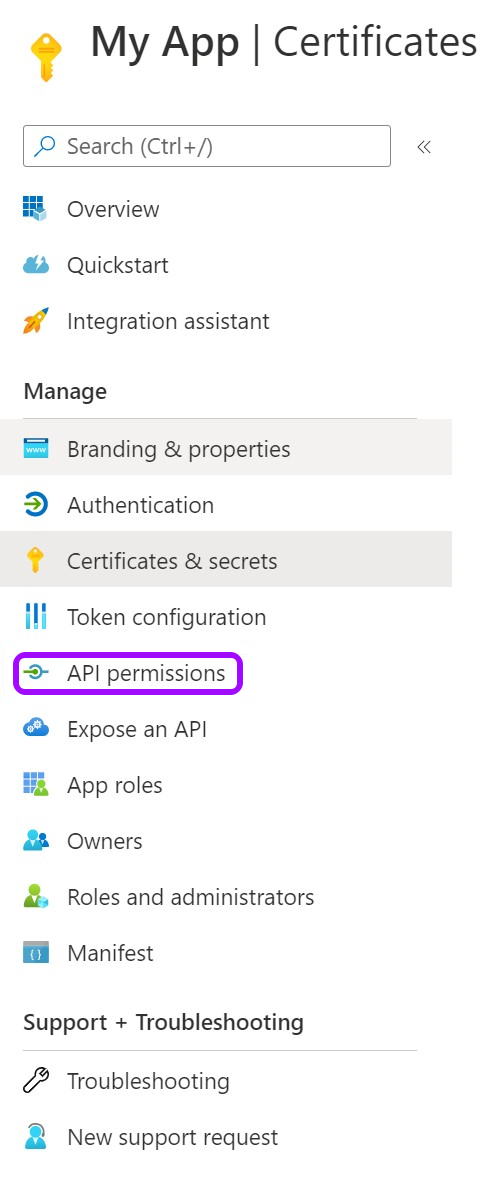
- Go to API permissions.
- Remove the existing default permission by clicking on the ellipses … on the right, then click Remove permission > Yes, remove.

- Now, click Add a Permission.

- From the Request API permissions pane, click Microsoft Graph.
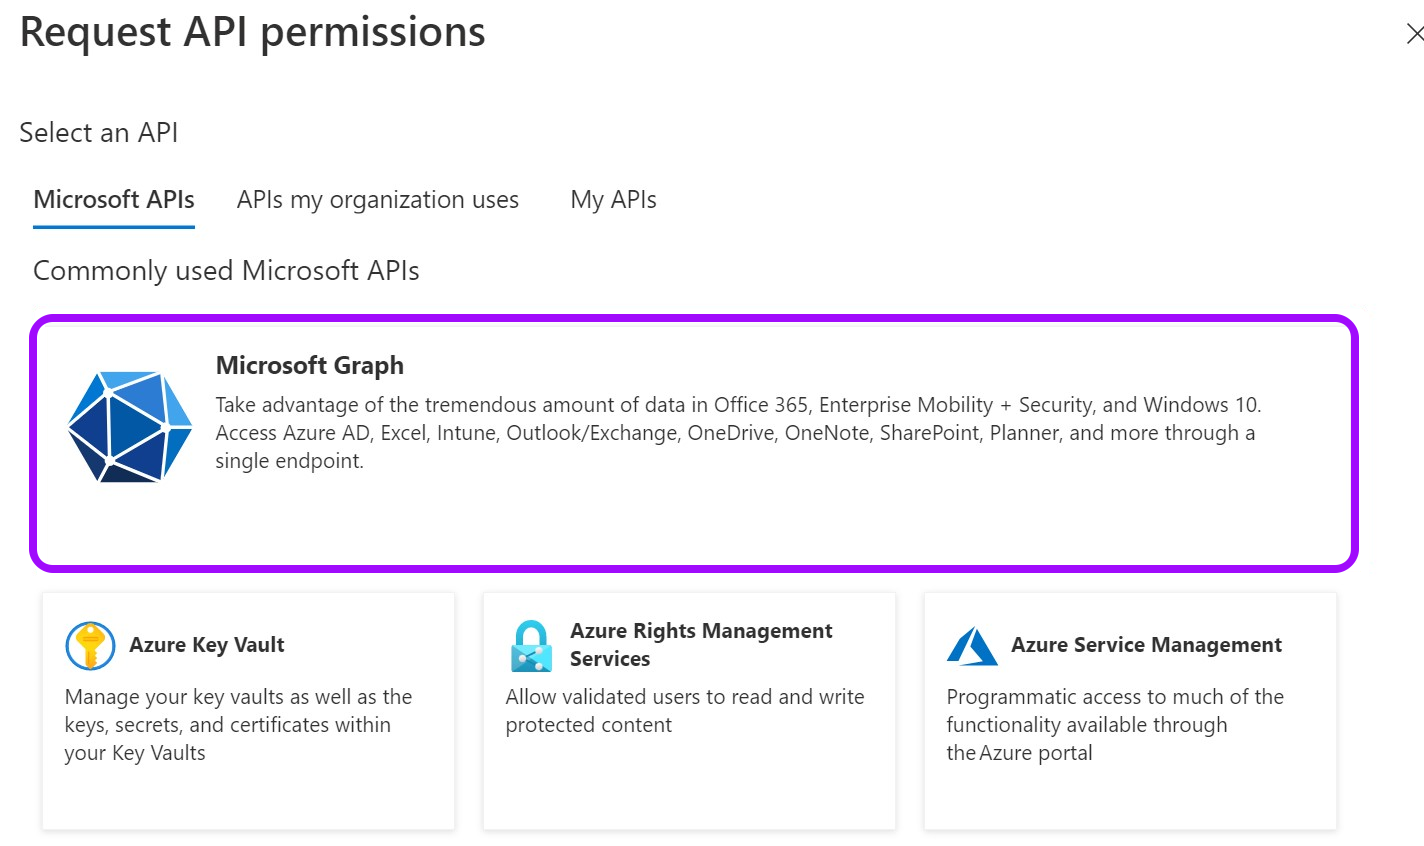
- Select Application permissions.
-
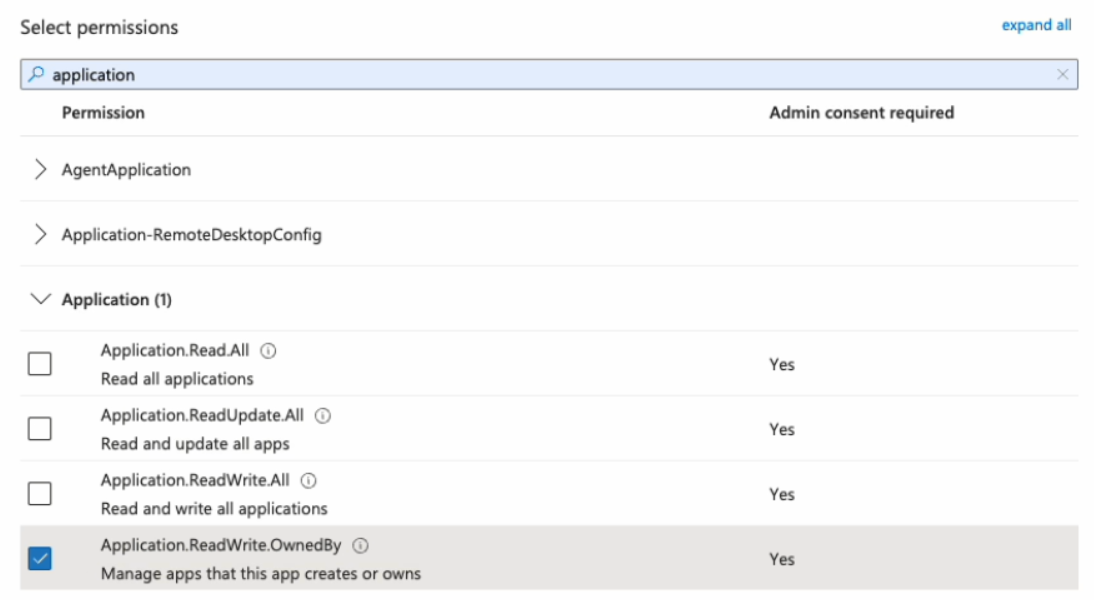
Search for and select the required permissions.
Choose the access level for your Entra ID instance:
- Full access. Grants directory-wide permissions.
- GroupMember.ReadWrite.All
- User.Read.All
- Owned groups access. Limits access to only groups owned by the Entitle service principal.
- User.ReadBasic.All
Use this option if your organization follows least-privilege principles or cannot grant directory-wide permissions. After selecting this option, configure the Entitle service principal as an owner of each group you want Entitle to manage.
- User.ReadBasic.All
Add the following permissions if you are using federated credentials:
-
Application.ReadWrite.OwnedBy
Allows Entitle to delete the temporary onboarding secret immediately after setup. If not granted, the secret remains until it expires.
-
Application.Read.All
Used to validate the nonce ID during setup. If not granted, an incorrect value may be accepted, and the secret will remain until it expires.
- Full access. Grants directory-wide permissions.
-
When you are done selecting the permissions, click Add permissions at the bottom of the screen.
-
You will now see the added permissions in the table under Configured permissions.
-
Click Grant admin consent for Default Directory > Yes.
-
If you are using a client secret, you can continue with Create the integration in Entitle. If you are using federated credentials with the Application.ReadWrite.OwnedBy permission, continue below.
For federated credentials
> ✅
The optional steps below are for additional security. When the integration setup is complete, Entitle immediately deletes the one-time secret created for the initial authentication to your Azure tenant.
If you choose not to run this command, the one-time secret remains active until it expires.
- Click the Cloud Shell icon in the top right bar.

- Run this command, first replacing
<APP_ID>with your Application (client) ID.
$appId=<APP_ID>
$appServicePrincipalId=$(az ad sp list --filter "appId eq '$appId'" --query "[0].id" -o tsv)
az ad app owner add --id $appId --owner-object-id $appServicePrincipalId
Create the integration in Entitle
- Log in to Entitle and go to the Integrations page.
- Click the Add Integration button, then type Microsoft Entra ID - Azure AD in the Application field.
Follow the steps for your chosen authentication method: client secret or federated credentials.
Client secret
3. Start the integration setup following the instructions in Set up a new integration.
4. From the Connection dropdown, select Client secret.
5. In the JSON, paste the values of the information generated earlier.

-
client_id: Your Application (client) ID, found on the Overview page.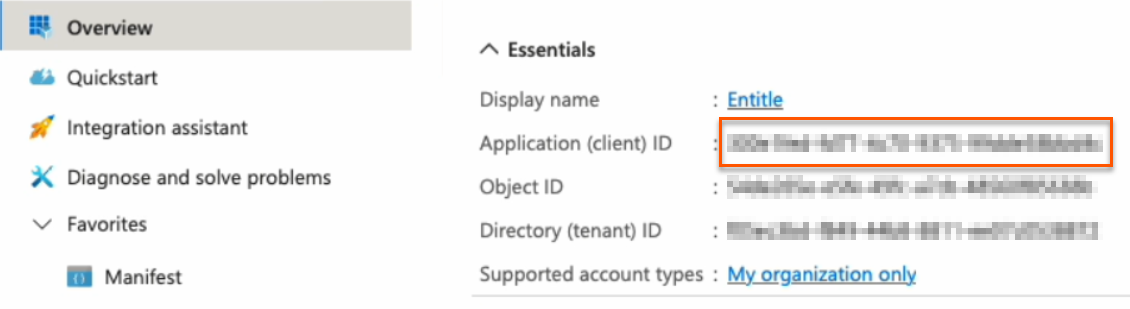
-
secret: Your Client secret, found on the Certificates & secrets page.
-
tenant: Your Directory (tenant) ID, found on the Overview page.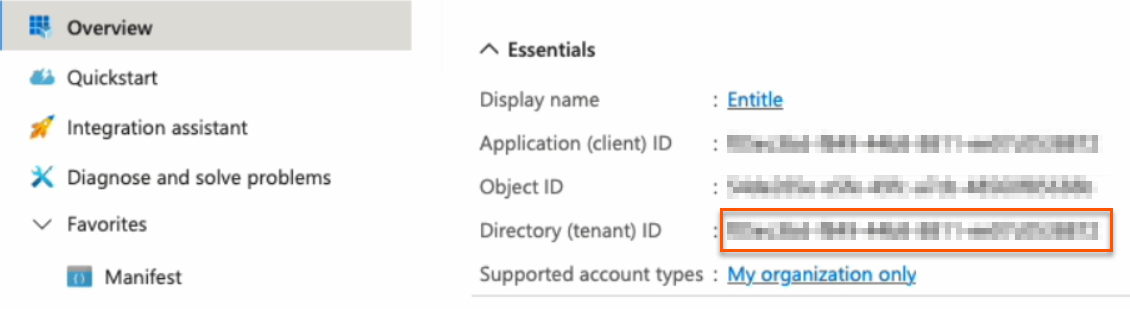
-
You may also add an
optionsfield to the JSON.If you would like the integration to use the UPN address, set the
email_field_nametouserPrincipalName:"options": { "email_field_name": "userPrincipalName" }If you would like the integration to use the standard email address, set the
email_field_nametoemail:"options": { "email_field_name": "email" }If the
email_field_namefield is not provided, the system defaults to using theuserPrincipalName.Example connection JSON{ "client_id": "a47b3f9c-8e1d-42b6-bc3f-9d204c1e8f27", "secret": "e2b0c714-28f4-4fa6-84b1-5de8f32c91ad", "tenant": "fb6d0243-9e81-47a2-a05b-63d40b9f8c92", "options": { "email_field_name": "email" } } -
Click Save.
Federated credentials
3. Start the integration setup following the instructions in Set up a new integration.
4. Save on: Choose whether you would like this integration to be saved on your own hosted agent or in Entitle’s cloud.
Important informationFederated credentials work only for integrations that are saved on Entitle's Cloud or on an on-premises agent that is hosted in Amazon Elastic Kubernetes Service (EKS).

-
From the Connection dropdown, select Federated credentials.
-
In the JSON, paste the values of the information generated earlier.
-
client_id: Your Application (client) ID, found on the Overview page.
-
nonce_id: Your Secret ID, found on the Certificates & Secrets page. Refresh your browser to see the secret ID.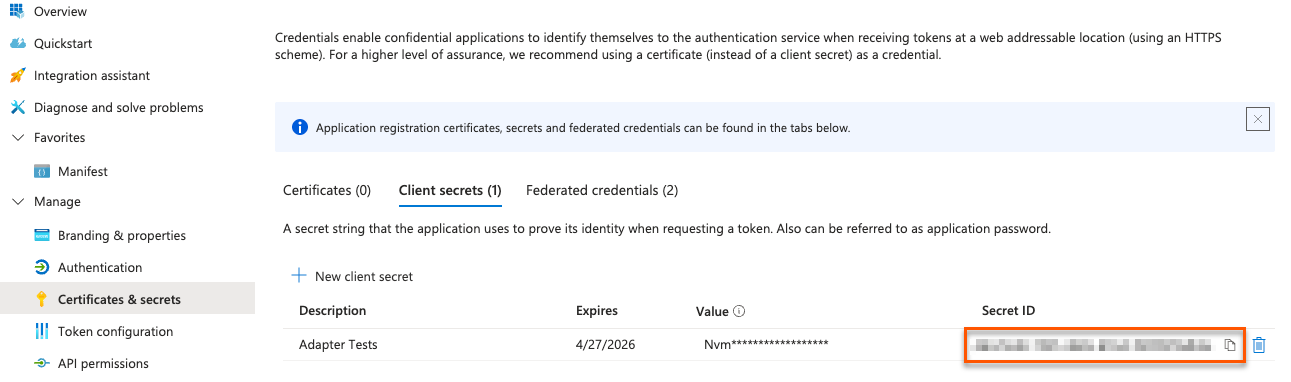
-
nonce_value: Your Nonce value, found in your Cloud Shell instance.
-
tenant: Your Directory (tenant) ID, found on the Overview page.
-
-
You may also add an
optionsfield to the JSON.If you would like the integration to use the UPN address, set the
email_field_nametouserPrincipalName:"options": { "email_field_name": "userPrincipalName" }If you would like the integration to use the standard email address, set the
email_field_nametoemail:"options": { "email_field_name": "email" }If the
email_field_namefield is not provided, the system defaults to using theuserPrincipalName.Example connection JSON{ "client_id": "a47b3f9c-8e1d-42b6-bc3f-9d204c1e8f27", "nonce_id": "3d92a6ef-4b8c-4d12-80a9-cc57e2e3b8a1", "nonce_value": "9c1f8e0a-35d2-4f13-9d4e-f91b2aa84e77", "tenant": "fb6d0243-9e81-47a2-a05b-63d40b9f8c92", "options": { "email_field_name": "email" } } -
Click Save.
Should you need to allowlist this integration, these are the IP addresses from which Entitle's service reaches the integration:
- Entitle EU (Cloud deployment)
- 34.243.199.171
- 54.216.133.226
- Entitle US (Pathfinder deployment)
- 52.45.229.219
- 54.88.235.213
- 3.224.15.134
- Entitle CA (Pathfinder deployment)
- 35.182.218.208
- 15.156.179.153
What's next?Make sure your setup is complete by testing your integration.
Updated 3 months ago
