REST API | Entitle
Overview
The REST API enables connectivity with custom-built applications, public cloud services not natively supported by Entitle, and ETL processes for applications lacking REST API support—for example, those managing permissions through database queries.
The REST API can connect to non-public IP addresses for internal customer applications and services. For example, a Kubernetes (K8s) agent installed on a private cloud can connect to these applications.
See the Entitle agent installation guide for more information.
Click here to view an example of how an implemented HTTP server for REST API integration should look.
Entitle supports the creation of ephemeral (temporary) accounts for this integration, enabling more secure Just-In-Time (JIT) access.
General guidelines
- To integrate REST API with Entitle, you are required to implement an HTTP server that supports one of two integration modes: Standing Accounts or Ephemeral Accounts:
- Standing Accounts means only existing users will be given access.
- Ephemeral Accounts means that temporary users are created and given access. After that, the users are deleted.
- Within the two integration modes, you can choose whether you wish to implement get all permissions (
get_all_permissions) or get asset permissions (get_asset_permissions).
Set up REST API to work with Entitle
In each of the two integration modes, there are mandatory and optional fields that can be implemented.
Standing Accounts:
- Mandatory fields to implement:
get_all_permissionsorget_asset_permissionsget_assetsget_actorsgive_accessrevoke_access
- Optional fields:
check_configcreate_actordelete_actor
Ephemeral Accounts:
- Mandatory fields to implement:
get_all_permissionsorget_asset_permissionsget_assetscreate_actordelete_actor
- Optional fields:
check_config
Definitions of entities
Below you will find an explanation for each entity that exists as a field (mandatory and optional ones).
Actor
An actor represents an entity that interacts with assets within a system. This actor could be a user, a service account, or any entity that requires access to resources or performs actions within the system.
| Field | Field Type | Description |
|---|---|---|
| identifier | string | Unique identifier of the actor |
| name | string | Display the name of the actor |
| type | string | Depending on the application - user? group? service account? |
| string | ||
| last_used | string(date) (optional) | The date it was last used in ISO-8601 format (for example: "2024-03-10T05:41:05Z") |
Asset
An asset represents a resource or entity within a system that actors interact with or access.
| Field | Field Type | Default | Sub-field | Sub-field Type | Description |
|---|---|---|---|---|---|
| identifier | string | The unique identifier by which the asset is to be identified | |||
| name | string | Asset display name | |||
| type | string | Depending on the application - group? repository? project? organization? | |||
| multirole | boolean (optional) | False | Can a single actor have multiple roles regarding this asset? | ||
| role_options | [RoleOption] | code | string | The unique string that identifies this role | |
| display_name | string | ||||
| available | boolean | Should be available for requests on entitle.io (default is True) | |||
| permissions | [string] | List of permissions this role grants (for display purposes) |
Permission
Permission represents the relationship between a role and an actor or asset, requiring an external mapping to an asset. There are two types of permissions:
-
Actor permissions
An Actor (e.g., user) is granted permission to an asset.
Field Field Type Description actor_id string The unique identifier of the actor who has said permission role_code string The role code of the permission the actor has -
Asset permissions
An Asset (e.g., group) grants permission to another asset.
Field Field Type Description asset_id string The unique identifier of the actor who has said permission role_code string The role code of the permission the actor has
Endpoints specification
Entitle's agent expects all responses to be in JSON format with the following structure:
| Field | Field Type | Description |
|---|---|---|
| next | string (optional) | For pagination, if you set this flag, Entitle’s agent will send the request again with ‘page={value of ‘next’}’ in the request parameters |
| data | dict | This field will contain all the response data |
Entitle's agent expects a status code 200 for success. All other status codes will indicate a failure.
[GET] Get Actors
Request body: empty
Response: {'data': {'actors': <as below>}}
| Field | Field Type | Description |
|---|---|---|
| actors | List[Actor] | A list of all integrations actors in the ‘Actor’ entity format |
[GET] Get Assets
Request body: empty
Response:{'data': {'assets': <as below>}}
| Field | Field Type | Description |
|---|---|---|
| assets | List[Asset] | A list of all integration assets in the ‘Asset’ entity format |
[GET] Get All Permissions
Request body: empty
Response: {'data': {'actor_permissions': <as below>, 'asset_permissions': <as below>}}
| Field | Field Type | Keys | Values | Description |
|---|---|---|---|---|
| actors_permissions | dict | Asset ID (string) | List[ActorPermission] | Maps each asset ID to all permissions that users have directly to it |
| assets_permissions | dict (optional) | Asset ID (string) | List[AssetPermission] | Maps each asset ID to all permissions other assets (groups, etc) have/grant to it |
[GET] Get Asset Permissions
Path parameters: The URL we call will look like this - <get_asset_permissions_path>/{asset_identifier}
Request body: empty
Response: {'data': {'actor_permissions': <as below>, 'asset_permissions': <as below>}}
| Field | Field Type | Values | Description |
|---|---|---|---|
| actor_permissions | list | ActorPermission | All the permissions that users have directly to the specified asset |
| asset_permissions | list (optional) | AssetPermission | All the permissions that other assets (groups, etc.) have/grant to the specified asset |
[POST] Give Access
The request body is in JSON format with the following fields:
| Field | Field Type | Description |
|---|---|---|
| asset | Asset | Whole asset information for the asset to grant access to |
| actor_identifier | string | The unique identifier of the actor to whom access should be granted |
| role_code | string | The unique identifier of the role of the asset to be granted to the actor |
Response: {'data': {}}
[POST] Revoke Access
The request body is in JSON format with the following fields:
| Field | Field Type | Description |
|---|---|---|
| asset | Asset | Whole asset information for the asset to revoke access to |
| actor_identifier | string | The unique identifier of the actor whose access should be revoked |
| role_code | string | The unique identifier of the role of the asset to be revoked from the actor |
Response: {'data': {}}
[POST] Check Config (optional)
The request body is in JSON format with the following fields:
| Field | Field Type | Description |
|---|---|---|
| config | dict | The integration configuration as created in the Entitle integration page |
Response: {'data': {'valid': <true/false>, 'reason': '<if the config is invalid, why?>'}}
[POST] Create actor (optional)
The request body is in JSON format with the following fields:
| Field | Field Type | Description |
|---|---|---|
| asset | asset | Whole asset information for the asset to revoke access to |
| provisioning_data | dict | Properties of the actor, such as email, first/last name For example: {'email':'[email protected] 'first_name': 'name' 'last_name': 'last_name'} |
| provisioning_data | string | The unique identifier of the role of the asset to be revoked from the actor |
Response: {'data': {'actor': {'email': 'actor_mail', 'identifier': 'actor_id', 'name': 'actor_name', 'type': 'actor_type'}, 'login_info': {'username': 'test'}}}
[POST] Delete actor (optional)
The request body is in JSON format with the following fields:
| Field | Field Type | Description |
|---|---|---|
| asset | asset | Whole asset information for the asset to revoke access to |
| actor_identifier | string | The unique identifier of the actor whose access should be revoked |
Response: {}
Endpoints SWAGGER - visual presentation
Open API definition
For a more convenient view of this specification and to automatically generate code stubs in different languages, visit the Swagger Editor and input the following definition.
Example server for REST API integration
Click here to view an example of how an implemented HTTP server for REST API integration should look.
Create the integration in Entitle
-
Log in to Entitle and go to the Integrations page.
-
Click Add Integration.
-
In the Application field, enter REST API.
-
In the Save on dropdown, select Entitle cloud or your hosted agent.
-
In the Connection field, select one of the four available options within the two integration modes (Standing Accounts or Ephemeral Accounts).
-
Select/deselect the Allow changing account permissions and Allow creating accounts checkboxes according to your selection:

| Connection method | Allow changing account permissions | Allow creating accounts | Notes |
|---|---|---|---|
Standing accounts (get_all_permissions) | V | X | You must implement get_actors routes |
Standing accounts (get_asset_permissions) | V | X | You must implement get_actors routes |
Ephemeral accounts (get_all_permissions) | X | V | You must implement create_actor and delete_actor routes |
| Ephemeral accounts ( get_asset_permissions) | X | V | You must implement create_actor and delete_actor routes |
| Both (wish to allow creation of users and changing of permissions) | V | V | You must implement get_actors , create_actor and delete_actor routes |
- Choose whether you wish to specify full or relative paths:
- Full path: To specify full paths, do not add
schemaandhostto the configuration. - Relative path: To specify relative paths, add
schema("http"/"https") andhost(e.g., "yourhost.com") to the final configuration:
- Full path: To specify full paths, do not add
"schema": "http", // http or https (optional)
"host": "yourhost.com", // the hostname which hosts your permissions server (optional)-
Choose one of two options for authentication and authorization:
- Option 1: OAuth
- Client credentials flow according to the Client Credentials flow.
- Under the
oauth_datafield, insert the relevant information.
See the example below:
{ "schema": "http", // http or https (optional) "host": "yourhost.com", // the hostname which hosts your permissions server (optional) "get_actors_path": "/my_actors", // get actors will call GET 'yourhost.com/my_actors' "get_assets_path": "/my_assets", // get assets will call GET 'yourhost.com/my_assets' "get_all_permissions_path": "/perm", // get all permissions will call GET 'yourhost.com/perm' "give_access_path": "/give", // give access will call POST 'yourhost.com/give" "revoke_access_path": "/revoke", // revoke access will call POST 'yourhost.com/revoke" "create_actor_path": "/create_actor", // create actor will call POST 'yourhost.com/create_actor" "delete_actor_path": "/delete_actor", // delete actor will call POST 'yourhost.com/delete_actor" "oauth_data": { "auth_server": "<http://myauth.company.com>", "client_id": "\\<CLIENT_ID>", "client_secret": "\\<CLIENT_SECRET>", "audience": "" //(optional) } } - Option 2: Token-based
- Insert the token in the appropriate position under the
headersfield.
See the example below:
{ "get_actors_path": "http://yourhost.com/my_actors", // get actors will call GET 'yourhost.com/my_actors' "get_assets_path": "http://yourhost.com/my_assets", // get assets will call GET 'yourhost.com/my_assets' "get_asset_permissions_path": "http://yourhost.com/perm", // get asset permissions will call GET 'yourhost.com/perm/{asset_identifier}' "give_access_path": "http://yourhost.com/give", // give access will call POST 'yourhost.com/give" "revoke_access_path": "http://yourhost.com/revoke", // revoke access will call POST 'yourhost.com/revoke" "create_actor_path": "/create_actor", // create actor will call POST 'yourhost.com/create_actor" "delete_actor_path": "/delete_actor", // delete actor will call POST 'yourhost.com/delete_actor" "headers": { "Authorization": "Bearer <TOKEN>", } } - Insert the token in the appropriate position under the
- Option 1: OAuth
-
Example JSON configuration:
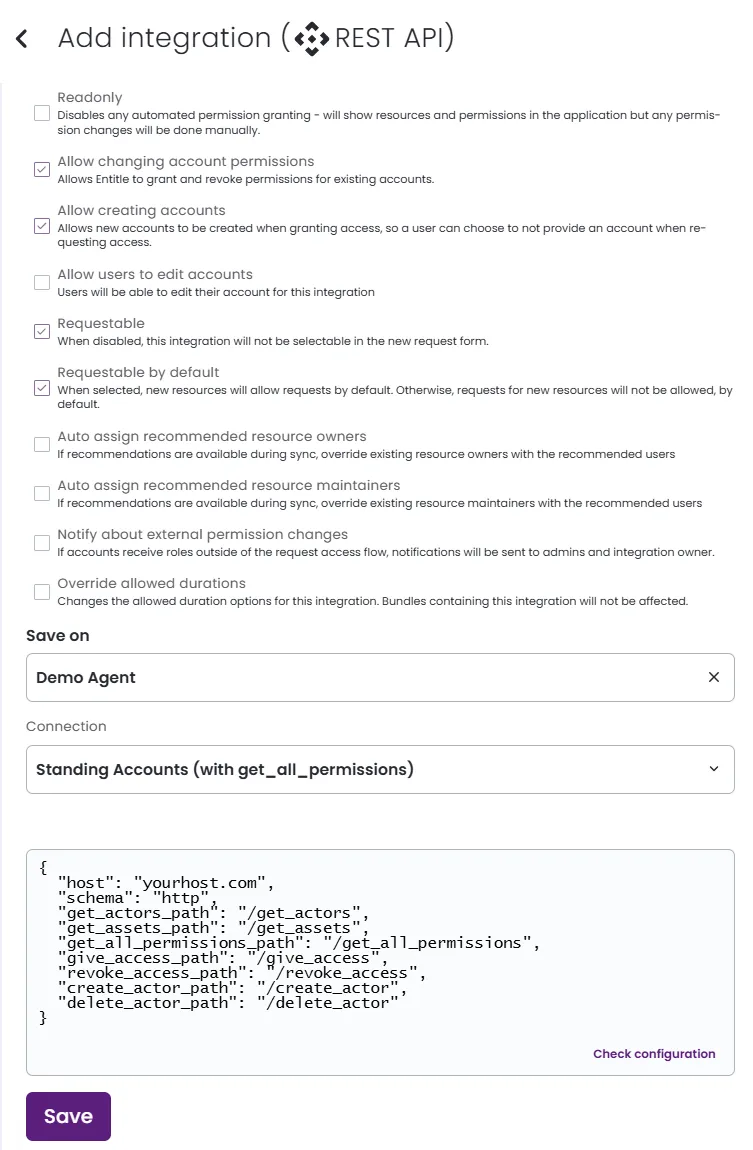
The configuration above reflects a combination of both integration modes—Standing Accounts and Ephemeral Accounts—since both Allow changing account permissions and Allow creating accounts checkboxes are enabled.
What's next?Make sure your setup is complete by testing your integration.
Updated 2 months ago
