Active Directory | Entitle
Overview
Active Directory (AD) is Microsoft's proprietary directory service. It runs on Windows Server and enables administrators to manage permissions and access to network resources.
Entitle can manage access to Active Directory groups, local admin access, and remote access (RDP) to computers.
This page will provide you with instructions on how to integrate Entitle and Active Directory.
General guidelines
Before proceeding with this guide, you might need to install Entitle’s Agent for the integration to work using the Entitle agent instructions.
If you have already set up Active Directory as an IdP in Entitle with Active Directory IdP connection, use the same AD application configuration and continue to the Creating the integration in Entitle section.
To integrate your Active Directory with Entitle, you will need to:
- Provide Entitle with your Directory’s domain, server, username, and password values.
Set up Active Directory to work with Entitle
Stage 1: Extract your Directory’s domain
-
In your Active Directory Management Panel, click on the Active Directory Users and Computers folder.
-
Inside the folder, you will be able to see your Domain value written where the
example.orgvalue in the screenshot below is written.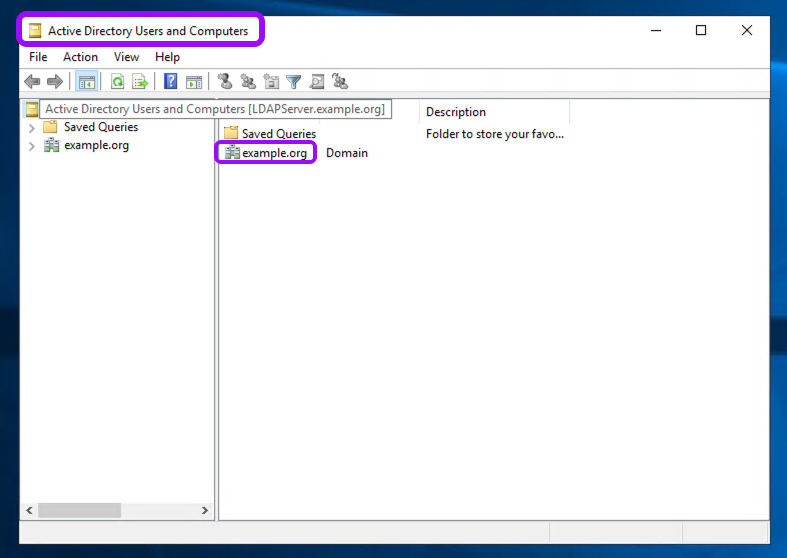
-
Change the format of your Domain value to the following format. You will need this base distinguished name later on for the configuration in Entitle:
DC=<Domain_Prefix>,DC=<Domain_Suffix>.
Stage 2: Extract your hostname (server)
- In case you don’t know your Active Directory’s hostname, open your command line and run the following command:
hostname. You will need it later on for the configuration as well.
Stage 3: Provide Entitle with your username and password
Username
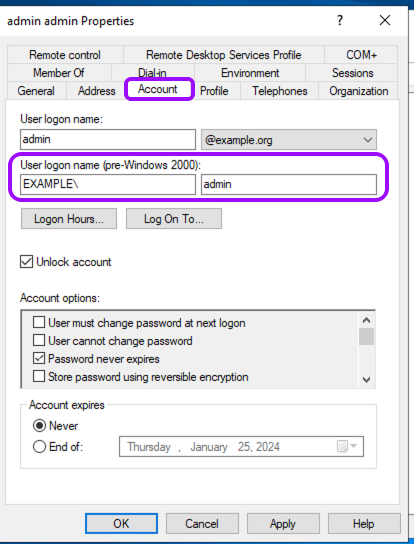
- For the configuration later on, you will need to add your username in the following format:
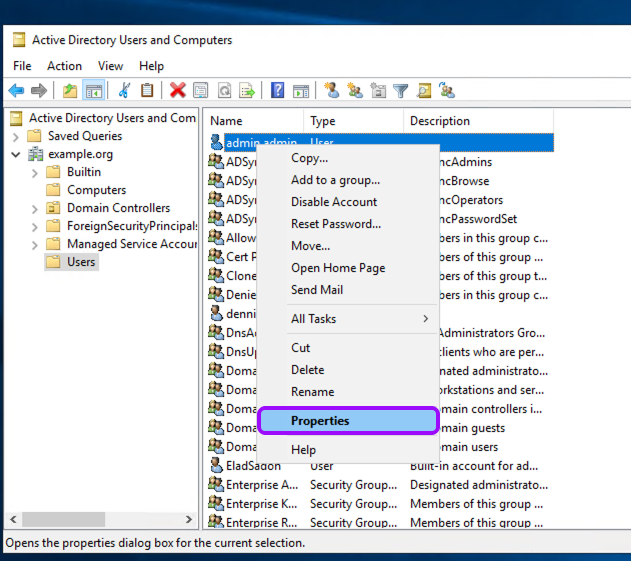
Domain\\Username. - Create a user, for example, in the default Users container, or wherever your organization stores service accounts.
If your user already exists, right-click the Users folder, choose Properties, and then click the Account tab. There, you will find it under the User logon name.Pay attention that in the username format required for the configuration, there are two slashes (
\\) and not a single slash (\).
Password
- Set a password for the account if it is new.
The configuration for Entitle currently uses a hard-coded password, so you should set the password to never expire or keep track of the expiration time, and update the password in the configuration (later) when it expires in AD.
Stage 4: Assign permissions
-
Go back to your Active Directory Management Panel and right-click on the Users folder.
-
Choose the View option, check the Detail option, and the Advanced Features option below it.

- Right-click on the organizational unit (OU) where groups exist that Entitle will manage, click on Properties > Security.

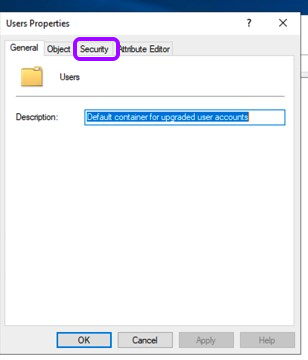
-
Click on the Advanced tab, and check if the Entitle user or group appears.
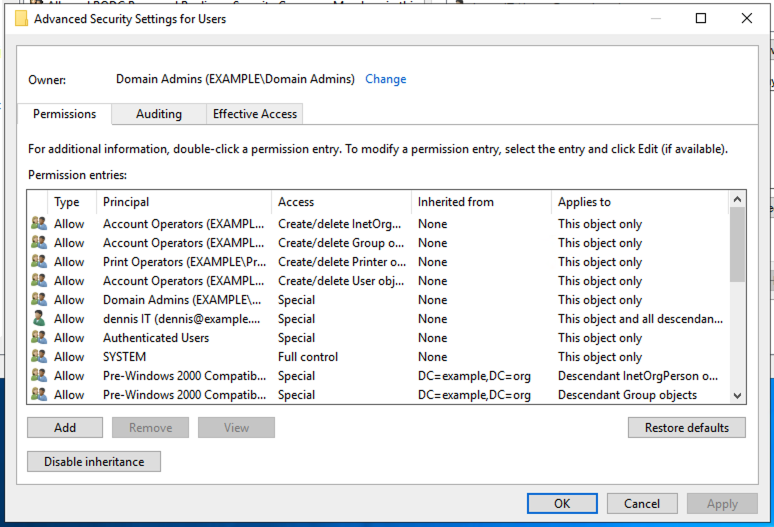
-
If the Entitle user doesn’t appear, click on the Add button, add the user, and then continue to the next step.
-
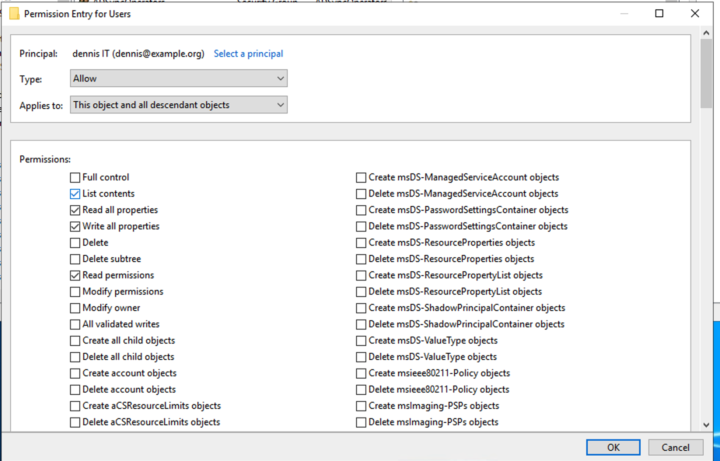
Edit the permissions of the Entitle user (or group). Make sure that the following properties are checked:
-
Read all properties
-
Write all properties
-
Read permissions
-
-
Click OK in the Permissions Entry for Users, Advanced Security Settings for Users, and the Users Properties screens.
-
To allow Entitle to manage domain privileges, the same process should also be applied to the Domain option: repeat the steps above on the domain level.
The Entitle user must be a member of the Domain Admins group to manage admin groups in Active Directory.
Manage group memberships
-
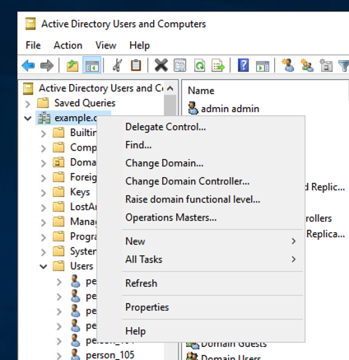
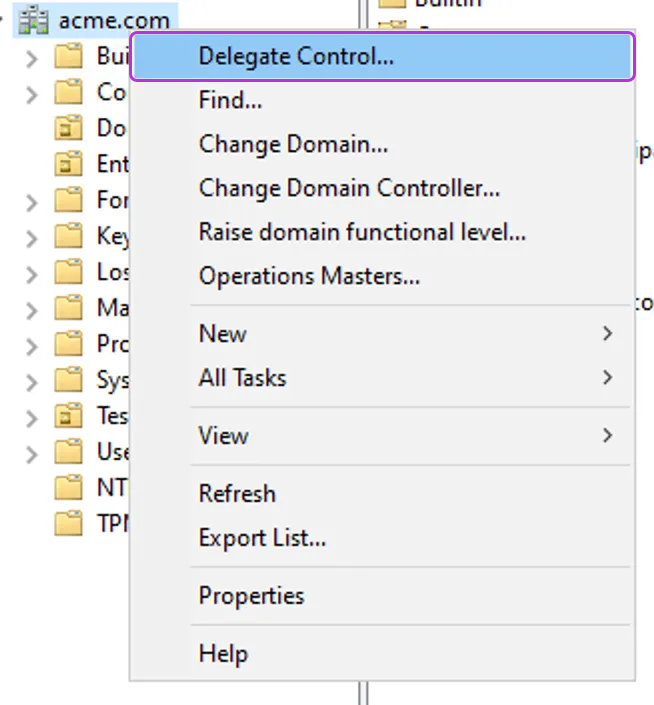
Right-click on the OU (or OUs) you wish to manage groups in. To manage groups in the whole organization, right-click on the parent directory.
-
Click Delegate Control.
-
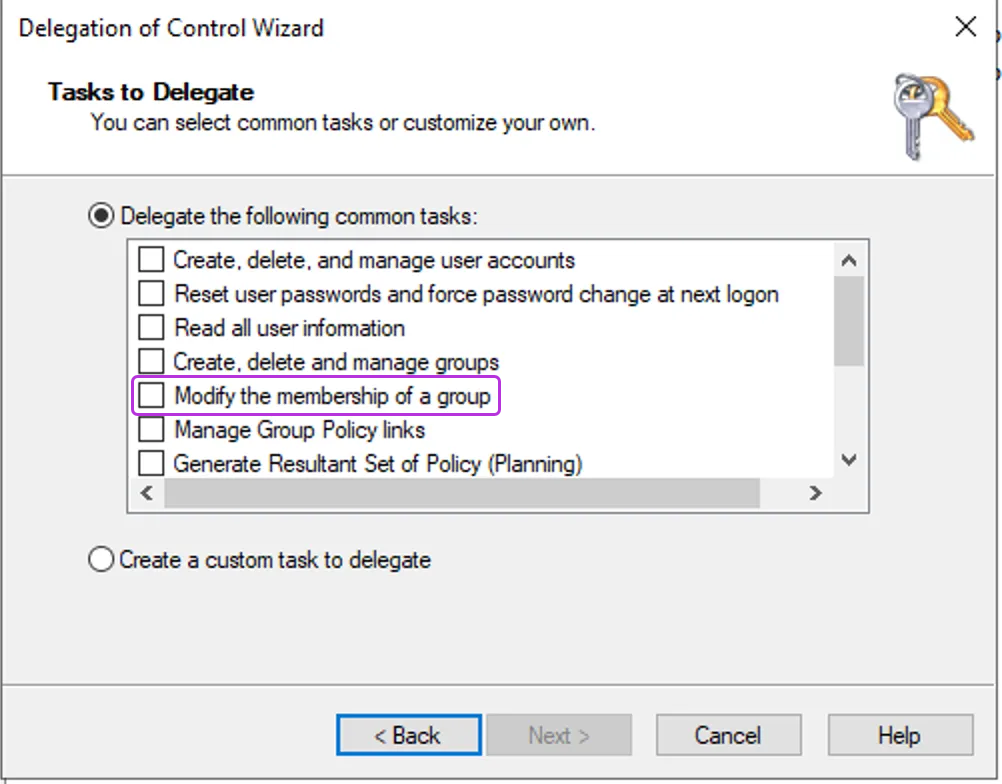
Add the user you wish to add to the group and click Next.
-
Select the following task from the list: Modify the membership of a group.
-
Approve and exit.
Create the integration in Entitle
-
Log in to Entitle and go to the Integrations page.
-
Click Add Integration, then type Active Directory in the Application field.
-
Start the integration setup following the instructions in Set up a new integration.
-
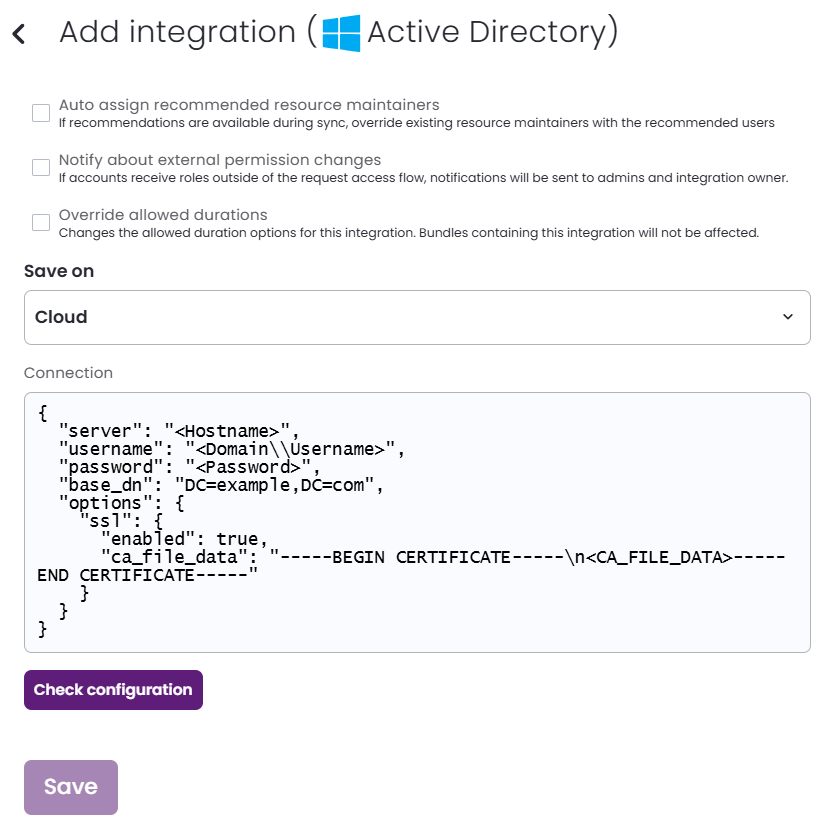
In the JSON, paste the values of the information generated earlier.
-
server: The hostname from stage 2. Supported formats are:ds.example.com: Implicit LDAP scheme, address, default port of389ldap://ds.example.com:389: LDAP with explicit portldaps://ds.example.com: LDAP with default port of636ldaps://ds.example.com:636: LDAPS with explicit port
-
username: The value from stage 3, step 1. -
password: The value from stage 3, step 3. -
base_dn: The value from stage 1.Example connection JSON{ "server": "<Hostname>", "username": "<Domain\\Username>", "password": "<Password>", "base_dn": "DC=example,DC=com" } -
options:-
ssl(optional): Configure SSL settings.enabled: Set totrueto enable SSL.ca_file_data(optional): Paste the entirety of your CA certificate as a single or multi-line string (using\\n), including-----BEGIN CERTIFICATE-----and-----END CERTIFICATE-----.
-
additional_base_dns(optional): An array of additional Base Distinguished Name values for Entitle to search. Use this when your users and resources span multiple organizational units or domains. Entitle searches bothbase_dnand all values listed here.
-
Example connection JSON with SSL and additional Base Distinguished Names{ "server": "<Hostname>", "username": "<Domain\\Username>", "password": "<Password>", "base_dn": "DC=example,DC=com", "options": { "ssl": { "enabled": true, "verify_hostname": true, "ca_file_data": "-----BEGIN CERTIFICATE-----\n<CA_FILE_DATA>-----END CERTIFICATE-----" } "additional_base_dns": [ "DC=example,DC=org", "DC=partner,DC=alt" ] } } -
-
Click Save.
The Entitle integration with Active Directory saves.
Should you need to allowlist this integration, these are the IP addresses from which Entitle's service reaches the integration:
- Entitle EU (Cloud deployment)
- 34.243.199.171
- 54.216.133.226
- Entitle US (Pathfinder deployment)
- 52.45.229.219
- 54.88.235.213
- 3.224.15.134
- Entitle CA (Pathfinder deployment)
- 35.182.218.208
- 15.156.179.153
What's next?Make sure your setup is complete by testing your integration.
Updated 3 months ago
