Integrations, resources, roles | Entitle Pathfinder
Overview
The Integrations screen in Entitle is a central hub for managing all applications and services connected to your Entitle tenant. It offers a clear overview of your linked integrations and allows you to perform various related actions.
The Integrations screen has several key functionalities:
- View and manage:
- Set prerequisite permissions
- Set up Rules for integration resources and roles
- Filter and set up Bulk Actions for integrations, resources, and roles
- Set up new integrations in Entitle
- Test your integration
This page provides you with step-by-step instructions on how to use the Integrations screen in Entitle.
The Integrations page
View role access to the integrations page
See which roles can perform each action.
ImportantThis page is accessible only to Super Admins, Tenant Admins, Admins, Read-Only Admins, and Integration Admins.
| Actions | Super Admin | Tenant Admin | Admin | Read-Only Admin | Manager | Integration Admin |
|---|---|---|---|---|---|---|
| Manage rules | Allowed | Allowed | Allowed | Conditionally allowed | Not allowed | Not allowed |
| Add integrations | Allowed | Allowed | Allowed | Conditionally allowed | Not allowed | Not allowed |
| Perform bulk actions | Allowed | Allowed | Allowed | Conditionally allowed | Not allowed | Not allowed |
| View integration details | Allowed | Allowed | Allowed | Allowed | Not allowed | Allowed |
| Search, sort, and filter | Allowed | Allowed | Allowed | Allowed | Not allowed | Allowed |
Allowed
Conditionally allowed
Not allowed
- Sign in to app.beyondtrust.io with your credentials. The BeyondTrust Pathfinder Home displays.
- At the top right of the page, select your site from the drop-down.
- Select the Entitle tile from your list of available applications.
- From the top left menu, select Integrations.
The Integrations page has several main functionalities:
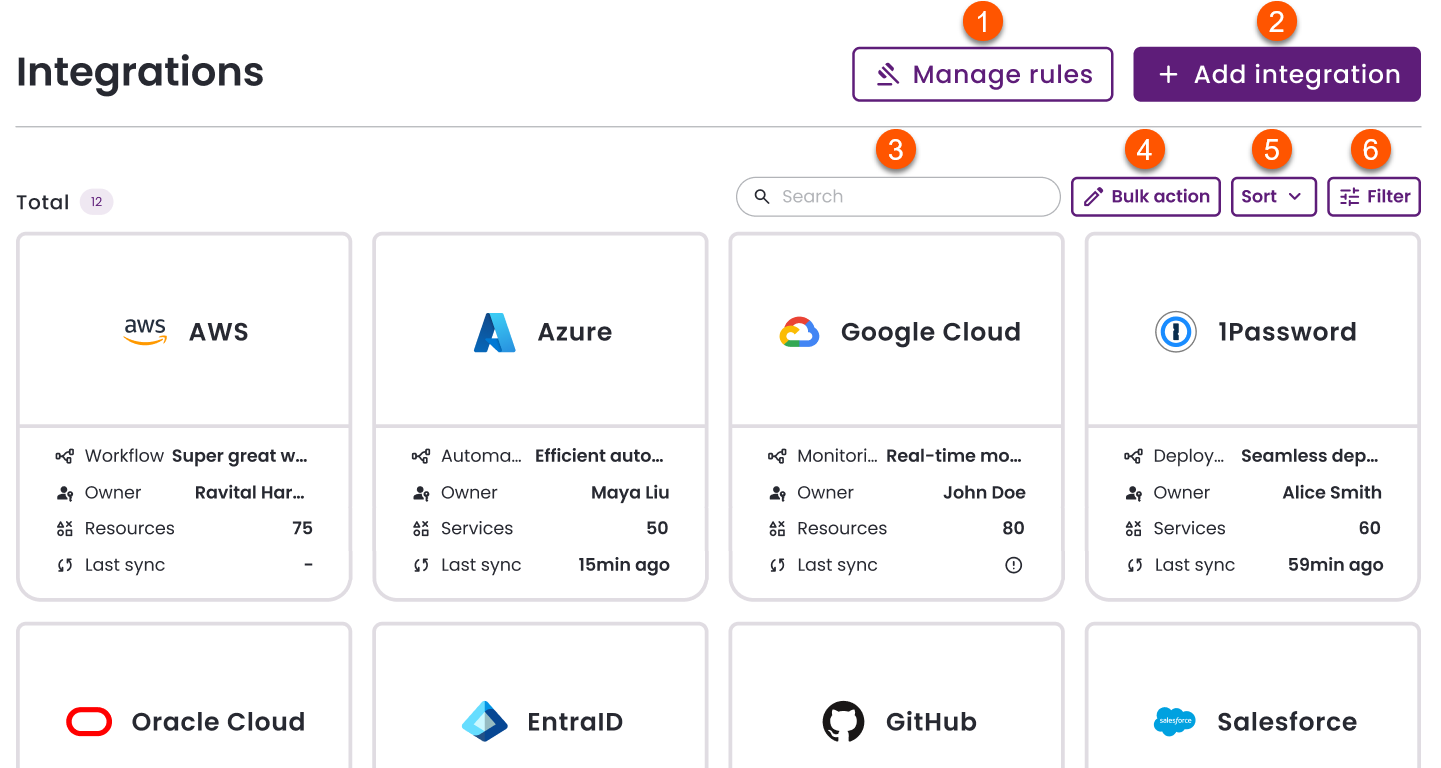
- Manage rules: Rules define how access is granted or removed in Entitle. They use conditions such as user role or resource type to determine attributes such as workflows, owners, maintainers, and requestability, helping you keep access secure and consistent without manual effort.
- Add integration: Set up a new integration in Entitle.
- Search: Search for a specific integration based on integration name, workflow name, or integration owner.
- Bulk actions: Select multiple integrations, resources, or roles to update their attributes in a single action.
- Sort: Sort your integrations by:
- Integration name
- Approval workflow
- Integration owner's last name
- Number of resources
- Last added
- Last sync
- Filter: Filter integrations by:
- Application name
- Integration name
- Integration owner
- Approval workflow
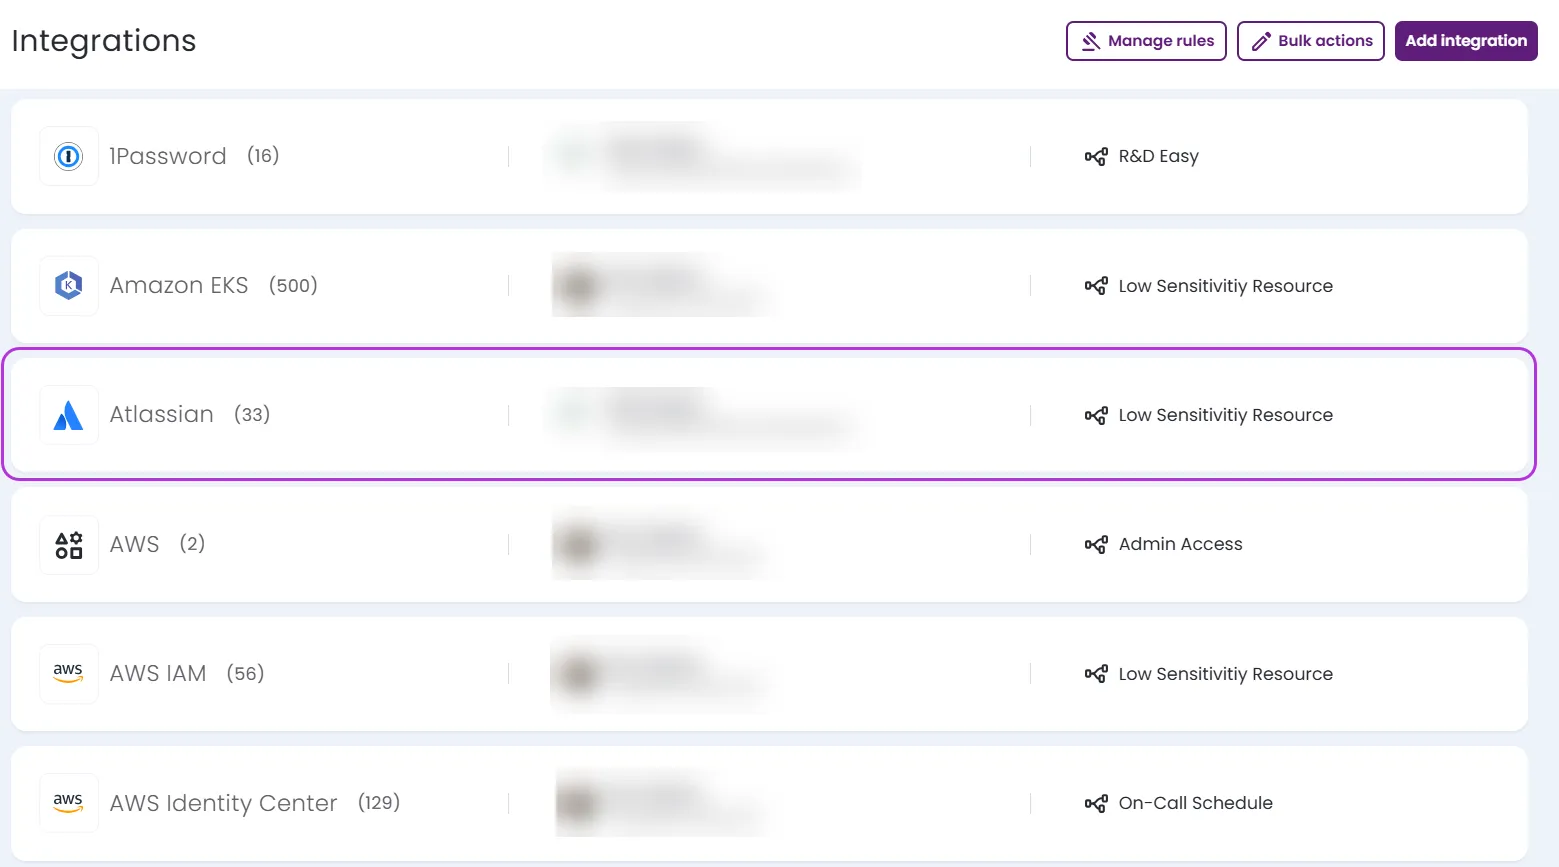
The integrations table displays all integrations set up for your organization. Each card provides key information about the specific integration, such as:
- The application icon.
- The integration name.
- The approval workflow. Hover over the workflow name to see a preview.
- The integration owner. If the name is too long to fully display, hover over it to view the full name. If the user has been deleted, the name appears in gray, and a deleted icon
 displays.
 - The number of resources that the integration has retrieved.
- The last time the resources have been synced. If the last resource sync was unsuccessful, a failed icon
 displays, flagging that you should review the audit logs for further details.
View and manage
When selecting integrations, resources, and roles while configuring a virtual integration, Entitle shows only manageable items:
- A resource appears only if it has at least one managed role.
- If a resource appears, only its managed roles are shown.
Integrations
-
On the Integrations page, click on a specific integration to be taken to its page.
-
On the selected integration's page, you can perform the following actions:
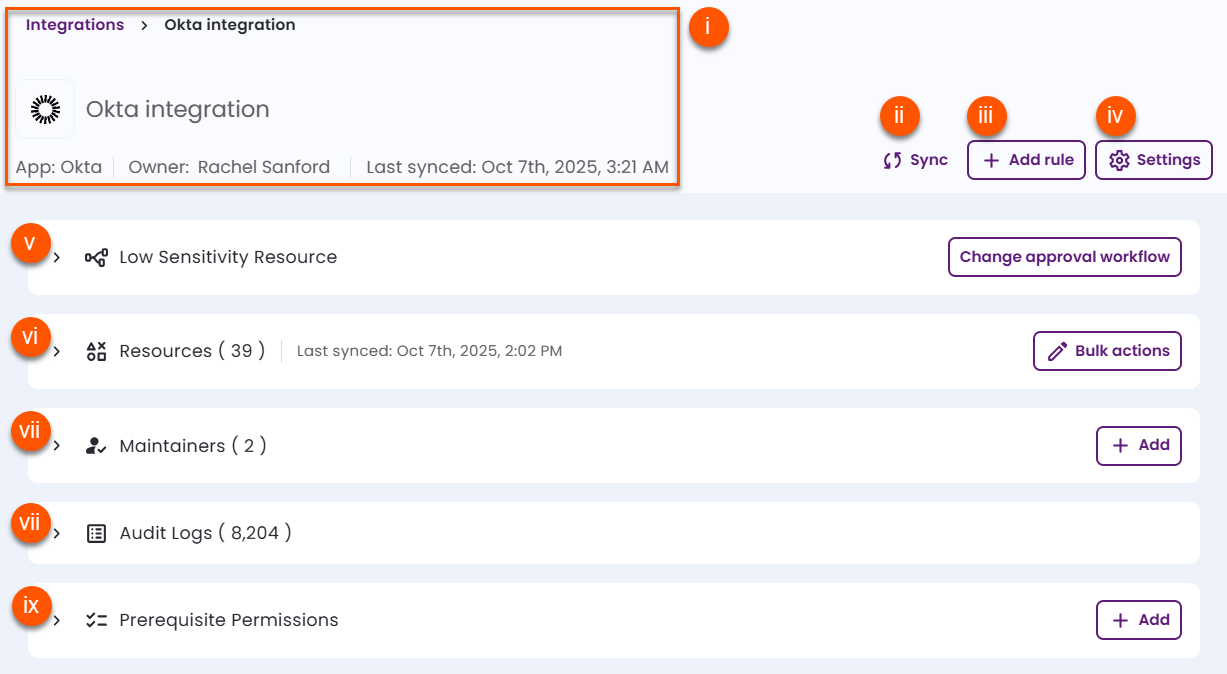
- View the integration's attributes:
- Icon (editable)
- Name (editable)
- Application
- Owner
- Last synced date and time
- Manually synchronize the integration's data.
- Create new rules.
- View and edit the integration's settings:
- Owner
- Readonly
- Allow changing account permissions
- Allow creating accounts
- Allow users to edit accounts
- Requestable
- Requestable by default
- Update all existing resources "Allows requests" option as well (visible only if Requestable by default is not checked)
- Auto assign recommended resource owners and maintainers
- Notify about external permission changes
- Override allowed durations
- Set up new connection
- Restore the default logo
- Delete the integration
For more information about these settings, see Set up a new integration.
- View and change the integration's approval workflow.
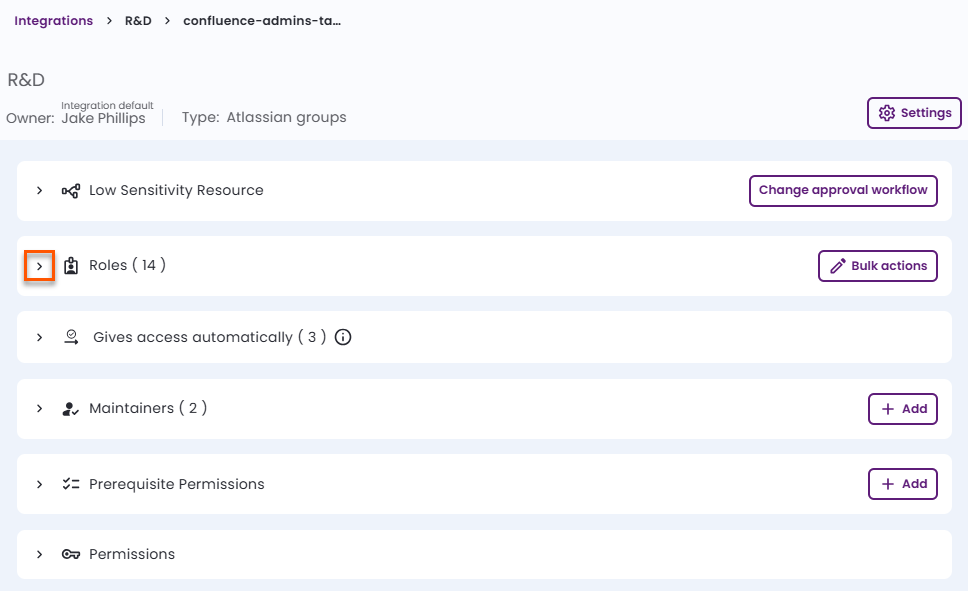
- View and manage the integration's resources and roles.
- Perform bulk actions.
- View and add maintainers for the integration.
- View the integration’s audit logs.
- View and add prerequisite permissions for the integration.
- View the integration's attributes:
Resources
-
On the Integrations page, click on a specific integration to be taken to its page.
-
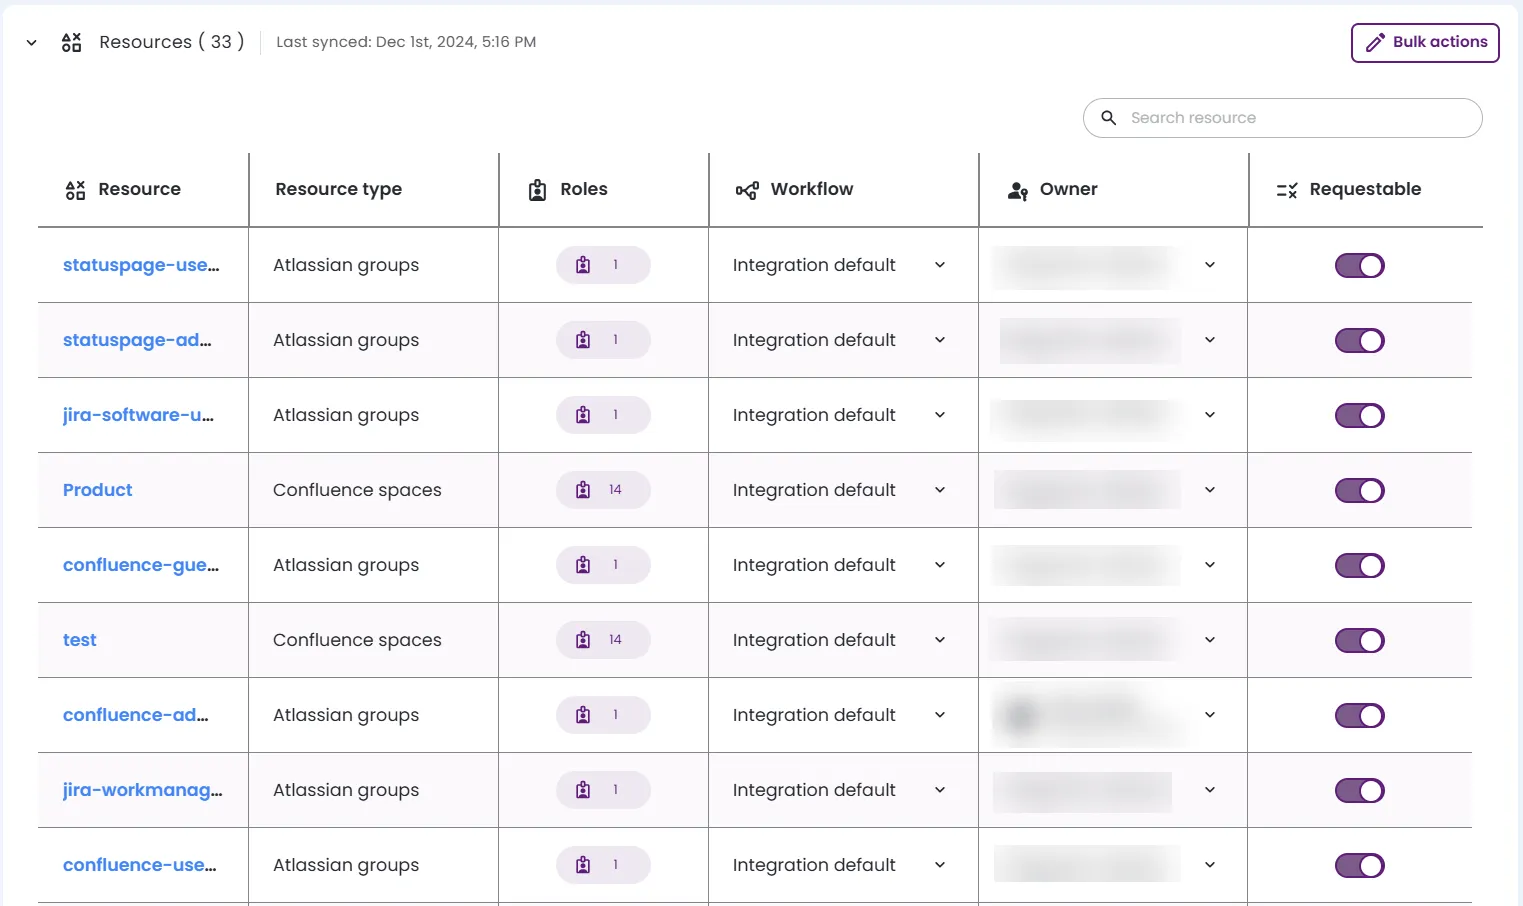
Expand the Resources section to view the existing resources within the integration and additional information about each of them.

-
Under the Resource column, click on a specific resource you would like to view or manage.
-
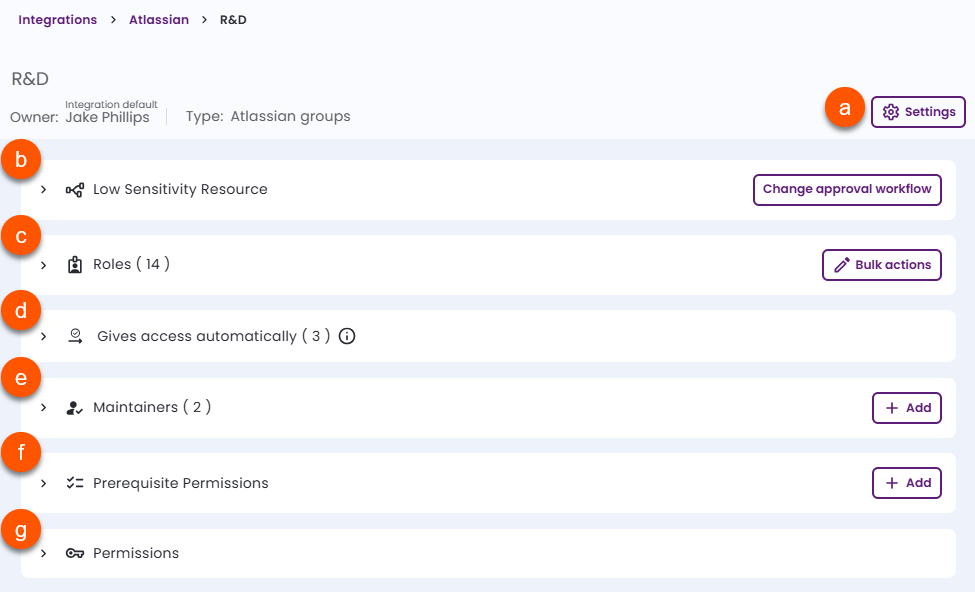
On the resource management page, you can perform the following actions:
-
View and edit the resource’s settings:
- Owner
- Name
- Description
- Tags
- Requestable
- Multirole
- Override allowed durations
-
View and change the resource's approval workflow.
-
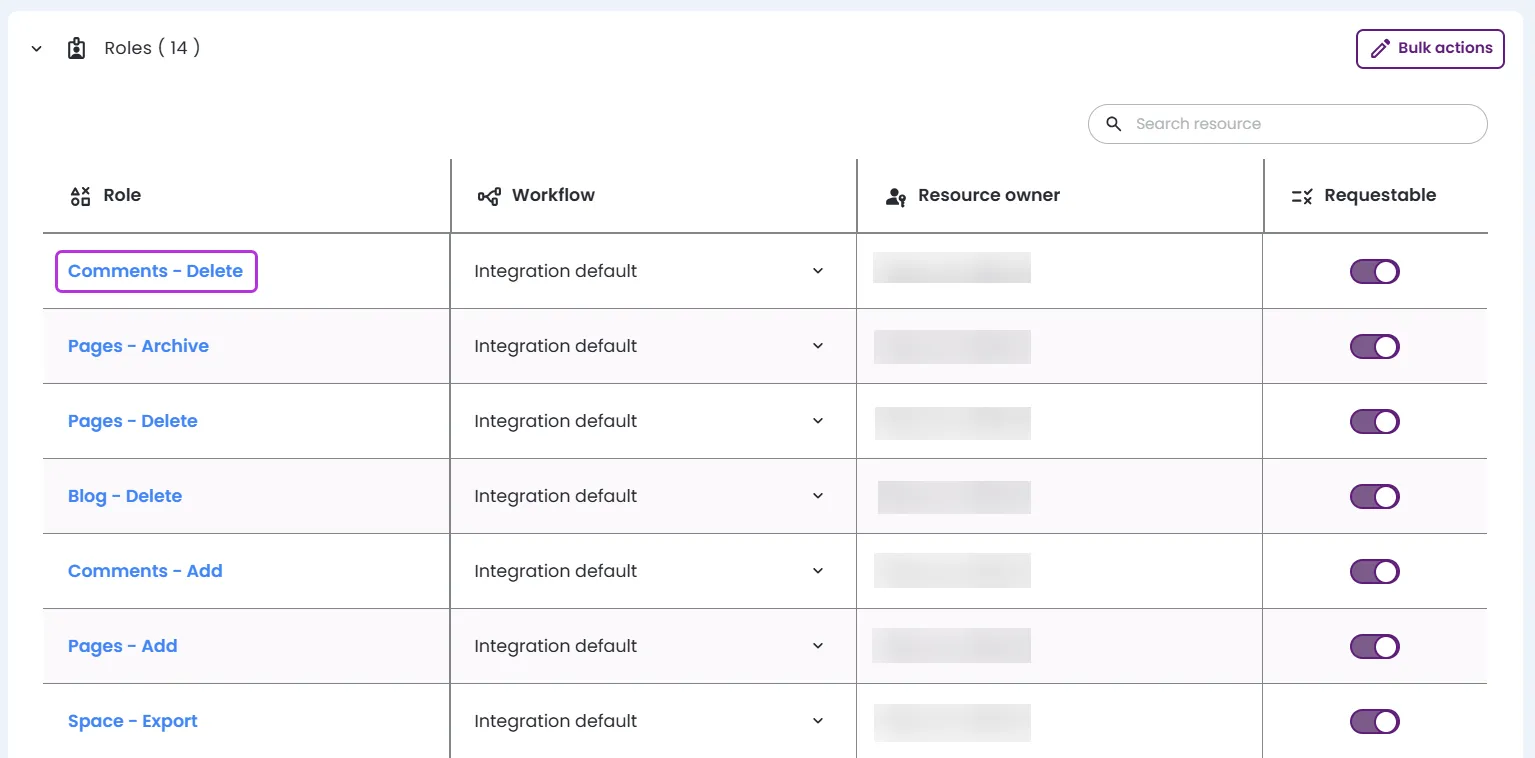
View and manage the integration's roles.
- Perform bulk actions.
-
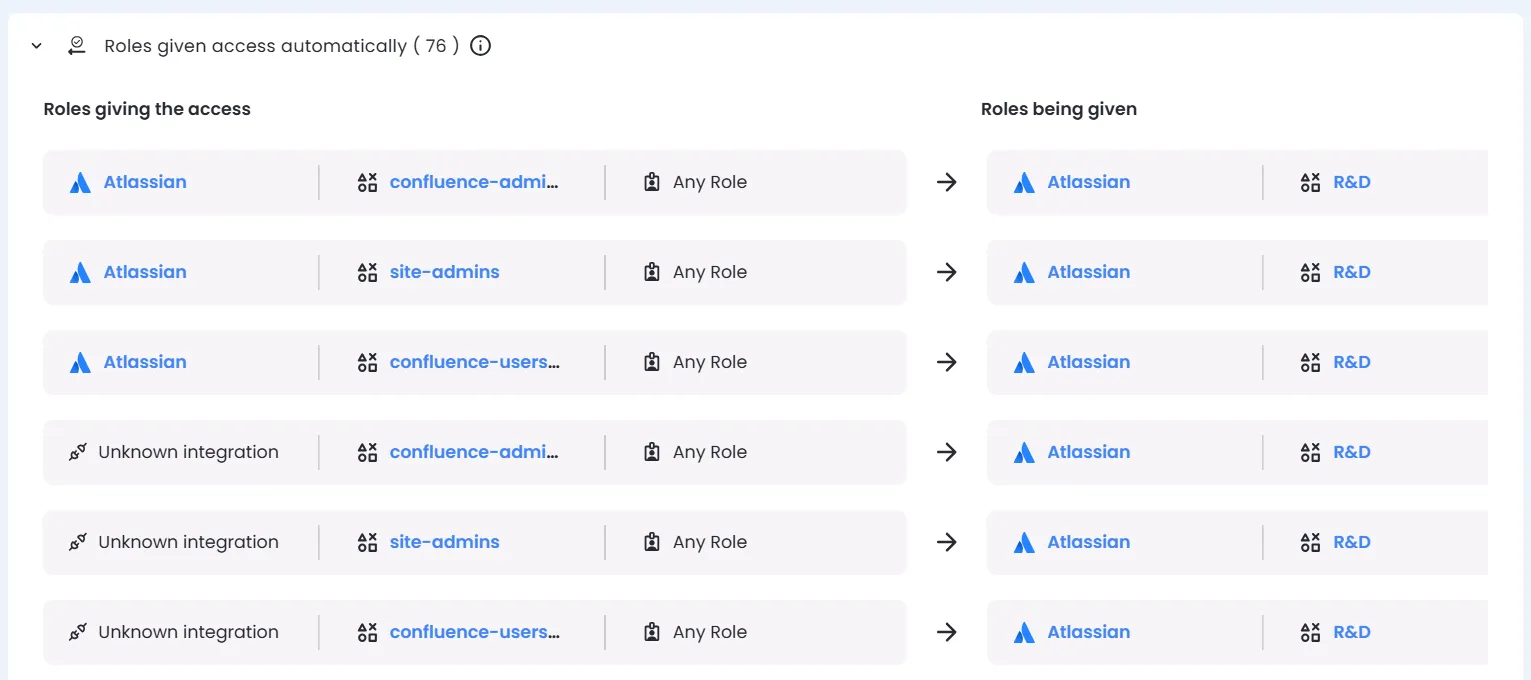
View how this resource’s roles automatically give or are given access from other resources or roles.
-
View and add maintainers for the resource.
-
View and add prerequisite permissions for the resource.
-
View the permissions granted to different users, and revoke permissions as needed.
-
-
Roles
-
On the Integrations page, click on a specific integration to be taken to its page.
-
Expand the Resources section to view the existing resources within the integration. Select a specific resource from the list.

-
Expand the Roles section to view the existing roles within the integration’s resource.
-
Under the Role column, select the specific role that you would like to manage.
-
On the role management screen, you can perform the following actions:

-
View and edit the role’s settings:
- Requestable
- Override allowed durations
-
View and change the approval workflow.
-
View how this resource’s roles are automatically given access from other resources or roles.

-
View and add prerequisite permissions for the role.
-
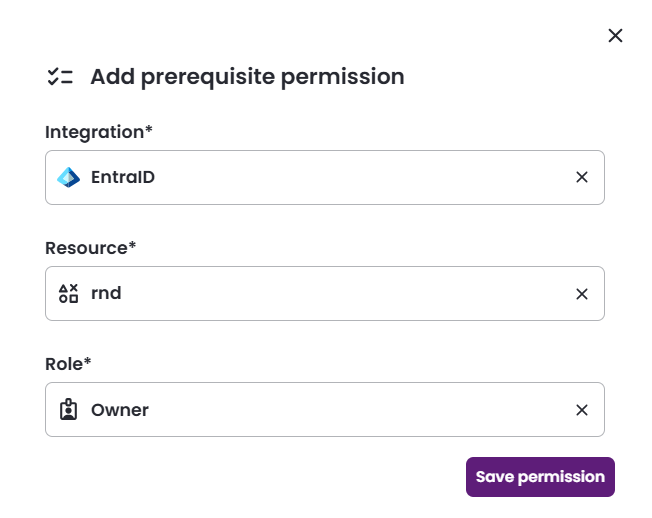
Set prerequisite permissions
-
Prerequisite permissions ensure users have the required access before granting dependent permissions. For example, if database access requires VPN access, the VPN role is set as a prerequisite. Entitle ensures the user has (or will get) VPN access before granting database access.
-
If a user requests a permission and Entitle adds its prerequisites at the same time, those prerequisites expire when the requested permission expires. Permissions granted through bundles or birthright policies also receive their required prerequisites.
-
To add a prerequisite permission, click + Add. Select the integration, resource, and role, then Save permission.
Set up a new integration
Setting up a new integration triggers the following process:
- Entitle attempts to integrate based on the provided configuration (details below).
- Entitle then automatically discovers and "scrapes" existing and changing resources, roles, accounts, and permissions into its database.
- Auto-discovery continues hourly for resources and accounts (or via manual command) as long as the integration remains connected to Entitle. Permission synchronization for changes occurring outside of Entitle happens daily.
- Entitle manages permissions for the integration and applies all its functions – including visibility, Just-in-Time (JIT) access, User Access Reviews (UAR), birthright permissions, session audit, and even future functions – unless otherwise specified.
-
On the Integrations page, click the Add integration button in the top-right corner.
-
Provide the following information:
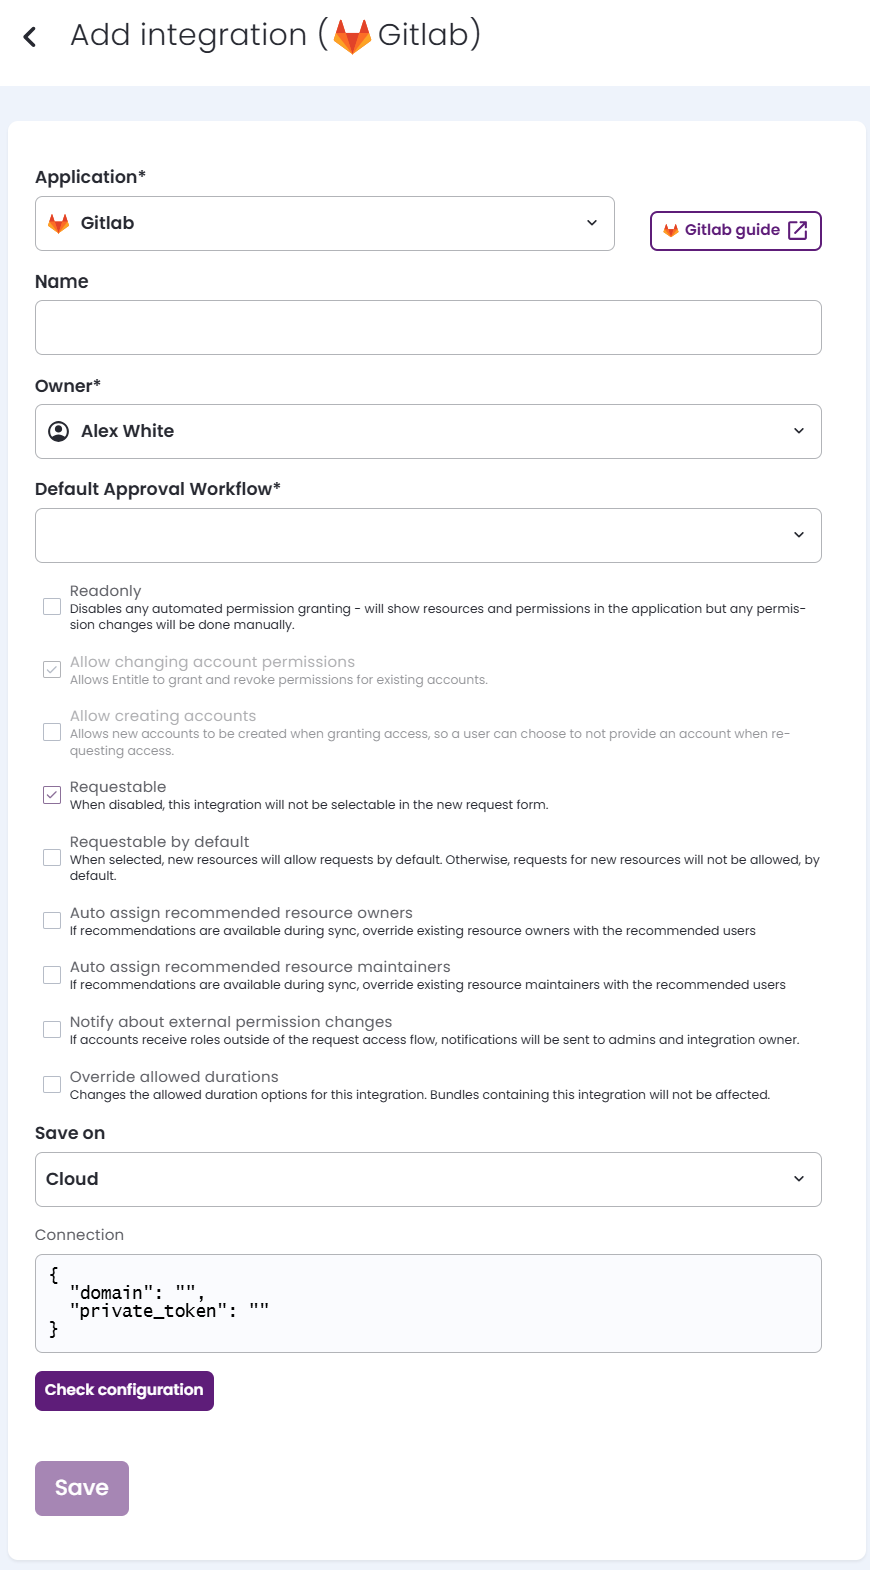
- Application: Select a supported application with which to create an integration. Once selected, a link to the integration's documentation appears to the right.
- Name: The integration's display name.
- Owner: Choose who should administer the integration and handle its approval workflows.
- Default approval workflow: The workflow automatically assigned to entitlements in this integration. You can overwrite it at the resource or role level.
- Checkboxes
- Read-only: In read-only mode, user requests are not automatically granted. Instead, a ticket is opened for manual review and resolution.
- Allow changing account permissions: When selected, Entitle can automatically grant or revoke permissions on this account. When deselected, Entitle can track but not modify permissions.
- Allow creating accounts: When selected, a temporary account is created for each access request and is deleted once the request is revoked or times out.
When deselected, the user must provide a permanent account for the request. Permissions are granted when the request is approved and removed when it is revoked or times out. - Allow users to edit accounts: When selected, users can edit their accounts for this integration. When deselected, their integration accounts are read-only.
- Account-mapping actions (such as mapping or removing an account from a user) may take up to 5 minutes to be reflected in the integration.
- For more information, see Manage integration accounts.
- Requestable: When selected, users can create entitlement requests for resources in this integration. When deselected, this integration is not available in the New request form.
- Requestable by default: When selected, newly added resources in this integration are requestable by default. When deselected, new resources are not requestable by default.
Admins can override this setting for selected resources.
- Auto-assign recommended resource owners: During a sync, Entitle can recommend who should own each resource. When selected, Entitle replaces existing resource owners with the recommended users. When deselected, current owners remain unchanged.
- Auto-assign recommended resource maintainers: During a sync, Entitle can recommend who should maintain each resource. When selected, Entitle replaces existing maintainers with the recommended users. When deselected, current maintainers remain unchanged.
- Notify about external permission changes: When selected, if an account in this integration is granted roles outside of Entitle's JIT access request flow or birthright policy (for example, by an admin manually granting permissions in the third-party integration or by an automated script), an audit log is created and streamed. A notification is then sent to Entitle administrators and the integration owner through instant messaging (Slack or Teams bots).
- Override allowed durations: When selected, you can set custom duration options for this integration. When deselected, users creating requests see the duration options defined by the linked workflow. Bundles containing this integration are not affected.
- Save on: Choose whether you would like this integration to be saved on your own hosted agent or in Entitle’s cloud.
- Connection: View an example JSON configuration for the Application you selected above.
-
Once you have finished configuring the integration, click Save.
Integration troubleshooting
Integration sync time varies based on the number of resources, roles, and entitlements in the third-party system.
- In Entitle, navigate to Integrations.
- Confirm the date/time of the Last sync on the integration card. This indicates the last time Entitle pulled all resources, roles, and entitlements from the third-party system.
- Select the integration and check the Last sync indicator next to Resources. This indicates the last time Entitle pulled the resources from the third-party system.
- Expand Audit logs to review integration activity and errors.
Updated 2 months ago
