AWS IAM single account – pod-based identity | Entitle
Learn how to manage granular access on different types of AWS resources for IAM users
How does it work?
Entitle integrates with AWS by assuming a role that you configure. This role enables Entitle to manage access dynamically based on approved requests.
- For on-premises deployments, the role is assumed by the agent pod's IAM role.
- When a request for access to an EC2 instance, S3 bucket, or IAM role is approved, Entitle automatically creates a policy with the required permissions and attaches it to the corresponding IAM user.
- For requests targeting an IAM policy or IAM group, Entitle grants access directly without creating a new policy.
Prerequisites
To integrate AWS with Entitle, the following setup is required:
- Create an IAM Role with a trust relationship that allows Entitle to assume it.
- Assign the necessary permissions to the role using inline policies.
Should you need to allowlist this integration, these are the IP addresses from which Entitle's service reaches the integration:
- Entitle EU (Cloud deployment)
- 34.243.199.171
- 54.216.133.226
- Entitle US (Pathfinder deployment)
- 52.45.229.219
- 54.88.235.213
- 3.224.15.134
- Entitle CA (Pathfinder deployment)
- 35.182.218.208
- 15.156.179.153
Set up AWS to work with Entitle
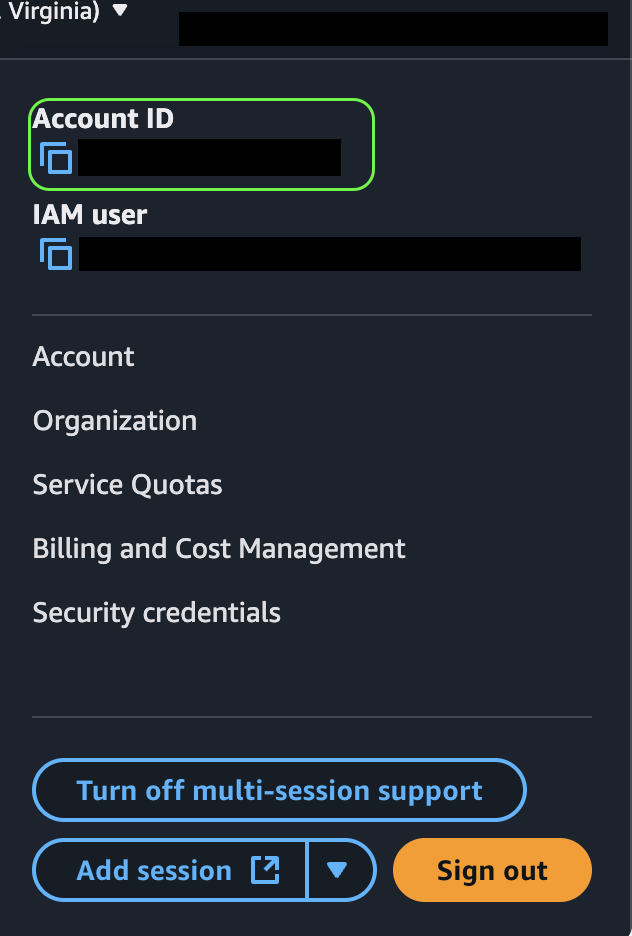
Obtain your account ID
Click the top-right corner of your screen and copy it the value under Account ID. Save it for later on in the configuration.
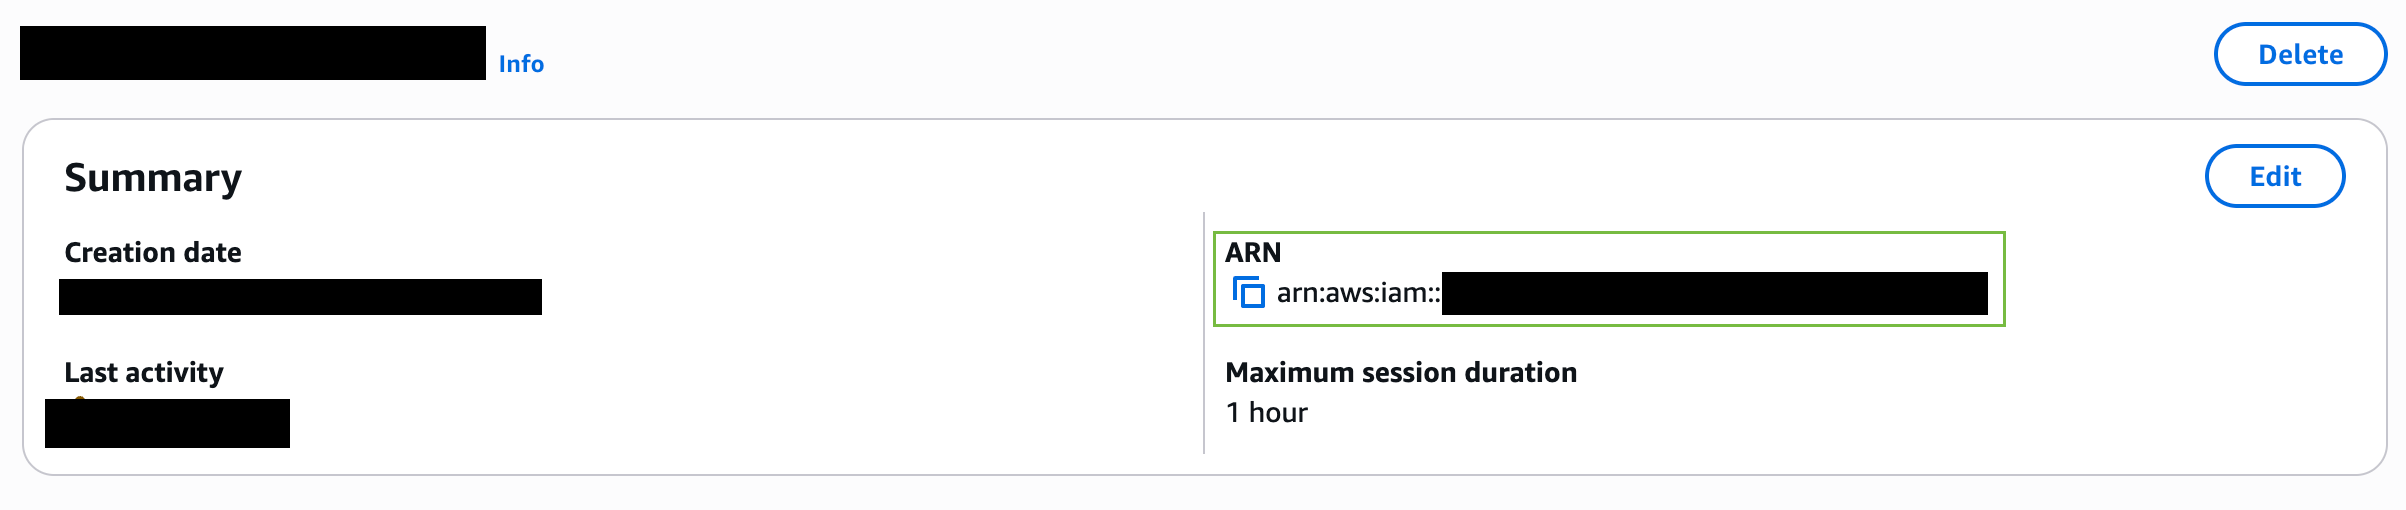
Set up an AWS access role
- Create an IAM Role in the desired account. Save that role's ARN aside; it will be used to configure your AWS integration later on.
- To establish a secure connection between Entitle and your AWS account, you must define a trust relationship that allows Entitle to assume the role you created. Add the following trust relationship policy to the role:
{
    "Version": "2012-10-17",
    "Statement": [
        {
            "Effect": "Allow",
            "Principal": {
                "AWS": "arn:aws:iam::321183744702:role/entitle-prod-ichilov@entitle"
            },
            "Action": "sts:AssumeRole",
            "Condition": {
                "StringEquals": {
                    "sts:ExternalId": "<EXTERNAL_ID>"
                }
            }
        }
    ]
}
{
"Version": "2012-10-17",
"Statement": [
{
"Effect": "Allow",
"Principal": {
"AWS": "arn:aws:iam::396913696231:role/entitle-prod-us-ichilov@entitle"
},
"Action": "sts:AssumeRole",
"Condition": {
"StringEquals": {
"sts:ExternalId": "<EXTERNAL_ID>"
}
}
}
]
}{
"Version": "2012-10-17",
"Statement": [
{
"Effect": "Allow",
"Principal": {
"AWS": "arn:aws:iam::321183744702:role/entitle-prod-ca-ichilov@entitle"
},
"Action": "sts:AssumeRole",
"Condition": {
"StringEquals": {
"sts:ExternalId": "<EXTERNAL_ID>"
}
}
}
]
}{
"Version": "2012-10-17",
"Statement": [
{
"Effect": "Allow",
"Principal": {
"AWS": "<Your agent-pod's AWS role ARN>"
},
"Action": "sts:AssumeRole",
"Condition": {
"StringEquals": {
"sts:ExternalId": "<EXTERNAL_ID>"
}
}
}
]
}- Entitle uses AWS's external ID feature. Create a value for External ID, set it under
"sts:ExternalId"and save the value; you will need it later in this guide. - Add an inline policy to the user you’ve just created

{
  "Version": "2012-10-17",
  "Statement": [
    {
      "Sid": "MergedPolicy0",
      "Effect": "Allow",
      "Action": [
        "iam:AttachRolePolicy",
        "iam:PutRolePolicy",
        "iam:AttachUserPolicy",
        "iam:CreateRole",
        "iam:CreatePolicy",
        "iam:CreatePolicyVersion",
        "iam:DetachUserPolicy",
        "iam:DetachRolePolicy",
        "iam:DeleteRole",
        "iam:DeletePolicy",
        "iam:DeletePolicyVersion",
        "iam:GetPolicy",
        "iam:GetPolicyVersion",
        "iam:GetRole",
        "iam:ListRoles",
        "iam:ListAttachedRolePolicies",
        "iam:ListEntitiesForPolicy",
        "iam:ListPolicies",
        "iam:ListPolicyTags",
        "iam:ListPolicyVersions",
        "iam:ListRolePolicies",
        "iam:ListRoleTags",
        "iam:ListUserPolicies",
        "iam:ListUsers",
        "iam:TagPolicy",
        "iam:UntagPolicy",
        "iam:TagRole",
        "iam:UnTagRole",
        "organizations:ListAccounts",
        "organizations:DescribeAccount",
        "iam:AddUserToGroup",
        "iam:RemoveUserFromGroup",
        "iam:ListGroupsForUser",
        "iam:ListGroups",
        "iam:GetUser",
        "iam:GetGroup"
      ],
      "Resource": "*"
    }
  ]
}- For each resource type you wish to manage, attach another inline policy:
{
    "Version": "2012-10-17",
    "Statement": [
        {
            "Sid": "VisualEditor0",
            "Effect": "Allow",
            "Action": [
                "iam:ListPolicies",
                "iam:GetPolicyVersion",
                "iam:GetPolicy",
                "iam:TagRole",
                "iam:ListEntitiesForPolicy",
                "iam:AttachUserPolicy",
                "iam:ListUsers",
                "iam:ListUserPolicies",
                "iam:ListPolicyTags",
                "iam:TagPolicy",
                "iam:TagUser"
            ],
            "Resource": "*"
        }
    ]
}
{
"Version": "2012-10-17",
"Statement": [
{
"Sid": "VisualEditor0",
"Effect": "Allow",
"Action": [
"iam:ListPolicies",
"iam:GetRole",
"iam:GetPolicyVersion",
"s3:GetBucketTagging",
"ec2:DescribeInstances",
"iam:GetPolicy",
"ec2:DescribeTags",
"ec2:DescribeRegions",
"iam:ListEntitiesForPolicy",
"iam:AttachUserPolicy",
"s3:ListBucket",
"iam:ListUserPolicies",
"iam:CreatePolicy",
"s3:ListAllMyBuckets",
"iam:ListUsers",
"iam:ListPolicyTags",
"iam:DetachUserPolicy"
],
"Resource": "*"
}
]
}{
"Version": "2012-10-17",
"Statement": [
{
"Sid": "VisualEditor0",
"Effect": "Allow",
"Action": [
"iam:ListPolicies",
"iam:GetRole",
"iam:GetPolicyVersion",
"iam:ListRoleTags",
"iam:GetPolicy",
"iam:AttachUserPolicy",
"iam:ListEntitiesForPolicy",
"iam:ListRoles",
"iam:ListUserPolicies",
"iam:CreatePolicy",
"iam:ListUsers",
"iam:ListPolicyTags",
"iam:DetachUserPolicy"
],
"Resource": "*"
}
]
}- Copy the role’s ARN, you’ll use it later in this guide.
Set up the integration in Entitle
-
Log in to Entitle and go to the Integrations page.
-
Click Add Integration and type AWS in the Application field.
-
Start the integration setup following the instructions in Set up a new integration.
-
Don’t forget to set the Save on field with your configuration, i.e., your own hosted agent or Entitle’s cloud.
-
In the Connection section, select IAM Single Account.
-
Fill in the required components in the configuration:
- Paste the account ID of the account you wish to manage resources on as the
account_idvalue. - Paste the ARN of the Entitle role as the
access_role_arn value. - Paste your external ID as the
external_idvalue. - Paste your region code as the
regionvalue. - Under the
optionsconfiguration, add the tags'keyandvaluein case you wish to retrieve only resources with the listed tags.
- Paste the account ID of the account you wish to manage resources on as the
{
    "root_account": {
        "account_id": "", // Your root account ID
        "access_role_arn": "", // Your access role ARN previously copied
        "external_id": "", // External ID set in the access role's trust-relationship
        "region": "" // Your region
    },
    "options": {
        "tags": [
            {
                "key": "", // Tag key of resources to be fetched
                "value": "" // Tag value of resources to be fetched
            }
        ]
    }
}- Click Save.
Updated 3 months ago
