Entitle agent | Entitle
What is the Entitle agent?
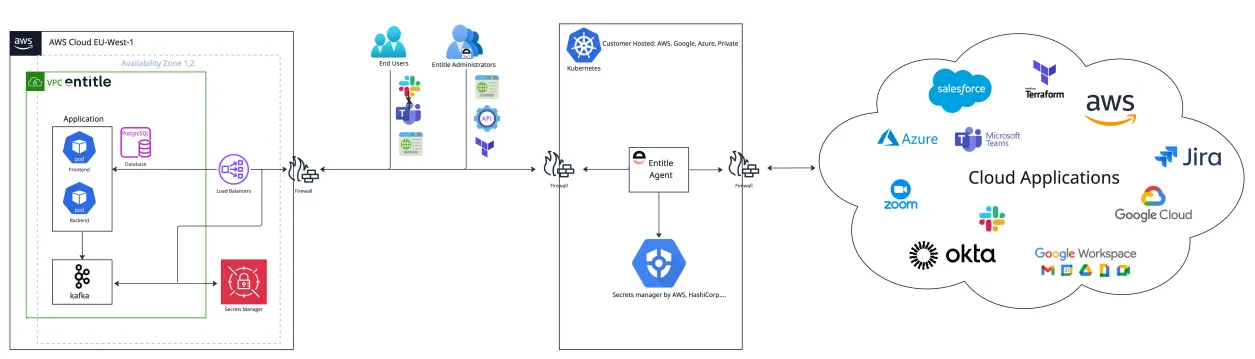
The Entitle agent is a locally hosted component that runs within the customer's Kubernetes cluster. It communicates directly with the managed applications. In contrast, the Entitle control plane, which includes the admin and end-user applications, is hosted in the Entitle cloud service.
Architecture overview
The Entitle system consists of two main components:
- The local agent, hosted within the customer’s Kubernetes cluster, handles communication with managed applications.
- The cloud-based control plane, managed by Entitle, provides administrative and user-facing interfaces for managing access.
User metadata – such as usernames, email addresses, and roles – is encrypted and stored in the Entitle cloud, typically in a secure environment like AWS.
Security and data handling
All secrets and access tokens are stored in a vault within the customer's Kubernetes cluster. These remain entirely within the customer’s environment and are never transmitted to Entitle’s cloud service.
Data sent from the local agent to the Entitle cloud is sanitized. This means logs and other transmitted data exclude any sensitive information, such as credentials or tokens. As a result, no data capable of accessing the managed applications is ever transferred outside the customer's infrastructure.
Job execution methods
Entitle agent supports two job execution methods, depending on the nature and size of the task:
- On-agent execution: Lightweight tasks are executed directly by the agent within its running container.
- Kubernetes job creation: For large or resource-intensive tasks, such as sync tasks, the agent creates a Kubernetes job to handle the workload.
Memory and CPU (central processing unit) requirements
Entitle agent’s resource requirements are defined through the Helm chart configuration and should be set according to your environment’s capacity planning. See the Configuration table for default values and customization options for the following requirements:
agent.resources.requests.cpu– CPU request for agent pod.agent.resources.requests.memory– Memory request for agent pod.agent.resources.limits.cpu– CPU limit for agent pod.agent.resources.limits.memory– Memory limit for agent pod.
Installation
Prerequisites
Confirm network access requirements are met.
This guide will walk you through the necessary steps to set up Entitle’s agent within your Kubernetes cluster. Kubernetes is a required environment for this setup procedure.
Make sure the following are configured within your Kubernetes cluster:
-
Install Datadog and Entitle's Helm charts in your cluster by running the following commands:
helm repo add datadog https://helm.datadoghq.com helm repo add entitle https://anycred.github.io/entitle-charts/To enable log forwarding when deploying Datadog pods in a Kubernetes environment, you must allow network access to the supported endpoint URLs listed in the Datadog Log Collection – Supported Endpoints documentation.
-
Generate a new
agent tokenin Entitle'sOrg Settingspage, and save it for further usage. Refer to the demo video below for guidance.The agent token is used for an agent authentication with Entitle. A specific token can be used for a single agent only, unless the agents are completely redundant. For Entitle agents redundancy architecture, consult BeyondTrust.
Kubernetes Secret Manager Installation (Recommended)
Kubernetes Secret Manager Installation (Recommended)
The Kubernetes Secret Manager installation type is set to be the default secret manager even if your K8s cluster is hosted on GCP/AWS/Azure.
Chart installation
- The
agent.tokenvalue was created as a part of the Prerequisites section above. - The
<ORG_NAME>value within thedatadog.tagskey should be replaced with your company's name. - Although you can replace the
entitlenamespace with your namespace, it is highly discouraged.
helm repo update entitle && \
helm upgrade --install entitle-agent entitle/entitle-agent \
    --set kmsType="kubernetes_secret_manager" \
    --set datadog.datadog.tags={company:${ORG_NAME}}  \
    --set agent.token="${TOKEN}"  \
    -n ${NAMESPACE} --create-namespace
GCP Installation
GCP installation
Workload Identity
If you installed Entitle's IaC, you may skip to the chart installation part.
- Follow the following GCP (GKE) guides:
- In the step Configure applications to use Workload Identity, use the following roles for the GCP service account:
roles/secretmanager.adminroles/iam.securityAdminroles/container.developerroles/iam.workloadIdentityUser
- When the GKE guides prompt you to create or reference a Kubernetes ServiceAccount (
KSA_NAME), you must name itentitle-agent-sa. Using a different Kubernetes ServiceAccount name will cause the Entitle agent deployment to fail.
Update kubeconfig
-
If you have installed Entitle's Terraform IaC:
You can set the environment variables using the Terraform output file
terraform_output.json:BASTION_HOSTNAME=$(jq -r '.bastion_hostname.value' terraform_output.json) PROJECT_ID=$(jq -r '.project_id.value' terraform_output.json) ZONE=$(jq -r '.zone.value' terraform_output.json) REGION=$(jq -r '.region.value' terraform_output.json) CLUSTER_NAME=$(jq -r '.cluster_name.value' terraform_output.json) ENTITLE_AGENT_GKE_SERVICE_ACCOUNT_NAME=$(jq -r '.entitle_agent_gke_service_account_name.value' terraform_output.json) TOKEN=$(jq -r '.token.value' terraform_output.json) COSTUMER_NAME=$(jq -r '.costumer_name.value' terraform_output.json) NAMESPACE=$(jq -r '.namespace.value' terraform_output.json) BASTION_SETUP_COMMAND=$(jq -r '.bastion_setup_command.value' terraform_output.json) AUTOPILOT=$(jq -r '.autopilot.value' terraform_output.json) AGENT_MODE=$(jq -r '.agent_mode.value' terraform_output.json)
Setting up IAP-Tunnel
- Run the following command, note that If AutoPilot is enabled, replace --zone with --region.
gcloud beta compute ssh "<BASTION_HOSTNAME>" --tunnel-through-iap --project "<PROJECT_ID>" --zone "<ZONE>" -- -4 -N -L 8888:127.0.0.1:8888 -o "ExitOnForwardFailure yes" -o "ServerAliveInterval 10" &- If your cluster isn't configured on kubeconfig yet:
gcloud container clusters get-credentials "<CLUSTER_NAME>" --zone "<ZONE>" --project "<PROJECT_ID>" --internal-ip - Otherwise, simply replace
<CLUSTER_NAME>and<ZONE>and run the following command:gcloud container clusters get-credentials <CLUSTER_NAME> --zone <ZONE>
-
The
agent.tokenvalue was created as a part of the Prerequisites section above. -
The
<ORG_NAME>value within thedatadog.tagskey should be replaced with your company's name. -
If you have installed Entitle's Terraform IaC, you need to set up a proxy (after Setting up IAP-tunnel):
export HTTPS_PROXY=localhost:8888- If you wish to use Hashicorp vault, set kmsType to
hashicorp_vault:
helm repo update entitle && \
helm upgrade --install entitle-agent entitle/entitle-agent \
  --set platform.mode="gcp" \
  --set kmsType="gcp_secret_manager" \
  --set platform.gke.serviceAccount="<ENTITLE_AGENT_GKE_SERVICE_ACCOUNT_NAME>" \
  --set platform.gke.projectId="<PROJECT_ID>" \
  --set agent.token="<AGENT_TOKEN_FROM_ENTITLES_ORG_SETTINGS>" \
  --set datadog.datadog.tags={company:<YOUR_ORG_NAME>} \
-n "<NAMESPACE>" --create-namespaceENTITLE_AGENT_GKE_SERVICE_ACCOUNT_NAMEmust be the service account name only, without the project domain suffix. Do not include@<PROJECT-ID>.iam.gserviceaccount.com.ExampleIf your GCP service account email is:
[email protected]Use the following value:
ENTITLE_AGENT_GKE_SERVICE_ACCOUNT_NAME=test-cluster-sa- If you set up environment variables, use the following command:
helm repo update entitle && \
helm upgrade --install entitle-agent entitle/entitle-agent \
  --set platform.mode="gcp" \
  --set kmsType="gcp_secret_manager" \
  --set datadog.providers.gke.autopilot="${AUTOPILOT}" \
  --set platform.gke.serviceAccount="${ENTITLE_AGENT_GKE_SERVICE_ACCOUNT_NAME}" \
  --set platform.gke.projectId="${PROJECT_ID}" \
  --set agent.token="${TOKEN}" \
  --set datadog.datadog.tags={company:${ORGANIZATION_NAME}} \
  -n "${NAMESPACE}" --create-namespace
AWS Installation
AWS installation
Declare variables
- Define bash variable for
CLUSTER_NAME:
CLUSTER_NAME=<your-cluster-name> - Define your cluster's name:
export CLUSTER_NAME=<your-cluster-name>- Update
kubeconfig:
aws eks update-kubeconfig --name $CLUSTER_NAME --region us-east-2 # Or any other region
aws eks update-kubeconfig --name $CLUSTER_NAME --region us-east-2 # (or any other region)If you installed our IaC, then you may now skip to the chart installation part.
You can check if you already have the Identity Provider for your cluster using one of the following:
- Run the following command:
aws eks describe-cluster --name $CLUSTER_NAME --query "cluster.identity.oidc.issuer" --output text - Or here.
- Run the following command:
aws eks describe-cluster --name $CLUSTER_NAME --query "cluster.identity.oidc.issuer" --output text - Alternatively, refer to IAM Identity Providers page in the AWS Console.
If you don't have an OIDC provider, create a new one by running the following command:
eksctl utils associate-iam-oidc-provider --cluster $CLUSTER_NAME --approveVerify your OIDC provider has been approved by checking the output of the following command:
aws iam list-open-id-connect-providersCreate policy
ACCOUNT_ID=$(aws sts get-caller-identity --query "Account" --output text)
echo $ACCOUNT_ID

cat > entitle-agent-policy.json <<ENDOF
{
    "Version": "2012-10-17",
    "Statement": [
        {
            "Sid": "VisualEditor0",
            "Effect": "Allow",
            "Action": [
              "secretsmanager:UpdateSecret",
              "secretsmanager:TagResource",
              "secretsmanager:PutSecretValue",
              "secretsmanager:ListSecretVersionIds",
              "secretsmanager:GetSecretValue",
              "secretsmanager:GetResourcePolicy",
              "secretsmanager:DescribeSecret",
              "secretsmanager:DeleteSecret",
              "secretsmanager:CreateSecret"
            ],
            "Resource": "arn:aws:secretsmanager:*:${ACCOUNT_ID}:secret:Entitle/*"
        },
        {
            "Sid": "VisualEditor1",
            "Effect": "Allow",
            "Action": "secretsmanager:ListSecrets",
            "Resource" : "*"
        }
    ]
}
ENDOF

aws iam create-policy --policy-name entitle-agent-policy --policy-document file://entitle-agent-policy.json
Create IAM role and attach policy
ACCOUNT_ID=$(aws sts get-caller-identity --query "Account" --output text)
echo $ACCOUNT_ID
OIDC_PROVIDER=$(aws eks describe-cluster --name ${CLUSTER_NAME} --query "cluster.identity.oidc.issuer" --output text | sed -e "s/^https:\/\///")
echo $OIDC_PROVIDER

cat > trust.json <<ENDOF
{
  "Version": "2012-10-17",
  "Statement": [
    {
      "Effect": "Allow",
      "Principal": {
        "Federated": "arn:aws:iam::${ACCOUNT_ID}:oidc-provider/${OIDC_PROVIDER}"
      },
      "Action": "sts:AssumeRoleWithWebIdentity",
      "Condition": {
        "StringEquals": {
          "${OIDC_PROVIDER}:aud": "sts.amazonaws.com",
          "${OIDC_PROVIDER}:sub": "system:serviceaccount:entitle:entitle-agent-sa"
        }
      }
    }
  ]
}
ENDOF

aws iam create-role --role-name entitle-agent-role --assume-role-policy-document file://trust.json --description "Entitle Agent's AWS Role"
aws iam attach-role-policy --role-name entitle-agent-role --policy-arn=arn:aws:iam::${ACCOUNT_ID}:policy/entitle-agent-policyEventually, you can install our Helm chart:
- The
agent.tokenvalue was created as a part of the Prerequisites section above. - The
<ORG_NAME>value within thedatadog.tagskey should be replaced with your company's name. - Replace
platform.aws.iamRolewith Entitle's AWS IAM Role, you've created. - Although you can replace the
entitlenamespace with your namespace, it is highly discouraged. - If you want to use Hashicorp vault, set kmsType to
hashicorp_vault.
export TOKEN=<TOKEN_FROM_ENTITLES_ORG_SETTINGS>
export ORG_NAME=<YOUR ORGANIZATION NAME>
export NAMESPACE=entitle

helm repo update entitle && \
helm upgrade --install entitle-agent entitle/entitle-agent \
    --set platform.mode="aws" \
    --set kmsType="aws_secret_manager" \
    --set datadog.datadog.tags={company:${ORG_NAME}} \
    --set platform.aws.iamRole="arn:aws:iam::${ACCOUNT_ID}:role/entitle-agent-role" \
    --set agent.token="${TOKEN}" \
    -n ${NAMESPACE} --create-namespace
Azure Installation
Azure installation
By the end of the installation, you will have a fully working Entitle agent on your Azure Kubernetes cluster.
The installation will be based on the following reading materials:
Reading Material
- Azure Resource Manager overview
- Workload Identity
- Use a workload identity with an application on Azure Kubernetes Service (AKS)
- Modernize application authentication with workload identity
- Provide an identity to access the Azure Key Vault Provider for Secrets Store CSI Driver
- Deploy and configure workload identity (preview) on an Azure Kubernetes Service (AKS) cluster
Prerequisites
- An Azure subscription
- Azure CLI
- Helm v3 installed
- kubectl installed
- kubelogin installed
- AKS cluster
- Verify the Azure CLI version 2.40.0 or later. Run
az --versionto find the version, and run az upgrade to upgrade the version. If you need to install or upgrade, see Install Azure CLI.
Set up environment variables
export CLUSTER_NAME=<YOUR_AKS_CLUSTER_NAME>
export RESOURCE_GROUP=<YOUR_AKS_RESOURCE_GROUP>
export SUBSCRIPTION_ID=<YOUR_AZURE_SUBSCRIPTION_ID>
export LOCATION=<YOUR_AKS_LOCATION>
export NAMESPACE="entitle"
export SERVICE_ACCOUNT_NAME="entitle-agent-sa"
export WORKLOAD_IDENTITY_NAME=<YOUR_WORKLOAD_IDENTITY_NAME>
export FEDERATED_IDENTITY_NAME=<YOUR_FEDERATED_IDENTITY_NAME>
export KEY_VAULT_NAME=<YOUR_KEY_VAULT_NAME>
export AAD_GROUP_OBJECT_ID=<YOUR_AAD_GROUP_OBJECT_ID>- The variables
CLUSTER_NAME,RESOURCE_GROUP,SUBSCRIPTION_ID,LOCATIONcan be found on the AKS cluster overview page. The other variables are up to you. (Entitle highly recommends not changing theNAMESPACEandSERVICE_ACCOUNT_NAME) - If you don't have a managed identity created and assigned to your pod, perform the following steps to create and grant the necessary permissions to Key Vault.
- Set account subscription.
az account set --subscription ${SUBSCRIPTION_ID}- Install the
aks-previewextension.
az extension add --name aks-preview
az extension update --name aks-preview- Register
EnablePodIdentityPreviewfeature.
az feature register --namespace Microsoft.ContainerService --name EnablePodIdentityPreview- It takes a few minutes for the status to show Registered. Verify the registration status by using the command:
watch -g -n 5 az feature show --namespace "Microsoft.ContainerService" --name "EnableWorkloadIdentityPreview"
Important informationThe -g or --chgexit option causes the watch command to exit if there is a change in the output.
- You'll get this message:
Once the feature 'EnablePodIdentityPreview' is registered, invoking 'az provider register -n Microsoft.ContainerService' is required to get the change propagated. - Run the following command:
az provider register --namespace Microsoft.ContainerService- Enable AAD/OIDC/WORKLOAD IDENTITY for the cluster.
- Verify that all the below are not False/Null.
echo "$(az aks show -n ${CLUSTER_NAME} -g ${RESOURCE_GROUP} --query "oidcIssuerProfile.issuerUrl" -otsv)"
echo "$(az aks show -n ${CLUSTER_NAME} -g ${RESOURCE_GROUP} --query "securityProfile.workloadIdentity" -otsv)"
echo "$(az aks show -n ${CLUSTER_NAME} -g ${RESOURCE_GROUP} --query "aadProfile" -otsv)"- If any of the above is False/Null, run the following command (with the right flags) to enable AAD/OIDC/WORKLOAD IDENTITY for the cluster:
az aks update --resource-group ${RESOURCE_GROUP} --name ${CLUSTER_NAME} --enable-aad --aad-admin-group-object-ids ${AAD_GROUP_OBJECT_ID} --enable-workload-identity --enable-oidc-issuer- Use the
az identity createcommand to create a managed identity.
az identity create --name "${WORKLOAD_IDENTITY_NAME}" --resource-group "${RESOURCE_GROUP}" --location "${LOCATION}" --subscription "${SUBSCRIPTION_ID}"
export USER_ASSIGNED_CLIENT_ID="$(az identity show --resource-group "${RESOURCE_GROUP}" --name "${WORKLOAD_IDENTITY_NAME}" --query 'clientId' -otsv)"
export TENANT_ID=$(az aks show --name ${CLUSTER_NAME} --resource-group "${RESOURCE_GROUP}" --query aadProfile.tenantId -o tsv)-
Grant Key Vault access to the managed identity.
When deploying the Entitle agent on AKS, you must grant the agent's managed identity access to Key Vault secrets. The correct command depends on your Key Vault authorization model.-
Option 1: Vault access policies (default)
Run this command if your Key Vault uses access policies:az keyvault set-policy -n ${KEY_VAULT_NAME} \ --secret-permissions get set list delete \ --spn $USER_ASSIGNED_CLIENT_ID -
Option 2: RBAC authorization
Use this option if the previous command fails with
Cannot set policies to a vault with '--enable-rbac-authorization' specified.export KEY_VAULT_SCOPE="/subscriptions/${SUBSCRIPTION_ID}/resourceGroups/${RESOURCE_GROUP}/providers/Microsoft.KeyVault/vaults/${KEY_VAULT_NAME}" az role assignment create \ --role "Key Vault Secrets Officer" \ --assignee $USER_ASSIGNED_CLIENT_ID \ --scope ${KEY_VAULT_SCOPE} az role assignment list \ --assignee $USER_ASSIGNED_CLIENT_ID \ --scope ${KEY_VAULT_SCOPE} \ --query "[].{role:roleDefinitionName, scope:scope}" -o tableTo check which authorization model your vault uses, go to Key Vault > Settings > Access configuration in the Azure portal.
-
-
To get the OIDC Issuer URL and save it to an environmental variable, run the following command:
export AKS_OIDC_ISSUER="$(az aks show -n ${CLUSTER_NAME} -g ${RESOURCE_GROUP} --query "oidcIssuerProfile.issuerUrl" -otsv)"
echo "AKS_OIDC_ISSUER: ${AKS_OIDC_ISSUER}"- Set credentials for kubectl to connect to your AKS cluster:
az aks get-credentials -n ${CLUSTER_NAME} -g "${RESOURCE_GROUP}" --admin
--adminis optional, if you have a user with sufficient permissions, you can omit it
- Use the
az identity federated-credential createcommand to create the federated identity credential between the managed identity, the service account issuer, and the subject.
az identity federated-credential create --name ${FEDERATED_IDENTITY_NAME} --identity-name ${WORKLOAD_IDENTITY_NAME} --resource-group ${RESOURCE_GROUP} --issuer ${AKS_OIDC_ISSUER} --subject system:serviceaccount:${NAMESPACE}:${SERVICE_ACCOUNT_NAME}- Log in with kubelogin.
There are several ways to log in with kubelogin according to the documentation, but we recommend using the interactive login:
export KUBECONFIG=<PATH_TO_KUBECONFIG>
kubelogin convert-kubeconfig
kubectl get no- You will get the following message:
To sign in, use a web browser to open the page https://microsoft.com/devicelogin and enter the code ARJFDH6FU to authenticate.
Follow the instructions and log in with your Azure account. After that, you should see the nodes of your cluster.
Chart installation
- The
agent.tokenvalue was created as a part of the Prerequisites section above. - The
ORG_NAMEvalue within thedatadog.tagskey should be replaced with your company's name.
export TOKEN=<TOKEN_FROM_ENTITLES_ORG_SETTINGS>
export ORG_NAME=<YOUR ORGANIZATION NAME> -
If you wish to use Hashicorp vault, set kmsType to
hashicorp_vault:helm repo update entitle && \ helm upgrade --install entitle-agent entitle/entitle-agent \ --set platform.mode="azure" \ --set kmsType="azure_secret_manager" \ --set datadog.datadog.tags={company:${ORG_NAME}} \ --set datadog.datadog.kubelet.tlsVerify=false \ --set datadog.datadog.kubelet.host.valueFrom.fieldRef.fieldPath="spec.nodeName" \ --set datadog.datadog.kubelet.hostCAPath="/etc/kubernetes/certs/kubeletserver.crt" \ --set platform.azure.clientId=$USER_ASSIGNED_CLIENT_ID \ --set platform.azure.tenantId=${TENANT_ID} \ --set platform.azure.keyVaultName=${KEY_VAULT_NAME} \ --set agent.token="${TOKEN}" \ -n ${NAMESPACE} --create-namespace
Configuration table
See Entitle agent configuration reference
Update behavior
When an Entitle Agent update requires a restart, the agent restarts automatically to complete the update and ensure a consistent running state.
Network validators
After installing the Entitle agent in your cluster, several validators run as a Startup Probe. These validators execute before the agent begins handling tasks and are used to verify that network access and required permissions are correctly configured. The supported validators are:
Kafka network validator
- Tests connectivity to Kafka to ensure the agent can reach Kafka infrastructure through network restrictions.
- Validates that firewall rules and network policies allow proper communication with Kafka endpoints.
S3 network validator
- Tests connectivity to AWS S3 to ensure the agent can reach the S3 infrastructure through network restrictions.
- Validates that firewall rules and network policies allow proper communication with S3 endpoints.
Validation logs
To ensure the agent is ready and all validation checks have passed successfully, follow the steps below:
- Run the following command to check the status of the agent's pods:
You should see one or more pods namedkubectl get pods -n <your-namespace>entitle-agent-...with the statusRunning. - If any of the pods are in a
CrashLoopBackOffstate, this could indicate a failure in one of the startup validators. To investigate the issue, check the pod logs by running:
Reviewing the logs will help you identify what went wrong during the startup process and provide guidance on how to resolve it.kubectl logs <your-pod-name> -n <your-namespace> | grep 'Validators Report’
Example log
kubectl logs entitle-agent-5bdb5bb5bc-85xd9 -n entitle-namespace | grep 'Validators Report'Validators report:
0 out of 3 validators failed. Successful validators: GcpServiceAccountBindingValidator, GcpKMSValidator, KafkaNetworkValidator.
Updated 2 days ago
