NetSuite | Entitle
Overview
NetSuite, is a cloud-based Enterprise Resource Planning (ERP) platform that integrates financials, Customer Relationship Management (CRM), inventory, e-commerce, and more.
Entitle can manage roles in NetSuite.
This page will provide you with instructions on how to integrate Entitle and NetSuite.
General guidelines
To integrate your NetSuite in Entitle, you will need to set up the following:
- Retrieve the account ID.
- Enable the token-based authentication and the SuiteAnalytics workbook.
- Create a user for Entitle.
- Set up an integration in NetSuite.
- Create 2 pairs of roles and tokens:
- The first role will be created to manage access in NetSuite’s roles and will consist of high privileges.
- The second role will be created to populate the permissions status from NetSuite to Entitle’s tenant and will consist of low privileges.
- Optional - Retrieve concurrency limit.
Prerequisites
- A user with administrator privileges to the NetSuite account should execute this setup manual.
Should you need to allowlist this integration, these are the IP addresses from which Entitle's service reaches the integration:
- Entitle EU (Cloud deployment)
- 34.243.199.171
- 54.216.133.226
- Entitle US (Pathfinder deployment)
- 52.45.229.219
- 54.88.235.213
- 3.224.15.134
- Entitle CA (Pathfinder deployment)
- 35.182.218.208
- 15.156.179.153
Set up NetSuite to work with Entitle
Stage 1: Retrieve the Account ID
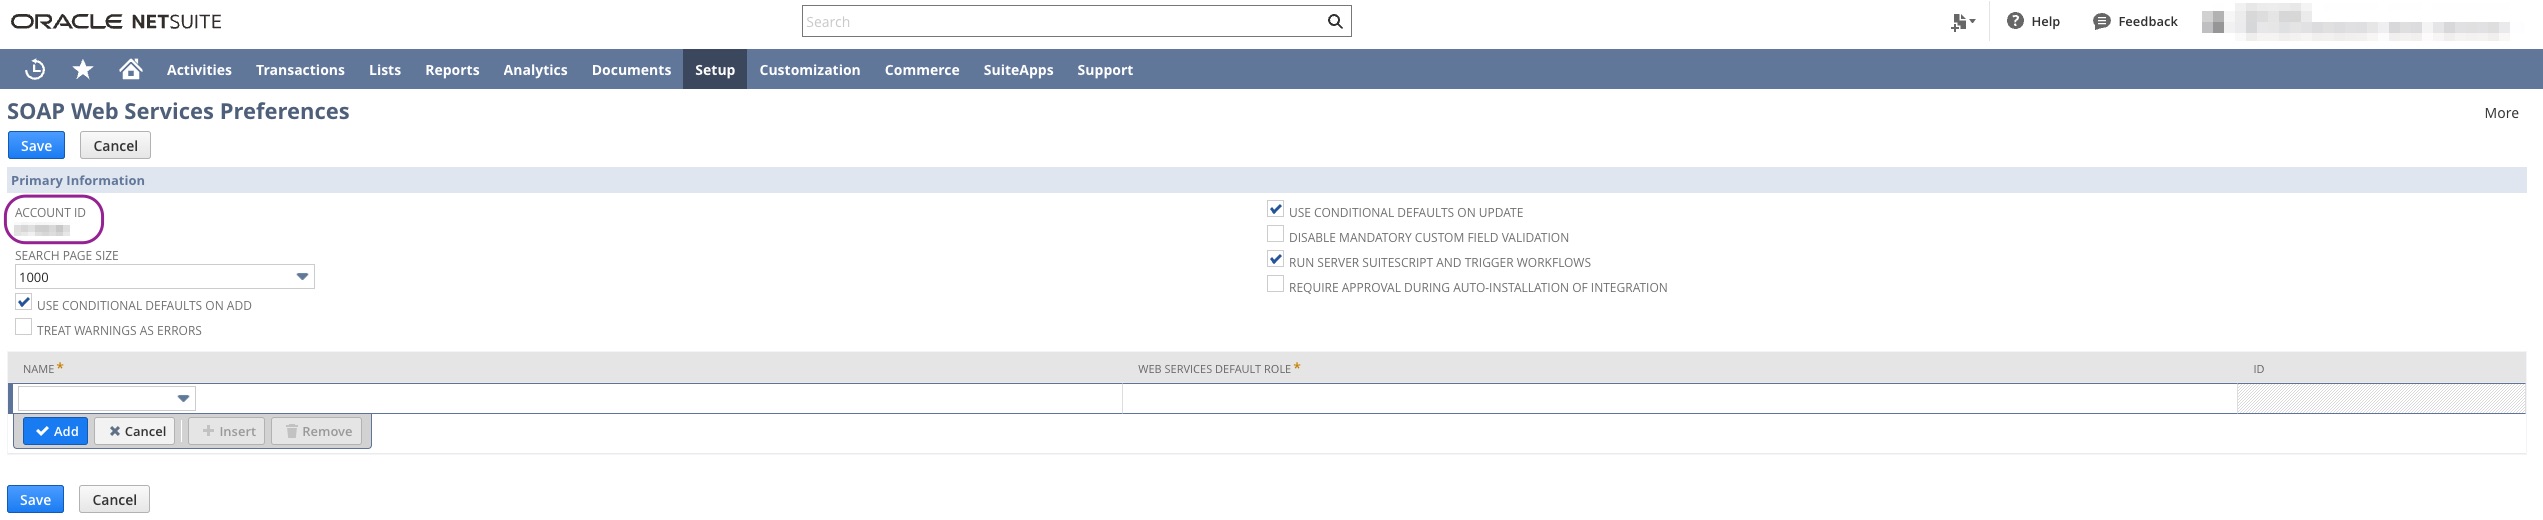
- On the top navigation bar, navigate to Setup → Integrations → SOAP Web Services Preferences.
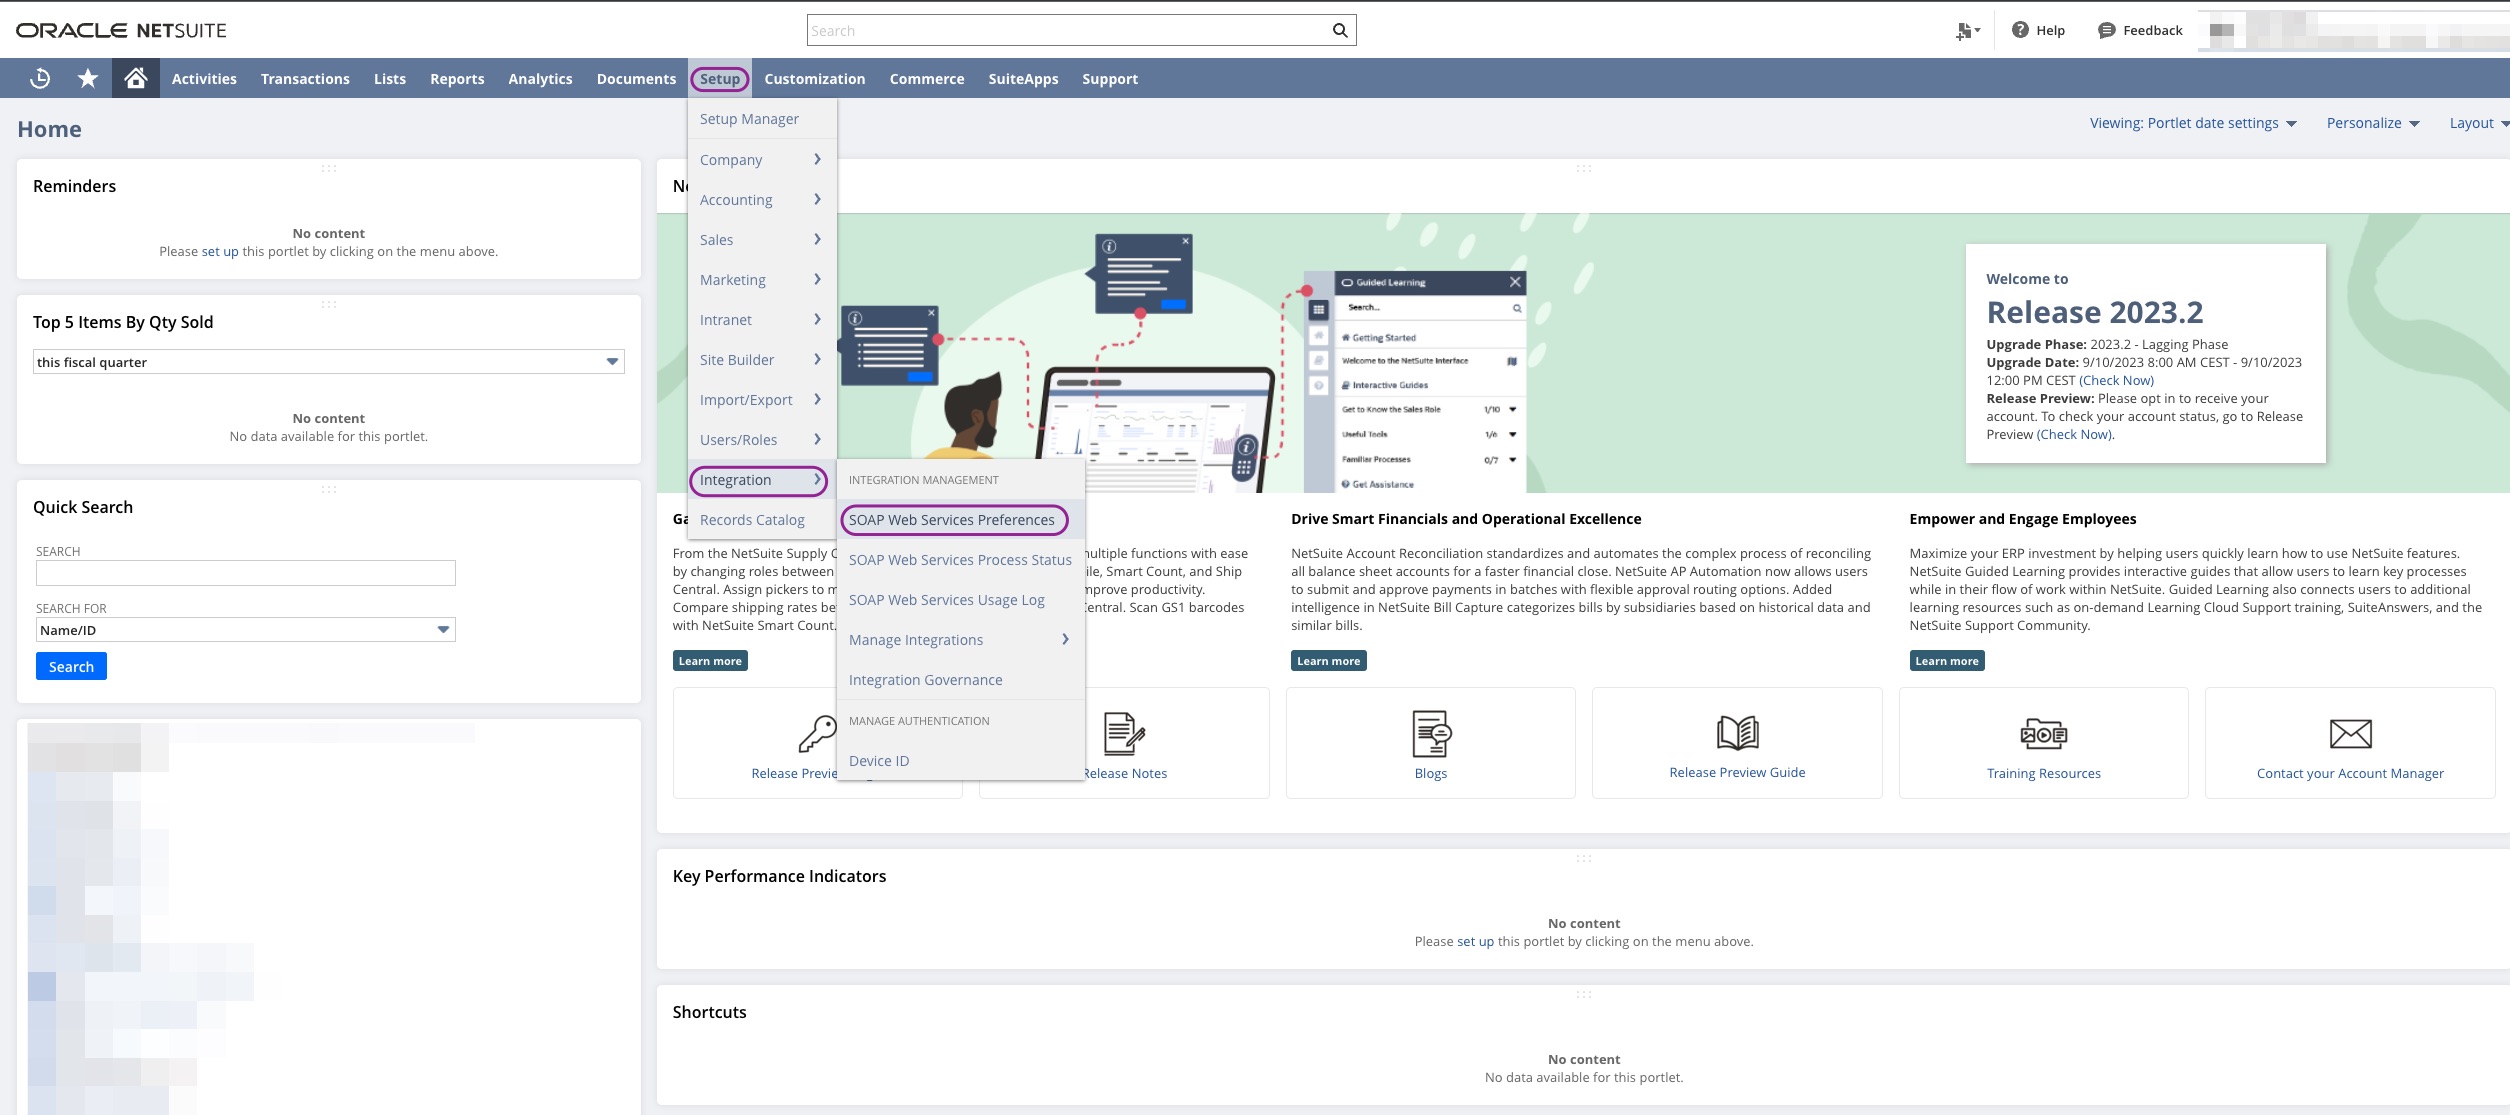
- Under the Primary information section, copy the Account ID, as you will use it later on.
Stage 2: Enabling token-based authentication and SuiteAnalytics Workbook
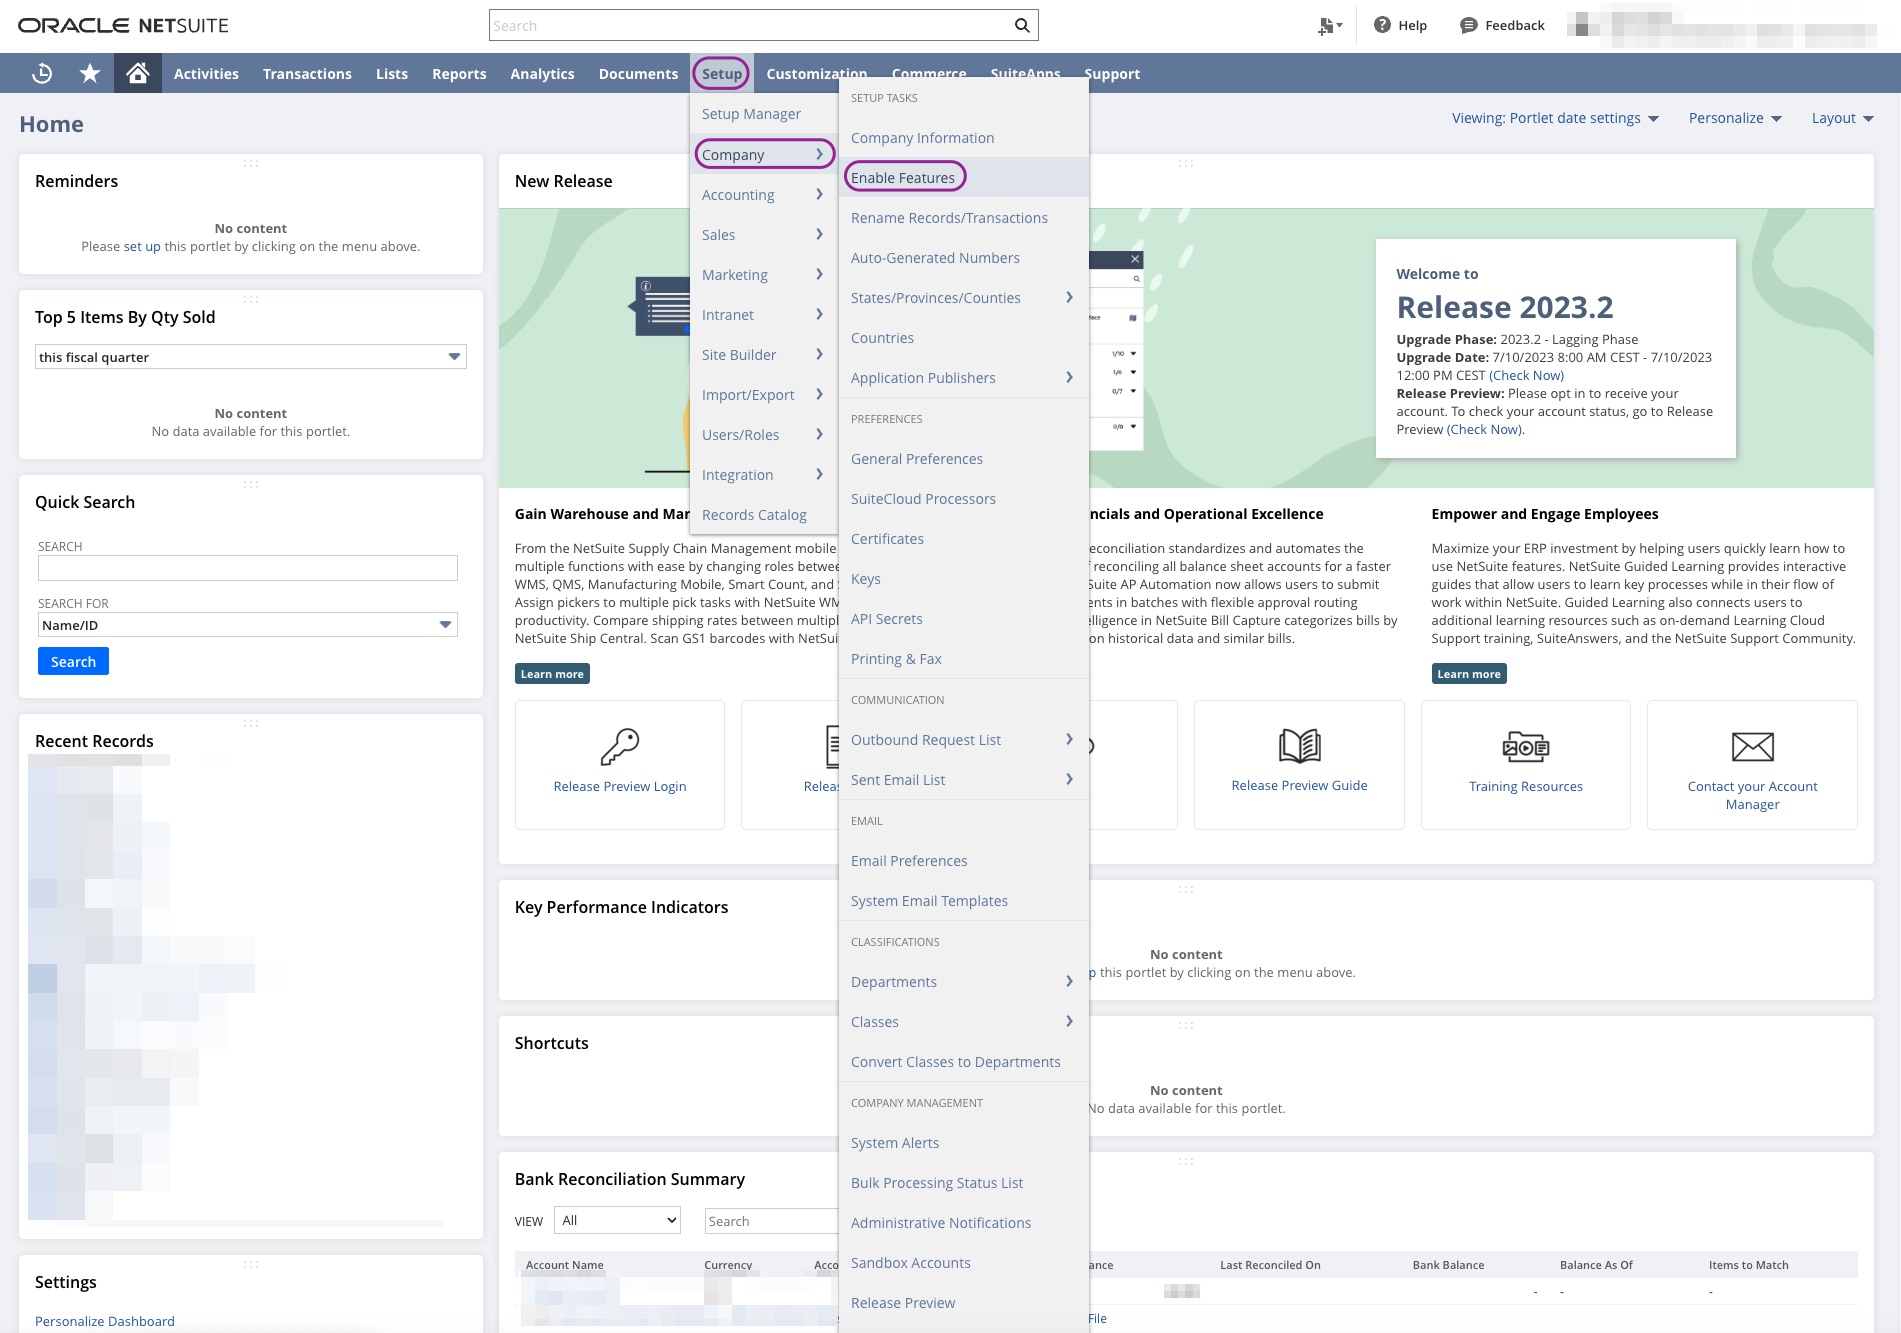
- On the top navigation bar, navigate to Setup → Company → Enable Features.
- Click on the Analytics tab, and enable the SuiteAnalytics Workbook checkbox which is under the SuiteAnalytics Workbook section.
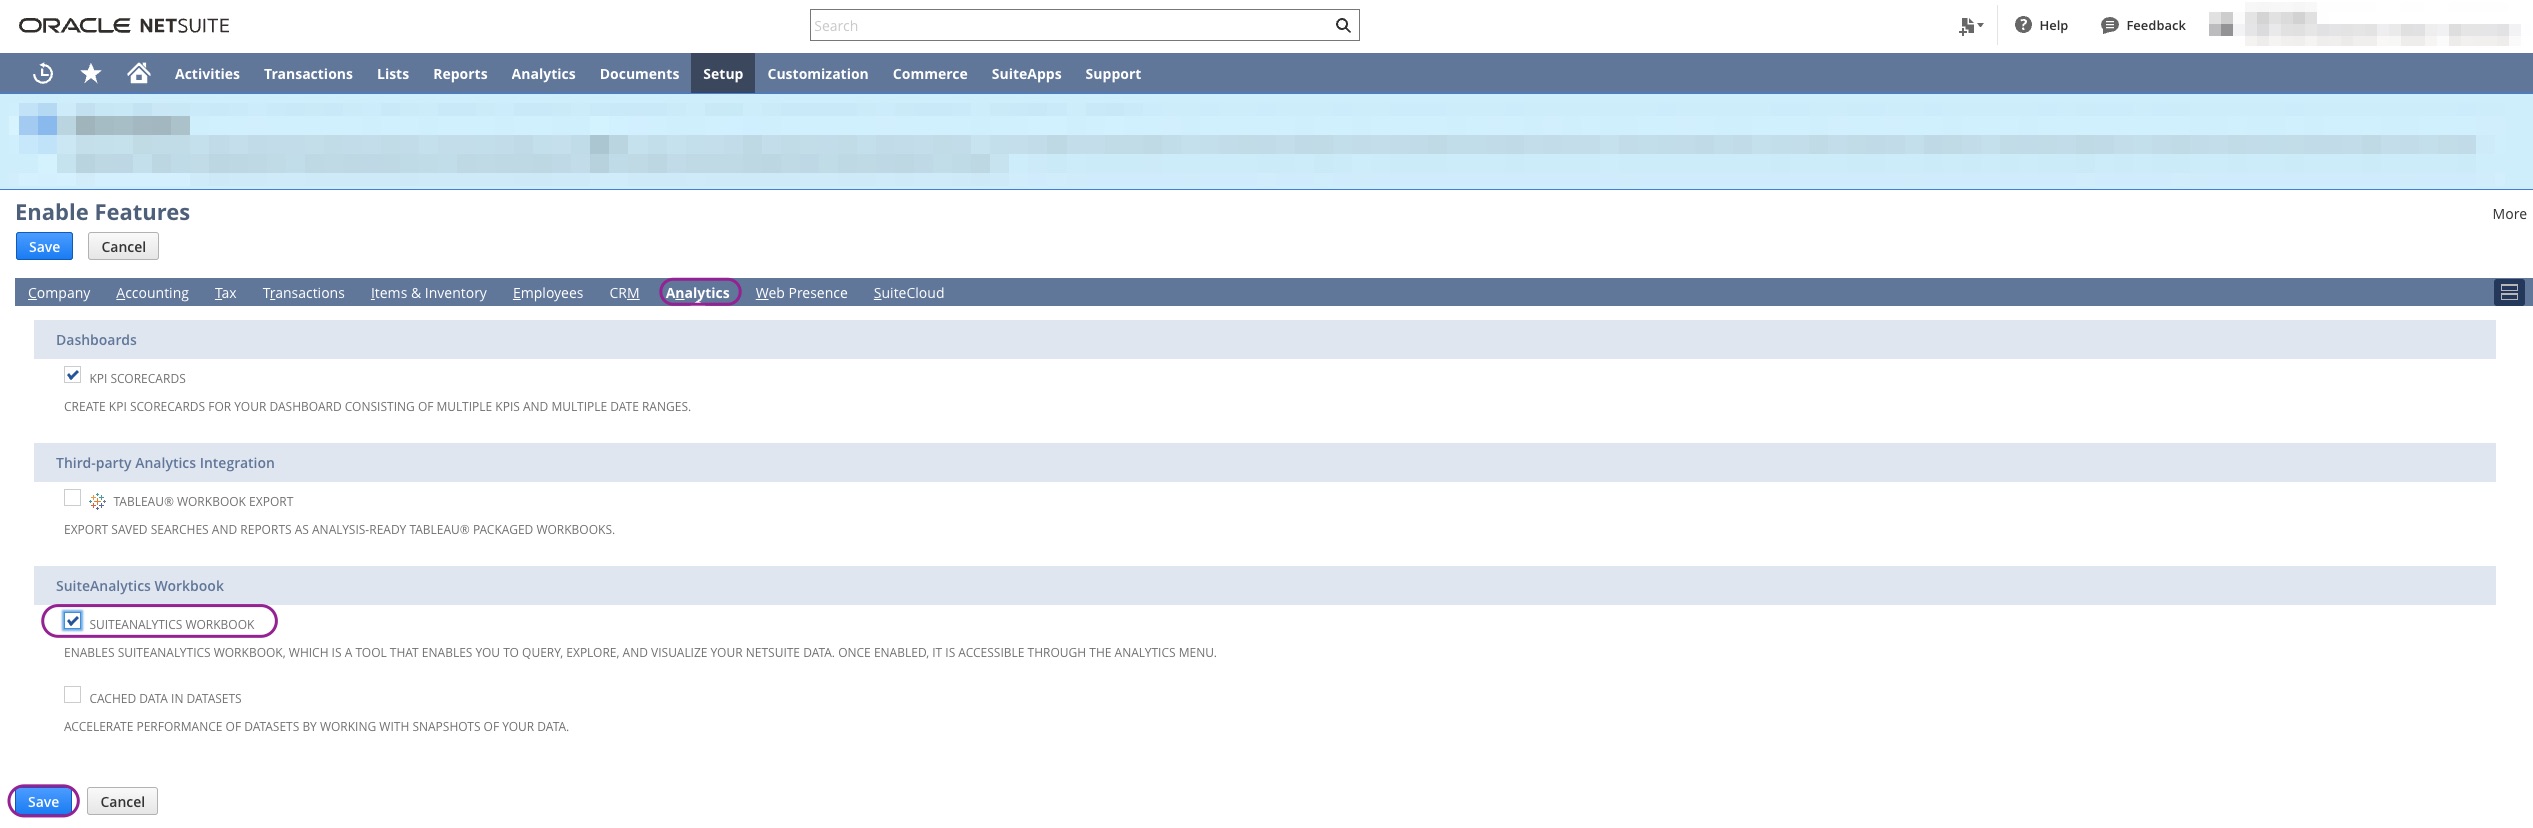
- Click on the SuiteCloud tab, and enable the Token-based authentication checkbox which is under the Manage Authentication section.
- Click on the Save button.

Stage 3: Create management and visibility roles
Step 1: Create an admin management role
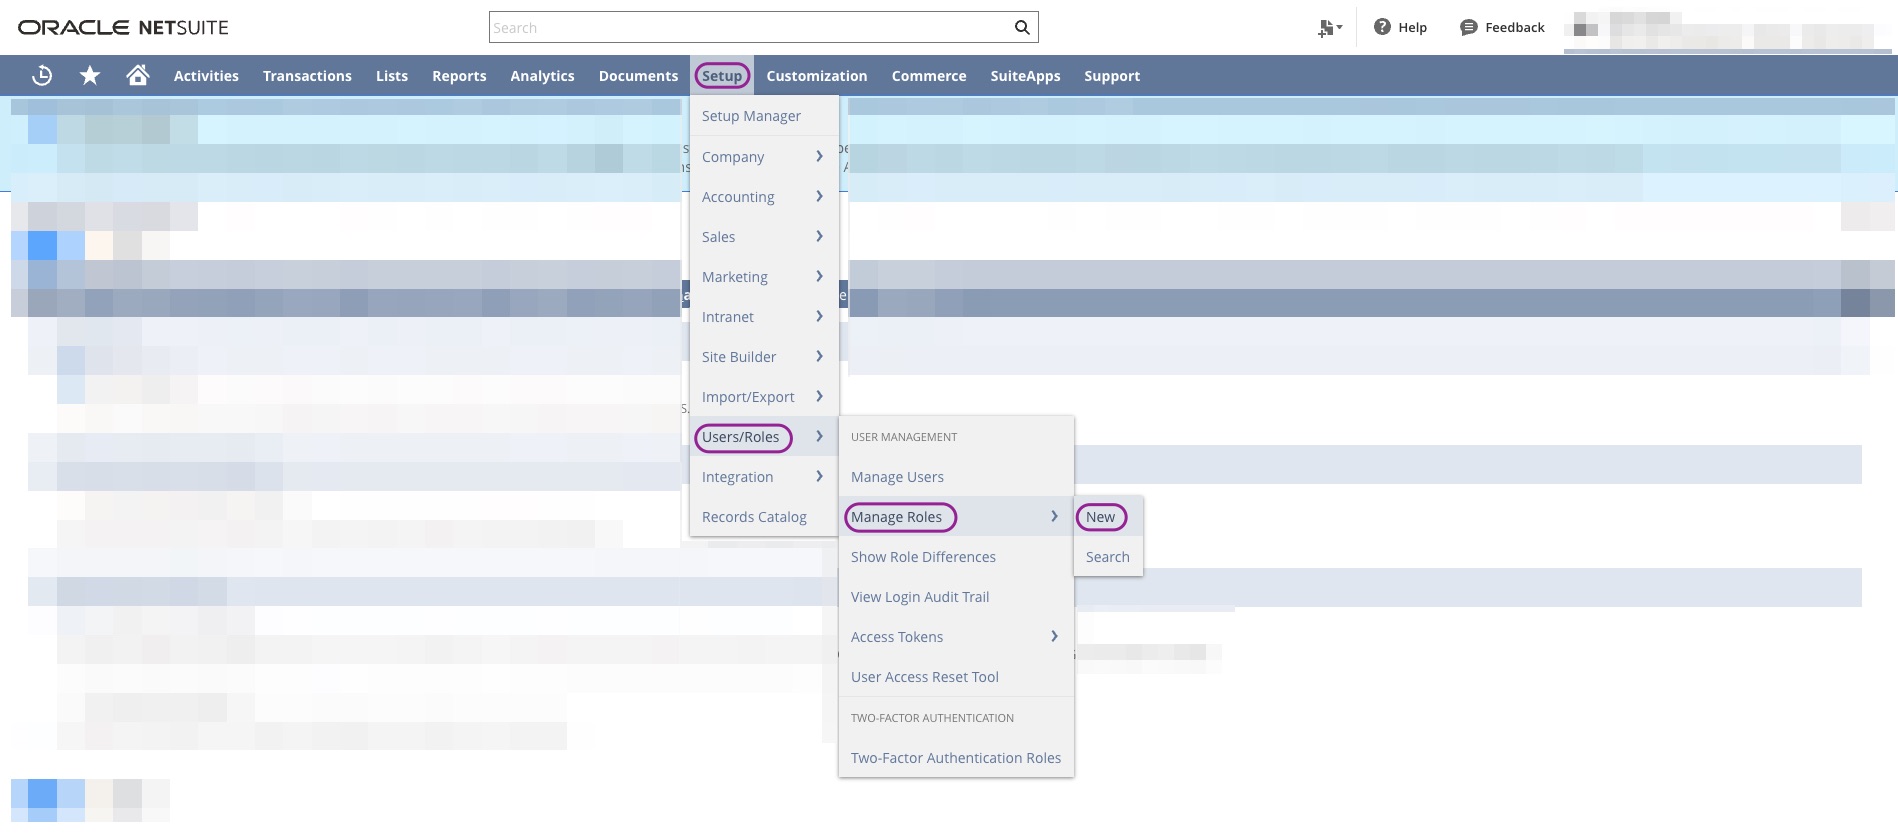
- On the top navigation bar, navigate to Setup → Users/Roles → Manage Roles → New.
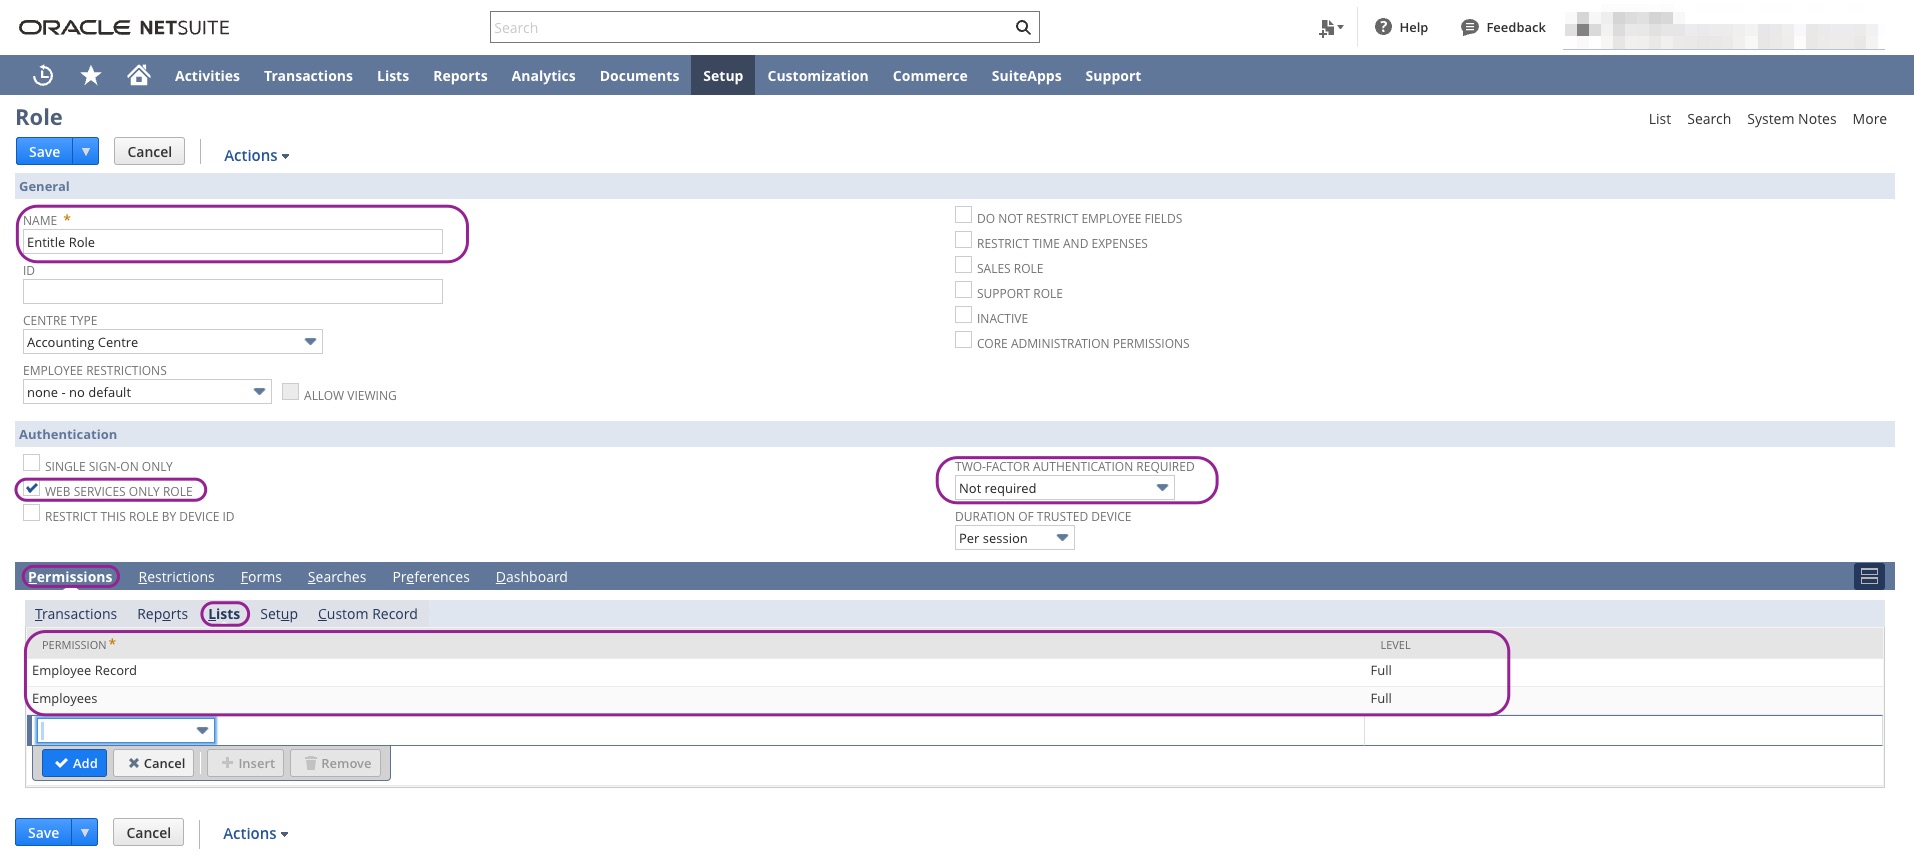
- Follow the following steps:
- Add a name to the role (for instance - Entitle Role).
- Under the Authentication section:
- Check the Web services only checkbox.
- Set the Two-Factor authentication required option to Not required.
- Under the Permissions section, add the following permissions to the Lists and Setup categories:
- Lists
    - Employee Record - Full
    - Employees - Full
- Setup
    - Bulk Manage Roles- Full
    - Log in using access tokens - Full
- REST web services - Full- Click on the Save button.

Step 2: Create an admin visibility role
- On the top navigation bar, navigate to Setup → Users/Roles → Manage Roles → New.

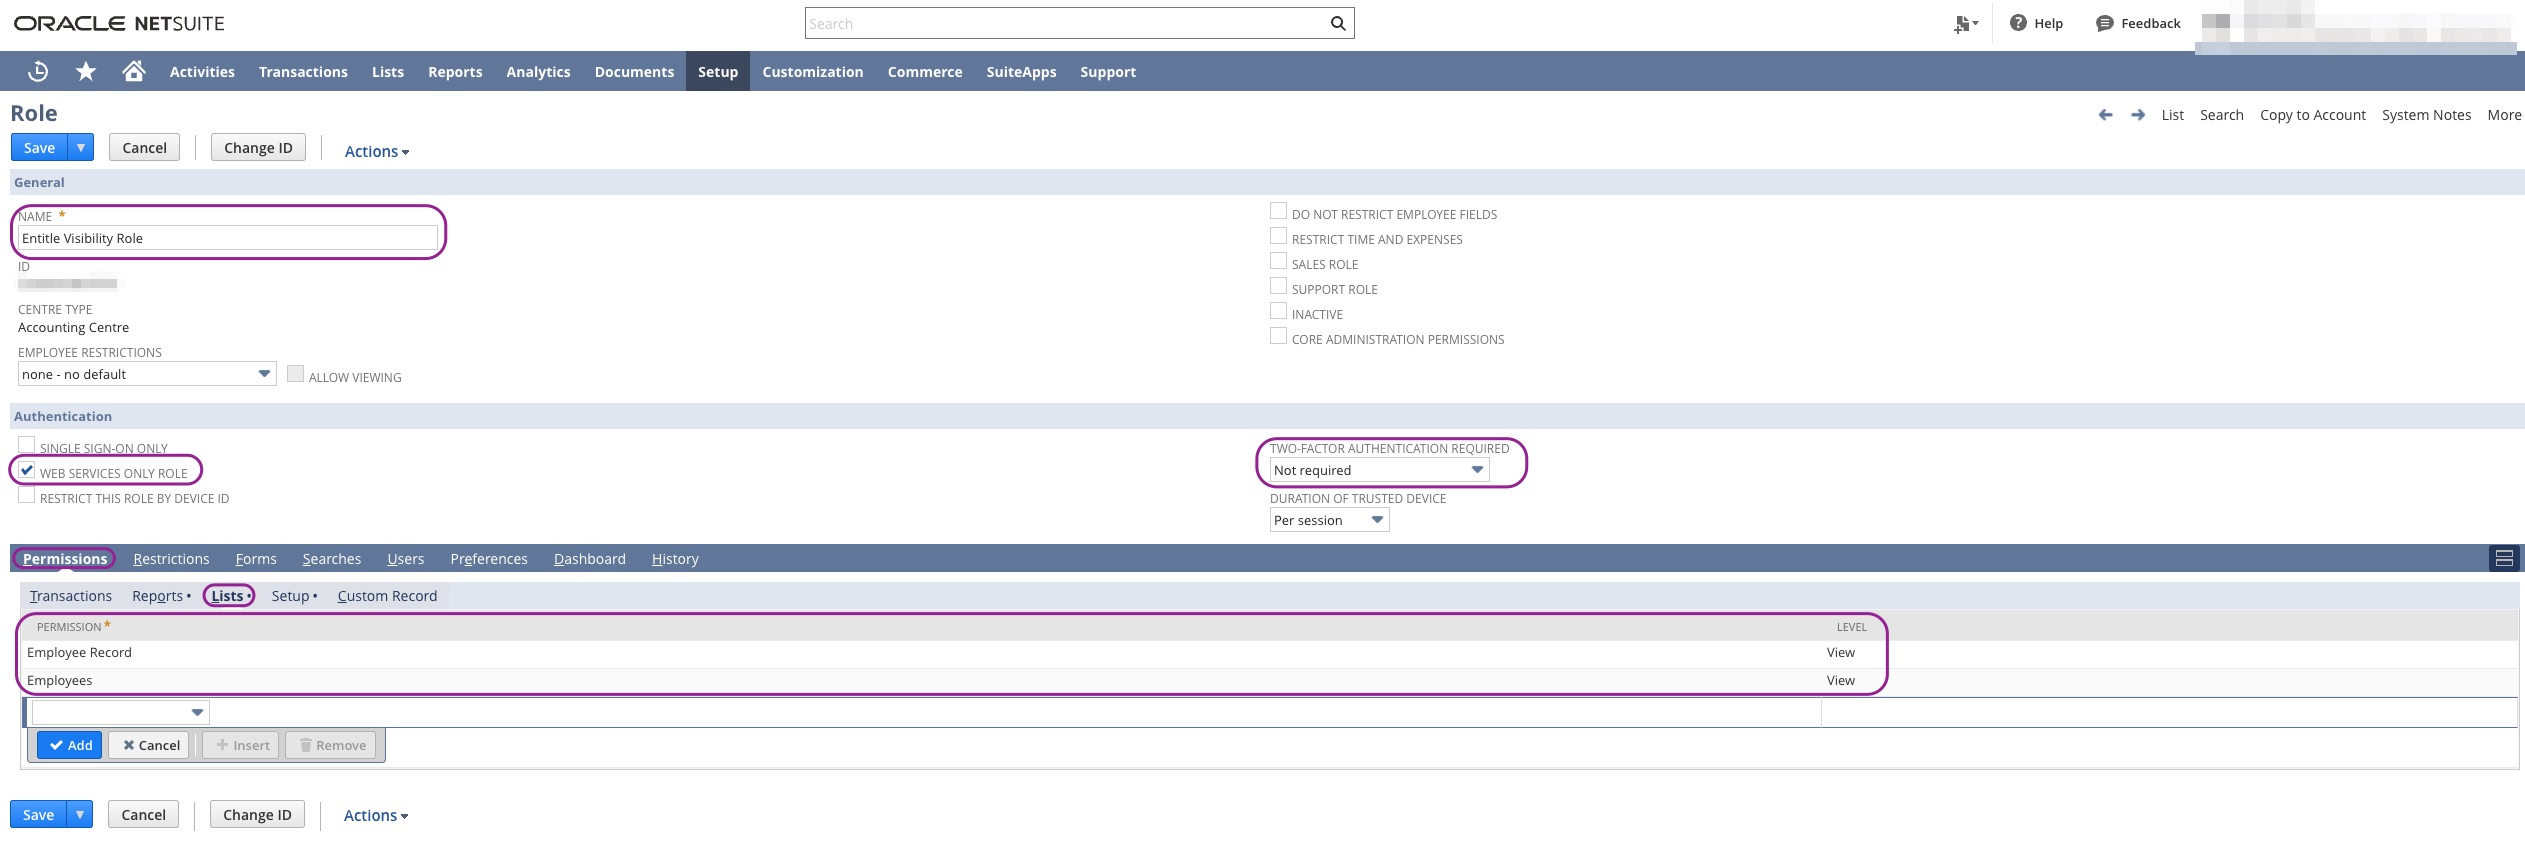
- Follow the following steps:
- Add a name to the role (for instance - Entitle Visibility Role).
- Under the Authentication section:
- Check the Web services only checkbox.
- Set the Two-Factor authentication required option to Not required.
- Under the Permissions section, add the following permissions to the Lists and Setup categories:
- Lists
    - Employee Record - View
    - Employees - View
- Setup
    - Bulk Manage Roles- Full
    - Log in using access tokens - Full
- REST web services - Full- Click on the Save button.

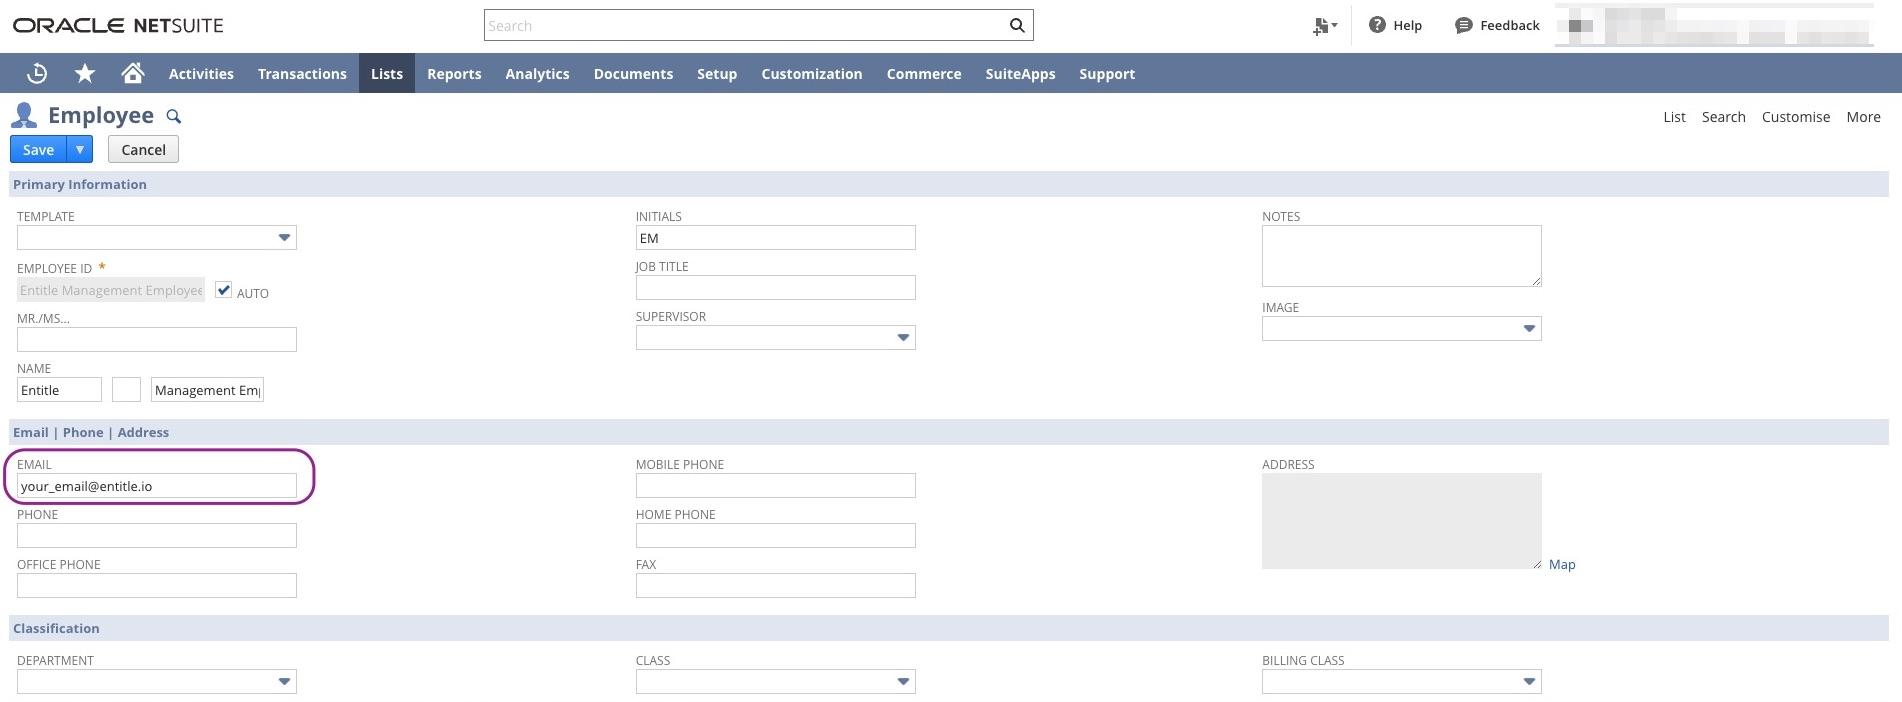
Stage 4: Create a user
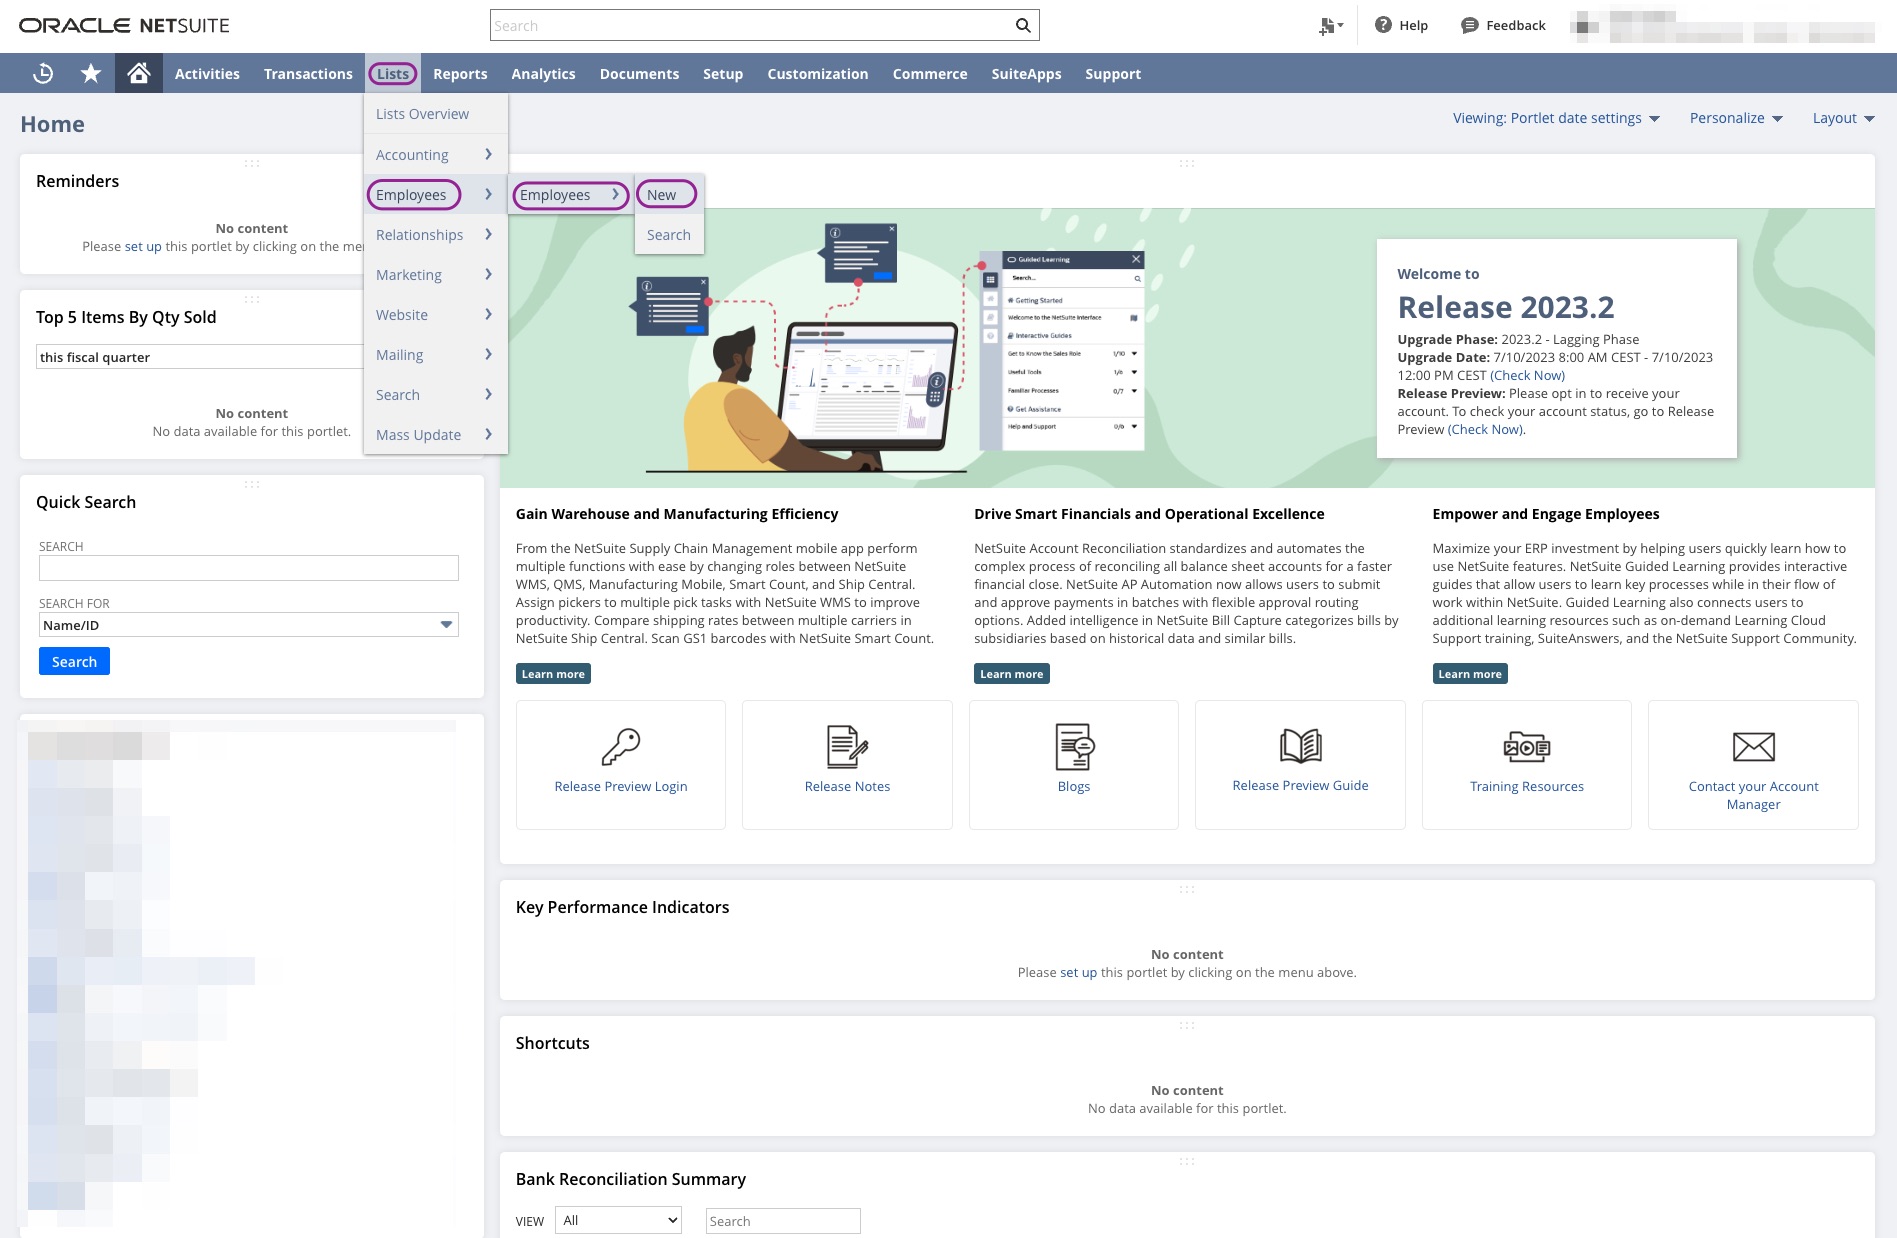
- On the top navigation bar, navigate to Lists → Employees → Employees → New.
- Under the Primary information section, fill in the following fields:
- Email - Fill in the mail address that you wish to use for the Entitle user.
- Name - Fill an indicative name for your use.
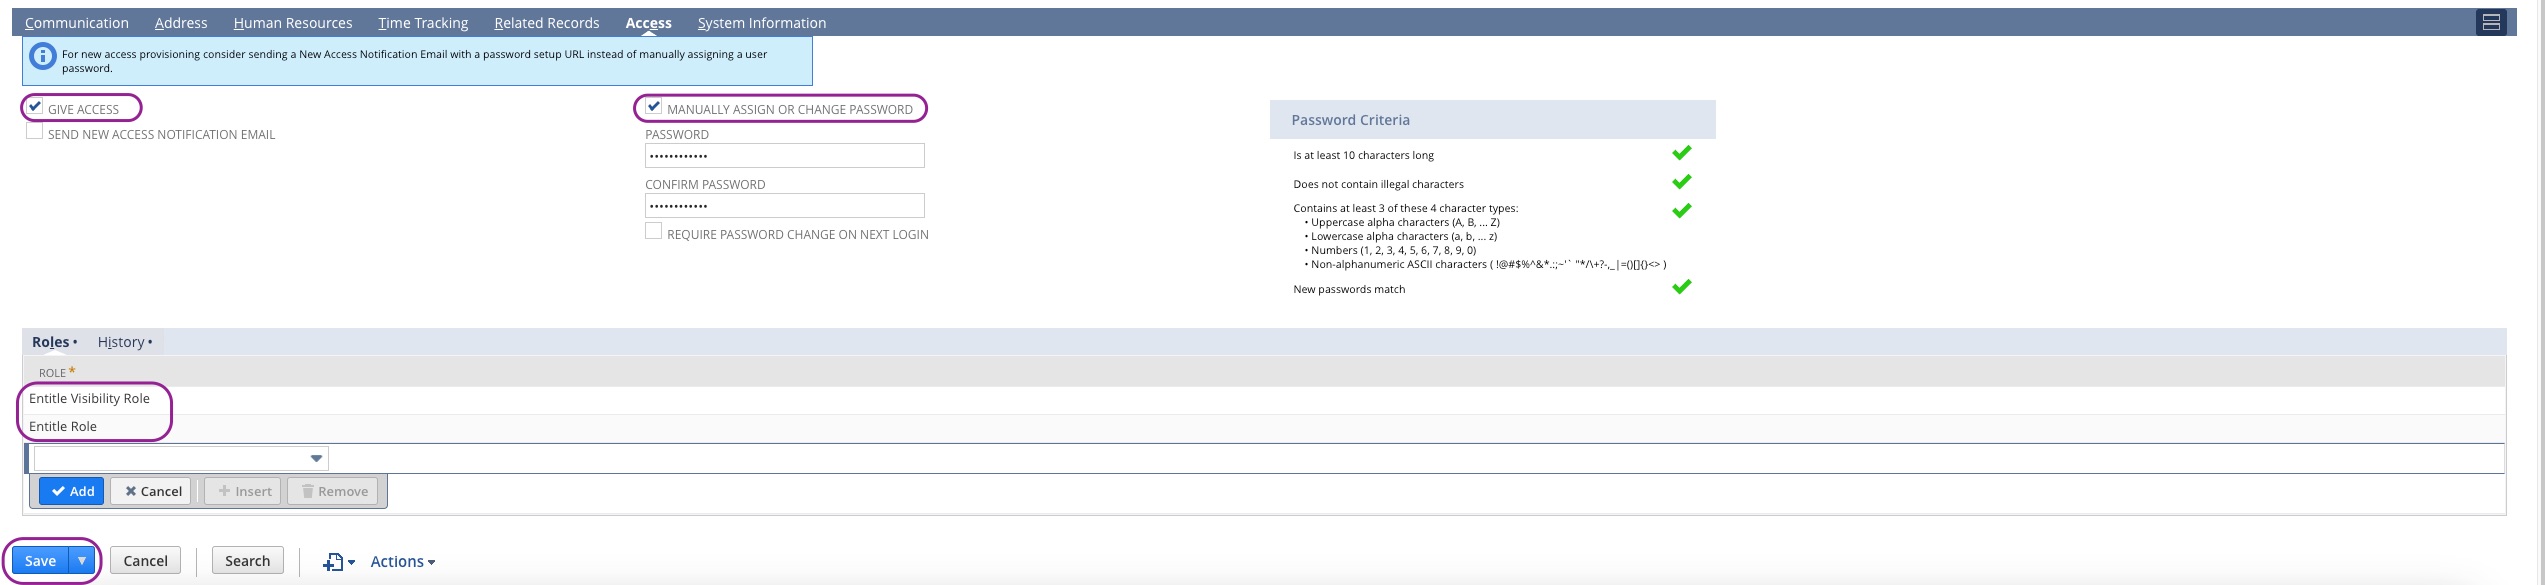
- Navigate to the Access tab, and check the following fields:
- Give Access.
- Manually assign or change password.
- Don’t forget to add a password that fulfills NetSuite’s criteria, which is listed to the right of the password fields. That password will not be used later on in this guide.
- Under the Roles section, add the visibility and management roles you created in Stage 3: Steps 1 and 2.
- Click the Save button.
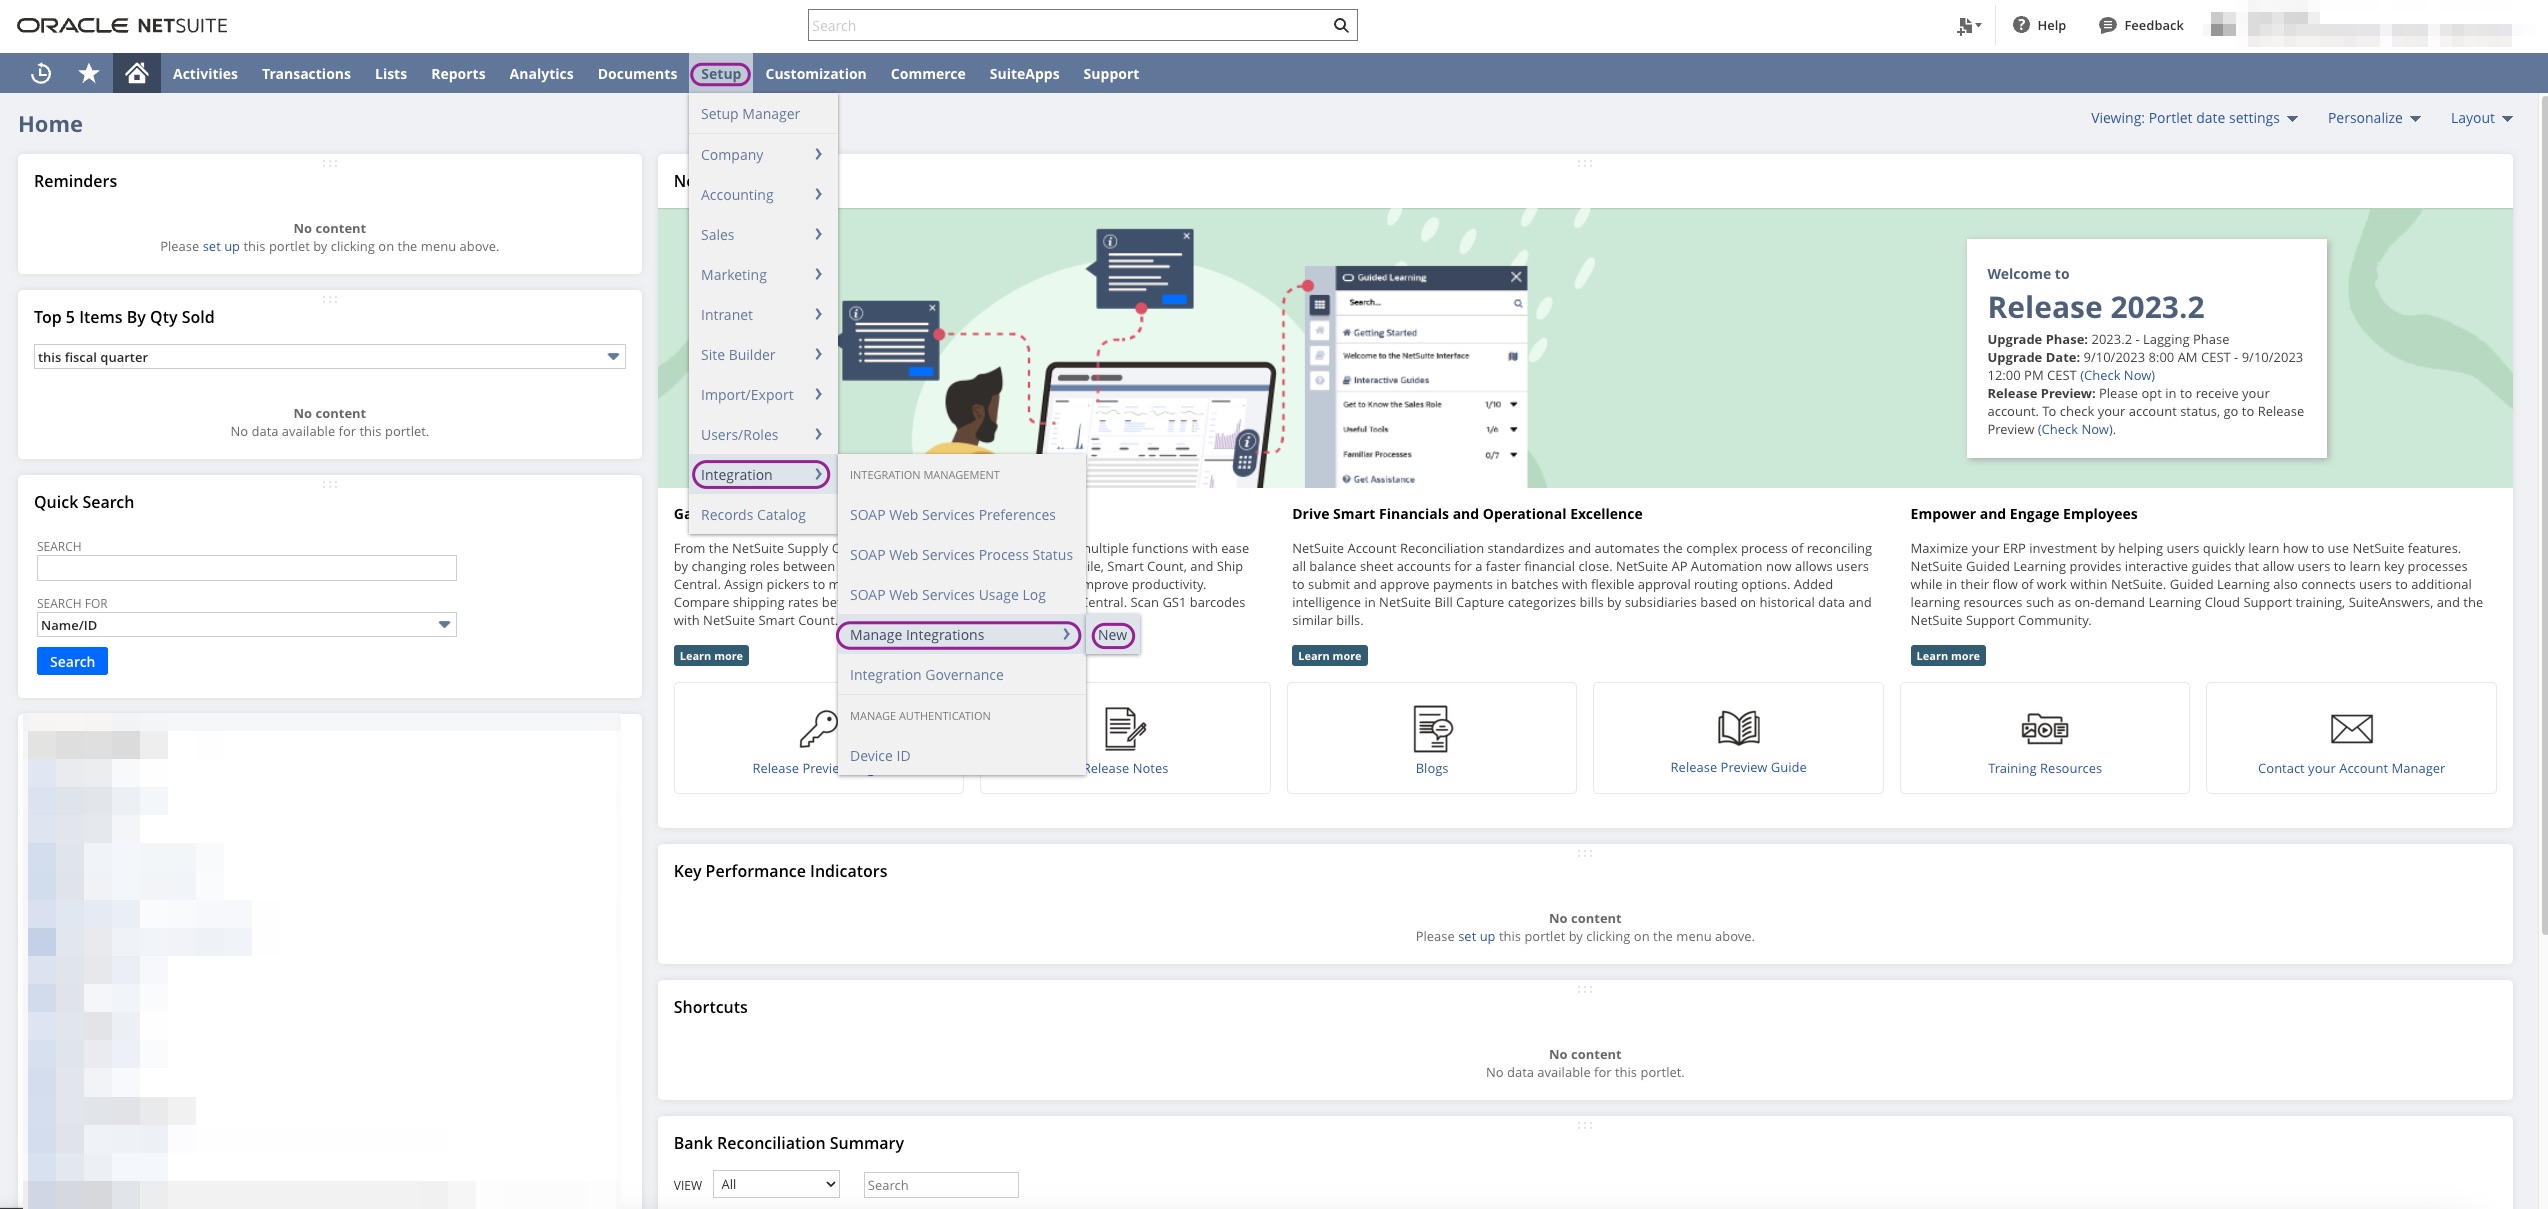
Stage 5: Create an integration
- On the top navigation bar, navigate to Setup → Integrations → Manage Integrations → New.
- Add a name to the integration (for instance - Entitle Integration).
- In the Token-based Authentication section which is under the Authentication tab, check the Token-based authentication checkbox. Make sure no other checkbox is checked.
- In the OAuth 2.0 section which is under the Authentication tab, check the following checkboxes:
- Client Credentials (Machine To Machine) Grant
- REST Web Services
- SuiteAnalytics Connect
- Click on the Save button.
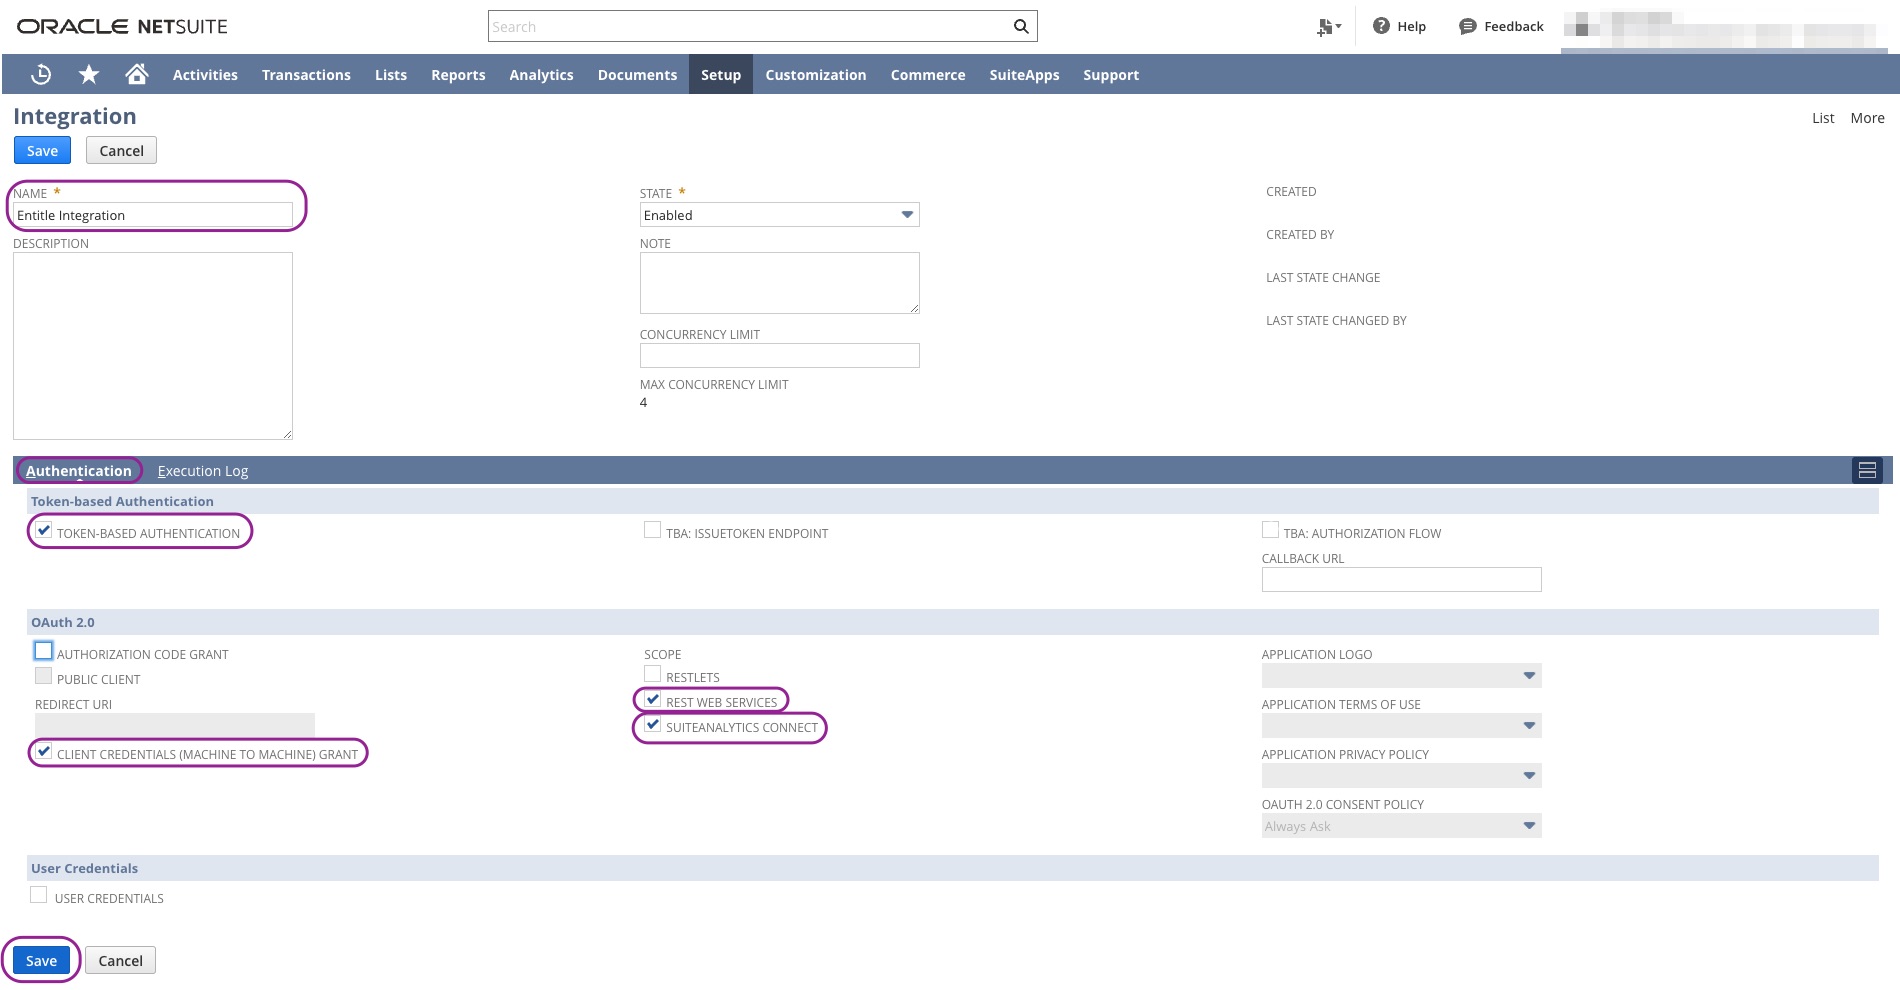
- Once saved, 2 values will be populated at the bottom of the integration creation page - Consumer Key and Consumer Secret. Copy them, as you will use them later on.

Stage 6: Create tokens for the management and visibility roles
Step 1: Create an access token for the management role
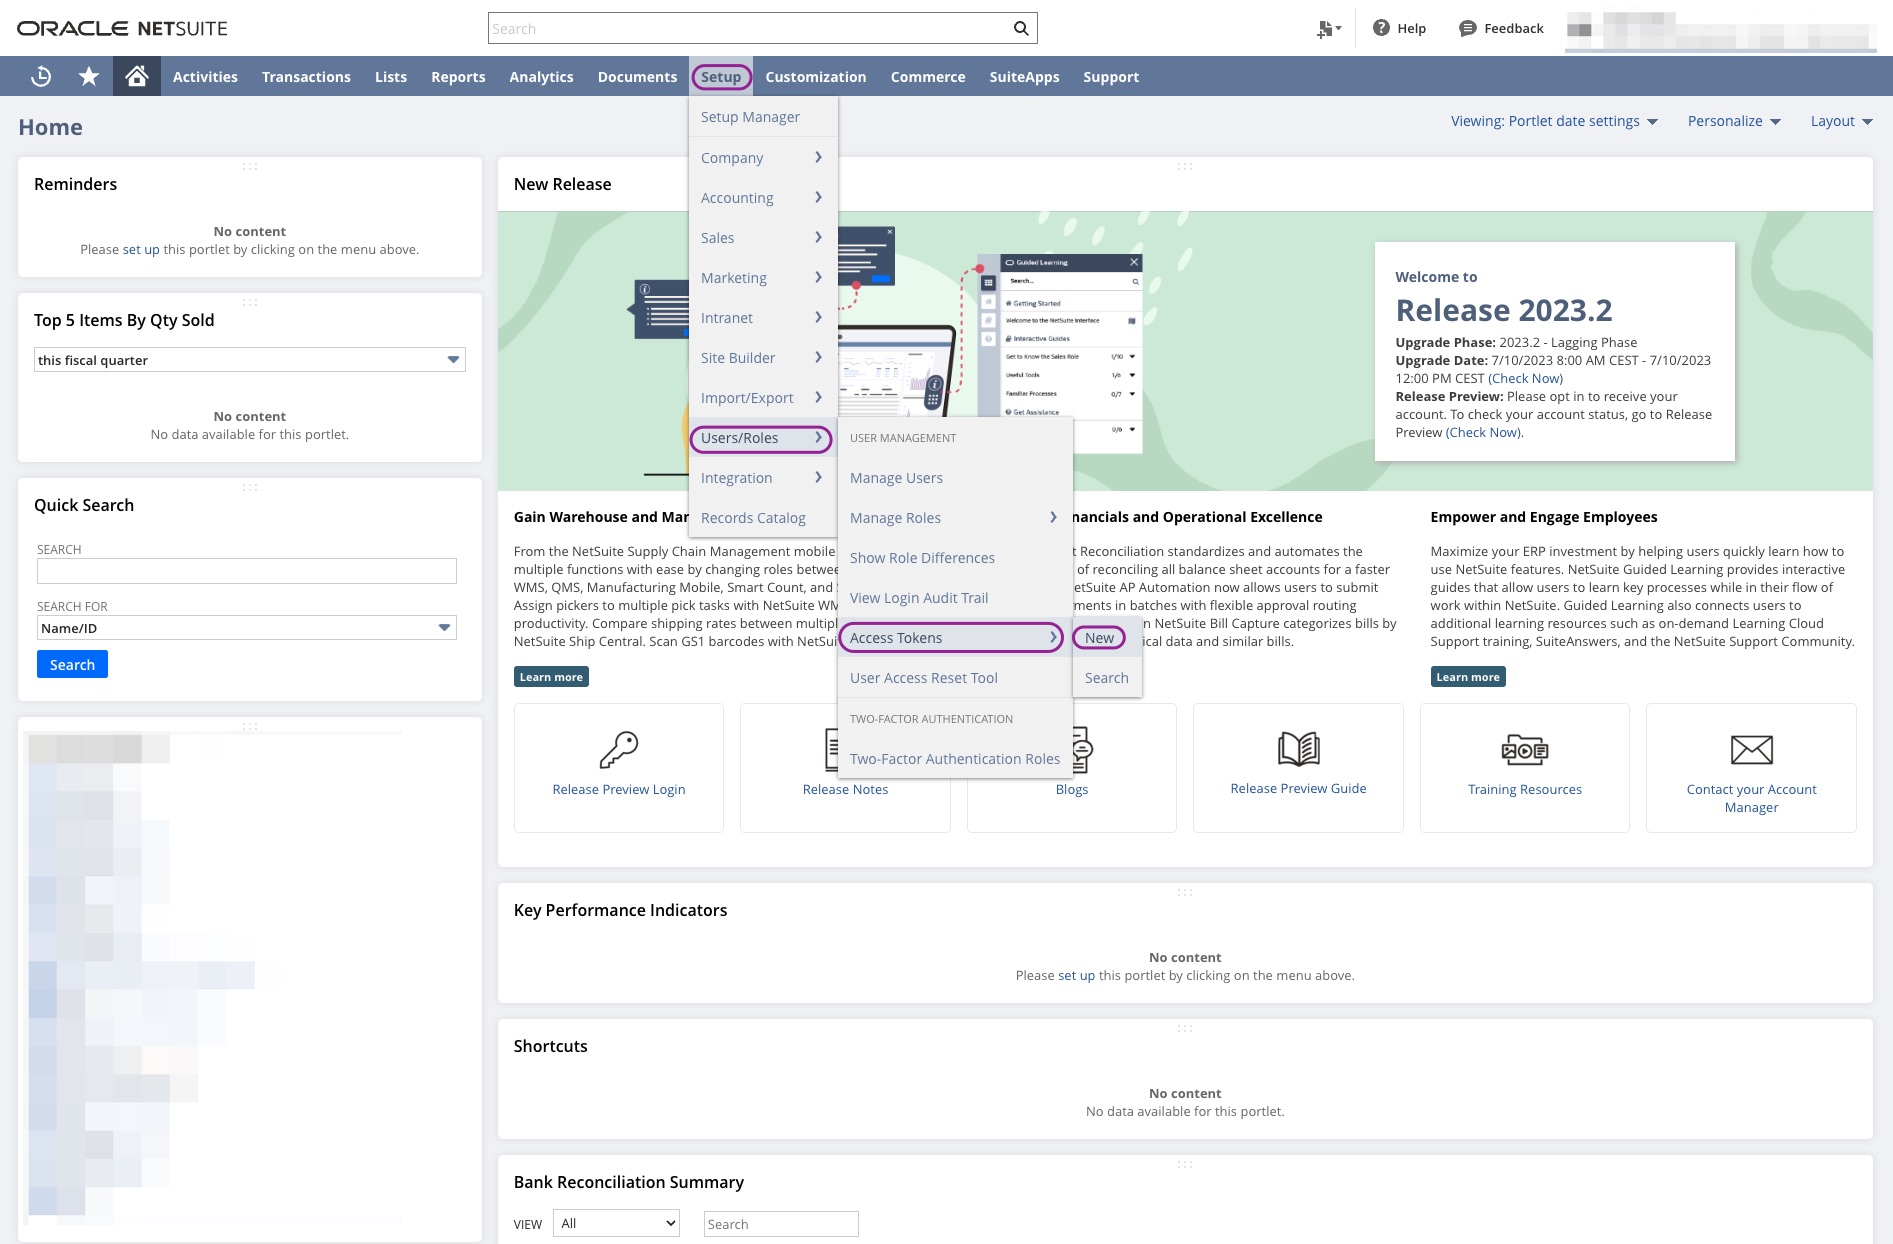
- On the top navigation bar, navigate to Setup → Users/Roles → Access Tokens → New.
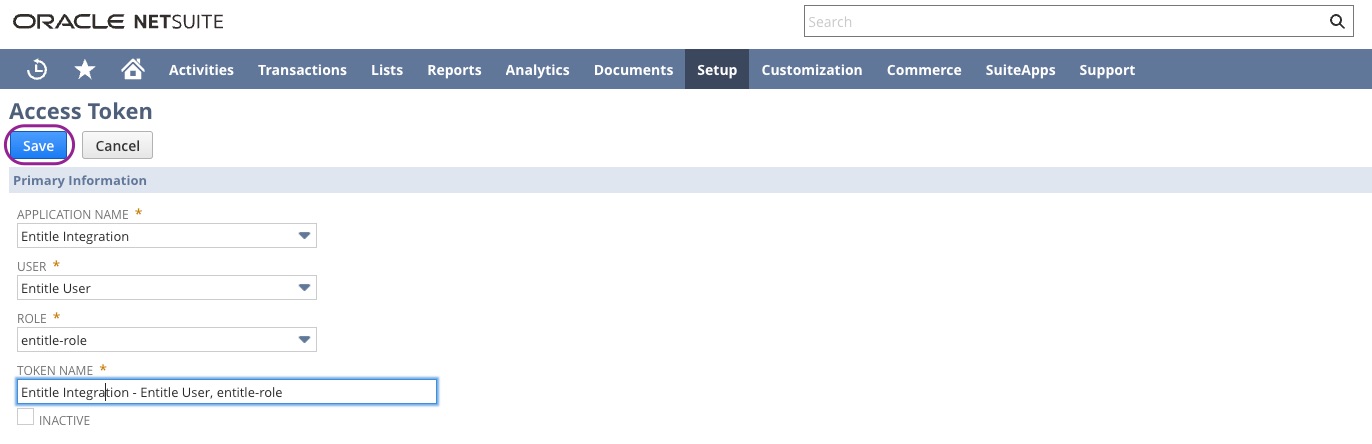
- Select the integration created in Stage 5 in the Application Name field.
- Select the user created in Stage 4 in the User field.
- Select the role created in Stage 3: Step 1 ** in the Role** field.
- Click on the Save button.
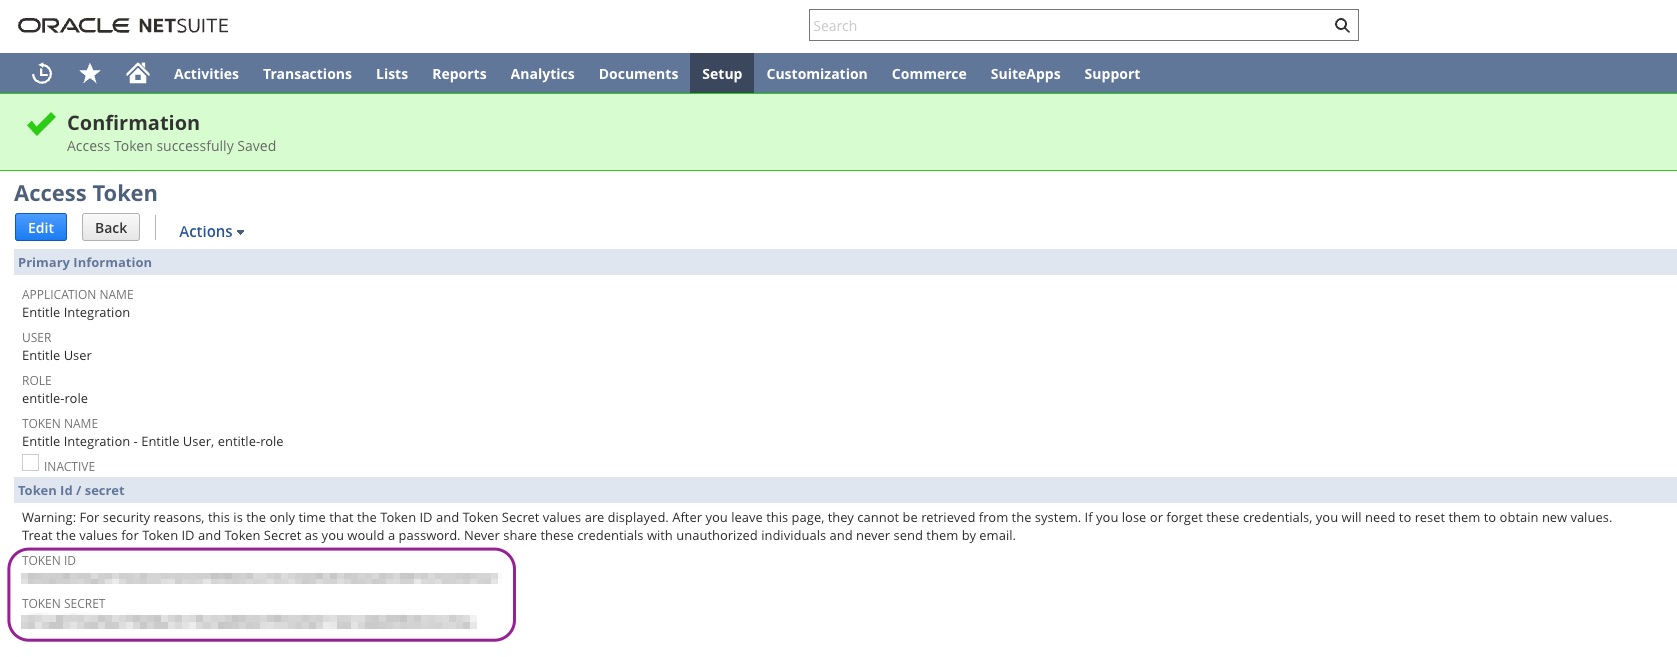
- Once saved, 2 values will be populated at the bottom of the token creation page - Token ID and Token Secret. Copy them, as you will use them later on.
Step 2: Create an access token for the visibility role
- On the top navigation bar, navigate to Setup → Users/Roles → Access Tokens → New.
- Select the integration created in Stage 5 in the Application Name field.
- Select the user created in Stage 4 in the User field.
- Select the role created in Stage 3: Step 2 ** in the Role** field.
- Click on the Save button.
- Once saved, 2 values will be populated at the bottom of the token creation page - Token ID and Token Secret. Copy them, as you will use them later on.
Stage 7: Retrieve Concurrency Limit - optional
- If you wish to optimize Entitle’s performance for the NetSuite integration, it would require getting the concurrency limit of your account.
- On the top navigation bar, navigate to Setup → Integration → Integration Governance.
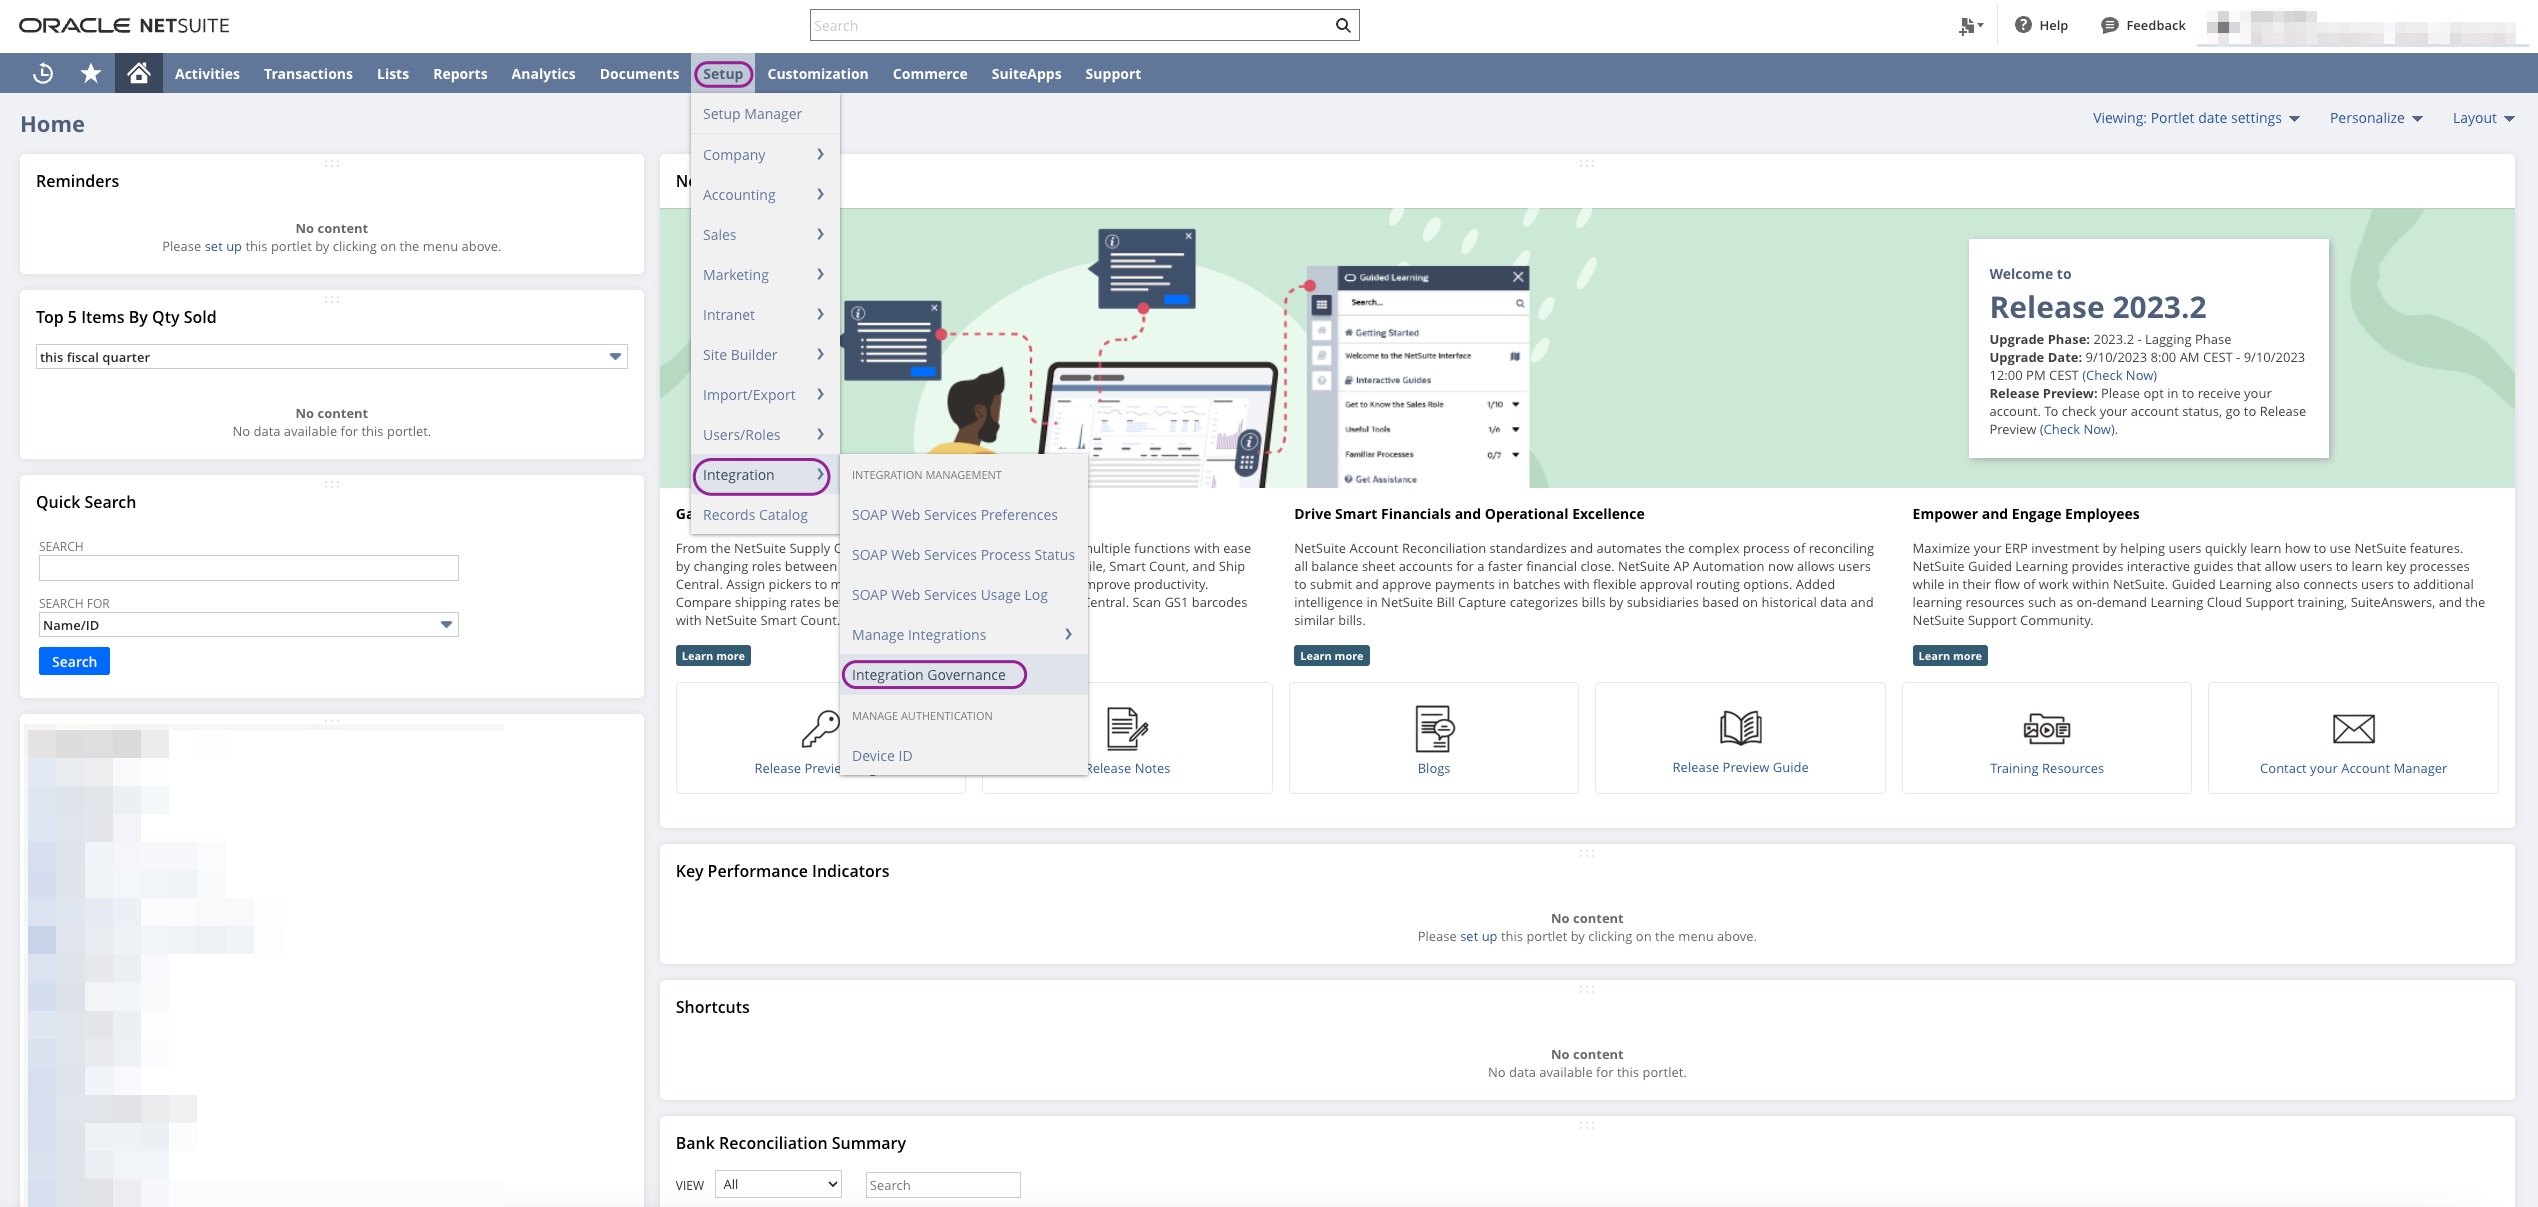
- Copy the value in the Account Concurrency Limit, as you will use it later on.

Create the integration in Entitle
- Log in to Entitle and go to the Integrations page.
- After clicking the Add Integration button, type NetSuite in the Application field.
- Don’t forget to set the Save on field with your configuration, i.e., your own hosted agent or Entitle’s cloud.

-
In the
account_idfield, paste the account ID value you copied in Stage 1, action 2. -
In the
consumer_keyfield, paste the consumer key you copied in Stage 5, action 6. -
In the
consumer_secretfield, paste the consumer secret you copied in Stage 5, action 6. -
In the
token_keyfield, paste the token key you copied in Stage 6, Step 1, action 6. -
In the
token_secretfield, paste the token secret you copied in Stage 6, Step 1, action 6. -
In the
low_privilege_token_keyfield, paste the token key you copied in Stage 6, Step 2, action 6. -
In the
low_privilege_token_secretfield, paste the token secret you copied in Stage 6, Step 2, action 6. -
Optional - In the
account_concurrency_limitfield, paste the value copied in Stage 7, action 3.Example connection JSON{ "account_id": "The Account ID (from Stage 1, action 2)", "consumer_key": "The Consumer Key (from Stage 5, action 6)", "consumer_secret": "The Consumer Secret (from Stage 5, action 6)", "token_key": "The Token Key of the Management role (from Stage 6, Step 1, action 6)", "token_secret": "The Token Secret of the Management role (from Stage 6, Step 1, action 6)", "low_privilege_token_key": "The Token Key of the Visibility role (from Stage 6, Step 2, action 6)", "low_privilege_token_secret": "The Token Secret of the Visibility role (from Stage 6, Step 2, action 6)", "account_concurrency_limit": "The value of the Account Concurrency Limit (from Stage 7, action 3)" } -
Click Save.
What's next?Make sure your setup is complete by testing your integration.
Updated 3 months ago
