Users | Entitle
Overview
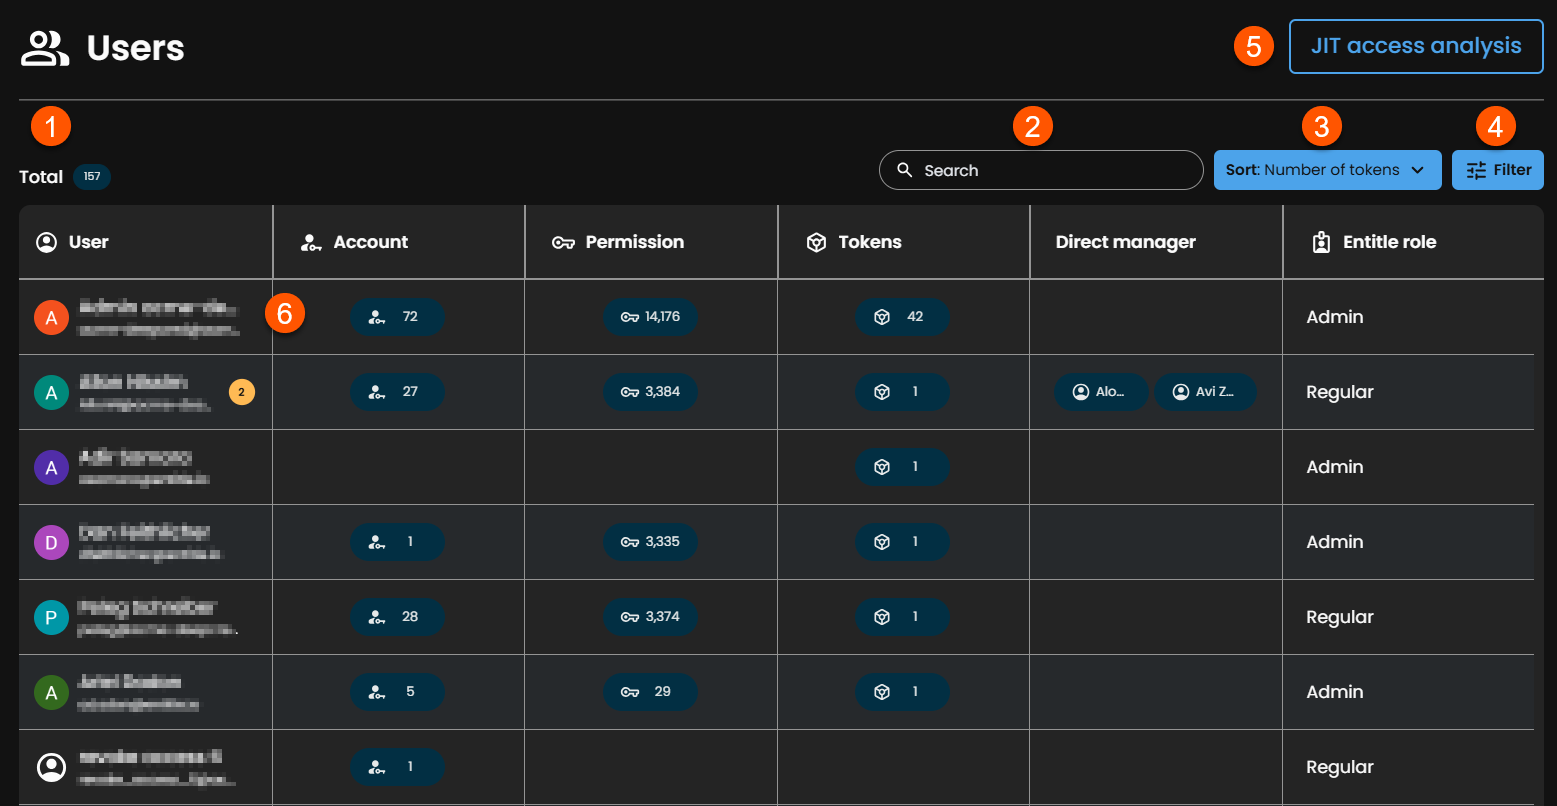
The Users page is where Entitle administrators can view and manage their users' (employees, partners, customers) permissions, accounts, Personal Access Tokens, and JIT access. This page includes the following functionality:
Log in to Entitle and go to the Users page on the left-side menu.
Manage your users
-
The table presents all your organization’s users within Entitle, the number of associated integration accounts, the number of permissions they have, the number of active personal access tokens, their direct manager, and their Entitle role.
-
Search for specific users by name or email.
-
Sort the users table.
Users marked with the Deleted icon have been previously removed from the Entitle tenant.
-
Filter the users table.
-
JIT access analysis opens a separate view where you can view and export reports showing which users are eligible to request which roles and resources.
-
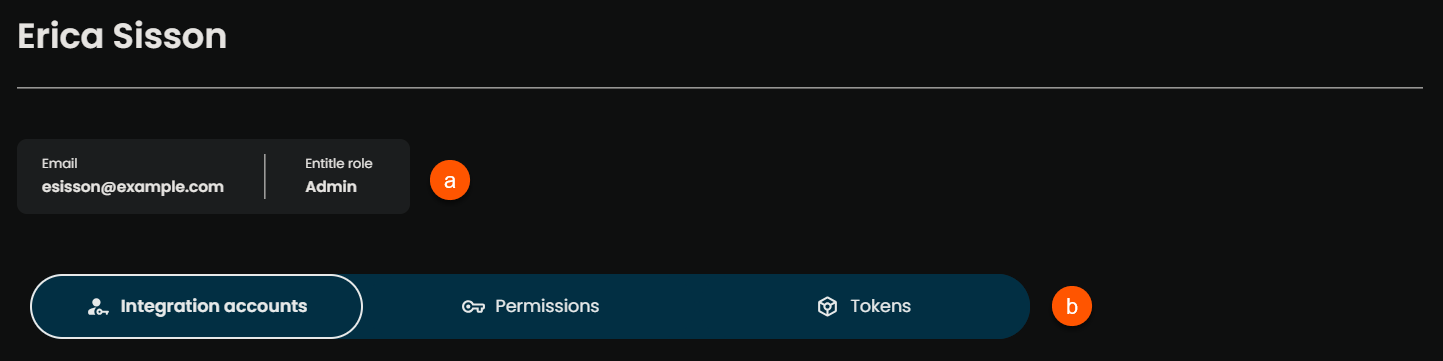
Clicking on a specific user will redirect you to the user's details screen, which has several key functionalities:
-
At the top of the screen, you will see the user’s email, Entitle role, and direct manager.
Direct manager information is available only if collecting it is enabled in the IdP or HRIS connection setup.
-
Integration accounts, Permissions, and Tokens tabs:
- Integration accounts: Manage the user's accounts associated with various integrations.
- Permissions: View and manage the user’s permissions in Entitle. For further details, see Manage users' permissions.
- Tokens: View all Personal Access Tokens (PATs) associated with the user. From this view, admins can review token details and revoke tokens as needed.
-
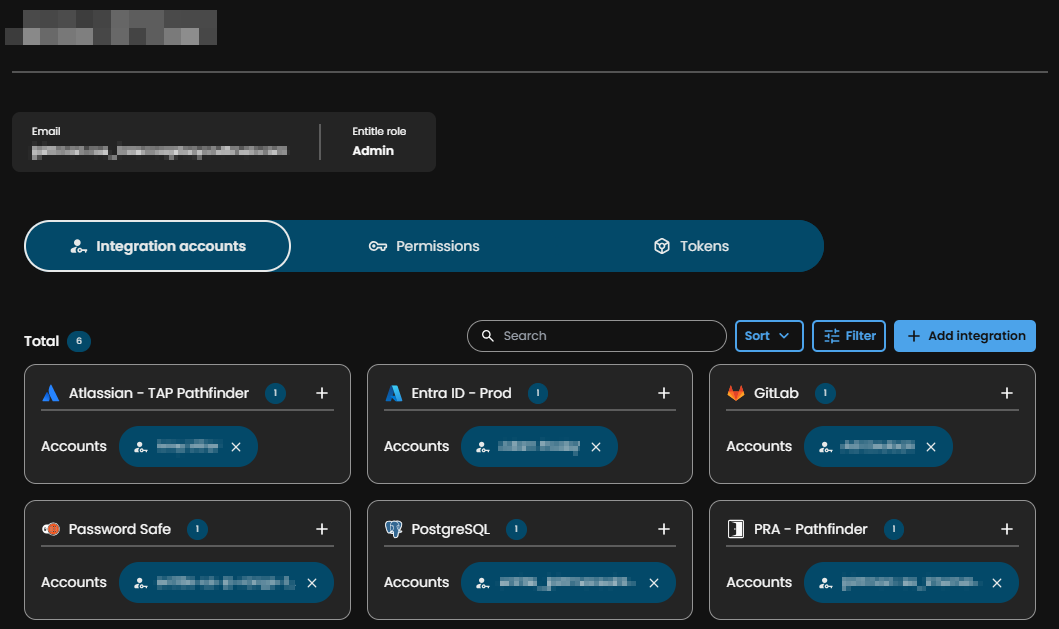
Manage users' integration accounts
Inside the Integration accounts tab in the Users screen, you will be able to:
- View the integrations that were set up in your tenant and the accounts that have integrated them.
- Add account associations to integrations not yet mapped to the user
- Add account associations to integrations mapped to the user
- Remove account associations from integrations mapped to the user
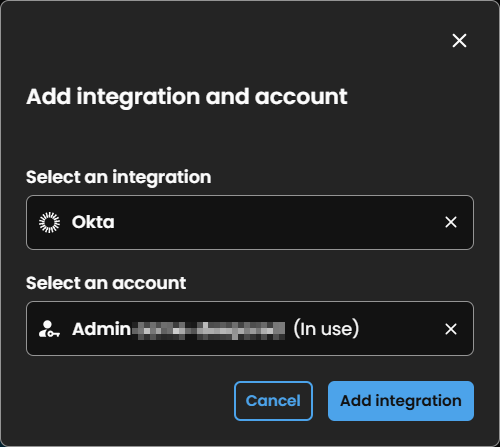
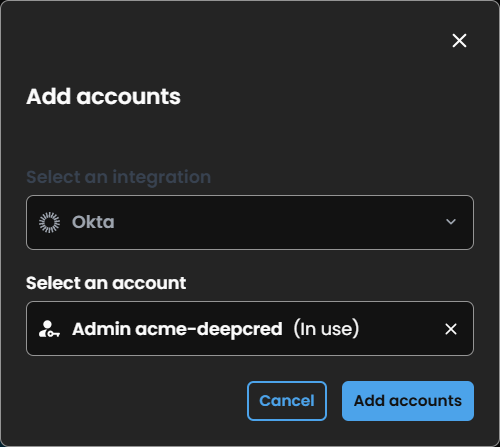
Add account associations to integrations not yet mapped to the user
-
To add an integration and account, click Add integration.
-
Select an integration from the list or start typing to search for one. Integrations already shown in the Integration accounts tab do not appear in the list.
-
Select an account from the list or start typing to search for one.
-
Click Add integration.
-
The integration and associated account appear as a new card in the Integration accounts tab.
Add account associations to integrations mapped to the user
-
In the Integration accounts tab, locate the integration to which you want to add accounts.
-
Click the + icon on the integration card.
-
In the Add accounts dialog, select the accounts you want to associate, then click Add accounts.
- The associated accounts now appear on the integration card. Repeat this process to add additional accounts as needed.
Remove account associations from integrations mapped to the user
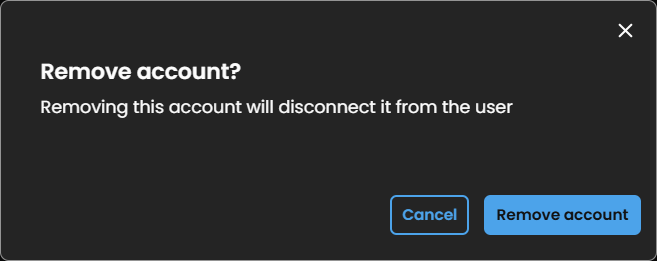
-
In the Integration accounts tab, click the x icon next to the account you want to remove from the integration.
-
In the confirmation dialog, click Remove account.
If you remove the only account associated with an integration, the integration is also removed.
Manage users' permissions
-
To view an employee's permissions, click anywhere in the user's row on the Users page.
-
Go to the Permissions tab. This view includes the following functionality:

-
Permissions table: Displays all permissions assigned to the user, both inside and outside Entitle. The table includes the following columns:
- Account
- Integration
- Resource type
- Resource
- Permission path
- Permission type
- Created
- Expiration
For definitions of these concepts, see Definitions of key concepts in the Permissions documentation.
-
Search: Search permissions by:
- Account
- Resource name
- Role name
-
Sort the permissions table.
-
Filter the permissions table.
-
Download as CSV: Download selected rows or, if no rows are selected, the entire table.
-
Revoke: Revoke selected permissions.
For more information, see Revoke permissions in the Permissions documentation.
-
To view additional details about an integration, resource, or role, hover over the item. Click the item to open its details page.
Manage users' Personal Access Tokens
-
To view an employee's tokens, click anywhere in the user's row on the Users page.
-
Go to the Tokens tab. This view includes the following functionality:
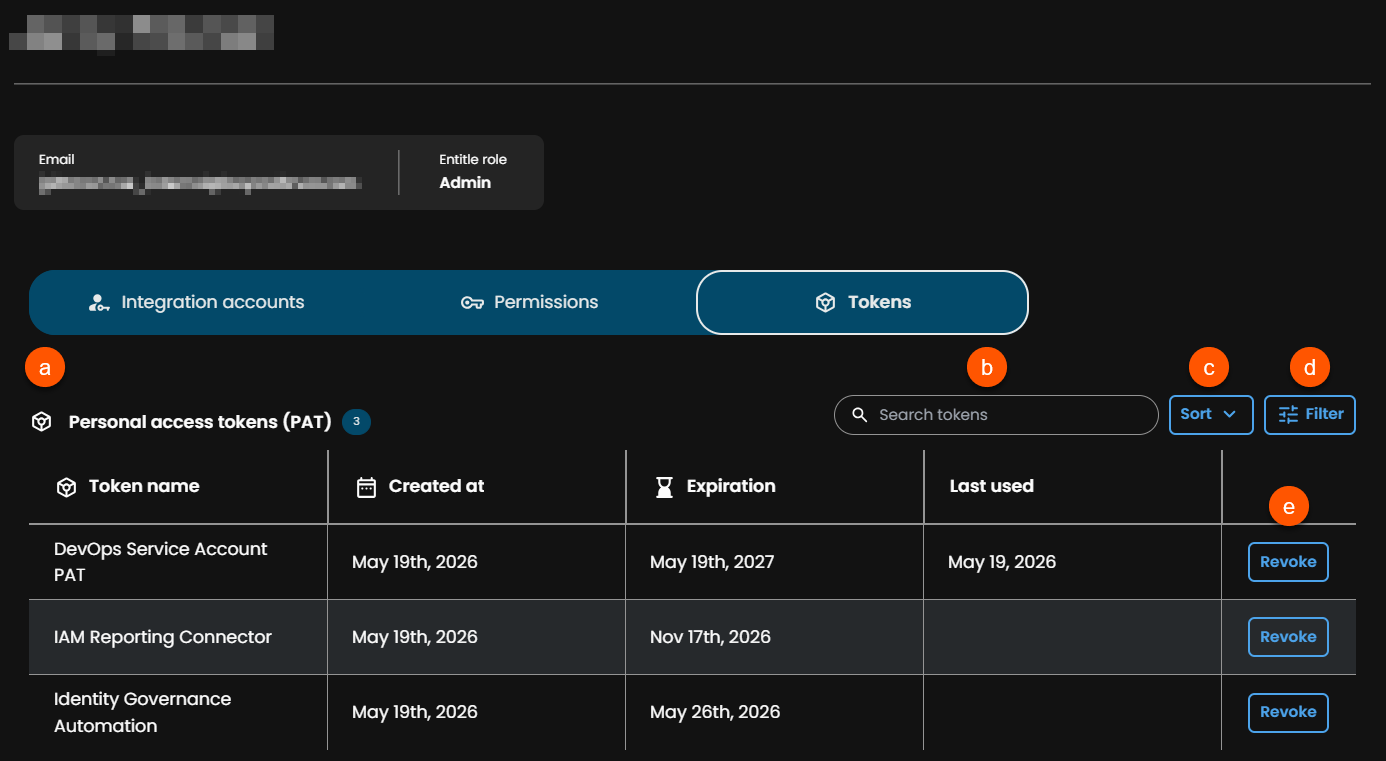
- Personal access tokens table: Displays all personal access tokens assigned to this user. The table includes the following columns:
- Token name
- Created at
- Expiration
- Last used
- Search: Search tokens by token name.
- Sort: Sort tokens by:
- Name
- Created at
- Expiration
- Last used
- Filter: Filter tokens by:
- Created at
- Expiration
- Expiration was set to
- Expired
- Last used
- Token name
- Revoke: Revoke the user's personal access token.
- Personal access tokens table: Displays all personal access tokens assigned to this user. The table includes the following columns:
View the JIT access analysis report
Admins and compliance users can use JIT request analysis to review just-in-time access eligibility across users, roles, and resources. The report includes every JIT-requestable role available to a user, whether through direct assignment, bundles, or virtual roles. Use this report to view who can request access, not who currently has access or who has requested access in the past.
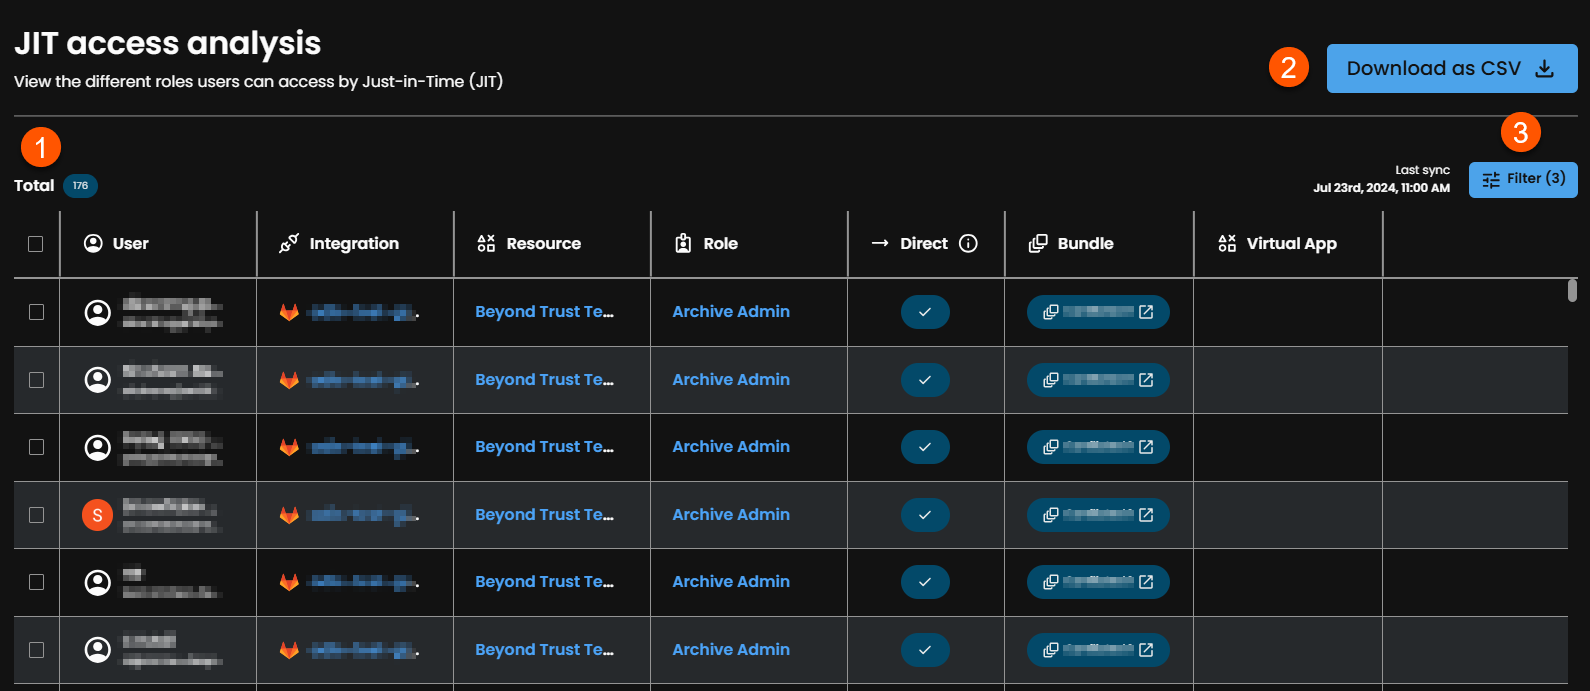
This view provides the following capabilities for admins:
-
View a table of users, roles, and resources that shows just-in-time access eligibility among them. The following columns provide details:
- User
The user's name and email appear in the table; only the email address appears in the CSV export.
- Application
This column appears only in the CSV export.
- Integration
- Resource
- Role
- Direct
- Bundle
- Virtual app
The Bundle and Virtual app columns appear only if bundles or virtual applications exist in your tenant. These columns may contain multiple values per row.
- User
-
Filter: Select one or more filters to control which data is displayed. Available filters include:
- IdP group
- On call
- User
- Integration
- Integration name
- Resource
- Resource name
- Role name
- Direct
- Bundle
- Virtual app
-
Download as CSV: Export a CSV file of the eligibility data shown in the table. When no filters are applied, the export includes all eligibility data, which is commonly required for audit purposes. When filters are applied, only the filtered results are exported.
If you select specific rows, only those rows are exported. If no rows are selected, the entire table is exported.
The exported file is named using the following format:
Entitle_exported_potential_jitroles%DATE_TIME%.csvThe CSV reflects the table content with minor differences, such as the User column containing only the user's email address and the Application column appearing only in the exported file.
To ensure an audit trail, each export of a JIT access report is recorded in the audit logs, including the user who performed the export and the time it occurred.
