Teams | Entitle
Overview
Microsoft Teams is a proprietary business communication platform developed by Microsoft, as part of the Microsoft 365 family of products. Teams offers workspace chat and videoconferencing, file storage, and application integration.
Entitle can manage both private and shared channels and teams in Microsoft Teams.
The following table shows which roles employees can request access to:
| Teams | Private Channel | Shared Channel | |
|---|---|---|---|
| Guest | ❌ Cannot request access | ❌ Cannot request access | ✅ Can request access |
| Member | ✅ Can request access | ⚠️ Need to first be in the corresponding team of the private channel to request access to it | ✅ Can request access |
| Owner | ✅ Can request access | ⚠️ Need to first be in the corresponding team of the private channel to request access to it | ✅ Can request access |
This page will provide you with instructions on how to integrate Entitle and Microsoft Teams.
General guidelines
- Entitle requires an Entra ID connection to integrate with Microsoft Teams.
To integrate your Azure AD with Entitle, you will need to:
- Create an application on Entra ID, and extract Client and tenant IDs.
- Create a secret, and extract its value.
- Provide Entitle with adequate permissions for the application.
Prerequisites
- The integration creator needs to have an Administrator account in Azure AD.
Set up Microsoft Teams to work with Entitle
- Using the search bar that appears, find the following permissions and select them:
team.readbasic.all
teammember.readwrite.all
channel.readbasic.all
channelmember.readwrite.all
user.read.all
Example

- When you are done selecting the permissions, click Add permissions at the bottom of the screen.
- You will now see the added permissions in the table under Configured permissions.
- Click Grant admin consent for Default Directory > Yes.
- If you are using a client secret, you can continue with Create the integration in Entitle. If you are using federated credentials with the Application.ReadWrite.OwnedBy permission, continue below.
Create the integration in Entitle
- Log in to Entitle and go to the Integrations page.
- Click the Add Integration button, then type Microsoft Teams in the Application field.
Follow the steps for your chosen authentication method: client secret or federated credentials.
Client secret
-
Start the integration setup following the instructions in Set up a new integration.
-
From the Connection dropdown, select Client secret.
-
In the JSON, paste the values of the information generated earlier.

-
client_id: Your Application (client) ID, found on the Overview page.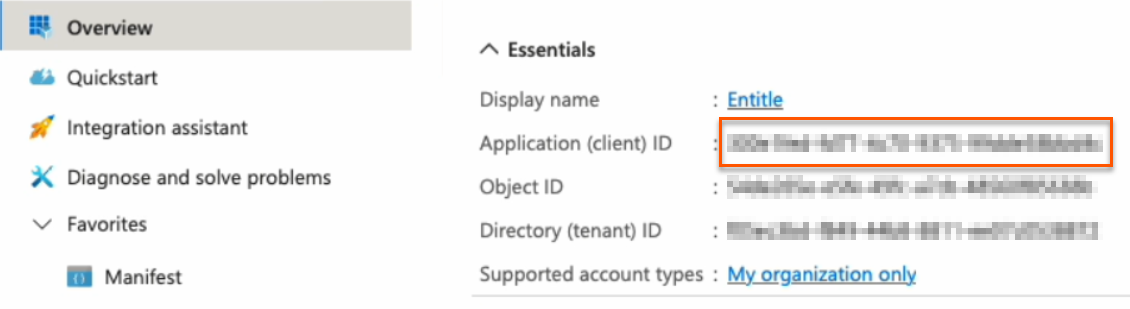
-
secret: Your Client secret, found on the Certificates & secrets page.
-
tenant: Your Directory (tenant) ID, found on the Overview page.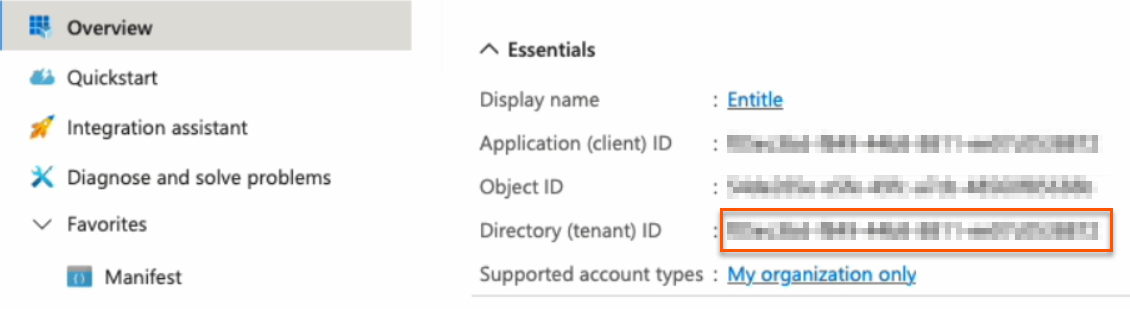
-
Example connection JSON{ "client_id": "a47b3f9c-8e1d-42b6-bc3f-9d204c1e8f27", "secret": "e2b0c714-28f4-4fa6-84b1-5de8f32c91ad", "tenant": "fb6d0243-9e81-47a2-a05b-63d40b9f8c92" }
- Click Save.
Federated credentials
-
Start the integration setup following the instructions in Set up a new integration.
-
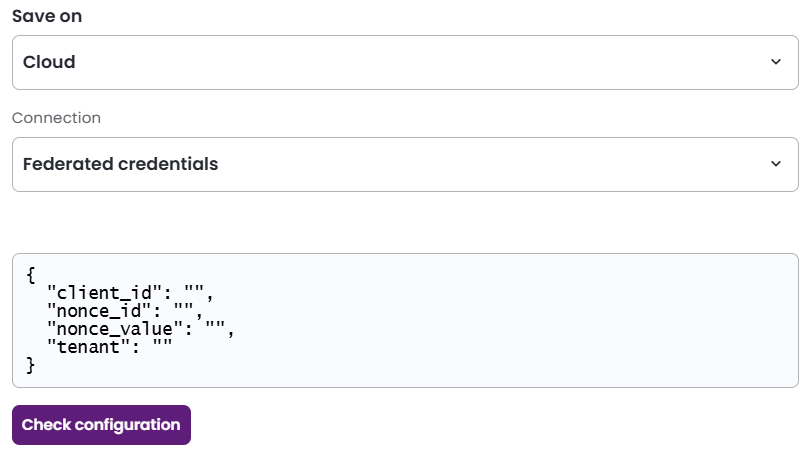
Save on: Choose whether you would like this integration to be saved on your own hosted agent or in Entitle’s cloud.
Important informationFederated credentials work only for integrations that are saved on Entitle's Cloud or on an on-premises agent that is hosted in Amazon Elastic Kubernetes Service (EKS).
-
From the Connection dropdown, select Federated credentials.
-
In the JSON, paste the values of the information generated earlier.
-
client_id: Your Application (client) ID, found on the Overview page.
-
nonce_id: Your Secret ID, found on the Certificates & Secrets page. Refresh your browser to see the secret ID.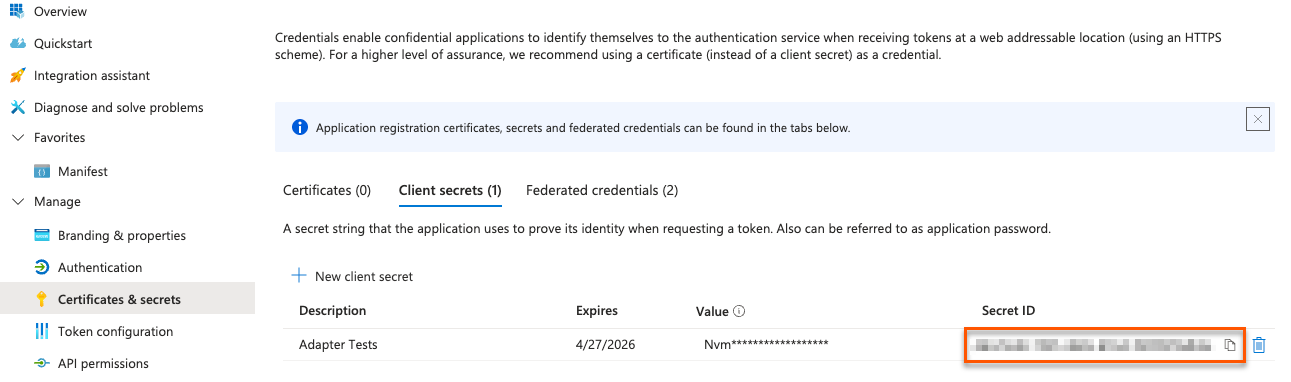
-
nonce_value: Your Nonce value, found in your Cloud Shell instance.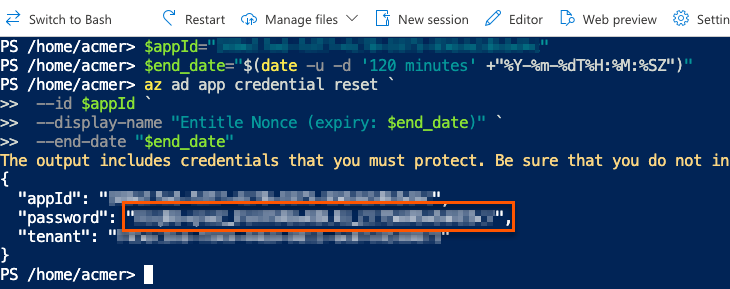
-
tenant: Your Directory (tenant) ID, found on the Overview page.
Example connection JSON{ "client_id": "a47b3f9c-8e1d-42b6-bc3f-9d204c1e8f27", "nonce_id": "3d92a6ef-4b8c-4d12-80a9-cc57e2e3b8a1", "nonce_value": "9c1f8e0a-35d2-4f13-9d4e-f91b2aa84e77", "tenant": "fb6d0243-9e81-47a2-a05b-63d40b9f8c92" } -
-
Click Save.
Updated about 1 month ago
