
Privileged Remote Access - Getting Started
What is Privileged Remote Access? 
Privileged Remote Access (PRA) controls how people connect to your most important systems from somewhere else. It gives secure remote access to admins, IT staff, and outside vendors without a VPN.
PRA is part of the BeyondTrust Privileged Access Management (PAM) family and provides three main roles:
- Access control: Only approved users can reach a system. They get only the level of access they need, and only when they need it.
- Credential security: Vault stores your privileged passwords and keys. PRA can inject a credential into a session so the user never sees or types the password.
- Session oversight: PRA records and logs sessions. You get a searchable audit trail, and you can watch a live session and end it if something looks wrong.
For more information, see Welcome to Privileged Remote Access.
New names for Jump termsIn version 26.1, many Jump terms were renamed to make them clearer. Jump Item is now Asset, and Jumpoint is now Gateway. The features work the same way. Jump Client kept its name. This article uses the new names, with the old name in parentheses the first time. For the full list of terms, see the Privileged Remote Access Glossary.
PRA capabilities and benefits
You can use PRA to do the following:
- Secure Privileged Remote Access: Give administrators and IT teams secure remote access to servers, desktops, network devices, and databases without broad VPN access to the network.
- Third-Party & Vendor Access: Provide vendors and external users with controlled, time-bound access only to required systems. Set expiration dates to automatically remove access when no longer needed.
- Credential Security: Inject stored credentials directly into privileged sessions, allowing users to access systems without seeing or knowing the underlying passwords.
- Privileged Credential Management: Discover, store, manage, and rotate privileged credentials in the built-in Vault, supporting up to 200,000 accounts.
- Just-in-Time Access Controls: Require controls such as a ticket number, business justification, manager approval, or multi-factor authentication before granting privileged access.
- Time-Based Access: Restrict privileged access to approved days and hours, preventing users and vendors from connecting outside authorized windows.
- Session Control: Control privileged-session activities, including clipboard use, file transfers, screen sharing, and command execution.
- Broad System & Protocol Support: Secure access to Windows, macOS, Linux, Android, and iOS systems, plus SSH and Telnet devices such as switches, routers, and other infrastructure.
- Session Recording & Audit: Record privileged sessions and capture activity to audit who accessed a system, what they did, and when.
- SIEM Integration: Send privileged-session and audit events to SIEM platforms through syslog for centralized monitoring, investigation, and compliance reporting.
Prerequisites
Before you start, you need to make a few decisions. The right answers depend on your organization's size, network, and security rules. This is not a full checklist, but it is a good place to start.
- Pick your deployment model, Cloud or on-premises. Your choice usually depends on who you want to manage the infrastructure. See Deployment methods below.
- Choose your site name and set up DNS. Every PRA site has a URL, and that URL is where users and client software connect. Cloud sites get a
yoursite.beyondtrustcloud.comaddress, and you can point your own name at it with a CNAME record. On-premises appliances need a static IP address and a DNS A record. - Get an SSL/TLS certificate. PRA needs a valid certificate before BeyondTrust can build your client software. Use a public certificate authority (CA) or your own internal CA. Cloud sites cannot use self-signed certificates. You create the certificate request on the appliance itself, at /appliance > Security > Certificates.
- Confirm your firewall settings. TCP 443 is required in every deployment. On-premises deployments may need more ports, including STUN and TURN ports for peer-to-peer traffic. Before you file a firewall request, see Network considerations.
- Decide how users sign in. PRA can use local accounts, or it can connect to a security provider such as Active Directory, LDAP, SAML, Microsoft Entra ID, OpenID Connect, or Kerberos. This choice affects how you create users and group policies.
- Plan your two-factor authentication. PRA supports TOTP apps and FIDO2 keys, which you turn on in group policies.
- Plan for retention. Session recordings and text logs are kept for up to 90 days. If the disk fills up, the oldest data is deleted first, even if 90 days have not passed. Use the Integration Client to export data if you need to keep it longer.
ImportantYour license file contains your site DNS name and your SSL certificate. If you change either one later, BeyondTrust Support has to rebuild your software, and you must wait 24 to 48 hours for clients to pick up the new certificate. Get these two things right before you deploy.
Deployment methods
You can deploy PRA in the cloud, or on-premises on a BeyondTrust B Series Appliance.
PRA Cloud
With PRA Cloud, BeyondTrust hosts runs for you, so you do not manage servers, storage, or the operating system. Your site runs on a single-tenant instance in the BeyondTrust cloud, with a 99.9% monthly uptime commitment.
BeyondTrust applies critical security updates for you, and you can pull other software updates whenever you want from the Updates page. Cloud sites use port 443 only, which keeps your firewall changes small.
Cloud customers sign in through Pathfinder, the shared BeyondTrust console at app.beyondtrust.io. Pathfinder is not a separate hosting model. It is a single front door for your BeyondTrust products, and it handles users and identity providers for all of them.
For more information, see Welcome to Privileged Remote Access Cloud and Pathfinder.
On-premises (B Series Appliance)
The B Series Appliance is a self-contained system that includes the operating system, the database, and the PRA software, already installed and configured. You run it in your own data center. You can buy it as physical hardware, or run the SRA Virtual Appliance on VMware, Hyper-V, Nutanix AHV, Red Hat OpenShift, Azure, or AWS.
An on-premises appliance has a second web interface at /appliance, where you manage the hardware, networking, storage, encryption, and base software. You control your own updates, backups, network placement, and clustering.
BeyondTrust recommends placing the appliance in a DMZ if you need to reach systems outside your network.
For more information, see Welcome to Privileged Remote Access On-Premises and Virtual appliance installation.
Compare the two methods
The following table describes what each deployment method provides.
| PRA Cloud | On-premises (B Series Appliance) |
|---|---|
| Cloud-hosted | Physical or virtual appliance you host |
| No appliance networking or storage to manage | You manage IP addresses, storage, and encryption |
| Limited /appliance interface | Full /appliance interface |
| Critical updates applied by BeyondTrust | You choose when to install every update |
| 99.9% uptime commitment from BeyondTrust | Uptime is your responsibility |
| BeyondTrust takes infrastructure snapshots | You are responsible for infrastructure recovery |
| Port 443 only | Port 443 plus additional ports |
| Self-signed certificates not allowed | Self-signed certificates allowed for testing only |
| Clustering deployed by BeyondTrust | You configure Atlas clustering and failover |
| Choose from published cloud regions | Choose your own data center |
Configuration backupsIn both deployment models, you download your own configuration backup from /login > Management > Software. Back up your Vault encryption keys at the same time. You need both files to restore your configuration to a new appliance.
PRA essentials
When you set up PRA, you build a small set of objects that control who can reach what. Add these during initial setup so access control and auditing work from day one.
| Name | Description |
|---|---|
| Endpoint | Any remote computer or device on a network. This includes Windows, macOS, and Linux systems, mobile devices, and SSH or Telnet devices such as Cisco switches. |
| Asset (formerly Jump Item) | A single system or device that you have set up in PRA for remote access. An Asset stores the address, the connection type, and the policies that apply. For more information, see Assets. |
| Asset Group (formerly Jump Group) | A collection of Assets. Asset Groups do two things: they keep your list organized, and they control access. For example, the help desk can reach one group, and the network team can reach another. For more information, see Asset Groups. |
| Asset Role (formerly Jump Item Role) | A set of permissions that says what a user can do with an Asset. This includes starting a session, creating or deleting Assets, moving them, and editing their settings. For more information, see Asset Roles. |
| Asset Policy (formerly Jump Policy) | A rule that says when and under what conditions an Asset can be used. You can require a ticket number, a written reason, manager approval, or two-factor authentication. You can also limit access to a schedule, send email when a session starts, and turn recording off. For more information, see Asset Policies. |
| Jump Client | A small program you install on a remote system. It keeps a secure connection open to the appliance, so you can reach that system at any time, no matter what network it is on. Use Jump Clients for systems you access often. For more information, see Jump Client guide. |
| Gateway (formerly Jumpoint) | A connection point you install on one computer inside a remote network. It acts as a tunnel to many other systems on that network, so you do not have to install software on each one. For more information, see Gateway guide. |
| Connection type (formerly Jump Method) | How PRA connects to an Asset. Options include Remote RDP, Shell for SSH and Telnet, Remote VNC, Website, and Protocol Tunnel for databases and other TCP traffic. For more information, see Use Assets. |
| Vault | The built-in place where PRA stores privileged credentials. Vault can discover accounts, hide passwords from users, inject them into sessions, and rotate them on a schedule. For more information, see Vault. |
| Credential injection | A feature that pushes a stored credential into a session for the user. The user gets access without ever seeing the password. For more information, see Credential injection. |
| Asset Association | The setting on a Vault account that says which Assets the credential can be injected into. It keeps each credential from showing up on every system. For more information, see Asset Association options. |
| Account group | A collection of shared Vault accounts. Use account groups to grant access to many accounts at once and apply one account policy to all of them. A shared account can belong to only one group. For more information, see Account groups. |
| Account policy | The rules for a Vault account, such as whether the password rotates after checkout and how often it rotates on a schedule. |
| Group policy | The main way you grant permissions in PRA. A group policy defines what a group of users can do, and which Teams, Gateways, Asset Groups, and Vault accounts they belong to. Assign users to group policies instead of editing accounts one at a time. For more information, see Group policies. |
| Session policy | The rules for what happens inside a session. This covers screen sharing, copy and paste, file transfer, allowed shell commands, registry access, and more. For more information, see Session policies. |
| Team | A group of users organized for daily work, with Team Members, Team Leads, and Team Managers. Each team gets its own queue in the access console. For more information, see Teams. |
| Vendor group | A group for outside users, such as a contractor or a software vendor. Vendor groups have their own expiration dates, approval steps, and an optional portal where vendors register themselves. For more information, see Vendors. |
| Access invite | A one-time invitation that lets an outside person join a single session with limited permissions. For more information, see Access invite. |
Asset types
Not every Asset is reached the same way. Some need software on the target system, and some need a Gateway on the target network. Knowing the difference helps you plan your rollout.
| Asset type | How PRA reaches it | Needs a Gateway | Needs a Jump Client |
|---|---|---|---|
| Jump Client | Software installed on the remote system keeps a connection open to the appliance. | No | Yes |
| Local Jump | The user's own computer connects directly to a Windows system on the same network. | No | No |
| Remote Jump, Remote RDP, Remote VNC | The session travels through a Gateway on the remote network. | Yes | No |
| Shell (SSH or Telnet) | The session travels through a Gateway to a network device or server. | Yes | No |
| Website | A remote browser session runs through a Gateway. This is a paid add-on. | Yes | No |
| Protocol Tunnel | A tunnel through a Gateway carries TCP traffic, including database connections. | Yes | No |
| External Asset | The Asset comes from Password Safe rather than from PRA. All external Asset sessions use a Gateway. | Yes | No |
TipUse Jump Clients for systems you access often, or systems that move between networks such as laptops. Use a Gateway when you need to reach many systems on one network and cannot install software on each of them.
The /login interface versus the access console
PRA has two interfaces, and they serve different people. Knowing which one to open saves a lot of time.
| Interface | Description |
|---|---|
| /login | The web admin interface, at your site URL plus /login. Administrators use it to create users and group policies, build Asset Groups and policies, deploy Jump Clients and Gateways, manage Vault, and run reports. |
| Access console | The application your users run to do the work. They use it to start sessions, browse the Assets they are allowed to reach, inject credentials, transfer files, and chat. It comes as a desktop app, a web version in the browser, and a mobile app. For more information, see Access console interface. |
On-premises deployments have a third interface, /appliance, which you use to configure networking, storage, certificates, and base software. Cloud deployments have a smaller version of this interface.
ImportantThe
/applianceand/logincredentials are separate. Changing one does not change the other. Your/logincredentials are also what you use to sign in to the access console.
Initial setup
ImportantComplete these steps to get PRA working. The steps are ordered because each one depends on the one before it.
1. Sign in
Use a supported browser to sign in to your PRA site.
- Cloud on Pathfinder: Go to
app.beyondtrust.ioand sign in, then open Privileged Remote Access. - Standalone Cloud: Go to your site URL followed by
/login. Your URL is in the BeyondTrust welcome email. - On-premises: Go to your appliance URL followed by
/login. The first sign-in uses the default administrator account, and you must change the password right away.
2. Install your SSL certificate and license
You do this before anything else because you cannot download client software without it.
- Go to /appliance > Security > Certificates.
- Create a certificate request, and send it to your certificate authority.
- Import the signed certificate, along with the intermediate and root certificates. Many CAs do not send the root certificate, so ask for it.
- Send your site name, the root certificate, and your appliance details to BeyondTrust Support so they can build your license package. Never send a private key.
- When Support notifies you, install the license and base software packages from /appliance > Updates.
Cloud sites already have a certificate for yoursite.beyondtrustcloud.com, so you only do this if you want to use your own hostname. Let's Encrypt is also supported in both models.
For more information, see SSL certificates.
3. Connect your identity source and create users
Next, decide how people sign in.
- Go to Users & Security > Security Providers, and add your provider. Use Test settings to check it before you save.
- Assign a default group policy to the provider. Every user who signs in from an outside identity source must belong to at least one group policy.
- Go to Users & Security > Users to add any local accounts you still need.
In Pathfinder, you manage users and SAML identity providers at the platform level instead, under Administration. The Security Providers page inside PRA is read-only.
Some settings, such as how users are provisioned, cannot be changed after you save the provider. Review your settings carefully.
For more information, see Security providers.
4. Create group policies
Group policies are how you grant permissions in PRA. Create them before you create Assets, so you have somewhere to assign access.
- Go to Users & Security > Group Policies, and click to add a policy.
- Set Account Settings, including whether TOTP or FIDO2 is required.
- Set General Permissions, such as whether members are administrators or can manage Vault.
- Set Access Permissions, including which connection types members can use.
- Add members. You can add local users, or whole groups from your security provider.
ImportantWhen a user belongs to more than one group policy, the policy lower in the list wins, unless a higher policy marks the setting as Final. To understand how the order of group policies and session policies works, see Understanding session and group policies.
5. Build Asset Roles, Asset Policies, and Asset Groups
Create these three objects in this order, because each one is used by the next.
- Asset Roles. Go to Asset Management > Asset Roles. Create roles that match the jobs people do. A read-only Auditor role ships with the product.
- Asset Policies. Go to Asset Management > Asset Policies. Create policies for your access rules, such as requiring approval or limiting access to business hours.
- Asset Groups. Go to Asset Management > Asset Groups. Create a group, give it a code name, and list the users and group policies allowed to use it. Assign each one an Asset Role.
6. Deploy Jump Clients, install a Gateway, or both
Now connect PRA to your systems.
To deploy Jump Clients:
- Go to Asset Management > Jump Clients, and start the Mass Deployment Wizard.
- Choose the Asset Group. This is the only required field.
- Set how long the installer stays valid, and choose the Asset Policy and session policy you want applied.
- Distribute the installer. You can send a link, run a script, or push the Windows MSI with a tool such as Intune, SCCM, or Group Policy.
To install a Gateway:
- Go to Asset Management > Gateway, and add a Gateway.
- Name it, set the platform, and turn on the connection types you need, such as SSH or Protocol Tunnel.
- Download and run the installer on a computer inside the target network. The installer link expires in 7 days.
ImportantThe Gateway platform and clustering settings cannot be changed after you save. Choose them carefully.
For more information, see Jump Client guide and Gateway guide.
7. Set up Vault and credential injection
With systems connected, store the credentials people need.
- Go to Vault > Accounts, and add your shared accounts. You can enter them by hand, or run a discovery job under Vault > Discovery to find them.
- Group related accounts under Vault > Account Groups, and apply an account policy to control rotation and checkout.
- Set Asset Association on each account so the credential is only offered on the Assets it applies to. For more information about Asset Association, see Asset Association options.
- Give users the Inject role, or Inject and Checkout if they also need to check the credential out. Assign these through group policies.
Vault discovery for domain accounts runs through a Windows Gateway. Local Windows account discovery runs through Jump Clients. If your credentials live in an outside vault such as Password Safe, you also need the BeyondTrust Endpoint Credential Manager (ECM).
Asset Association options
Asset Association controls which Assets a Vault account can be injected into. Without it, every credential in Vault would appear as a choice on every system, and your users would have to pick the right one from a long list.
You set it when you add or edit an account. Go to Vault > Accounts, then click Add. To change an account you already have, find it in the grid, click the ellipsis, and select Edit. Asset Association is a section on that page. The same section appears on the account group page, which is what makes the inherited option work.
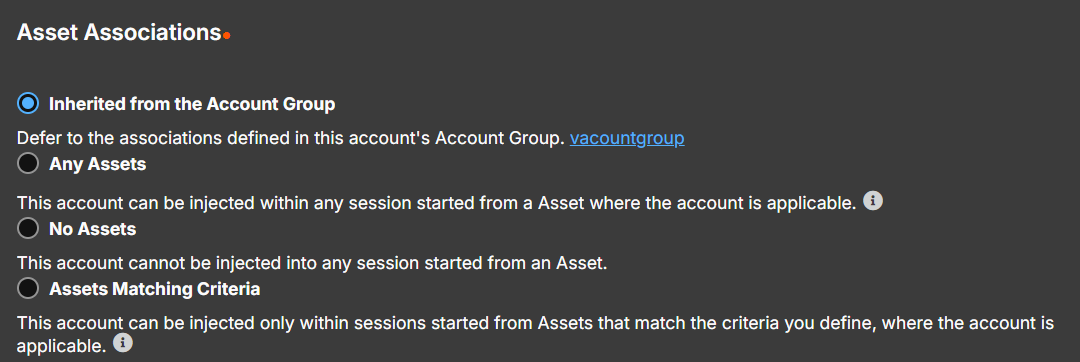
Choose one of the following types.
| Type | What it does |
|---|---|
| Inherited from the Account Group | Uses the associations set on this account's account group. This is the simplest choice if you already organized your accounts into groups. |
| Any Assets | The account can be injected into any session where the account type applies. |
| No Assets | The account can never be injected. Use this for a credential people only check out. |
| Assets Matching Criteria | The account can only be injected on Assets you name directly, or on Assets that match the filters you set. |
If you choose Assets Matching Criteria, you can pick Assets from the list and click Add Asset. You can also filter on four Asset attributes: Name, Hostname / IP, Tag, and Comments. Assets you pick and Assets that match a filter are combined, not replaced. Each attribute holds up to 32 values, and each value can be up to 64 characters.
Filters accept these patterns.
| Pattern | Result |
|---|---|
value | Matches the field exactly. |
value* | Matches the start of the field. |
*value | Matches the end of the field. |
*value* | Matches if the field contains the value. |
Asset Association controls credential injection only. It does not control who can see or check out an account. The Inject and Inject and Checkout roles do that.
Credential injection works with the Jump Client, Remote RDP, Remote Jump, SSH, Database Connection, and Website connection types. It does not work with personal Assets, or with TCP tunnel and IP tunnel database connections.
8. Configure session policies
Session policies control what users can do once they are connected.
- Go to Users & Security > Session Policies, and add a policy.
- Set Availability to say where the policy can be applied: to users, to Assets, or to access invites.
- Set your permissions. Leave a permission as Not Defined if you want a lower policy to decide it.
- Use the Session Policy Simulator to confirm the result before you roll it out.
For information on how the order of session policies and group policies works, see Understanding session and group policies.
9. Install the access console
Finally, get your users the app they will actually use.
- Go to Consoles & Downloads.
- Choose the platform and download the access console.
- For a large rollout, install the MSI silently with
msiexec.
The desktop console has every feature but only runs on the computer it was downloaded to. The privileged web access console runs in any browser, but it does not include features that need deep access to the operating system.
Users must sign in to the desktop console at least once before you upgrade the appliance. Otherwise the console cannot update itself.
For more information, see Consoles and downloads.
10. Back up your configuration
Go to /login > Management > Software, set a backup password, and download your configuration backup. Download your Vault encryption keys as a separate file. Repeat this every time you change your settings. You need both files to restore PRA to a new appliance.
Next steps
- Onboard your third parties with Vendors and Access invite.
- Walk through a real task with Add a Jump Client to an endpoint.
- Confirm your systems are covered in Supported platforms.
- Send session data to your SIEM with Syslog.
- Look up any term you are unsure about in the Privileged Remote Access Glossary.
Updated about 1 hour ago
