Management | PRA Pathfinder
What is the Management page?
The Management page is where administrators can view and manage installed software, including updates and configurations for their BeyondTrust deployment. This page provides options for checking for software updates and ensuring the system runs the latest, most secure version.
How is the Management page useful?
The Management page allows administrators to maintain the software environment by providing the tools needed to update and monitor the health of their deployment, ensuring that all components are up to date and functioning properly.
How do I access the Management page?
- Sign into app.beyondtrust.io.
The BeyondTrust Home page displays. - From the main menu, click Privileged Remote Access > Management.
The Management page opens and the Software tab displays by default.
The Management page
- Left menu: Easy access to all pages in Privilege Remote Access, including Status, Consoles & Downloads, My Account, Configuration, Asset Management, Vault, Console Settings, Users & Security, Reports, Management, and Appliance pages.
- Status: Opens the Status page.
- Header: Change your tenant site, manage your profile, and access documentation.
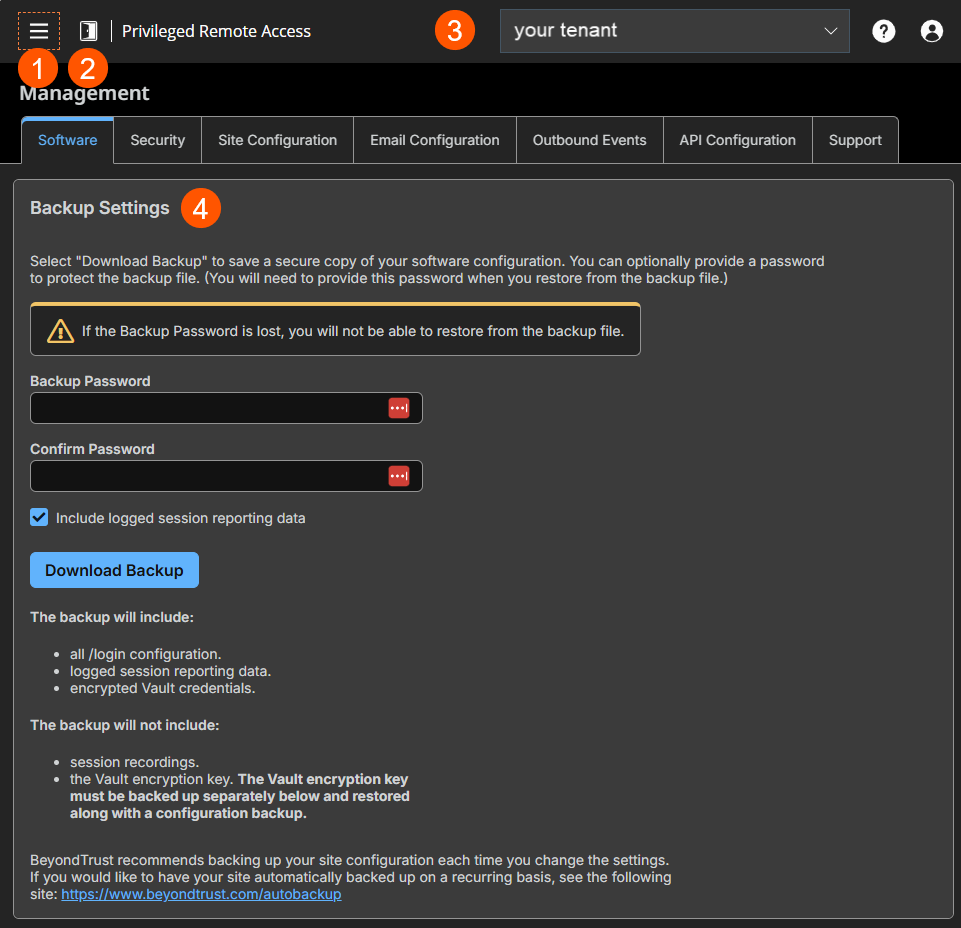
- Backup settings: Create passwords to backup your software configuration.
What does a backup include and not include?
| Backup Includes | Backup does NOT include |
|---|---|
| All PRA Support for Admins configuration. | Session recordings |
| Logged session reporting data. | The Vault encryption key ℹ️ The Vault encryption key must be backed up separately below and restored along with a configuration backup. |
| Encrypted Vault credentials |
Create a backup
It is an important disaster recovery best practice to save a backup copy of your software settings regularly. BeyondTrust recommends backing up your B Series Appliance configuration each time you change its settings. In the event of a hardware failure, a backup file speeds time-to-recovery and, if necessary, allow BeyondTrust to provide you access to temporary hosted services while retaining the settings from your most recent backup.
- Sign into app.beyondtrust.io.
The BeyondTrust Home page displays. - From the main menu, click Privileged Remote Access > Management.
The Managment page opens and the Software tab displays by default. - From Backup Password, create a password to password protect your software backup file. If you do choose to set a password, you cannot revert to the backup without providing the password.
- From Confirm Password, enter the password you created in step 3.
- For Include logged history reporting data, if selected, then your backup file includes session logs. If clear, session reporting data is excluded from the backup.
- Click Download Backup to create a secure copy of your software configuration. Save this file in a secure location.
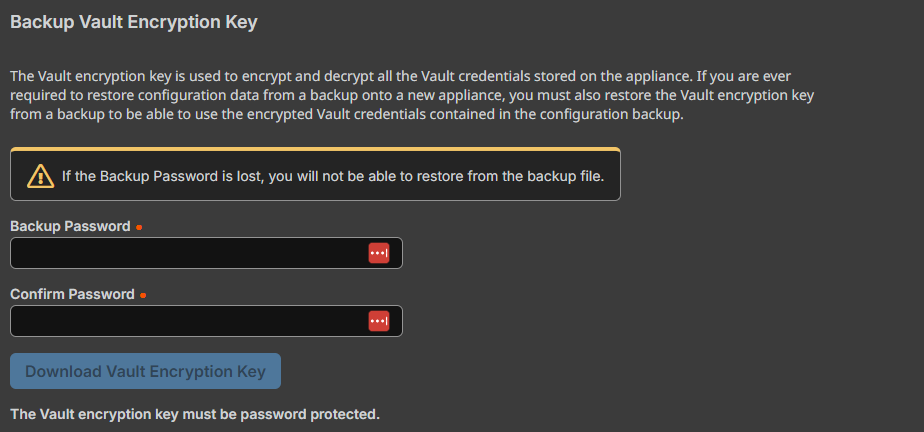
Backup Vault encryption key
The Vault encryption key is used to encrypt and decrypt all the Vault credentials stored on the B Series Appliance. If you are ever required to restore configuration data from a backup onto a new B Series Appliance, you must also restore the Vault encryption key from a backup to be able to use the encrypted Vault credentials contained in the configuration backup.
- Sign into app.beyondtrust.io.
The BeyondTrust Home page displays. - From the main menu, click Privileged Remote Access > Management.
The Managment page opens and the Software tab displays by default. - From Backup Password, create a password to password protect your Vault encryption key. If the Backup Password is lost, you are not able to restore from the backup file.
- From Confirm Password, enter the password you created in step 3.
- Click Download Vault Encryption Key to create a secure copy of your Vault encryption key. Save this file in a secure location.
The Vault encryption key must be password protected.
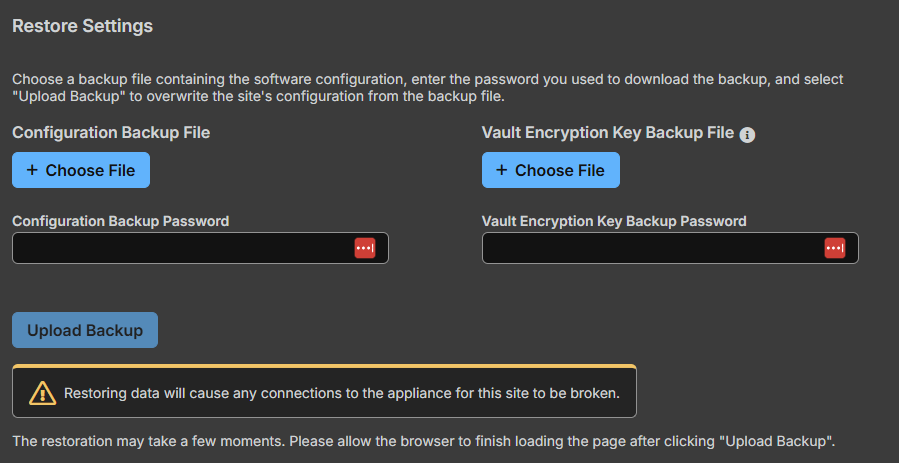
Restore settings
- Sign into app.beyondtrust.io.
The BeyondTrust Home page displays. - From the main menu, click Privileged Remote Access > Management.
The Managment page opens and the Software tab displays by default. - From the Restore Settings section, select the Configuration Backup file, click +Choose File and then enter the Configuration Backup Password you created in step 3 in the Create a backup section.
- From the Restore Settings section, select the Vault Encryption Key Backup file, click +Choose File and then enter the Vault Encryption Key Backup Password you created in step 3 in the Backup a Vault Encryption key section.
- Click Upload Backup.
Restoring data will cause any connections to the appliance for this site to be broken.
Upload update
Select a software update file to manually upload new software packages from BeyondTrust. You must confirm that you wish to upload the software package. The Uploaded Update section displays additional information to verify your uploaded package. Click Install if you wish to complete the installation process, or Delete Update if you wish to clear the update staging area. If your update package only contains additional licenses, you can install the update without restarting the B Series Appliance. After confirmation that you wish to install, the page displays a progress bar to notify you of the overall installation progress. Updates made here automatically update all sites and licenses on your B Series Appliance.
Your B Series Appliance administrator can also use the Check for Updates feature of the B Series Appliance interface to automatically search for and install new software packages.
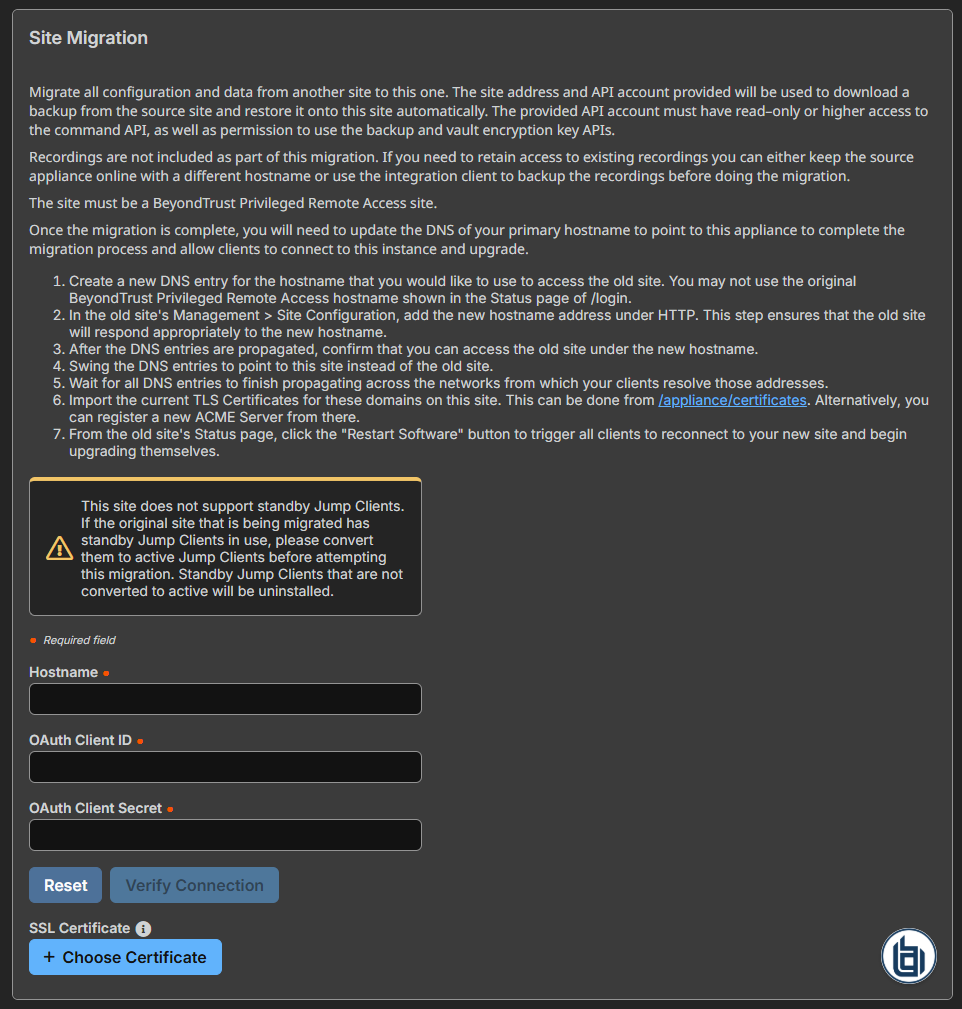
Site Migration
Site migration allows you to migrate configuration settings and data from another BeyondTrust Privileged Remote Access site. For example, migration can be used to move from an on-premises installation to a cloud installation. Migration uses an API account to automatically download and restore a backup.
Prerequisites for migration
Before you migrate the data, observe the following prerequisites and conditions:
- The API account needs read-only or higher access to the command API, and access to the backup and Vault encryption key APIs.
- The administrator needs access to the local admin account to sign in, in case security providers do not reconnect properly after the migration.
- If the source site version is earlier than 21.2, the Vault encryption key must be migrated manually.
- Recordings are not included as part of migration. To retain access to existing recordings, keep the source online with a different host name or use the integration client to back up the recordings before migration.
- After the data has been migrated, additional steps are required to make the new instance fully functional. These steps are listed on the Site Migration panel, and are summarized below:
- Create a new DNS entry for the host name to access the old site.
- Add the new host name to the old site public portal.
- Confirm access to the old site.
- Allow time for DNS entries to propagate across networks.
- Click the Restart Software button on the old site to upgrade clients to use the new site.
This site does not support passive Jump Clients. If the original site that is being migrated has passive Jump Clients in use, convert them to active Jump Clients before attempting this migration. Passive Jump Clients that are not converted to active will be uninstalled.
Data migration
- Enter the following information about the source site to start a migration:
- Hostname
- OAuth Client ID
- OAuth Client Secret
- Once the information is entered, click Verify Connection.
- A pop-up notification verifies the connection and that the site version is supported.
- Reset can be clicked at any time before starting the migration, if changes are required.
- If applicable, click +Choose Certificate to select the SSL Certificate for a self-signed SSL certificate.
- Certificates must be in PEM, DER, or CRT format.
- An option to Automatically begin site migration is available once the connection is verified. Check this option to bypass some of the steps and notifications that follow. If checked, click Retrieve Backup and respond to the notifications to complete the migration.
- Review displayed information, and if correct, click Retrieve Backup. If not correct, click Reset.
- Pop-up confirmation messages appear for the backup file and, if applicable for your version, the Vault encryption key. The file names display on the panel, as well as a Migrate Site button.
- Click Migrate Site.
- A pop-up notification warns that a local account is required, and a second pop-up warns that the migration overwrites data on the current site. Then a Migration in Process message displays.
- When the migration completes, click Yes in the pop-up notification to reset the site. Sign in again to view the migrated data.
- Complete the post-migration steps listed on the Site Migration panel.
Updated 14 days ago
