Vendors | PRA On-prem
What are vendors?
Vendors are third-party users who are granted controlled access to your systems for tasks like support, maintenance, or other necessary operations.
How are they useful to my organization?
Vendors enable you to securely collaborate with external parties by granting access through configurable vendor groups, with support for up to 500 groups.
How do I access the Vendors page?
- Use a Chromium-based browser to sign in to your Remote Support URL.
This URL is provided in the BeyondTrust welcome email and includes your site URL followed by /login. - From the left menu, click Users & Security.
The Users page opens and displays by default. - At the top of the page, click Vendors.
The Vendors page displays.
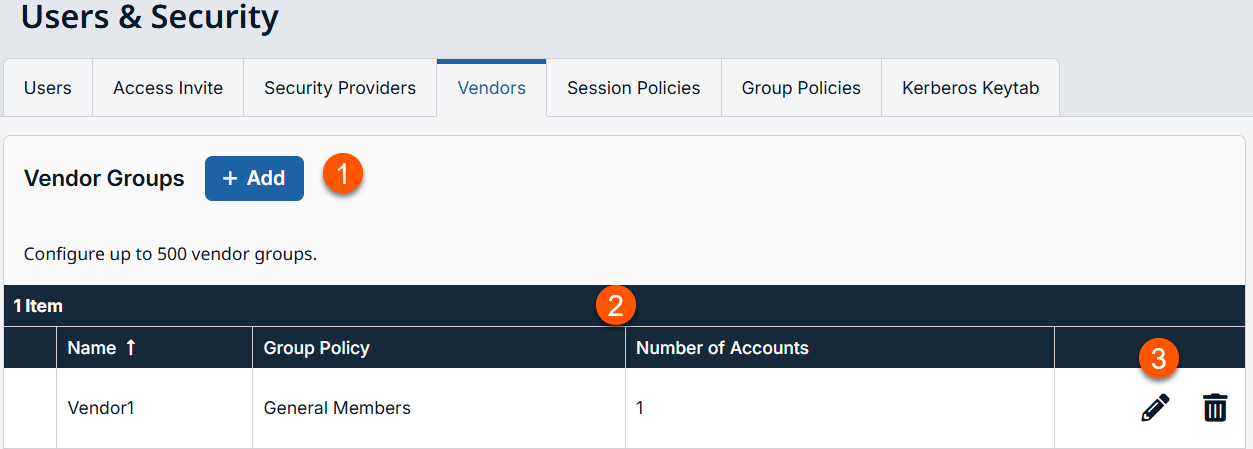
- Add: Adds a new vendor group.
- Vendors Group columns: The list of Vendors Group columns.
Vendors Group columns
- Name: Unique name of the special action.
- Group Policy: The group policy name that authenticates with the vendor.
- Number of Accounts: Administrative accounts associated with the vendor.
- Special Actions list options: Edit or delete a vendor group.
Add new vendor group
- Use a Chromium-based browser to sign in to your Remote Support URL.
This URL is provided in the BeyondTrust welcome email and includes your site URL followed by /login. - From the left menu, click Users & Security.
The Users page opens and displays by default. - At the top of the page, click Vendors.
The Vendors page displays. - Click Add.
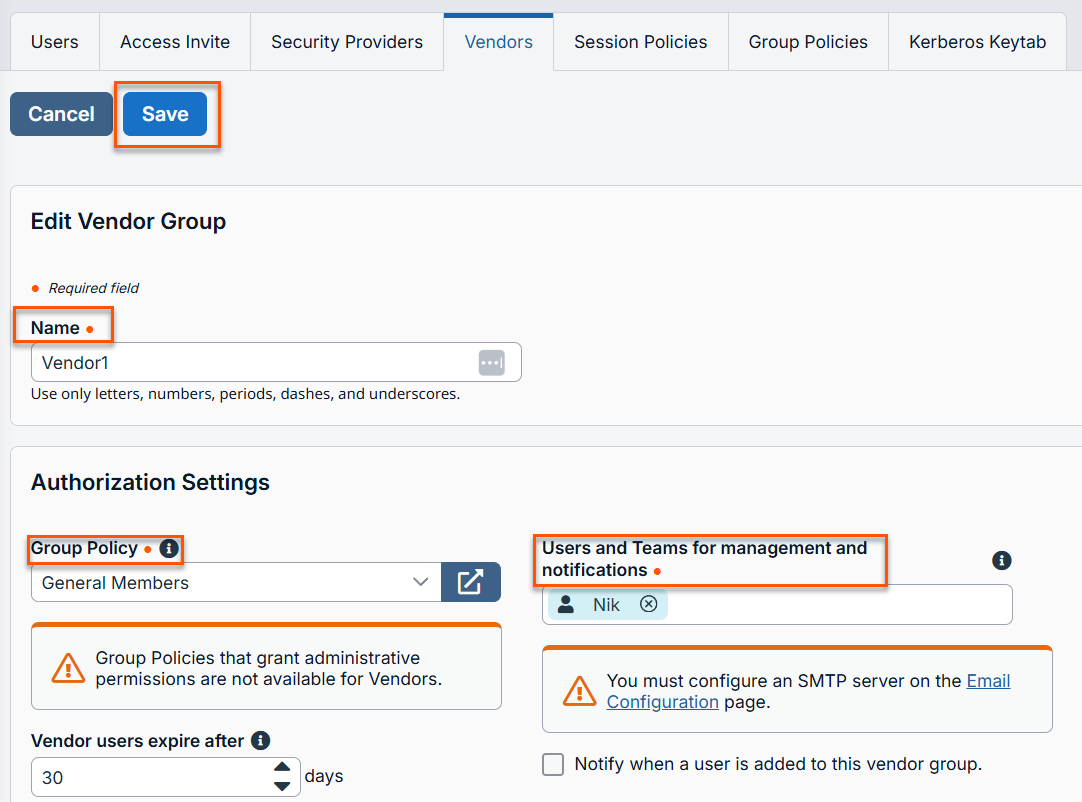
The Add new Vendor Group displays. - For Name, enter a unique group name.
- In the Authorization Settings section, set the options to the following values:
Group Policy
- The selected group policy defines the permissions, memberships, and other settings to all users authenticating with this vendor. These settings cannot be changed on a per-user basis. Select a policy from those available or go to Users and Security > Group Policies to create a new one.
Group policies that grant administrative permissions are not available for vendors.
Vendor users expires after
- Vendor user accounts expire after the given number of days from their creation. After expiration, they will not be able to log in until the PRA User or a vendor admin extends their account's expiration time.
- The vendor account is deactivated according to this setting, regardless of the options selected for the selected group policy Account Expiration.
- The hook runs every hour. Expiration is calculated from the time the access was approved or extended. Once the allotted time has passed, the item is marked as expired during the next hourly hook run.
Automatically delete expired users
- Vendor user accounts that have expired are automatically deleted after the given number of days since their expiration.
Users and Teams for management and notifications
- You can select up to 10 users and teams to manage vendor users in this group and some self-registration portal settings. These users and teams receive all configured notifications for this vendor group if they have valid email addresses.
The configuration settings are:
- Notify when a user is added to this vendor group
- Notify when a user has expired in this vendor group
- Notify when a user has expired or has been automatically deleted in this vendor group (displays when the Automatically delete expired user checkbox is selected
- Require approval to activate users in this vendor group
- Require approval to extend or reactivate users in this vendor group
- Email if users are awaiting action after
Network Restrictions
Network address allow list
Enter network address prefixes, one per line, in the formats shown in the examples. Netmasks are optional, and they can be given in either dotted-decimal or integer bitmask format. Entries that omit a netmask are assumed to be single IP addresses.
Vendor portal settings
You can customize the vendor self-registration portal users see when they register.
Changes are not applied until after the vendor group is saved.
Enable Vendor Portal
Check the box to enable the vendor portal. This feature can only be turned on after selecting a group policy under Authorization Settings.
Upload logo
Click to upload a logo. This can be your logo, or the vendor's logo, depending on your needs and preferences. For best results use an image that is 128x128 pixels.
Branding colors
You can apply two accent colors and one background color:
- Accent Color 1: Controls the section header background color, border color, and dark text color.
- Accent Color 2: Controls the link color, button background color, and the language globe color.
- Background Color: Controls the page background color and light text color.
TipClick Revert to Default if you do not want to keep the changes you made.
Portal Instructions
Enter the text to be displayed to users when they register in the self-registration portal.
Email Subject
This is the email subject that users see when they receive their confirmation email, after they have registered through the self-registration portal.
Email Body
Enter the text for the confirmation email sent to users after they submit the registration form.
Vendor Portal URL
Enter the URL for the users' registration site.
Email Domain Allow List
You can restrict email addresses to the domains listed here when users register through the portal. Enter one email domain per line. Commas and spaces are prohibited. If not provided, there are no restrictions on allowed email addresses.
Configurable Slug
Enter the URL slug for your site. By default, this is a randomly generated string.
When you are done, click Preview Vendor Portal to see how the portal looks.
Add vendor administrator
Vendor administrators
After you click Save on the newly created vendor group, you are notified that all vendor groups must have one user assigned as vendor administrator. You can either click Proceed to assign a vendor administrator or add the admin user later from the Vendors page.
Vendor admins cannot add other vendor admins.
Add user
To add an administrator to the vendor group after the initial save, do the following:
- Click Proceed.
- For Username, enter a valid user name.
- For Display Name, enter the name you want to display.
- For Email Address, enter a valid email address.
- For Password, enter a valid password that is associated with the email address in step 4.
- For Confirm Password, enter the same password in step 5.
- Click Save.
- When you add a vendor admin, ensure the Vendor Group Administrator box is checked.
- When Email Password Reset Link to User is checked, vendor admins can send password reset links to users. The reset link expires 24 hours after the email is sent. The expiration time cannot be changed.
Edit a vendor group
- Use a Chromium-based browser to sign in to your Remote Support URL.
This URL is provided in the BeyondTrust welcome email and includes your site URL followed by /login. - From the left menu, click Users & Security.
The Users page opens and displays by default. - At the top of the page, click Vendors.
The Vendors page displays. - From the vendor group table, select a group.
- Click the pencil to edit the group.
- Make the necessary changes and click Save.
Delete a vendor group
- Use a Chromium-based browser to sign in to your Remote Support URL.
This URL is provided in the BeyondTrust welcome email and includes your site URL followed by /login. - From the left menu, click Users & Security.
The Users page opens and displays by default. - At the top of the page, click Vendors.
The Vendors page displays. - From the vendor group table, select a group.
- Click the trash can to delete the group.
- Click Yes when the confirmation dialog box displays.
Updated 14 days ago
