Security | PRA Pathfinder
What is the Security page?
The Security page provides options for configuring security-related settings within your BeyondTrust deployment. It includes features for managing user authentication, session security, and other security controls to ensure that access is protected and policies are enforced.
How is the Security page useful?
The Security page is essential for administrators to implement and manage security measures across the system, such as authentication methods and session policies. It helps protect sensitive data and ensures that user access aligns with organizational security requirements.
How do I access the Security page?
- Sign into app.beyondtrust.io.
The BeyondTrust Home page displays. - From the main menu, click Privileged Remote Access > Management.
The Management page opens and the Software tab displays by default. - Click the Security tab.
The Security tab displays.
The Security page
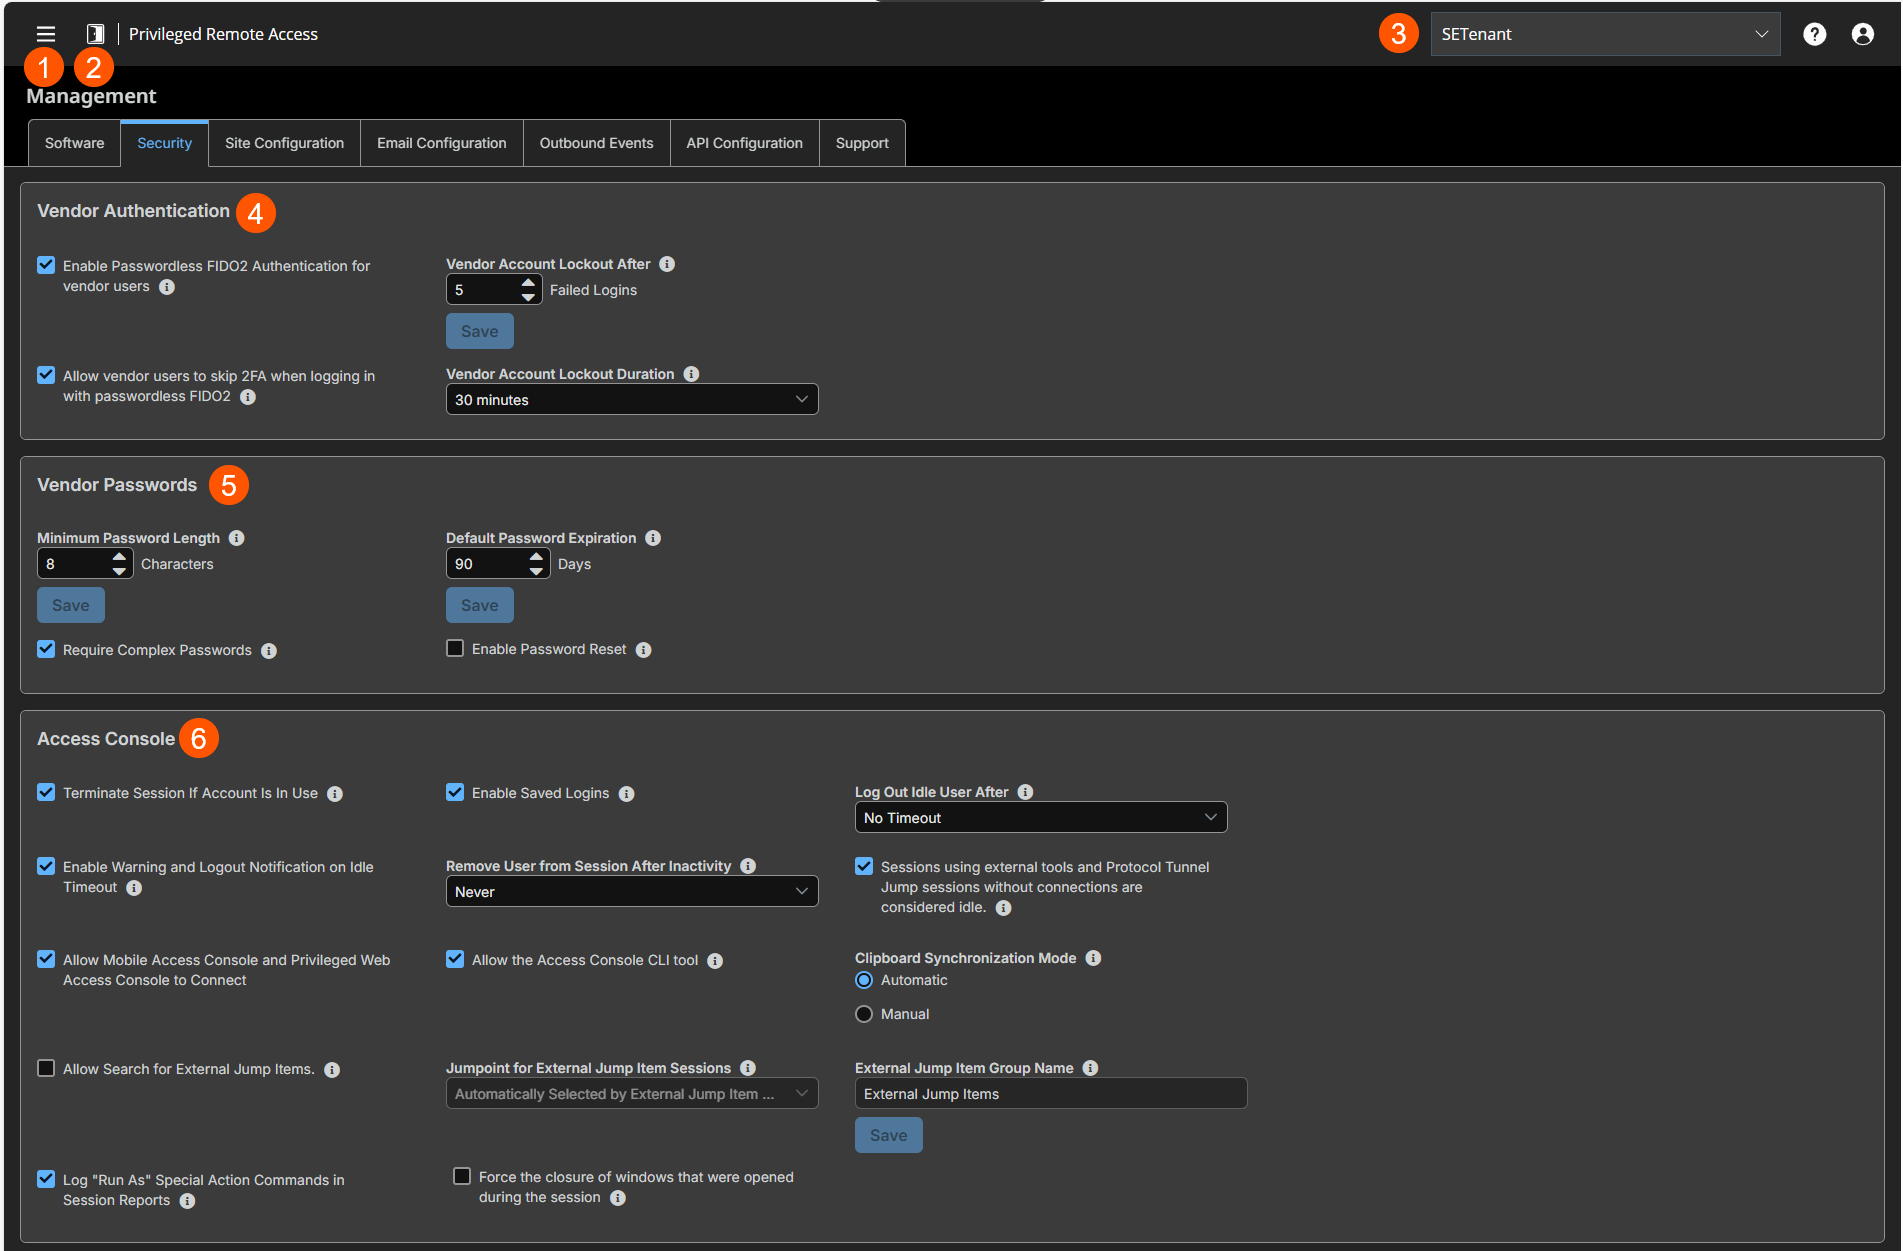
- Left menu: Easy access to all pages in Privilege Remote Access, including Status, Consoles & Downloads, My Account, Configuration, Asset Management, Vault, Console Settings, Users & Security, Reports, Management, and Appliance pages.
- Status: Opens the Status page.
- Header: Change your tenant site, manage your profile, and access documentation.
-
Vendor Authentication: Settings for authentication.
-
Vendor Password: Set password for vendor accounts.
-
Access Console: Settings for Access Console.
How to configure the security settings
Vendor Authentication
Default authentication method
The default authentication method is OIDC Credentials. If the Enable Passwordless FIDO2 Authentication for vendor users checbox is selected, then Passwordless FIDO2 is available for the default authentication method. If Passwordless FIDO2 authentication is selected, either authentication method can be selected when you sign in.
Enable Passwordless FIDO2 authentication
This feature allows users from the local security provider or vendor users to register and log in with FIDO2-certified authenticators rather than a password. FIDO2 authenticator devices must support CTAP2 and be able to perform user verification using biometrics or a PIN.
Clearing this feature does not remove previously registered authentications. If it is necessary to remove those, they must be deleted before the feature is disabled.
Users with registered passwordless authentication can continue to log in using their username and password. This can be useful if they need to log in using a device that does not support passwordless authentication.
This feature cannot be limited to specific users or user groups.
Vendor Account Lockout After
This setting sets the number of times an incorrect password can be entered before the account is locked out.
Vendor Account Lockout Duration
This setting sets how long a locked-out vendor must wait before being allowed to reattempt login. Alternatively, require an admin to unlock the account.
Allow local users to skip 2FA when logging in with passwordless FIDO2
When this setting is enabled, if a local user has set up both Two Factor Authentication and Passwordless FIDO2 Authentication, and the user logs in using passwordless FIDO2, the user is not prompted to enter a second factor code from their authenticator app. The user is still prompted for a second factor code if they log in using a password.
Vendor Passwords
Minimum Password Length
This setting sets rules for vendor accounts regarding the length of passwords. The default value is 8 characters.
Require Complex Passwords
This setting enforces that a vendor user's password contains at least one uppercase letter, one lowercase letter, one number, and one special character.
Default Password Expiration
This setting sets the default number of days after which new passwords for vendor users will expire.
Enable Password Reset
This setting allows vendor users with email addresses to reset forgotten passwords. The link provided in password reset emails are valid until one of the following events occurs:
- 24 hours has elapsed.
- The link is clicked, and the password is successfully reset.
- The system sends another link to the email address.
Access console
Terminate session if account is in use
If a user tries to log into the access console with an account already in use, a checked Terminate Session box disconnects the previous connection in order to allow the new login.
Enable Saved Logins
This setting allows the Access Console to securely save a vendor user's account information instead of requiring them to enter their account information each time they log in.
Log out idle user after
This setting sets the length of time after which an inactive user is logged out of the access console to free the license for another user. If the Sessions using external tools and Database Connection sessions without connections are considered idle checkbox is selected, then Shell and Remote RDP sessions using external tools and Database Connection sessions will be considered as idle if there is nothing connected to the open tunnel.
Enable Warning and Logout Notification on Idle Timeout
This setting sets this option to show a notification to an idle user 30 seconds before a logout is set to occur. The user also receives another notification when the logout has occurred.
Remove User from Session after Inactivity
This option effectively removes a user out of a session after the period of inactivity you select. This helps BeyondTrust customers meet compliance initiatives with inactivity requirements. The user is notified one minute prior to removal and may reset the timeout.
A user is considered active in a session if any files are being transferred, whether through the file transfer tab or the chat interface, or if they click the mouse or press a key in the session tab. Mouse movement by itself does not count as activity. As soon as activity stops, the inactivity timer begins.
Allow Mobile Access Console and Privileged Web Access Console to Connect
This setting gives users the option of accessing remote systems through the BeyondTrust access console app for iOS and Android, as well as through the privileged web access console, a browser-based access console.
Allow the Access Console CLI tool
This setting allows users to use the Access Console Command Line Interface (CLI) tool.
Clipboard synchronization mode
Clipboard Synchronization Mode determines the clipboard synchronization mode across all sessions in the Desktop Access Console. You must restart the software on the status page for this setting to take effect. The available settings are as follows:
- Automatic: The endpoint and user's clipboards are automatically synchronized when one or the other changes.
- Manual: The user has to click one of the clipboard icons on the access console to either send content to or pull content from the endpoint's clipboard.
Admins can prevent users from accessing the clipboard, can allow users to send data to the endpoint, or can allow users to have access in both directions (send and receive data). These settings control which clipboard icons the user sees in the access console when Manual mode is selected, as well as how the synchronization flows in Automatic mode.
Granular control of access to the clipboard can be set for session policies and group policies, as well as granted to specific users. See the links below for each particular case:
- Users: Add User Permissions for a User or Admin: Users and Security > Users > Add > Session Permissions > Clipboard Synchronization Direction
- Session Policies: Set Session Permission and Prompting Rules: Users and Security > Session Policies > Add > Permission > Clipboard Synchronization Direction
- Group Policies: Apply User Permissions to Groups of Users: Users and Security > Group Policies > Add > Session Permissions \Session Policy > Clipboard Synchronization Direction
Allow Search for external Assets
This enables Asset searching in Password Safe, when Privileged Remote Access (PRA) has a Password Safe integration and a fully configured Endpoint Credential Manager (ECM).
You must restart the software for this setting to take effect. When enabling or disabling this setting, you are prompted to restart now or restart later from the Status page in PRA Support for Admins.
Gateway for external Asset sessions
This setting is available only when the Allow Search for External Assets checkbox is selected. All sessions started from external Assets are performed through the Gateway selected here, or in the case where multiple Gateways are deployed on endpoints across segmented networks, the Gateway used may be selected automatically by matching against an External Asset's Network ID. A Gateway must be positioned on the network to have connectivity to potentially any of the External Assets returned by the ECM.
Select the Gateway to use for external Asset sessions from the dropdown list of available Gateways, or leave the default selection of Automatically Selected by External Asset Network ID to allow PRA to determine which Gateway handles the session.
- The External Asset Network ID is an attribute you must set on the Gateway from Asset Management > Gateway in Admin interface. It is equivalent to the Workgroup attribute on managed systems in Password Safe. Its value is matched against the Network ID property for external Assets returned by the ECM to determine the Gateway to handle a session.
External Asset Group Name
This setting is available only when the Allow Search for External Assets option is checked. Optionally, enter a name for the external Asset Group, or leave the default option of External Assets. The name supplied by this setting displays as the group name on Assets found as a result of an external search. Click Save if you have modified the default group name.
You must restart the software on the status page for changes to this setting to take effect.
Log "Run As" Special Action Commands in Session Reports
When this checkbox is selected, it results in all "Run As" commands to be logged, including their parameters.
WarningSince the entire command is logged, any credentials passed as a command parameter are logged.
Force the closure of windows that were opened during the session
Set this option to force closure of windows opened during an elevated session. This ensures all windows are closed when a session ends.
This option is for elevated Windows sessions only.
Important informationThis setting is off by default. Setting this option may cause loss of data if information is not saved. Ensure you save your data during the session.
Miscellaneous
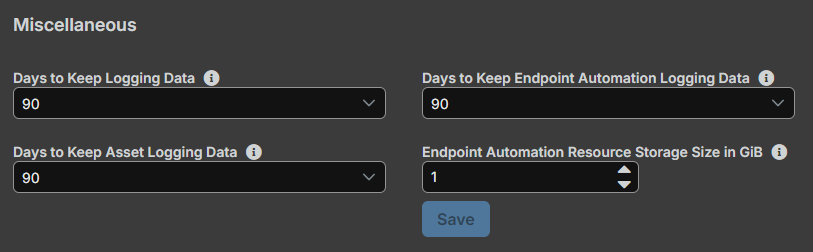
Days to Keep logging Data
In the Days to Keep Logging Data setting, you can set how long logging information should be stored on the B Series Appliance. This information includes the session reporting data and recordings. The maximum duration for which session reporting data and recordings can be retained on a B Series Appliance is 90 days. This is the default value in a new installation. It is possible that session recordings for some sessions within the retention time frame are not available. This could be caused by disk space constraints or the Days to Keep Logging Data setting.
The BeyondTrust Appliance B Series runs a maintenance script every day that ensures disk usage does not exceed 90%. Should this be exceeded, the script begins deleting session recordings based on a formula until the disk usage is less than 90%. If the Days to Keep Logging Data setting was recently changed, the new setting may take up to 24 hours to go into effect.
Recording availability is not guaranteed for the full log retention period, and storage capacity is tied to the size of your licensed appliance.
Days to keep Endpoint Automation logging data
This setting defines how long finished Endpoint Automation job data remains on the appliance. Since data is purged once daily, it may remain accessible for up to 24 hours beyond the selected timeframe.
Days to Keep Asset logging information
This setting chooses how long Asset reporting data will be accessible from the appliance. Because data is purged only once a day, it may actually be accessible for up to 24 hours beyond what is selected here.
Endpoint Automation Resource Storage Size in GiB
This setting specifies the maximum amount of storage in gibibyte (GiB) available for endpoint automation resources.
Network restrictions
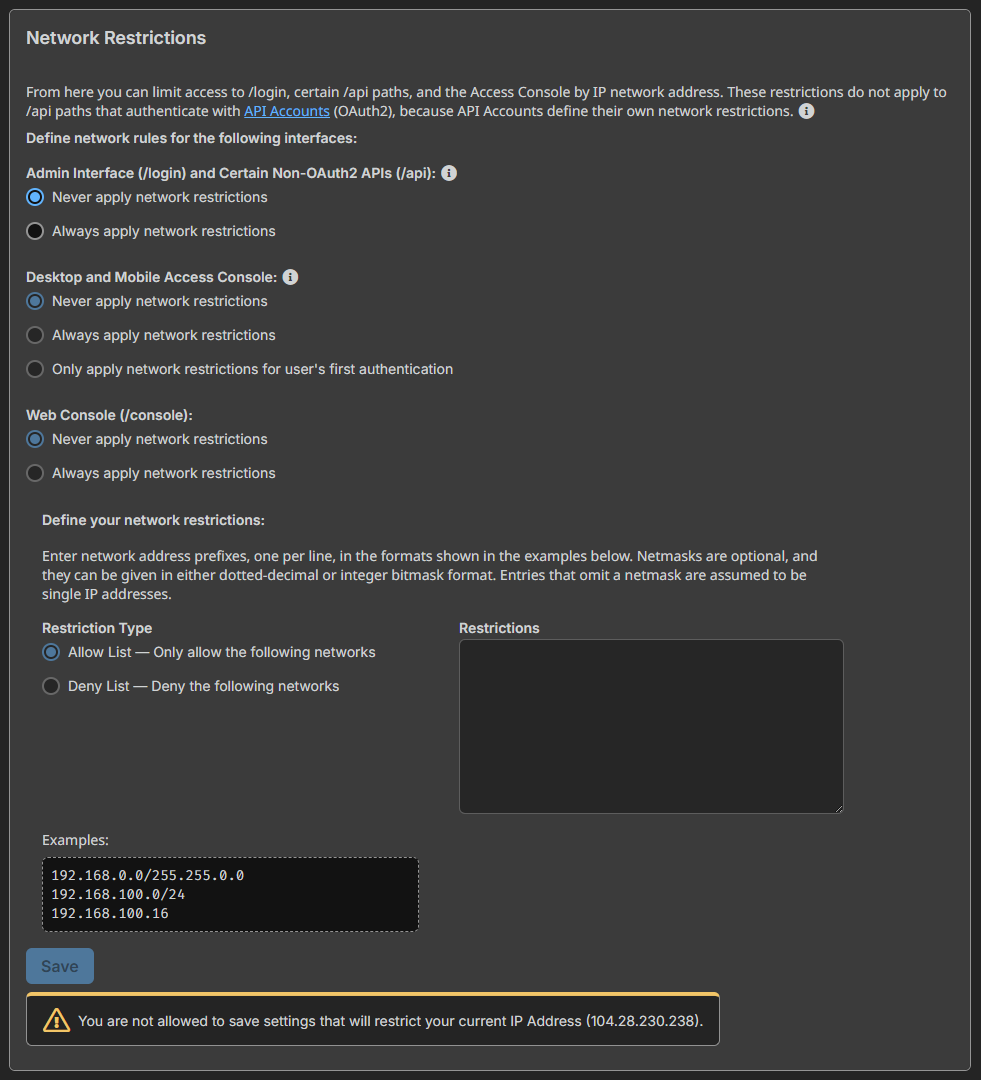
Determine which IP networks should be able to access Admin interface, /api, and the BeyondTrust access console on your Appliance. If you enable network restrictions, you can also enforce the networks on which access consoles may be used.
Admin interface (/login) and API interface (/api)
- Always apply network restrictions: when this is selected, the option to create an Allow list containing only allowed networks, or a Deny list containing networks that are denied access is available. When this option is selected, you can determine which restrictions, if any, should apply to the desktop, mobile, and web access consoles.
- Never apply network restrictions: when this is selected, no restrictions are applied and no other options are available to apply restrictions to the desktop, mobile, and web console.
Desktop and mobile access console
- Always apply network restrictions: when this is selected, it inherits the network restrictions entered for the Admin interface.
- Never apply network restrictions: when this is selected, no restrictions are applied to the desktop and mobile consoles, but you have the option to apply restrictions to the web access console.
- Only apply network restrictions for user's first authentication: this applies restrictions selected above, but only when the user first logs in.
Guest Users using the Access Invite feature are not subject to these network restrictions.
Web console (/console)
- Always apply network restrictions: when this is selected, the web access console inherits the restrictions entered for the admin interface.
- Never apply network restrictions: when this is selected, no restrictions are applied to the web access console, even if restrictions are in effect for the other access console methods.
Port restrictions for administrative web interface
This feature is available only to customers who own an on-premises BeyondTrust Appliance B Series. BeyondTrust Cloud customers do not have access to this feature.
Set the ports through which your Admin interface can be accessed.
Proxy configuration
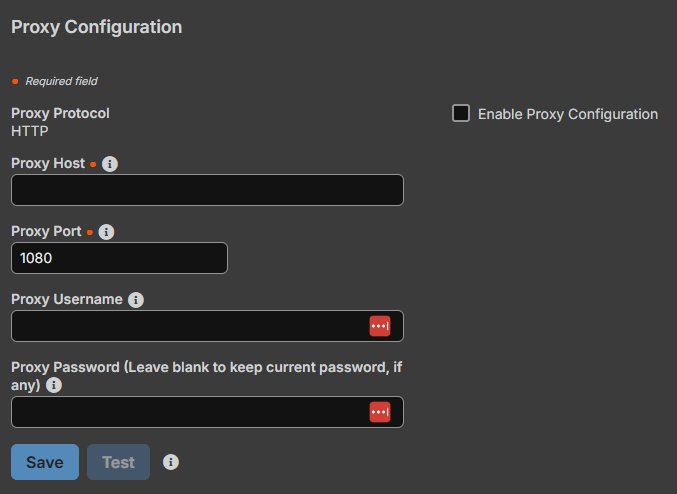
Configure a proxy server to control the dataflow for information sent from the Appliance. This applies to outbound events and API calls.
Proxy Protocol
Configure HTTP or HTTPS proxy types for outbound connectivity from the B Series Appliance.
Enable Proxy Configuration
Select the checkbox to enable the outbound proxy settings.
Proxy Host
Enter the IP address or hostname of your proxy server.
Proxy Port
Enter the port your proxy server uses. The default port is 1080.
Proxy Username
If your outbound proxy server requires authentication, enter a username and password.
Proxy Password
If your outbound Proxy Server requires authentication, enter a username and password.
Test
Click Test to ensure configuration settings are entered correctly. The current test result displays in the Last Test Result area. Error messages indicate where configuration settings must be corrected.
ICAP configuration

You can configure file transfers to pass through the Secure Remote Access Appliance and be scanned by an Internet Content Adaptation Protocol (ICAP) server. If the ICAP server indicates that a file is malicious, it is not sent to the destination.
File transfers cannot be sent to an ICAP server in the following scenarios: Database Connection-based file transfers, clipboard file transfers within RDP sessions, and external tool file transfers within RDP or Shell sessions. Even with ICAP enabled, these transfers are not scanned.
When you enable ICAP or change the ICAP URL, it requires you to restart the appliance to ensure clients are reconnected and properly configured. In an Atlas environment, a sync is required.
- Using ICAP reduces the performance of file transfers due to the added steps and scanning. If the ICAP server is down, file transfers fail.
- Improper ICAP configuration prevents Gateways from working correctly.
ICAP settings
- Sign into app.beyondtrust.io.
The BeyondTrust Home page displays. - From the main menu, click Privileged Remote Access > Management.
The Managment page opens and the Software tab displays by default. - Click the Security tab.
The Security tab displays. - From the ICAP Configuration section, enter the ICAP Server URL.
This is supplied by your ICAP server vendor. The default port is 1344. If you are using another port, it must be entered with the URL, in this format: icap://example.com:0000 or icaps://example.com:0000.
- If the protocol is icaps://, select Use a CA Certificate. Then click Choose a Certificate and upload the certificate.
- If you use a self-signed ICAPS certificate and you do not provide a CA certificate that can validate it, all session file transfers will fail.
- Expired or invalid certificates cause session file transfers to fail, regardless of whether a CA certificate is provided.
- Click Save before testing.
Test ICAP connection
After you enter and save the ICAP settings, click Test with a file and select a file to upload. The maximum file size is to test is 10 mebibyte (MiB). There are three possible results:
- A connection error. An error header and ICAP logs display (if available).
- A malicious file is detected. A warning header and response details display. The exact nature of the malicious content does not display.
- No problems are detected. The response details display.
Updated 3 days ago
