Credential injection | PRA for Web
When accessing a Windows-based Asset via the access console, you can use credentials from a credential store to log into the endpoint or to run applications as an admin.
Before using credential injection, make sure that you have a credential store or password vault available to connect to BeyondTrust Privileged Remote Access.
This feature is not supported for ARM-based Windows systems.
Install and configure the endpoint credential manager
Before you can begin accessing Assets using credential injection, you must download, install, and configure the BeyondTrust Endpoint Credential Manager (ECM). The BeyondTrust ECM allows you to quickly configure your connection to a credential store, such as a password vault.
The ECM must be installed on your system to enable the BeyondTrust ECM Service and to use credential injection in BeyondTrust Privileged Remote Access.
System requirements
- Windows Vista or newer, 64-bit only
- .NET 4.5 or newer
- Processor: 2GHz or faster
- Memory: 2GB or greater
- Available Disk Space: 80GB or greater
-
To begin, download the BeyondTrust Endpoint Credential Manager (ECM) from BeyondTrust Support.
-
Start the BeyondTrust Endpoint Credential Manager Setup Wizard.
-
Agree to the EULA terms and conditions. Check the box if you agree, and then click Install.
If you need to modify the ECM installation path, click the Options button to customize the installation location.
You are not allowed to proceed with the installation unless you agree to the EULA.
- Click Next on the Welcome screen.
- Choose a location for the credential manager, and then click Next.
- On the next screen, you can begin the installation or review any previous step.
- Click Install when you are ready to begin.
- The installation takes a few moments. On the Completed screen, click Finish.
- To ensure optimal up-time, administrators can install up to three ECMs on different Windows machines to communicate with the same credential store. A list of the ECMs connected to the appliance site can be found at /login > Status > Information > ECM Clients.
- When ECMs are connected in a high availability configuration, the BeyondTrust Appliance B Series routes requests to the ECM in the ECM Group that has been connected to the appliance the longest.
Install and configure the plugin
- Once the BeyondTrust ECM is installed, extract and copy the plugin files to the installation directory (typically C:\Program Files\BeyondTrust\ECM).
- Run the ECM Configurator to install the plugin.
- The Configurator should automatically detect the plugin and load it. If so, skip to step 4 below. Otherwise, follow these steps:
- First, ensure that the DLL is not blocked. Right-click on the DLL and select Properties.
- On the General tab, look at the bottom of the pane. If there is a Security section with an Unblock button, click the button.
- Repeat these steps for any other DLLs packaged with the plugin.
- In the Configurator, click the Choose Plugin button and browse to the location of the plugin DLL.
- Click the gear icon in the Configurator window to configure plugin settings.
Configure a connection to your credential store
Using the ECM Configurator, set up a connection to your credential store.
- Locate the BeyondTrust ECM Configurator you just installed using the Windows Search entry field or by viewing your Start menu programs list.
- Run the program to begin establishing a connection.
- When the ECM Configurator opens, complete the fields. All fields are required.
| Field Label | Value |
|---|---|
| Client ID | The ID for your credential store. |
| Client Secret | The secret key for your credential store. |
| Site | The URL for your credential store instance. |
| Port | The server port through which the ECM connects to your site. |
| Plugin | Click the Choose Plugin... button to locate the plugin. |
- When you click the Choose Plugin... button, the ECM location folder opens.
- Paste your plugin files into the folder.
- Open the plugin file to begin loading.
If you are connecting to a password vault, more configuration at the plugin level may be needed. Plugin requirements vary based on the credential store that is being connected.
Important informationTo apply new settings in the configuration, restart the ECM service.
Use credential injection to access endpoints
After the credential store has been configured and a connection established, the access console can begin using credentials in the credential store to log into endpoints.
- Sign in to the Access Console.
- Connect to an endpoint with an Asset installed as an elevated service on a Windows machine.
- Click the Play button to begin screen sharing with the endpoint. If the endpoint is at the Windows login screen, the Inject Credentials button is highlighted.
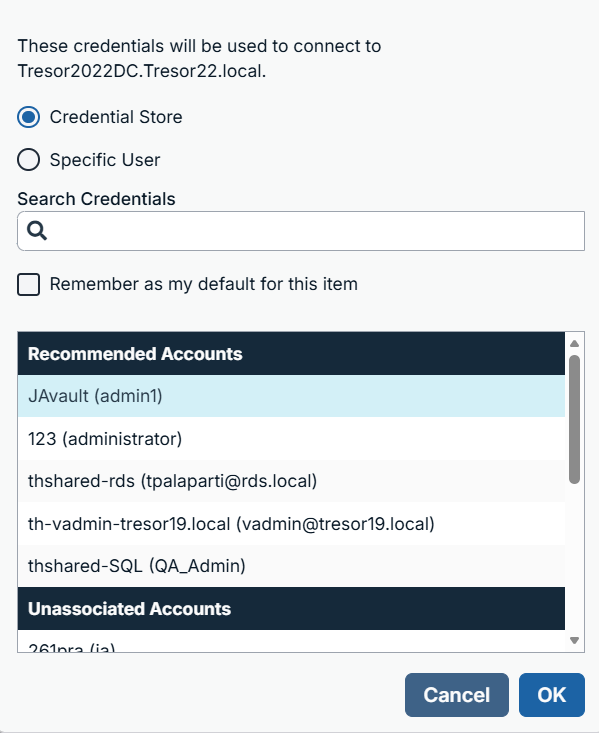
- Click the Inject Credentials button. A pop-up credential selection dialog appears, listing the credentials available from the ECM.
- Select the appropriate credentials to use from the ECM. The system retrieves the credentials from the ECM and injects them into the Windows login screen.
- The user is logged in to the endpoint.
Check in and check out credentials
From the access console, you can easily access the Privileged Remote Access Vault in the /login interface to check out and check in credentials when necessary, either during a session or on your local machine.
To access the vault, click the Actions dropdown in the top navigation bar and select View Vault Accounts. You are taken directly to the Vault > Accounts page in the /login interface, once logged in.
You can then locate and check out or check in a Vault account.
Updated 8 days ago
