Asset Management | PRA Cloud
Formerly known as Jump
What are Jump Clients?
Jump Clients are software agents installed on remote systems, enabling secure, unattended access to those systems for support or administrative tasks.
How are Jump Clients useful to my organization?
Jump Clients provide reliable, always-available access to remote systems, improving efficiency by allowing teams to resolve issues without requiring user intervention. They enhance security through encrypted connections and customizable access controls.
How do I access the Jump Clients page?
- Use a Chromium-based browser to sign in to your Privileged Remote Access URL.
This URL is provided in the BeyondTrust welcome email and includes your site URL followed by /login. - From the left menu, click Asset Management.
The Jump Clients page opens and displays by default.
The Jump Clients page
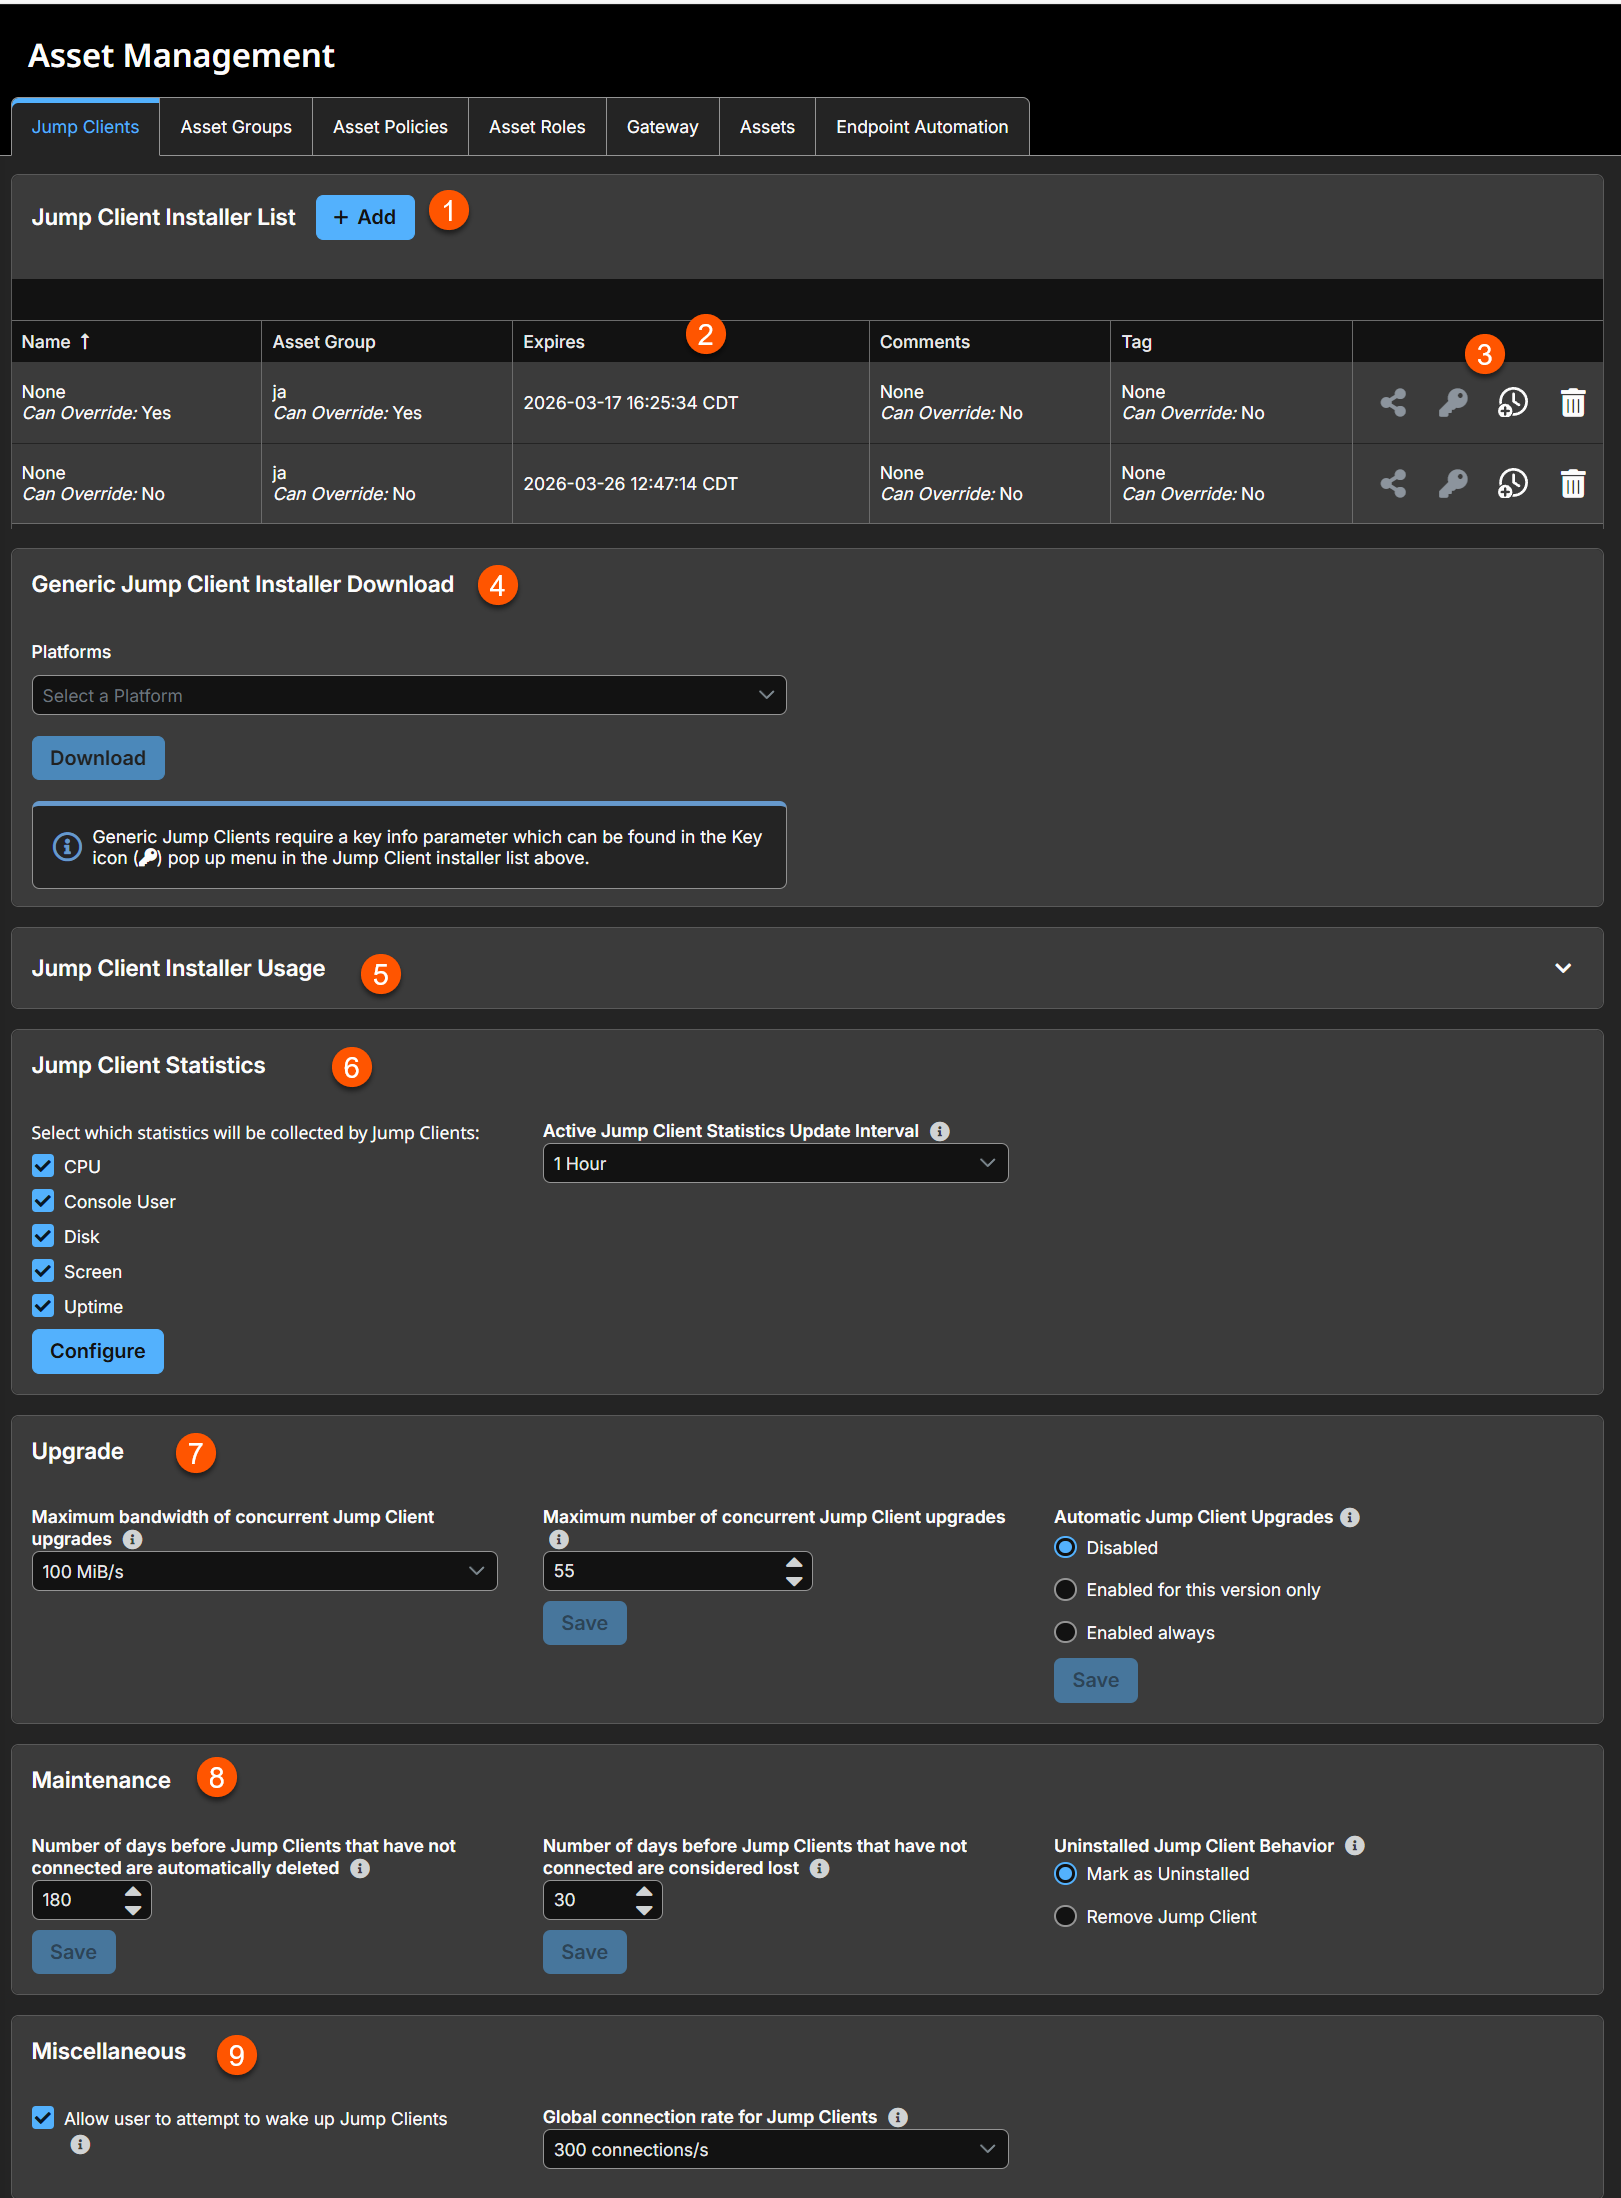
-
Add: Adds a new Jump Client.
-
Jump Clients columns: The list of Jump Clients.
Jump Clients columns
- Name: The identifier for the Jump Client.
- Asset Group: The group this Jump Client is assigned to, which controls access and organization.
- Expires: Defines how long the installer is valid. This is determined by the This Installer Is Valid For setting.
- Prompt if Elevating on Deploy: If the Jump Client prompts the user to enter administrative credentials during deployment for privilege escalation.
- Comments: Additional notes or context about the Jump Client’s purpose, configuration, or usage.
- Tag: Keywords or labels assigned to the Jump Client for easier filtering, searching, or categorization.
-
Jump Client options: You can download, show key information, extend the installer expiration, or delete a Jump Client installer.
-
Generic Jump Client Installer Download: Downloads a generic installer.
-
Jump Client Installer Usage: Command line help for large deployments.
-
Jump Client Statistics: Settings to gather statistics for Jump Clients.
-
Upgrade: Settings to control automatic upgrade of Jump Clients.
-
Maintenance: Settings to control maintenance of Jump Clients.
-
Miscellaneous: Setting to wake up Jump Clients via Wake on LAN (WOL).
Jump Client installer list
The Jump Client installer list shows existing Jump Client installers and the ability to add a new Jump Client. To add a new Jump Client, see Jump Client Mass Deployment Wizard.
A warning appears at the top of the list:
Installing more than one Jump Client as the same user or more than one Jump Client as a service on the same system is being phased out in a future release. In the Access Console you may use the copy action on a Jump Client to apply different policies to the same endpoint.
Click Dismiss to hide the message.
- Click
 and then select a platform to either download the installer, email the direct download link to recipients, or copy the direct download link to your clipboard.
 - Click
 and then select a platform to view the key info to be used with the generic Jump Client installer.
 - Click
 to change how long the installer is valid.
 - Click
 to delete the Jump Client installer. This does not delete any Jump Clients that use this installer.
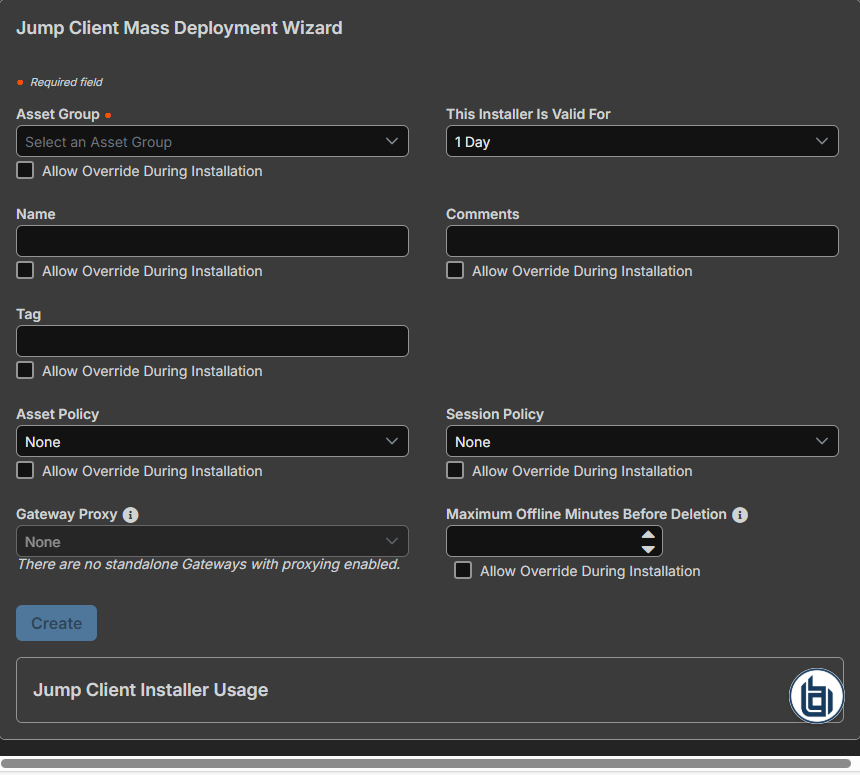
Jump Client Mass Deployment Wizard
To create a new Jump Client installer, click Add at the top of the Jump Client Installer List.
The Mass Deployment Wizard enables administrators and privileged users to deploy Jump Clients to one or more remote computers for later unattended access.
The only field that is required is Asset Group. After all fields have been completed, click Create.
Jump Client Mass Deployment Wizard fields
Allow override during installation: Some Mass Deployment Wizard settings allow override, enabling you to use the command line to set parameters that are specific to your deployment, prior to installation.
| Field Name | Description |
|---|---|
| Asset Group | From the Asset Group dropdown box, select whether to pin the Jump Client to your personal list of Assets or to an Asset Group shared by other users. Pinning to your personal list of Assets means that only you (and higher ranking roles on your team, such as Team Lead and Team Manager if you are a Team Member, and Team Manager if you are a Team Lead) can access this remote computer through this Jump Client. Pinning to a shared Asset Group makes this Jump Client available to all members of that Asset Group. |
| This installer is Valid For | The installer remains usable only as long as specified by the This Installer is Valid For dropdown. Be sure to leave adequate time for installation. If you attempt to run the Jump Client installer after this time, installation fails. You can extend the time the installer is valid by clicking Once a Jump Client has been installed, it remains online and active until it is uninstalled from the local system either by a logged-in admin user with appropriate permissions, by a user from the Asset Management Interface, or by an uninstall script. It can also be uninstalled, or extended, from the Jump Client Installer List. A user cannot remove a Jump Client unless the user is given appropriate permissions by their Remote Support admin. |
| Name | Enter a name for the Asset. This name identifies the item in the session tabs. This string has a maximum of 128 characters. |
| Comments | Add comments, which can be helpful in searching for and identifying remote computers. |
| Asset Policy | You can apply a Asset Policy to this Jump Client. Asset Policies are configured on the Asset Management > Asset Policies page and determine the times during which a user can access this Jump Client. If no Asset Policy is applied, this Jump Client can be accessed at any time. |
| Tag | Adding a tag helps to organize your Jump Clients into categories within the representative console. |
| Session Policy | Choose a session policy to assign to this Jump Client. The session policy assigned to this Jump Client has the highest priority when setting session permissions. |
| Gateway Proxy | When a Jump Client is first deployed, if it cannot connect to the Appliance, it searches the local network for a Gateway or Gateway cluster serving as a Proxy. This allows a Jump Client installed on a system without a native internet connection to use the Gateway to connect back to the Appliance. In the special case where the Jump Client and Gateway are not on the same local network or where a firewall blocks the Jump Client's attempt to connect to the Gateway, the Gateway Proxy setting allows you to set which Gateway the Jump Client should try to use as a proxy. This setting is used by Jump Clients that cannot use multicast DNS to retrieve proxy information from a Gateway. |
| Maximum Offline Minutes Before Deletion | The maximum number of minutes a Jump Client will be offline before it is deleted from the system. This setting will override the global setting if specified. |
Once you click Create, you can download the Jump Client installer immediately, copy the link for later use, or email the installer to remote users. Multiple recipients can install from the same link.
-
The Platform dropdown defaults to your operating system. Select a different platform if you plan to deploy on another OS.
-
Choose an option to download or distribute the Jump Client installer.
-
Download the installer immediately to run locally or distribute with a systems management tool.
-
Copy a direct download link or a cURL/wget/btapi command.
-
Email the installer link to one or more recipients.
-
-
Run the installer. The Jump Client attempts to connect to the B Series Appliance.
If successful, it appears in the Asset Management Interface of the representative console. If it cannot connect right away, it keeps retrying until it succeeds.
If it fails to connect within the time set by This Installer Is Valid For, it uninstalls automatically and must be redeployed.
WarningMass deployment installers are tied to the user account that created them and are affected by its permissions at the time the installer is executed. If the user is removed from the shared Asset Group it attempts to deploy to, or if the user account is deleted, the installer fails to install.
Install on Windows systems
For system administrators who need to push out the Jump Client installer to a large number of systems, the Windows MSI can be used with your systems management tool of choice.
When using a command line or system management tool to install, you can override certain installation parameters. For any setting with Allow override during installation checked, you can modify the Jump Client installer with the following parameters for each installation.
If a parameter is passed on the command line but the setting is not marked for override in the administrative interface, the installation fails. View the operating system event log for installation errors.
| Command line parameter | Value | Description |
|---|---|---|
| KEY_INFO= | <keyinfo> | Specifies a keyinfo parameter required to install the generic Jump Client installer. |
| INSTALLDIR= | <directory_path> | Specifies a new writable directory under which to install the Jump Client. This is supported only on Windows and Linux. When defining a custom install directory, ensure that the directory you are creating does not already exist and is in a location that can be written to. |
| JC_NAME= | <name...> | If override is allowed, this command line parameter sets the Jump Client's name. |
| JC_JUMP_GROUP= | user: <username> jumpgroup: <jumpgroup-code-name> | If override is allowed, this command line parameter overrides the Asset Group specified in the Mass Deployment Wizard. |
| JC_SESSION_POLICY= | <session-policy-code-name> | If override is allowed, this command line parameter sets the Jump Client's session policy that controls the permission policy during a session. |
| JC_JUMP_POLICY= | <jump-policy-code-name> | If override is allowed, this command line parameter sets the Asset Policy that controls how users are allowed to connect to the Jump Client. |
| JC_TAG= | <tag-name> | If override is allowed, this command line parameter sets the Jump Client's tag. |
| JC_COMMENTS= | <comments…> | If override is allowed, this command line parameter sets the Jump Client's comments. |
| JC_MAX_OFFLINE_MINUTES= | <minutes> | If override is allowed, this command line parameter sets the number of minutes the Jump Client can be offline before being considered lost. |
| JC_EPHEMERAL=1 | If override is allowed on Maximum Offline Minutes, this command line parameter sets the Jump Client to ephemeral mode, marking it as uninstalled if it goes offline for more than 5 minutes. This is the same as setting --jc-max-offline-minutes 5. | |
| ONLINE_INSTALL=1 | Set the Jump Client to verify online status after installation. This is useful for ensuring that the client is properly connected to the network and can communicate with the server. | |
| START_SERVICES="" | Prevents the installer from starting services after installation. Useful in IT scenarios where post-install service startup should be skipped. |
When deploying an MSI installer on Windows using the msiexec command:
- The installation directory may be specified by passing a variable: INSTALLDIR=<path>
- The KEY_INFO= is optional as it is built into the filename.
- If you specify ONLINE_INSTALL=1, the installation fails if it cannot immediately reach the appliance. The default is blank.
- A silent installation can be done by specifying /quiet to the msiexec command.
- All of the --jc… parameters listed above may be specified as variables by:
- Removing leading dashes (-)
- Converting remaining dashes to underscores (_)
- Assigning a value using an equals sign (=)
Examplemsiexec /i sra-scc-win32.msi jc_jump_group=jumpgroup:general jc_tag=servers
Normally, when msiexec runs, no messages display in the command line interface. To wait for the installation to complete and to check for any errors, you can set up your command like this:
$ start /wait msiexec /qn /i sra-pin-21fce94dee1940e.msi ONLINE_INSTALL=1
$ echo %ERRORLEVEL%
The error output will be either 0 to indicate success or a number indicating an error. For more information about error codes, see https://learn.microsoft.com/en-us/windows/win32/msi/error-codes.
Modify Windows proxy information
In some cases, the proxy settings of an existing Windows Jump Client must be manually modified to accommodate changes in the proxy environment. The Jump Client has built-in logic to automatically detect updated proxy information within a 24-hour period. However, if the proxy enforces authentication, then the end-user is prompted to enter authentication credentials. If the system is unattended, then credentials and/or other proxy information may need to be manually entered.
The following steps guide you through manually modifying proxy-related sections of the settings.ini file used by the Jump Client.
If a large number of systems must be manually modified, the process can be automated. You can develop a script to do this, or contact BeyondTrust Technical Support to engage the BeyondTrust Professional Services group.
To manually modify the proxy information for a pre-existing Jump Client on a Windows system:
- Go to C:\ProgramData\sra-scc-, where is the Jump Client's unique ID.
- Locate and edit the settings.ini file.
- Within settings.ini, locate the proxy-related section, titled [Proxy]. An example existing proxy section is shown below.
[Proxy]
version=2
detect_failed=0
[Proxy\access.example.com:443\LastGood]
Proxy=DIRECT
[Proxy\access.example.com:443\Detected\1]
Proxy=DIRECT- Remove all of the settings within the [Proxy] section and replace them with the settings as follow. Replace all <bracketed> text with the appropriate information.
[Proxy]
version=1
ProxyUser=<domain\user>
ProxyPass=<password>
[Proxy\Manual]
ProxyMethod=<numeric value of 0=DIRECT, 100=HTTP CONNECT, 200=SOCKS4>
ProxyHost=<proxy hostname/ip>
ProxyPort=<proxy port>
An example of a manually modified section is below.
[Proxy]
version=1
ProxyUser=myDomain\proxyUser
ProxyPass=MyPassword
[Proxy\Manual]
ProxyMethod=200
ProxyHost=myproxyserver.example.com
ProxyPort=8443- Save and close the settings.ini file.
- Either reboot the system or stop/start the BeyondTrust Jump Client service for the new information to apply.
- The Jump Client nows use the manually defined proxy information.
After making the above changes to the settings.ini file, the defined username and password which were entered in plain text will be hashed into an unreadable format.
Mass deploy on Windows
Avoid deploying duplicates
When mass-deploying the SRA Jump Client MSI with tools such as SCCM or Altiris, it is important to avoid installing duplicate clients, because this can cause multiple deployment failures. BeyondTrust does not provide any utilities for deploying clients, but there are some basic methodologies you can use to script a deployment system that will only install Jump Clients on systems that do not have one installed already. These methods depend on whether you already have Jump Clients installed.
If you have already installed Jump Clients, your script can be modified to prevent duplicates. If you have installed Jump Clients, you can use the INSTALLDIR.MSI variable or a custom file as described below. When you use INSTALLDIR, the MSI installation package itself automatically aborts if it finds the directory you specify already exists. If you choose the custom file option, you must script the install to check for this file prior to running the MSI installation package.
Prevent additional duplicates
If your deployment tool has already deployed duplicate clients, edit your script so that the tool aborts installation if the target system matches either of these conditions:
- The system has any sra-scc.exe processes running.
- The system has any DisplayName registry entries matching BeyondTrust Privileged Remote Access Jump Client [support.example.org], where support.example.com matches the hostname of your SRA appliance.
Prevent duplicates before deployment
If your deployment tool has not yet deployed any clients, you can script the tool to use the INSTALLDIR variable or deploy a custom file during the install process.
Use INSTALLDIR
Follow these steps to use the INSTALLDIR variable:
-
From the /login administrative interface, go to Asset Management > Jump Clients.
-
At the top of the Jump Client Installer List, click Add.
-
Enter the appropriate mass deployment wizard parameters.
-
Click Create.
-
Select Windows (x64) MSI, copy the string after KEY_INFO=, and then click Download/Install.
-
Load the downloaded MSI into your deployment tool and script the tool to install it using the following command:
msiexec /i sra-scc-win64.msi KEY_INFO=<key_info_string> INSTALLDIR=
where <key_info_string> is the KEY_INFO string you copied earlier and is the install directory of your choice.
-
Configure the deployment tool to abort installation if it finds the install directory you have chosen is already present.
Use a custom file
You have the option of deploying a custom file during installation and automatically aborting subsequent duplicate installation if this file is found. To do this:
- Save a small text file with a descriptive title such as PRAJumpClient.txt to a shared network location accessible from all systems on which Jump Clients will be deployed.
- Follow the above steps for using INSTALLDIR to create and download an MSI installation file.
- Configure the script to abort if the PRAJumpClient.txt file already exists, or copy it to the local system and install the MSI file if the text file does not exist.
Manage deployment rate
It is important to consider rate of deployment if mass deploying on a large scale. A large number of simultaneous client installations can cause network traffic delays.
Depending on the deployment method used, the granular control allowed may vary. We recommend deploying no more than 60 clients per minute to avoid installation failures and degraded performance. For reference, 60 clients per minute equates to:
- 1 client install per second
- 60 client installs per minute
- 3,600 client installs per hour
Performance impact may vary with environmental factors, usage patterns, and appliance resources. BeyondTrust recommends starting mass deployment conservatively with smaller scale pushes at slower rates to confirm acceptable performance before gradually scaling up the number and rate of deployment.
Install on Linux
Linux instructions
Changes in 25.2+
There are several changes on how you download and install Jump Clients on Linux.
- The biggest change is how you download the Linux installer. The headless and desktop version are now combined as one. The Platform dialog box for the installer displays as Linux (64) instead of Linux (64) and Linux (64) Headless.
- Headless can now be deployed in service and user mode. In previous versions, headless was only available in user mode.
- The are several new parameters for the command line. They are the following:
- Scope
- Startup
- Headless
- Online-install
- Session-user
The --silent parameter has been removed and no longer valid.
You can override certain installation parameters specific to your needs. These parameters can be specified using a systems administration tool or the command line interface. When you mark specific installation options for override during installation, you can use the following optional parameters to modify the Jump Client installer for individual installations.
The -jc attribute parameters are also available and work on a Windows-based system.
| Command line parameter | Value | Description |
|---|---|---|
| --scope | <system|user> |
|
| --startup | <auto|systemd|xdg|none>. |
|
| --headless | Does not involve any functionality requiring a graphical session. | |
| --install-dir | <directory_path> | Specifies a new writable directory under which to install the Jump Client. This is supported only on Windows and Linux. When defining a custom install directory, ensure that the directory you are creating does not already exist and is in a location that can be written to. |
| --key-info | <keyinfo> | Specifies a keyinfo parameter required to install the generic Jump Client installer. |
| -jc-name | <name...> | If override is allowed, this command line parameter sets the Jump Client's name. |
| --jc-jump-group | user: jumpgroup: | If override is allowed, this command line parameter overrides the Asset Group specified in the Mass Deployment Wizard. |
| --jc-session-policy | If override is allowed, this command line parameter sets the Jump Client's session policy that controls the permission policy during a session. | |
| --jc-jump-policy | If override is allowed, this command line parameter sets the Asset Policy that controls how users are allowed to connect to the Jump Client. | |
| --jc-tag | If override is allowed, this command line parameter sets the Jump Client's tag. | |
| --jc-comments | <comments…> | If override is allowed, this command line parameter sets the Jump Client's comments. |
| --jc-max-offline-minutes | If override is allowed, this command line parameter sets the number of minutes the Jump Client can be offline before being considered lost. | |
| --jc-ephemeral | None | If override is allowed on Maximum Offline Minutes, this command line parameter sets the Jump Client to ephemeral mode, marking it as uninstalled if it goes offline for more than 5 minutes. This is the same as setting --jc-max-offline-minutes 5. |
| --online-install | The installer only completes if it can successfully connect to the server during installation. If a connection cannot be established, the installation fails immediately. | |
| --session-user | <username> | Causes sessions to run as the specified user. This setting is only applicable if --scope system and --headless are specified. ℹ️If you don't specify this parameter, you get a root based headless session every time you perform a Jump. |
| --help | Displays the argument help to the user. |
Wayland support
Wayland is a modern display server protocol used in Linux-based operating systems. It serves as a replacement for the older X11 (X Window System), aiming to provide a simpler, more efficient, and more secure way for graphical applications to communicate with the display hardware. The Wayland to X11 Video Bridge is required for the Jump Client to work. It is preinstalled with Wayland on most Linux distributions.
This feature offers foundational capabilities, with more enhancements planned in upcoming releases.
Supported capabilities
- Mouse and keyboard support
- Ability to screen share
- Ubuntu 24.04 and RHEL 10 support
- Support of English keyboards
Current limitations
- After installing a Jump Client, it is recommended to log out at least once to fully reinitialize the display manager.
- Jump Client thumbnails are not currently supported on Wayland.
- Team Monitoring is not currently supported.
If you try to use a Jump Client, it should connect correctly. However, if you do need to disable Wayland support for troubleshooting purpose, you can disable Wayland in the custom.conf file by following these steps:
- Open a command line terminal, and then edit the /etc/gdm3/custom.conf file to set WaylandEnable=false.
- Type the following syntax:
WaylandEnable=false - Restart the computer.
Install a Linux Jump Client in service mode
To install a Jump Client in service mode on a Linux system, the Jump Client installer must be run by root, but the Jump Client service should not be run under the root user context. A service mode Jump Client allows the user to start a session even if no remote user is logged on, as well as to log off the current remote user and log on with different credentials. A Linux Jump Client installed in user mode cannot be elevated within a session.
Run the installer as the root user using the sudo command:
sudo sh ./Downloads/sra-pin-[uid].binLinux Jump Clients can be installed in service mode. The status of any Jump Client is shown in the info panel that appears when a Jump Client is highlighted in the representative console’s list of Jump Clients. If a Jump Client shows the Install Mode as Service, it is installed as a service; otherwise, this field reads User, indicating it is installed in single-user context.
A service-mode Jump Client allows the user to start a session even if no remote user is logged on, as well as to log off the current remote user and log on with different credentials. A Linux Jump Client installed in user mode cannot do this, nor can it be elevated to service mode within a session.
To install a Jump Client in service mode on a Linux system, the Jump Client installer must be by run by root. This causes the Jump Client to run as a system service. The process for doing this varies slightly depending on the distribution of Linux being used, but what follows is typical.
-
Sign in to the /login admin web interface of the BeyondTrust site and download a Jump Client installer for Linux from the Asset Management > Jump Clients tab.
-
Execute the installation file as the root user using the sudo command:
sudo sh ./Downloads/sra-pin-[uid].bin
Once the installation is complete, a new entry appears in the list of available Jump Clients displayed in the representative console. To test whether the Jump Client is installed as a service or not, you can connect to the client and log out the active user. If you can still control the screen after logging out, this proves the client is running as a service.
By default, Jump Clients installed in service mode are found in the /opt/beyondtrust/sra-pin-* folder.
Uninstall a Jump Client installed on a headless Linux system
To uninstall a Jump Client, remove it from the representative console.
- If the client is not connected when it is removed from the console, the files are removed the next time the client authorizes with the server.
- Manual changes made for service mode Jump Client or headless Jump Client to start on boot are not removed.
Jump Clients can be removed from a device by using a script:
/install/folder/uninstallsudo installfolder/uninstallThis leaves an entry in the representative console interface. The entry is automatically marked as uninstalled or deleted, depending on your Jump Client settings. Manual changes made for service mode Jump Client or headless Jump Client to start on boot are not removed by the script.
For information about Jump Client settings, see Jump Client settings.
Install a Jump Client on a headless Linux system
To install a Jump Client on a remote Linux system with no graphical user interface, be sure you have downloaded the Linux Jump Client installer, and then follow these additional steps:
- Using your preferred method, transfer the Jump Client installer file to the headless Linux system you wish to access.
- Once the installer file is on the remote system, use a command interface to install the file and specify any desired parameters, but specifically include the -–headless option. See the table above for the various additional command line options, including the –-scope parameter to select system or user mode.
- If the headless Jump Client is installed with system scope, then the service will run as root and started sessions will provide the remote user root access. If root access is not desired, then specify the --session-user argument.
Screen sharing on a Headless Client
As of v25.3, you can screen share on a headless pinned client if X11 is present.
Environmental requirements:
- The launched headless SCC must be informed of the appropriate $DISPLAY value.
- If necessary, xauth must permit connections from the user account running the session to the X server user.
To meet the requirements above, administrators must have a deeper understanding of their system and perform some extra hands-on steps when installing.
Administrators have several options for deploying the Jump Client in these environments. Three example approaches are outlined below. These examples help administrators identify the steps that may apply to their specific system.
Option 1: Run Everything as root
This option is the simplest to install and grants the most system rights to the remote user.
Create a script: session-wrapper.sh:
#!/bin/bash
# This script will run as root.
# Here it may be necessary to authorize the session process to connect to the X server
# xhost / xauth ...
export DISPLAY=:0
export SHELL=/bin/bash
exec "$@"
Install the Jump Client:
- Obtain a root shell.
- Transfer the sra-pin-xxx.bin installer to the system.
- mkdir /opt/beyondtrust
- Place session-wrapper.sh in /opt/beyondtrust.
- chmod +x /opt/beyondtrust/session-wrapper.sh
- Run:
sh "sra-pin-xxx.bin" --headless --session-wrapper /opt/beyondtrust/session-wrapper.sh
This automatically starts the Jump Client service at boot.
Sessions give root access to the remote user:
- Screen Sharing is available.
- Remote Shell processes run as root.
- File Transfer to and from the system is not limited by file permissions (beyond root’s inherent access).
Option 2: Install as root, Run Sessions as a user, sessionuser
This option is also simple to install, but limits the remote user to the sessionuser account.
The administrator must ensure at system start that future support processes running as sessionuser are authorized to connect to the X server or by setting an appropriate $XAUTHORITY value.
Create a script - session-wrapper.sh:
#!/bin/bash
export DISPLAY=:0  # adjust appropriately
exec "$@"
Install the Jump Client:
- Obtain a root shell.
- Transfer the sra-pin-xxx.bin installer to the system.
- mkdir /opt/beyondtrust
- Place session-wrapper.sh in /opt/beyondtrust.
- chmod +x /opt/beyondtrust/session-wrapper.sh
- Run:
sh "sra-pin-xxx.bin" --headless --session-wrapper /opt/beyondtrust/session-wrapper.sh --session-user sessionuser
This automatically starts the Jump Client service at boot.
Sessions give sessionuser access to the remote user:
- Screen Sharing is available.
- Remote Shell processes runs as sessionuser.
- File Transfer to and from the system is limited to the access rights of sessionuser.
Option 3: Install Everything as a user, sessionuser
This option is the most hands‑on to install, and does not grant BeyondTrust root permissions at any point.
Install the Jump Client:
- Obtain a shell as sessionuser.
- Transfer the sra-pin-xxx.bin installer to the system.
- Run:
sh "sra-pin-xxx.bin" --scope user --headless - Make note of the location of the init-script reported at the end of the installation.
When the Jump Client is started (e.g. at boot or user-login), the administrator must:
- Ensure the $DISPLAY and, if necessary, $XAUTHORITY variables are exported in the process that launches the service. Regarding X authorization, in many distributions, a /home/sessionuser/.Xauthority file is already configured to authorize connections to the X server, which is used by default.
- Execute init-script start to start the service. The full path to this script is provided by the installer when installation completes.
Sessions give sessionuser access to the remote user:
- Screen Sharing is available.
- Remote Shell processes runs as sessionuser.
- File Transfer to and from the system is limited to the access rights of sessionuser.
- In any of the scenarios above, --install-dir <path> can be used to control where the software is installed.
- If a system is rebooted during a session, the session does not automatically resume. The remote user needs to initiate a new connection. Any session-wrapper.sh script above can be used to remove leftover session folders if the system is rebooted while a session is in progress.
Install on Mac systems
Jump Clients are deployed on macOS using a .pkg installer. Only one .pkg file can be installed, and only system mode Jump Clients are supported.
One .pkg file can be installed from each distinct RS or PRA deployment.
You can install the .pkg file with either a generic or a non-generic installer. Jump Client installations on macOS can be customized using configuration profiles (.mobileconfig) that are deployed before installing the .pkg file.
Generic installer
The generic installer requires a .mobileconfig file. Without this file, the Jump Client cannot register with your BeyondTrust environment. At a minimum, the .mobileconfig must include key_info. You can customize the installation with additional settings, such as comments or a Jump Group, by including those in the same .mobileconfig file.
For more information, see Download the Generic Jump Client Installer and Deploy the configuration profile.
Non-generic installer
The non-generic installer does not require a .mobileconfig file. It contains the necessary connection information to register the Jump Client without any additional configuration. However, if you want to customize the installation with additional settings, such as comments or a Jump Group, you must provide a .mobileconfig file. This file is the only way to specify those settings. You can also include key_info if including a .mobileconfig file. It is used if present, though this is not necessary or recommended when using the non-generic installer.
Parameters
| Command line parameter | Type | Value | Description |
|---|---|---|---|
| key_info | string | <keyinfo> | Specifies a keyinfo parameter required to install the generic Jump Client installer. |
| online_install | boolean | Set the Jump Client to verify online status after installation. This is useful for ensuring that the client is properly connected to the network and can communicate with the server. | |
| name | string | <name...> | If override is allowed, this command line parameter sets the Jump Client's name. |
| jump_group | string | user:<username> OR jumpgroup:<code-name> | If override is allowed, this command line parameter overrides the Asset Group given above. |
| public_site_address | string | <public-site-hostname> | If override is allowed, this command line parameter associates the Jump Client with the public portal which has the given hostname as a site address. If no public portal has the given hostname as a site address, then the Jump Client will revert to using the default public site. |
| session_policy_present | string | <code-name> | If override is allowed, this command line parameter sets the Jump Client's session policy that controls the permission policy during a support session if the customer is present at the console. |
| session_policy_not_present | string | <code-name> | If override is allowed, this command line parameter sets the Jump Client's session policy that controls the permission policy during a support session if the customer is not present at the console. |
| support_button_profile | string | <code-name> | If override is allowed, this command line parameter sets the Jump Client's Support Button profile that controls the configuration of the Support Button created by the Jump Client. |
| support_button_direct_queue | string | team:<code-name> | If override is allowed, this command line parameter sets the Jump Client's Support Button direct queue. |
| jump_policy | string | <code-name> | If override is allowed, this command line parameter sets the Asset Policy that controls access to the Jump Client. |
| tag | string | <tag-name> | If override is allowed, this command line parameter sets the Jump Client's tag. |
| comments | string | <comments...> | If override is allowed, this command line parameter sets the Jump Client's comments. |
| max_offline_minutes | integer | <minutes> | If override is allowed, this command line parameter sets the number of minutes the Jump Client can be offline before being considered lost. |
| ephemeral | boolean | Set the Jump Client to ephemeral mode. It will be marked as uninstalled if it goes offline for more than 5 minutes. This is convenience alias for setting max_offline_minutes to 5. You must be allowed to override Maximum Offline Minutes during installation to use this flag. |
Download the Generic Jump Client Installer
- On the Jump Client page, go to the Generic Jump Client Installer Download section.
- Select macOS from the Platforms dropdown.
- Copy the Generic Jump Client installer command to your clipboard by clicking
 . This is used to install the .pkg file.
 - Click Download.
You must create the configuration profile and deploy it prior to installing the .pkg file.
Deploy the configuration profile
- Create a .mobileconfig file with the required parameters. You can create the file using an app, such as Apple Configurator for Mac, or you can download and edit an example configuration profile located on the Jump Clients tab. Navigate to Jump Clients > Jump Client Installer Usage > macOS Deployment > Installation Steps to download a copy of this profile.
- Deploy the profile by opening the file in Finder. Or you can deploy it via Mobile Device Management (MDM).
Install the .pkg file
- At the top of the Jump Client Installer List , click Add.
The Jump Client Mass Deployment Wizard page displays. - Fill out the fields as required, and then click Create.
- Select macOS from the Platforms dropdown.
- Click Download.
- Install the .pkg file:
- sudo installer -pkg <file.pkg> -target / - (Optional) Remove the profile after installation:
- sudo profiles remove -identifier com.beyondtrust.jumpclient.deploy.bt_example_com
Mass deploy on macOS
The installer files for access consoles and Jump Clients allow you to mass deploy BeyondTrust software to your macOS devices. This guide provides examples of how to mass-deploy BeyondTrust software using generally accepted deployment concepts. Actual deployment steps may vary.
Set privacy policy preference control
Starting with macOS Mojave (10.14), Apple introduced new privacy controls for end users. These controls require that applications be granted permission to access sensitive data or use macOS accessibility features. As an administrator, you can grant these permissions to an MDM-managed Mac using a Privacy Policy Preference Control (PPPC) profile. To ensure proper functionality of the BeyondTrust Privileged Remote Access Customer Client, deploy a PPPC profile targeting the following app bundle:
- Identifier: com.bomgar.bomgar-scc
- Identifier Type: Bundle ID
- Code Requirement: identifier "com.bomgar.bomgar-scc" and anchor apple generic and certificate 1[field.1.2.840.113635.100.6.2.6] / exists / and certificate leaf[field.1.2.840.113635.100.6.1.13] / exists / and certificate leaf[subject.OU] = B65TM49E24
| Service | Purpose | Allowed |
|---|---|---|
| Accessibility | Screen Sharing | true |
| SystemPolicyAllFiles (Full Disk Access) | File Transfer | true |
| ScreenCapture (Screen Recording) | Screen Sharing | AllowStandardUserToSetSystemService |
Screen recording can only be configured via MDM to allow a non-admin user to provide consent. IT administrators cannot grant screen recording permissions on behalf of end users. This preference is applicable for systems running macOS Big Sur (11.0) and later.
Configure managed login items
Starting with macOS Ventura 13, Apple introduced a new framework for managing background tasks such as LaunchAgents, LaunchDaemons, and Login Items. BeyondTrust's Jump Client for Privileged Remote Access leverages background tasks to ensure the client is running at all times. Administrators can manage these background tasks using a Managed Login Items payload delivered to managed devices. To ensure proper functionality, deploy a configuration profile targeting the below values:
| Rule Type | Rule Value |
|---|---|
| Label Prefix | Bomgar |
| Team Identifier | B65TM49E24 |
| Label Prefix | com.bomgar |
Configure appliance
When deploying the Jump Client, there are two prerequisites that must be completed in Privileged Remote Access.
- A user account with administrative permission to access the /login interface is required. This user can create Jump Clients only for Asset Groups where they have appropriate permissions.
- To ensure that a single Jump Client installer can be used to pin a system to any Asset Group, a service account with Manage permissions on all Asset Groups must be created.
Create a service account user for Jump Client package creation
- Log in to the Privileged Remote Access user interface.
- Click Users & Security.
- Click Add.
- Fill in the basic details for the user account.
- Expand Account Settings.
- Check Account Never Expires, if necessary.
- Expand Access Permissions.
- Ensure Allowed to access endpoints is checked.
- Uncheck all boxes under the Session Management and User-to-User Screen Sharing areas.
- Under Allowed Asset Methods, ensure:
- Jump Clients is checked
- All other methods are unchecked
- Under Asset Roles, ensure:
- Default dropdown is set to Administrator
- System dropdown is set to Administrator
- Click Save.
Create a Jump Client installer package
- Log in to the Privileged Remote Access appliance using the new account created above.
- Click Asset Management. The Jump Client tab displays.
- Click Add to add a new Jump Client Installer.
- Select a default Asset Group within the Jump Client Mass Deployment Wizard.
- Check Allow Override During Installation for all available options.
- Select your desired validity period from the This Installer is Valid For dropdown .
- Check Start Customer Client Minimized When Session is Started, to ensure a completely silent deployment.
- Click Create.
- From the Platform dropdown, select macOS (for programmatic installation).
- Click Download. A DMG file downloads. This is later imported into your management platform.
Do not rename the downloaded DMG file.
Deploy manually
The BeyondTrust Privileged Remote Access Jump Client installer is delivered as a uniquely generated and named DMG file. This file has the format sra-scc-<uid>.dmg.
For deployment, the sequence of steps includes:
- Stage the DMG file in a temporary location.
- Mount the DMG file.
- Install the Remote Support Jump Client.
- Unmount the disk image.
- Remove the DMG from the temporary location.
Deploy using JAMF Pro
This information is provided for general assistance when using JAMF Pro, however BeyondTrust cannot provide support for third-party products, and their requirements and operations may change.
Upload package to Jamf software server
- Log in to your Jamf Software Server (JSS) via a web browser.
- Click Computers.
- Click Management Settings.
- Click the Computer Management tab.
- Click Packages.
- Click New.
- Fill out a display name, and choose a category (if applicable).
- Click Upload to choose the DMG file.
- Click Save.
Upload deployment script
- If necessary, log in to the JSS via a web browser.
- Click Computers.
- Click Management Settings.
- Click the Computer Management tab.
- Click Scripts.
- Click New.
- Copy and paste this sample deployment script on the Script tab (for Privileged Remote Access versions 23.3.1 and later):
hdiutil attach /Library/Application\ Support/JAMF/Waiting\ Room/sra-scc-<uid>.dmg

sudo /Volumes/sra-scc/Open\ To\ Start\ Support\ Session.app/Contents/MacOS/sdcust --silent

sleep 15
For Privileged Remote Access versions before 23.3.1, paste this script:
hdiutil attach /Library/Application\ Support/JAMF/Waiting\ Room/sra-scc-<uid>.dmg

sudo /Volumes/sra-scc/Double-Click\ To\ Start\ Support\ Session.app/Contents/MacOS/sdcust --silent

sleep 15- Update the file name to match the DMG file downloaded from your appliance. For Privileged Remote Access, this includes updating bomgar-scc to sra-scc.
- Click Save.
Some networks or environments may have configurations that prevent endpoints from checking for malicious software. This can addressed by adding
xattr -d com.apple.quarantine sra-scc-[uid].dmgto the script, or by enabling Stapled Mac Notarization. Administrators should evaluate which approach is more appropriate for their environment.
For detailed information on sdcust usage, see Mass Deploy Help located within the /login interface on Asset Management > Jump Client.
Create deployment policy
- If necessary, log in to the JSS via a web browser.
- Click Computers.
- Click Policies.
- Click New.
- Provide a policy name, configure desired policy triggers, and ensure Execution Frequency is Once Per Computer.
- Click Packages, and then click Configure.
- Click Add to select the Jump Client package from the list of available packages.
- Select Cache as the action. This makes the packages available in the JAMF downloads folder for use by the deployment script created earlier.
- Click Scripts from the left navigation menu.
- Click Add to select the deployment script created above.
- Confirm that the Priority is set to After.
- Click Save.
The created policy now runs based on the defined trigger(s) to install the BeyondTrust Jump Client.
Deploy a Jump Client on a Raspberry Pi
Raspberry Pi instructions
To access the File System, Command Shell, and System Info of a remote Raspberry Pi system, you can deploy a Jump Client to that system.
- From the /login administrative interface, go to Asset Management > Jump Clients.
- From the Asset Group dropdown, select whether to pin the Jump Client to your personal list of Assets or to an Asset Group shared by other users. Pinning to your personal list of Assets means that only you can access this remote computer through this Jump Client. Pinning to a shared Asset Group makes this Jump Client available to all members of that Asset Group.
- You may apply an Asset Policy to this Jump Client. Asset Policies are configured on the Asset Management > Asset Policies page and determine the times during which a user can access this Jump Client. An Asset Policy can also send a notification when it is accessed or can require approval to be accessed. If no Asset Policy is applied, this Jump Client can be accessed without restriction.
- You may choose a Session Policy to apply to this Jump Client. A session policy assigned to this Jump Client has the highest priority when setting session permissions.
We recommend that you not set a session policy for a headless Jump Client.
-
Adding a Tag helps to organize your Jump Clients into categories within the access console.
-
Set the Connection Type to Active or Passive for the Jump Clients being deployed. An active Jump Client maintains a persistent connection to the B Series Appliance, while a passive Jump Client instead listens for connection requests.
-
Add Comments, which can be helpful in searching for and identifying remote computers. Note that all Jump Clients deployed via this installer have the same comments set initially, unless you check Allow Override During Installation and use the available parameters to modify the installer for individual installations.
-
The installer remains usable only as long as specified by the This Installer is Valid For dropdown. Be sure to leave adequate time for installation. If someone should attempt to run the Jump Client installer after this time, installation fails, and a new Jump Client installer must be created. Additionally, if the installer is run within the allotted time but the Jump Client is unable to connect to the B Series Appliance within that time, the Jump Client uninstalls, and a new installer must be deployed. The validity time can be set for anywhere from 10 minutes to 1 year. This time does NOT affect how long the Jump Client remains active.
In addition to expiring after the period given by the This Installer is Valid For option, Jump Client mass deployment packages invalidate when their B Series Appliance is upgraded. The only exception to this rule is live updates which change the license count or license expiration date. Any other updates, even if they do not change the version number of the B Series Appliance, invalidate the Jump Client installers from before the upgrade.
Once a Jump Client has been installed, it remains online and active until it is uninstalled from the local system either by a user from the Asset Management Interface or by an uninstall script. It can also be uninstalled, or extended, from the Jump Client Installer List. A user cannot remove a Jump Client unless the user is given appropriate permissions by their admin from the /login interface.
-
Once you click Create, select the Raspberry Pi OS option, and then click Download.
-
Using your preferred method, push the Jump Client installer file to each headless system you wish to access.
-
Once the installer file is on the remote system, install the file in a location to which you have write permission, using --install-dir . You must have permission to write to this location, and the path must not already exist. Any additional parameters must also be specified at this time, as described below.
sh ./sra-scc-{uid}.bin --install-dir /home/pi/<dir> -
You can also override certain installation parameters specific to your needs. When you mark specific installation options for override during installation, you can use the following optional parameters to modify the Jump Client installer for individual installations. Note that if a parameter is passed on the command line but not marked for override in the /login administrative interface, the installation fails. If the installation fails, view the operating system event log for installation errors.
| Command Line Parameter | Value | Description |
|---|---|---|
| --jc-jump-group | user: <username> jumpgroup: <jumpgroup-code-name> | If override is allowed, this command line parameter overrides the Asset Group specified in the Mass Deployment Wizard. |
| --jc-session-policy | <session-policy-code-name> | If override is allowed, this command line parameter sets the Jump Client's session policy that controls the permission policy during an access session. |
| --jc-jump-policy | <jump-policy-code-name> | If override is allowed, this command line parameter sets the Asset Policy that controls how users are allowed to connect to the Jump Client. |
| --jc-tag | <tag-name> | If override is allowed, this command line parameter sets the Jump Client's tag. |
| --jc-comments | <comments…> | If override is allowed, this command line parameter sets the Jump Client's comments. |
-
After installing the Jump Client, you must start its process. The Jump Client must be started for the first time within the time frame specified by This Installer Is Valid For.
/home/username/jumpclient/init-script startThis init script also accepts the stop, restart, and status arguments. You can use ./init-script status to make sure the Jump Client is running.
-
You must also arrange for init-script start to run at boot in order for the Jump Client to remain available whenever the system restarts. An example system.d service displays once the Jump Client is installed. Copy this information and create the new service for the Jump Client, filename.service (where filename is any name you choose), following these steps:
- cd /etc/systemd/system
- vi filename.service
- Paste copied information
- run chmod 777 filename.service
- Reload the systemctl daemon
- Enable and start the service file
-
If you wish to uninstall the Jump Client, you must run its uninstall script.
/home/pi/<dir>/uninstall
Separately and in addition to running the uninstall script, you must remove the Jump Client via the access console. Otherwise, the Jump Client remains in the access console, though it is not accessible. Relatedly, removing the Jump Client via the access console only prevents it from being accessed but leaves the Jump Client files on the system.
Generic Jump Client installer download
The generic installer allows you to download a Jump Client installer package that is not tied to a specific Jump Client installer. Generic installers can be used for automated or ephemeral deployments on Virtual Machine (VM) images and do not require authenticating and downloading the Jump Client-specific installer once deployed.
To use the Generic Jump Client installer, do the following steps:
- Select your desired platform and click Download.
- Copy the provided command into your command line interface (CLI), or click Download to download the .msi installer file.
- From the Jump Client installer list, select an installer and click the download icon to copy the key. If using a CLI, replace the text insert key info here with the key; otherwise, if running the Windows MSI through the user interface, enter the key when prompted.
Jump Client statistics
An administrator can choose which statistics to view for all Jump Clients on a site-wide basis. These statistics are displayed in the representative console and include the following items:
- CPU
- Console user
- Disk usage
- Remote screen
- Uptime
Upgrade
Automatic Jump Client upgrades
Use the radio buttons below to control automatic Jump Client upgrades. You can:
- Disabled: Permanently disable Jump Client upgrades.
- Enabled for this version only: Temporarily enable Jump Client upgrades for the current upgrade cycle.
- Enabled always: Permanently enable Jump Client upgrades.
To manually update Jump Clients in the Web Rep Console, you must first disable Automatic Jump Client Upgrades.
Maintenance
| Field Name | Description |
|---|---|
| Number of days before Jump Clients that have not connected are automatically deleted | This setting determines when the system should remove Jump Clients that have failed to connect to the site for the configured number of days. This setting is also shared with the client itself during normal operation so that even if it cannot communicate with the site, it will uninstall itself at the configured time. This setting must be configured for 15 days or more. |
| Number of days before Jump Clients that have not connected are considered lost | This setting determines when a Jump Client is considered lost by the system, which means that it has not connected in the configured number of days. No specific action is taken on that client, but it is labeled as lost for identification purposes. If the Jump Client cannot contact the Appliance at the time it is uninstalled, the affected item remains in its offline state. To identify lost Jump Clients before they are automatically deleted, set this field to a smaller number than the Number of days before Jump Clients that have not connected are automatically deleted field. This setting must be configured for 15 days or more. |
| Uninstalled Jump Client Behavior | If a user uninstalls a Jump Client at the endpoint, the Access Console can either keep the Jump Client in the list and mark it as Uninstalled or remove it from the list entirely. When changed, this setting only affects Jump Clients that will be uninstalled in the future. |
Miscellaneous
Allow representatives to attempt to wake up Jump Clients
Allow Representatives to attempt to wake up Jump Clients provides a way to wake up a selected Jump Client by broadcasting Wake-on-LAN (WOL) packets through another Jump Client on the same network. Once a WOL is attempted, the option becomes unavailable for 30 seconds before a subsequent attempt can be made. WOL must be enabled on the target computer and its network for this function to work. The default gateway information of the Jump Client is used to determine if other Jump Clients reside on the same network. When sending a WOL packet, the user has an advanced option to provide a password for WOL environments that require a secure WOL password.
