Gateway guide | PRA
With BeyondTrust Jump Technology, a user can access and control remote, unattended computers in any network. Jump Technology is integral to the BeyondTrust software offerings.
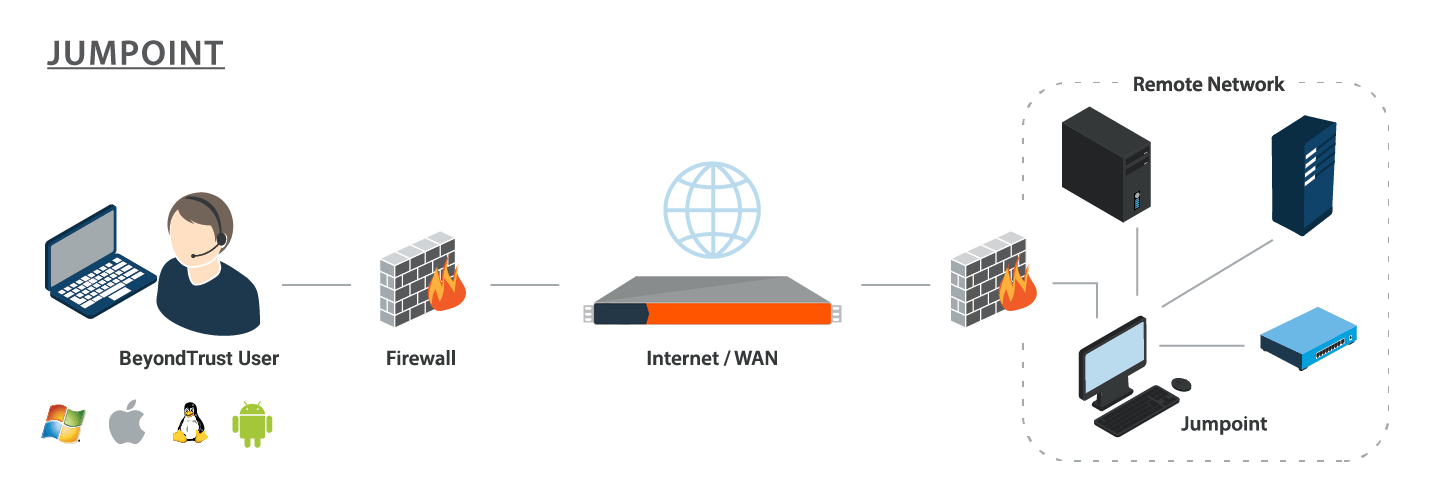
A Gateway acts as a conduit for unattended access to Windows and Linux computers on a known remote network. A single Gateway installed on a computer within a local area network is used to access multiple systems, eliminating the need to pre-install software on every computer you may need to access.
Within the local area network, the BeyondTrust user's computer can initiate a session to a Windows system directly without using a Gateway, if appropriate user permissions are enabled. A Gateway is needed only when the BeyondTrust user's computer cannot access the target computer directly.
Implementation
When working with Jump Technology, there are a lot of moving parts. Here is a recommended order of implementation to make full use of your software.
- Add Asset Roles. Asset Roles determine how users are allowed to interact with Assets. These roles are applied to users by means of individual account settings, group policies, or when added to Asset Groups.
- Add Asset Policies. Asset Policies are used to control when certain Assets can be accessed by implementing schedules, sending email notifications when an Asset is accessed, or requiring approval or user entry of a ticket system ID before an Asset may be accessed. Asset Policies are applied to Assets upon creation and can be modified from the access console. Additionally, Asset Policies can be applied to users when associating a user or group policy with an Asset Group.
- Add Asset Groups. An Asset Group is a way to organize Assets, granting members varying levels of access to those items. Users are assigned to Asset Groups either individually or by means of group policy.
- Deploy Assets. This step can be performed in several ways.
a. Deploy Gateways. Assets allow you to access Windows systems on an accessible network. If you plan to use Assets on only your local area network, you do not need a Gateway. If you plan to use Assets on remote networks, you must install a Gateway. Only users who are added to the Gateway can use it to access systems on the remote network. Users are assigned to Gateways either individually or by means of group policy.
b. Deploy Assets in Bulk.When creating a large number of Assets, it may be easier to import them via a spreadsheet than to add them one by one in the access console.From /login > Asset Management > Assets, download a CSV template for each type of Asset you wish to import. Enter the information for the shortcuts, being sure to set the Asset Group and Asset Policy, and then upload the completed CSV files.
c. Deploy Assets One by One. When creating only a few Assets, it may be quicker to deploy them from the access console. In the Asset Management Interface of the access console, click the Create button. Select the type of Asset you wish to create, and enter the details, being sure to set the Asset Group and Asset Policy.
Asset Roles
An Asset Role is a predefined set of permissions regarding Asset management and usage. Asset Roles are applied to users either from the Asset Management > Asset Groups page or from the Users & Security > Group Policies page.
If more than one role is assigned to a user, then the most specific role for a user is always used. The order of specificity for Asset Roles, from most specific to least specific, is:
- The role assigned to the relationship between a user and an Asset Group on the Asset Management > Asset Groups page.
- The role assigned to the relationship between a user and an Asset Group on the Users & Security > Group Policies page.
- The Asset Roles configured for a user on the Users & Security > Users page or the Users & Security > Group Policies page.
Create or edit an Asset Role, assigning it a name and description. Then set the permissions a user with this role should have.
Under Asset Group or Personal Assets, determine if users can create and deploy Assets, move Assets from one Asset Group to another, and/or delete Assets.
Check Start Sessions to enable users to connect to any Assets they have access to.
To allow users to edit Asset details, check any of Edit Tag, Edit Comments, Edit Asset Policy, Edit Session Policy, Edit Connectivity and Authentication, and Edit Behavior and Experience.
Asset Policies
To control access to particular Assets, create Asset Policies. Asset Policies are used to control when certain Assets can be accessed by implementing schedules, sending email notifications when an Asset is accessed, or requiring approval or user entry of a ticket system ID before an Asset may be accessed. An Asset Policy can be applied to Jump Clients as well as to Assets.
Create an Asset Policy
- From the /login administrative interface, go to Asset Management > Asset Policies.
- Click Add.
An Asset Policy does not take effect until you have applied it to at least one Asset.
- Create a unique name to help identify this policy. This name should help users identify this policy when assigning it to Assets.
- Set a code name for integration purposes. If you do not set a code name, PRA creates one automatically.
- Add a brief description to summarize the purpose of this policy.
- If you want to enforce an access schedule, check Enable. If it is disabled, then any Assets that use this policy can be accessed without time restrictions.
- Set a schedule to define when Assets under this policy can be accessed. Set the time zone you want to use for this schedule, and then add one or more schedule entries. For each entry, set the start day and time and the end day and time.
- If, for instance, the time is set to start at 8 am and end at 5 pm, a user can start a session using this Asset at any time during this window but may continue to work past the set end time. Attempting to re-access this Asset after 5 pm, however, results in a notification indicating that the schedule does not permit a session to start. If necessary, the user may choose to override the schedule restriction and start the session anyway.
- If stricter access control is required, check Force session to end. This forces the session to disconnect at the scheduled end time. In this case, the user receives recurring notifications beginning 15 minutes prior to being disconnected.
Jump schedule and Context Requirement cannot both be enabled on the same policy.
- You may choose to trigger an email notification whenever a session starts or ends with an Asset that uses this policy.
- Check Notify recipients when a session starts to send an email at the beginning of a session. When a user attempts to start a session with an Asset that uses this policy, a prompt states that a notification email will be sent and asks if the user would like to start the session anyway.
- Check Notify recipients when a session ends to send an email at the end of a session. When a user attempts to start a session with an Asset that uses this policy, a prompt states that a notification email will be sent at the end of the session and asks if the user would like to start the session anyway.
- Enter one or more email addresses to which emails should be sent. Separate addresses with a space.This feature requires a valid SMTP configuration for your B Series Appliance, set up on the /login > Management > Email Configuration page.
- Enter a name for the approver. This name appears on the prompt the user receives prior to a session with an Asset that uses this policy.
- If more than one language is enabled on this site, set the language in which to send emails.
- If you check Require a ticket ID before a session starts, a valid ticket ID from your external ticket ID approval process must be entered by the user whenever a session is attempted with any Asset that uses this Asset Policy. When a user attempts to start a session with an Asset that uses this policy, a configurable dialog prompts the user to enter the approved ticket ID from your external ITSM or ticket ID system.
- If you check Require approval before a session starts, an approval email is sent to the designated recipients whenever a session is attempted with any Asset that uses this Asset Policy. When a user attempts to start a session with an Asset that uses this policy, a dialog prompts the user to enter a request reason and the time and duration for the request.
- Set the maximum length of time for which a user can request access to an Asset that uses this policy. The user can request a shorter length of access but no longer than that set here.
- When approval has been granted to an Asset, that Asset becomes available either to any user who can see and request access to that Asset or only to the user who requested access.
- Enter an email address or user name, or a team name so that anyone on that team can approve the jump. Separate multiple entries with a space.This feature requires a valid SMTP configuration for your B Series Appliance, set up on the /login > Management > Email Configuration page.
- Enter a name for the approver. This name appears on the prompt the user receives prior to a session with an Asset that uses this policy.
- If more than one language is enabled on this site, set the language in which to send emails.
Jump schedule and Context Requirement cannot both be enabled on the same policy.
- If you check Disable Session Recordings, sessions started with this Asset Policy are not recorded, even if recordings are enabled on the Configuration > Options page. This affects screen sharing recordings, Database Connection recordings, and command shell recordings.
- When you are finished configuring this Asset Policy, click Save.
If you have more than one language enabled on your site, you can select the language you want to use on the screens below from the dropdown menu. Fields that display the language globe icon can display content in the language you select.
-
You can modify the notification email template. Click the link below the Body field to view the macros that can used to customize the text in your emails for your purposes.
-
You also can modify the approval email template. Click the link below the Body field to view the macros that can used to customize the text in your emails for your purposes.
-
If you enabled the requirement of a ticket ID in the Context Requirement section, configure access to your external ticket ID system.
In Ticket System URL, enter the URL for your external ticket system. If an HTTPS URL is entered, upload the certificate for the HTTPS ticket system connection to the B Series Appliance.
In User Prompt, enter the dialog text you want access console users to see when they are requested to enter the ticket ID required for access.
If your company's security policies consider ticket ID information as sensitive material, check Treat the Ticket ID as sensitive information.
-
For additional security, the Asset Policy can require an end-user to confirm their identity using a multi-factor authentication challenge before starting or elevating a session. If desired, check Must complete a two factor authentication challenge before starting or elevating a session.
After the Asset Policy has been created, you can apply it to Assets either from the /login interface or from the access console.
Asset Groups
An Asset Group is a way to organize Assets, granting members varying levels of access to those items. Users are assigned to Asset Groups either from the Asset Management > Asset Groups page or from the Users & Security > Group Policies page.
To quickly find an existing group in the list of Asset Groups, enter the name, part of the name, or a term from the comments. The list filters all groups with a name or comment containing the entered search term. The list remains filtered until the search term is removed, even if the user goes to other pages or logs out. To remove the search term, click the X to the right of the search box.
You can create or edit an Asset Group, assigning it a name, code name, and comments. The Group Policies section lists any group policies that assign users to this Asset Group.
In the Allowed Users section, you can add individual users if you prefer. Search for users to add to this Asset Group. You can set each user's Asset Role to set their permissions specific to Assets in this Asset Group, or you can use the user's default Asset Roles as set on the Users & Security > Group Policies or Users & Security > Users page. An Asset Role is a predefined set of permissions regarding Asset management and usage.
You can also apply a Asset Policy to each user to manage their access to the Assets in this Asset Group. Selecting Set on Assets instead uses the Asset Policy applied to the Asset itself. Asset Policies are configured on the Asset Management > Asset Policies page and determine the times during which a user can access this Asset. An Asset Policy can also send a notification when it is accessed or can require approval to be accessed. If neither the user nor the Asset has an Asset Policy applied, this Asset can be accessed without restriction.
Existing Asset Group users are shown in a table. You can filter the list of users by entering a username in the Filter box. You can also edit a user's settings or delete the user from the Asset Group.
To add groups of users to an Asset Group, go to Users & Security > Group Policies and assign that group to one or more Asset Groups.
Edit and delete functionality may be disabled for some users. This occurs either when a user is added via group policy or when a user's system Asset Role is set to anything other than No Access.
You can click the group policy link to modify the policy as a whole. Any changes made to the group policy apply to all members of that group policy.
You can click the user link to modify the user's system Asset role. Any changes to the user's system Asset role apply to all other Asset Groups in which the user is an unassigned member.
You also can add the individual to the group, overriding their settings as defined elsewhere.
Requirements and considerations
A Gateway-facilitated BeyondTrust session involves three computers:
- The BeyondTrust user's system
- A computer that hosts the Gateway
- The unattended computer targeted for remote control
There are various permission, hardware, software, and port requirements for these systems that must be met or should be considered when installing a Gateway.
Review Gateway permission requirements
The administrator deploying the Gateway must have administrative rights on the computer hosting the Gateway.
Users must have the following permissions to access the Gateway:
- The user must have administrative rights to the target computer.
- In the administrative interface, one or both of the following conditions must be true:
- The user must have the account permission Allowed Connection Types: Local Jump on the local network.
- The user must have the account permission Allowed Connection Types: Remote Jump via a Gateway and must be granted access to one or more Gateways, either individually or via a group policy.
Review Gateway installation considerations
The main objective of any BeyondTrust administrator should be to ensure the integrity of the BeyondTrust deployment. The simpler and more straightforward a BeyondTrust deployment is, the easier it is to maintain a level of integrity that is in line with your company's security objectives. Specifically, when deploying a Gateway on a remote network, another layer of complexity is introduced to your deployment. Therefore, BeyondTrust recommends using a dedicated resource for a Gateway in order to decrease any potential security risks, increase availability, and reduce management complexity. A dedicated resource is most often a virtual machine or sometimes a physical machine with the sole purpose of hosting the Gateway.
If a dedicated resource is not readily available, there are several factors to take into consideration before deciding to use a shared resource as a Gateway host. When using a shared resource, the BeyondTrust administrator must be aware of everything for which the shared resource is used. For example, the BeyondTrust administrator would need to identify and control any unwanted changes to or repurposing of the resource by other groups, especially in large organizations.
There are many other variables that are unique to any given network or business environment. The questions below are provided to encourage a proactive approach before pursuing the use of a shared resource as a Gateway host. BeyondTrust encourages adding your own list of pros and cons before deploying a Gateway on a shared resource.
Security questions
- Who has access to this resource?
- Are file shares accessible on this resource?
- Are there group policies in place that may restrict Gateway functionality?
- What is the risk of virus infection or malware due to multi-user access?
- What is the risk of another user changing the system permissions or deleting needed files?
File/print sharing questions
- What other programs will be competing for resources such as disk space, processor availability, bandwidth, and disk access?
- Will the resource be available at all times? How critical is on-demand access?
- What is the risk of permission modification on file shares?
- Will this resource be used frequently for print jobs? Large or frequent print jobs can consume a large amount of resources, adversely affecting Gateway performance.
Other shared resource questions
- How critical is availability? What is the risk of the Gateway not being available?
- How frequently will this Gateway be used?
- What is the potential number of sessions that will need to be run through this Gateway at the same time?
- Will shared responsibility of this resource across different departments increase complexity?
A Gateway cannot be used to access itself, because that is an unsupported loopback connection.
Review Gateway hardware and software requirements
Host hardware and software requirements – all session types
| Configuration or scenario | Recommendation(s) |
|---|---|
| Server specifications and concurrent sessions | 8–12 CPU cores and 32–64 GB of RAM. This configuration can typically support:
|
| RDP Session Types | There are two RDP types.
|
| CPU Guidance with RDP Recording | ℹ️This applies to BYOT sessions only, and only when session recording is enabled. It does not apply to other session types, including built-in RDP sessions, even if recording is enabled for those sessions. When RDP session recordings are enabled, resource consumption increases because the native RDP proxy on the Gateway must decode the H.264 RDP stream to capture the session. This decoding process is CPU-intensive and significantly impacts performance. Therefore, we recommend the following guidance:
|
| Asset Policy guidance | Use Asset Policies to disable video recordings for specific Assets if global disable isn’t possible. For example, if your company has a global policy that requires session recording, but you have a special case (such as a sensitive system where recording is not allowed), you can override that global setting for that specific Asset using an Asset Policy. |
Session-specific host and target software requirements
Except as noted, the target and the host must be on the same network.
Remote sessions – host system requirements
Admin rights on the remote system must use either a domain admin user or, in the case of a workgroup environment, a local admin user.
The following applies to Windows systems:
- The host must be a member of the respective Active Directory domain.
- By default, the Gateway runs under the local system account. In certain environments, this may need to be changed to a domain account that has local admin rights on the target computer(s).
- Follow these steps if this account is changed:
- Log on to the Gateway host system as an administrator.
- Stop the BeyondTrust Gateway service using services.msc.
- Navigate to C:\ProgramData\BeyondTrust\Gateway\hostname or C:\Users\All Users\Application Data\BeyondTrust\Gateway\hostname, depending on the Windows version.
- Open the properties for settings.ini and go to the Security tab. Click Continue to view the security properties.
- Select the Users or Everyone group, depending on the Windows version.
- Uncheck the Read permission in the Deny column.
- Apply the changes.
- The Gateway may now be safely changed to be under a different account.
- Restart the Gateway service using services.msc.
- File sharing must be turned on, specifically IPC$ and ADMIN$.
- The Remote Registry service must be running (check using services.msc).
Remote/Local sessions – target system requirements
For Remote sessions, the target system must be on the same network as the Gateway host system. For Local sessions, the target system must be on the same network as the BeyondTrust user's system.
The following applies to Windows systems:
- The Workstation service must be running (check using services.msc).
- The Server service must be running (check using services.msc).
- The Remote Registry service must be running (check using services.msc).
- The ADMIN$ share must be available (check using Computer Management).
- The Windows Network must be running, and printer and file sharing must be activated.
- Make sure firewall settings do not block the connection. If the firewall blocks incoming traffic, open port 445 (and possibly 135) on the target computer for incoming traffic.
RDP sessions – host system requirements
No session-specific host system requirements.
RDP sessions – target system requirements
Microsoft Remote Desktop Protocol (RDP) must be enabled on the target system.
Privileged Remote Access supports only Microsoft's RDP server implementation built into Windows operating systems and Remote Desktop Session (formerly Terminal Services) Hosts.
VNC sessions – host system requirements
No session-specific host system requirements.
VNC sessions – target system requirements
Listening VNC server supporting RFB protocol 3.8 or earlier, configured for basic or no authentication.
Database Connection sessions – host system requirements
No session-specific host system requirements.
Database Connection sessions – target system requirements
The target system must be configured to accept connections on a static listening port. If this is a MySQL Server, it must be at least version 8.
Shell sessions – host system requirements
No session-specific host system requirements.
Shell sessions – target system requirements
Any available SSH server.
Web sessions – host system requirements
If the target web server requires Flash, then the Gateway host system must have Flash installed.
Web sessions – target system requirements
Any available web server.
Review port requirements for discovery and rotation of Vault accounts
Active Directory:
- Port 389
- Port 636
Local account management:
- Port 445
Updated 8 days ago
