Outbound events | PRA Pathfinder
What are outbound events?
Outbound events are notifications or alerts that are sent from the BeyondTrust system to external systems or recipients, triggered by specific actions or occurrences within the system.
There are two types of outbound events: HTTP Recipient and Email Recipient.
| Type of Outbound Event | Description |
|---|---|
| HTTP Recipient | You can configure your BeyondTrust Appliance B Series to send messages to an HTTP server or to an email address when different events are triggered. The variables sent by the B Series Appliance arrive as an HTTP POST method and can be accessed by calling the method used to retrieve POST data in your coding language. If the server does not respond with an HTTP 200 to indicate success, the B Series Appliance re-queues the current event and retries it later. |
| Email Recipient | Configure up to 10 external email addresses that will be notified when certain session events occur. |
How are outbound events useful?
Outbound events help automate the communication of important system updates or actions to external systems or stakeholders, ensuring that relevant parties are kept informed and that necessary actions can be taken promptly.
How do I access the Outbound Events page?
- Sign into app.beyondtrust.io.
The BeyondTrust Home page displays. - From the main menu, click Privileged Remote Access > Management.
The Management page opens and the Software tab displays by default. - Click the Outbound Events tab.
The Outbound Events tab displays.
The Outbound Events page

- Left menu: Easy access to all pages in Privilege Remote Access, including Status, Consoles & Downloads, My Account, Configuration, Asset Management, Vault, Console Settings, Users & Security, Reports, Management, and Appliance pages.
- Status: Opens the Status page.
- Header: Change your tenant site, manage your profile, and access documentation.
-
Add: Adds a HTTP recipient.
-
HTTP Recipient column: A list of HTTP Recipient columns.
HTTP Recipient columns
- Name: Displays the name of the account.
- Disabled: Displays whether the account is enabled or not. This is determined by the Enabled checkbox. If not selected, the column displays Yes, otherwise it displays No.
- URL: Events are sent to this URL via an HTTP POST request. Enter the destination URL in the form of: http[s]://
- Events to Send: Select which events should trigger messages to be sent.
- Status: Display the status of the recipient.
- Queued Events: Displays the number of queued events.
-
Add: Adds an Email Recipient.
-
Email Recipient column: A list of Email Recipient columns.
Email Recipient columns
- Name: Displays the name of the recipient.
- Disabled: Displays whether the account is enabled or not. This is determined by the Enabled checkbox. If not selected, the column displays Yes, otherwise it displays No.
- Email Address: Enter the email address for the account.
- Events to Send: Select which events should trigger messages to be sent.
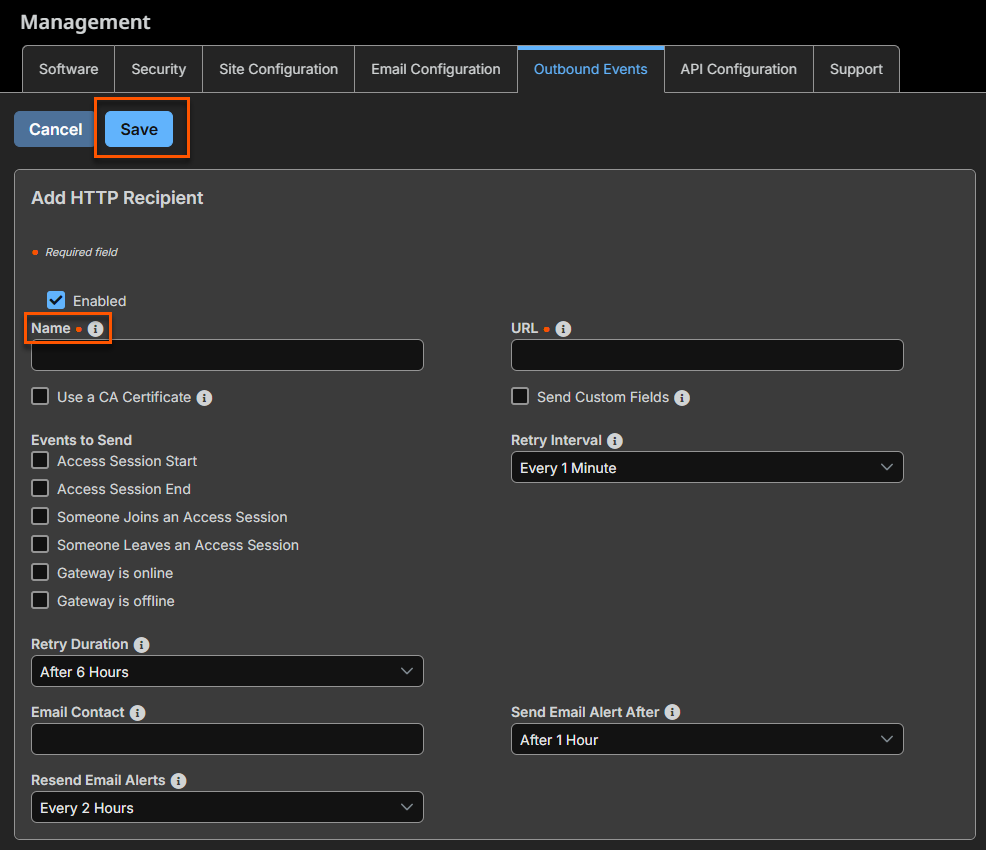
Add HTTP recipient
- Sign into app.beyondtrust.io.
The BeyondTrust Home page displays. - From the main menu, click Privileged Remote Access > Management.
The Management page opens and the Software tab displays by default. - Click the Outbound Events tab.
The Outbound Events tab displays. - Click Add.
- Select the Enabled checkbox to enable the event handler. Uncheck Enabled to quickly stop the messages for the event handler you set up, as in the event of planned integration testing.
- In the Name field, enter a unique name for the destination. This is a required field.
- In the URL field, enter a destination URL for the outbound handler in the form of: http[s]://
- For the Send Custom Fields checkbox, if selected all custom fields configured on the Configuration > Custom Fields page will be included in the outbound event.
- For the Use a CA Certificate checkbox, this is only applicable for HTTPS connections. Upload your Issuer's CA certificate in PEM or DER format to force certificate validation. If you do not use a CA Certificate, HTTPS connections proceed without certificate validation.
- From Events to Send, select the appropriate events for your organization:
- Access Session Start
- Access Session End
- Someone Joins an Access Session
- Someone Leaves an Access Session
- Gateway is online
- Gateway is offline
- In the Email Contact field, enter one or more email addresses for the notifications to be sent if an error occurs. Each email address is separated by a space. Be sure to configure an SMTP relay server on the Management > Email Configuration page.
- In the Retry Interval field, enter a value for redelivery. This specifies how often events will be retried for redelivery.
- In the Send Email Alert After field, this specifies the length of time this destination must be in a failure state before sending an error notification email.
- In the Retry Duration field, this specifies how long events will be retried before they are dropped.
- In the Resend Email Alerts field, this specifies to wait at least this length of time before sending another error alert.
Edit a HTTP recipient
- Sign into app.beyondtrust.io.
The BeyondTrust Home page displays. - From the main menu, click Privileged Remote Access > Management.
The Management page opens and the Software tab displays by default. - Click the Outbound Events tab.
The Outbound Events tab displays. - From the HTTP Recipient table, select the entry to edit.
- Click the pencil to edit.
- Make the necessary changes and click Save.
Delete a HTTP recipient
- Sign into app.beyondtrust.io.
The BeyondTrust Home page displays. - From the main menu, click Privileged Remote Access > Management.
The Management page opens and the Software tab displays by default. - Click the Outbound Events tab.
The Outbound Events tab displays. - From the HTTP Recipient table, select the entry to edit.
- Click the trash can to delete.
- Click Yes to the confirmation dialog box.
BeyondTrust Cloud customers must use of URLs beginning with HTTPS; only port 443 is supported.
Add an Email recipient
Before you set up your B Series Appliance to send event messages to an email address, verify that your B Series Appliance is configured to work with your SMTP relay server. Go to the Management > Email Configuration page to verify settings.
- Sign into app.beyondtrust.io.
The BeyondTrust Home page displays. - From the main menu, click Privileged Remote Access > Management.
The Management page opens and the Software tab displays by default. - Click the Outbound Events tab.
The Outbound Events tab displays. - In the Email Recipient section, click Add.
- Check Enabled to enable the event handler. Uncheck Enabled to quickly stop the messages for the event handler you set up, as in the event of planned integration testing.
- In Name, type a unique name to identify the outbound event.
- In Email Address, enter an email address to receive notice of the selected events. You can configure up to ten email addresses, separated by commas.
- If the Require External Key checkbox is selected, emails are sent only for sessions which have an external key at the time the event occurs.
- For Events to Send, select which events should trigger messages to be sent.
- Access Session End
- Gateway is online
- Gateway is offline
- Subject: Customize the subject of this email. Click the link below the Body field to view the macros that can used to customize the text in your emails for your purposes.
- Body: Customize the body of this email. Click the link below the Body field to view the macros that can used to customize the text in your emails for your purposes.
- Click Save.
Edit an Email recipient
- Sign into app.beyondtrust.io.
The BeyondTrust Home page displays. - From the main menu, click Privileged Remote Access > Management.
The Management page opens and the Software tab displays by default. - Click the Outbound Events tab.
The Outbound Events tab displays. - From the Email Recipient table, select the entry to edit.
- Click the pencil to edit.
- Make the necessary changes and click Save.
Delete an Email recipient
- Sign into app.beyondtrust.io.
The BeyondTrust Home page displays. - From the main menu, click Privileged Remote Access > Management.
The Management page opens and the Software tab displays by default. - Click the Outbound Events tab.
The Outbound Events tab displays. - From the HTTP Recipient table, select the entry to edit.
- Click the trash can to delete.
- Click Yes to the confirmation dialog box.
Updated 5 days ago
