Install a Windows Gateway | PRA
Setup of a Gateway on a remote network is a multi-step process that includes configuring from the /login administrative interface, downloading the installer, and running the installation wizard.
Understand clustered Gateways
Before configuring a Gateway, it is important to understand the difference between clustered Gateways and stand-alone Gateways, because they have different feature sets and because a clustered Gateway cannot be converted to stand-alone, nor a stand-alone Gateway converted to clustered. A clustered Gateway allows you to install up to ten redundant nodes of the same Gateway on different host systems in the same local network.
A clustered Gateway is available as long as at least one of the installed nodes is online. This provides redundancy, preventing the failure of all Assets associated with the failure of a single, stand-alone Gateway, and improves load balancing across the system.
All configuration of clustered Gateways is done in /login, with no local configuration available on the local host either during or after the installation. This means that if you install a clustered Gateway, selecting the BeyondTrust Gateway Configuration item on the start menu of the Gateway host does not result in a configuration window, and only an About box is shown. Editing a clustered Gateway in /login loads the same configuration page that was used to create the Gateway.
Configure
- From the administrative interface, go to Asset Management > Gateway.
- Click Add.
- Create a unique name to help identify this Gateway. This name should help users locate this Gateway when they need to start a session with a computer on the same network.
- Set a code name for integration purposes. If you do not set a code name, PRA creates one automatically.
- If you have a Password Safe integration, and the Gateway for External Asset Sessions selection is set to Automatically Selected by External Asset Network ID, on the /login Security page, enter the External Asset Network ID. This value is equivalent to the Workgroup attribute for managed systems in Password Safe. It is matched against the Network ID property of external Assets returned by the Endpoint Credential Manager to determine which Gateway handles the session.
- Add comments to help identify this Gateway.
- Select Windows for the Gateway Platform. Once the Gateway has been created, this option cannot be changed.
- Leave the Disabled box unchecked.
- Check the Clustered box, if appropriate. Once the Gateway has been created, this option cannot be changed.
A clustered Gateway allows you to install up to ten redundant nodes of the same Gateway on different host systems on the same local network. If this option is selected, the Gateway is available as long as at least one of the installed nodes is online. It selects the most optimal node based on latency or current load. This provides redundancy, preventing the failure of all Assets associated with the failure of a single, stand-alone Gateway, and improve session routing across clustered Gateways, improves load balancing performance while maintaining redundancy
All configuration of clustered Gateways is done in the admin interface, with no local configuration available during the install. Once created, a clustered Gateway cannot be converted to stand-alone, nor a stand-alone Gateway converted to clustered
Important infoGateway cluster nodes must be installed on hosts residing in the same local area network.
- If you want users to be able to connect to SSH-enabled and Telnet-enabled network devices through this Gateway, check the Enable SSH Method option.
- If the Enable Database Connection Method option is checked, users may make connections from their systems to remote endpoints through these types of Gateway.If Network Connection is enabled on your system, then when Enable Database Connection Method is checked, there is an option to enter Managed IP Addresses for Database Connection. You can enter multiple IP address ranges. This allows using the Network Connection feature on networks without DHCP.
- Under RDP Service Account, select the vault account to be used by the Gateway to run a user-initiated client on the RDP server. This allows you to collect additional event information from an RDP session started with this Gateway. This account in used only if the Remote RDP Asset is configured to enable the Session Forensics functionality. This option is not available for Linux Gateways.
The RDP Service Account setting must not use a local admin account, and must use a domain account with sufficient privileges on the endpoint to remotely connect to the endpoint's ADMIN$ share, remotely create and start services on the endpoint machine, and access remote file systems.
- If you check Enable Proxy, you can set up this Gateway to function as a proxy server, allowing it to proxy connections for Assets on the network that do not have a native internet connection, such as POS systems. Using a Gateway as a proxy routes traffic only to the B Series Appliance.
You can enable Proxy on either a standalone Gateway or a Gateway cluster. If you set up a Gateway cluster as a Proxy, then if an endpoint is connected to one Proxy and that system goes down, the endpoint can connect to another Proxy in the cluster.
-
Optionally, under Proxy Host, you can enter the hostname of the machine on which this Gateway will be installed. Do not start the hostname with http://or https://. IP addresses are not recommended as they might change. The Gateway will automatically detect the hostname if one is not provided. If this is a clustered Gateway, this field does not appear, and the Gateway will automatically detect the hostname on install. If the hostname changes, you may have to redeploy any Assets that use this Gateway as a proxy.
The proxy host and port should be set carefully since any Asset deployed using this Gateway as a proxy server uses the settings available to it at the time of deployment and are not updated should the host or port change. If the host or port is changed, the Asset must be redeployed.
In order for a Gateway to function as a Proxy, its host system cannot reside behind a proxy. The Gateway must be able to access the internet without having to supply proxy information for its own connection.
-
Under Proxy Port, enter the port through which Assets will connect to this Gateway. If the port changes, you may have to redeploy any Assets that use this Gateway as a proxy.
It is a best practice to make an exception in the Windows firewall for the port on which the proxy server listens for the process to accept connections.
Important informationIn previous versions, proxy configuration was only for non‑clustered Gateways, which prevents consistent configuration across deployment types.
As of PRA 26.1.1, you can specify the Proxy Host and Proxy Port which enables the clustered Gateway to forward traffic through an upstream Gateway or through a specific node within another Gateway cluster.

- Check Allow HTTP GET to enable HTTP connections to proxy to the B Series Appliance. This is needed only if you want to use a browser to access /login or /console from behind the proxy.
- Under Restriction Type, select No access restrictions to allow Asset connections from any IP address. You can limit allowed connections by selecting Deny access only for the following IP addresses or Allow access only from the following IP addresses, then entering network address prefixes, one per line. Netmasks are optional, and they can be given in either dotted-decimal or integer bitmask format. Entries that omit a netmask are assumed to be single IP addresses.
- Under Allowed Users, you may authorize users to start sessions through this Gateway. After you have created the Gateway, you can also grant access to groups of users from Users & Security > Group Policies.
- Save the configuration. Your new Gateway should now appear in the list of configured Gateways.
Once you have installed the Gateway and started it at least once, PRA populates the table with the hostname of the system it is installed on, as well as with that system's public and private IP addresses. This information can help you locate the Gateway's host system in case you need to change the Gateway's configuration.
Download
Now that your Gateway is configured, you must install the Gateway on a single system in the remote network you wish to access. This system serves as the gateway for sessions with other computers on the remote network. You can either install the Gateway directly on the host or email the installer to a user at the remote system. If this is to be a clustered Gateway, you can add nodes later.
- From the table, find the appropriate Gateway and click the link to download the installer file.
- If you have access to the system you want to use as the Gateway host, you can run the installation file immediately.
- Otherwise, save the file and then email it to the remote user to deploy on the system that will serve as the Gateway host.
- If you need to change the Gateway's host system, click Redeploy. This uninstalls the Gateway from its current location and sets the download links as available. You can then install the Gateway on a new host. The new Gateway replaces the old one for any existing Assets that are associated with it. The new Gateway does not copy over the configuration from the old Gateway and must be reconfigured during installation.
- The Gateway EXE installer can be deployed through a command line interface or a systems management utility, such as Microsoft Intune. When deploying an EXE installer, the /S option can be specified for a silent installation, without any user interaction on the target system. When the /S option is used, the Gateway installer uses the default installation options.
sra-jpt-24cf209c6aab939fc418813b9723995ev.exe /SThe Gateway installer expires 7 days after the time of download.
Install
- From the system that hosts the Gateway, run the installation package. When the installation wizard appears, click Next.
- Read and accept the waiver agreement. You must accept the agreement to be able to proceed with the installation.
- Read and agree to the disclaimer.
- Choose where you would like the Gateway to install. The default location is C:\Program Files\BeyondTrust\Gateway\your-site or C:\Program Files (x86)\BeyondTrust\Gateway\your-site. Click Install.
- If you are installing a single Gateway, the Gateway Configuration application opens to allow you to configure proxy settings. The proxy configuration steps are documented in the section below. If you are installing a clustered Gateway node, the installation finishes.
- After installing the Gateway, you receive a confirmation message. Click Finish.
Once the Gateway is installed, the configuration options can be modified using the Gateway Configuration application, which you can access from the Windows Start menu.
Clustered Gateway setup: add nodes
The steps for creating a clustered Gateway in /login are the same as for a standalone, except that once you have created the clustered Gateway, you can add nodes to it. At least one node needs to be installed for the Gateway to be online.
Click the Add Node link to download the installer file.
If you have access to the system you want to use as the Gateway host, you can run the installation file immediately.
Otherwise, save the file and then email it to the remote user to deploy on the system that will serve as the Gateway host.
Follow the prompts and install the node. Note that there are no configuration screens. Once installed, the clustered Gateway shows the new node as installed, associated information, such as the public and private IP addresses, and whether a node is online or offline, as well as the number of nodes installed.
Nodes can be deleted but cannot be individually edited. In the access console, none of the nodes are visible; only the Gateway under which they are installed is visible. Nodes function as redundant connection points. When a user needs to use the Gateway, Privileged Remote Access selects one of the nodes at random. At least one node must be online for the Gateway to work.
A clustered Gateway allows you to install up to ten redundant nodes of the same Gateway on different host systems on the same local network. If this option is selected, the Gateway will be available as long as at least one of the installed nodes is online. This provides redundancy, preventing the failure of all Assets associated with the failure of a single, stand-alone Gateway, and improves load balancing across the system. All configuration of clustered Gateways is done in /login, with no local configuration available during the install. Once created, a clustered Gateway cannot be converted to stand-alone, nor a stand-alone Gateway converted to clustered.
Deploy behind proxy
In the case of clustered Gateways, there is no customization at the local level. As a result, you will not see the configuration window that allows for proxy settings. If you are installing a clustered Gateway, you can skip the following steps and go directly to Clustered Gateway setup: add nodes.
For a Gateway to be deployed on a remote network that is behind a proxy, appropriate proxy information may be necessary for the Gateway to connect back to the BeyondTrust Appliance B Series.
- From the dropdown on the Proxy tab in the Gateway Configuration application, select Basic or NTLM to configure proxy settings.
- Enter the Proxy Host, Proxy Port, Username and Password, and then click OK. The Gateway supplies the proxy information whenever connecting to another system on the remote network, providing the credentials necessary to download and run the endpoint client on the target system.
Gateway through a Gateway deployed as a proxy server
You can configure a Gateway to go through another Gateway deployed as a proxy server. This allows secure access to isolated, non-routable, OT networks without being constrained to only Jump Clients. Follow these steps:
- On System 1, install a Gateway configured as a Proxy server.
- On System 2, which can be non-routable and on a network isolated from the internet, install a Gateway.
- On System 2, configure the Gateway's basic proxy configuration to point to the Proxy on System 1.
- You can now create new Assets using the Gateway on System 2, for endpoints in the same isolated network as System 2, and start sessions with them through the Proxy on System 1.
- The Proxy, whether standalone or clustered, must be deployed to the target network before installing the Jump Client or Gateway used to create Assets. This enables automated discovery of the broadcasting proxy.
- Automated discovery works only if the installing Gateway or Jump Client is on the same subnet as the Proxy or if you have configured mDNS broadcasts to route across networks.
- If you are going to use a Proxy on a network and the Jump Clients need to auto-discover the proxy, it uses multicast DNS (mDNS) on UDP port 5353 to broadcast and listen for traffic.
Configure multiple outbound Gateway proxies
A Gateway can connect to other Proxy Proxies, allowing you to reach endpoints in target networks across multiple layers bridged by interconnected Gateways.
For example, there are three networks, Network A, Network B, and Network C. You want a Jump Client in Network C to be able to communicate with the appliance. Only Network A has direct access to appliance, while Network B and C have no direct access to appliance, as they are in separate subnets. These networks can communicate with each other only if a route exists between them, either through static routing or a router.
To resolve this problem so that Network C can communicate with the appliance, you need to create multiple Proxy proxies that communicate with each other.
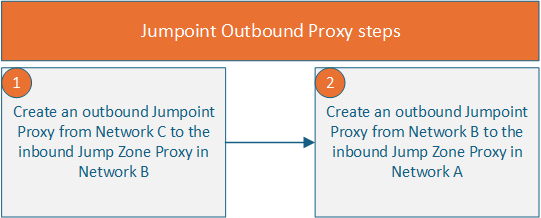

 To configure Network C (192.168.44.1) as an outbound proxy to communicate with the inbound Proxy in Network B (192.168.16.1):
-
Follow the steps in the Configure section.
-
From the table, find the appropriate Gateway and click the link to download the installer file.
-
If you have access to the system you want to use as the Gateway host, you can run the installation file immediately. Otherwise, save the file and then email it to the remote user to deploy on the system that will serve as the Gateway host.
-
From the system that will host the Gateway, run the installation package. When the installation wizard appears, click Next.
-
Read and accept the waiver agreement. You must accept the agreement to be able to proceed with the installation.
-
Read and agree to the disclaimer.
-
Choose where you would like the Gateway to install. The default location is C:\Program Files (x86)\BeyondTrust\Gateway\your-site.
-
Click Install.
-
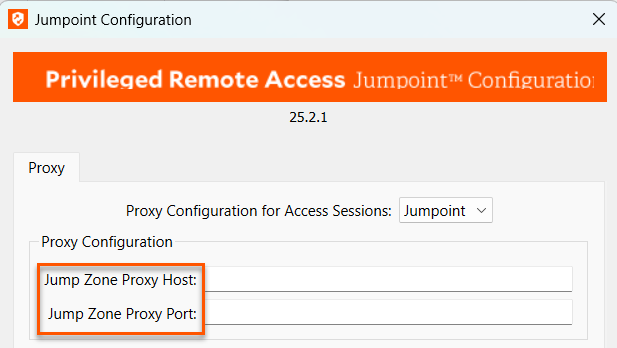
If you are installing a single Gateway, the Gateway Configuration application opens to allow you to configure proxy settings.
-
On the Proxy tab, select Gateway for the Proxy Configuration for Access Sessions section.

-
For Proxy Host, enter an address. For this example, enter 192.168.16.1.
-
For Proxy Port, enter a number or a port that is defined in your organization. The default port number is 9555. For this example, use the default port number.
-
Click OK, then Finish.
 To configure Network B (192.168.16.1) as an outbound proxy to communicate with inbound Proxy in Network A (192.168.154.1), repeat steps 1-12, but for Proxy Host, enter 192.168.154.1.
The network path is now configured for Jump Clients and Gateways from Network C through Network B to Network A, allowing Network C to communicate with the appliance.
Updated 9 days ago
