Access console interface | PRA for Desktop
The access console contains several panels, providing tools and information about sessions.
-
Sessions: Manage multiple remote sessions at the same time.
-
Queues: Queues list sessions currently running as well as requests to share sessions with any member of a team. Details about the remote system being accessed appear in this section.
-
Type: How the session was started.
-
Owner: The user the session is assigned to.
-
Total Time: Total duration since the session was created.
-
Computer: The hostname of the customer’s system.
-
OS: The operating system running on the customer’s system.
-
Uptime: How long the customer’s system has been running since last reboot.
-
External Key: An identifier passed from an external system (like a ticket ID).
-
Credential: The stored credential in BeyondTrust Vault linked to the session.
About credentials
In order for the credential column to work correctly, the following items need to be configured:
-
A Vault account (personal or shared) needs to be created.
-
A Gateway needs to be created.
-
An Asset needs to be created.
-
In the Asset Associations section of the Vault account, the Any Assets option needs to be selected.
-
In Access Permission section of the Users & Security > Users page, the appropriate Assets and roles need to be selected for the Allowed Asset Methods and Asset Roles permissions.

- The credential name for this field comes from the Credential Store and is not the actual credential.
- The credential name is comprised of the Name and Username fields of the Vault account.
-
-
-
Dashboard: Privileged users can view and monitor ongoing sessions and teammates of a lower role, providing administrative oversight to help manage staff.
-
Asset Interface: Installed Jump Clients and Assets appear here, grouped according to who can access them.
You can filter the list of Assets and search within specific fields. You can also save filters. Once a filter has been created and applied, click Save to enter a name for the filter and keep it for future use. Saved filters appear in a list under the Add Filter button. To apply a saved filter, double-click the filter name in the list, or right-click the filter name and click Apply. To delete a saved filter, right-click the filter name and click Remove. -
Chat: Chat with other logged in users. You also can share your screen with a team member without requiring a session.
Change settings and preferences in the access console
Click File > Settings in the upper-left corner of the console to configure your preferences.
In general, you can configure the console settings according to your preferences. However, your BeyondTrust administrator might choose to manage your settings, enforcing those managed settings if desired.
If your BeyondTrust administrator has changed and applied the default settings, then you will see a Settings Changed alert the next time you log into your console. Click View Settings to open your settings window to view the changes, or click OK to acknowledge the changes.
These instructions assume you are allowed to choose the settings used in your console. Settings enforced by your administrator appear marked with an asterisk and are grayed out, and they are not locally configurable. See your administrator or Console settings for more information.
The Access Console Settings window includes a Restore Defaults button in the lower-left corner of the window. This button returns all of your settings to the BeyondTrust default settings or to the default settings applied by your administrator if any have been set. An alert dialog asks you to confirm that you wish to change to the defaults. Click Cancel if you wish to return to your locally saved preferences.
If any of the defaults are forced by your administrator, you are unable to configure them.
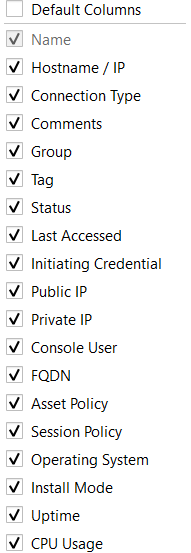
You can choose which columns to add, move, and remove in the grid within the Desktop console. To add customize columns, you must unselect the Default Columns checkbox.
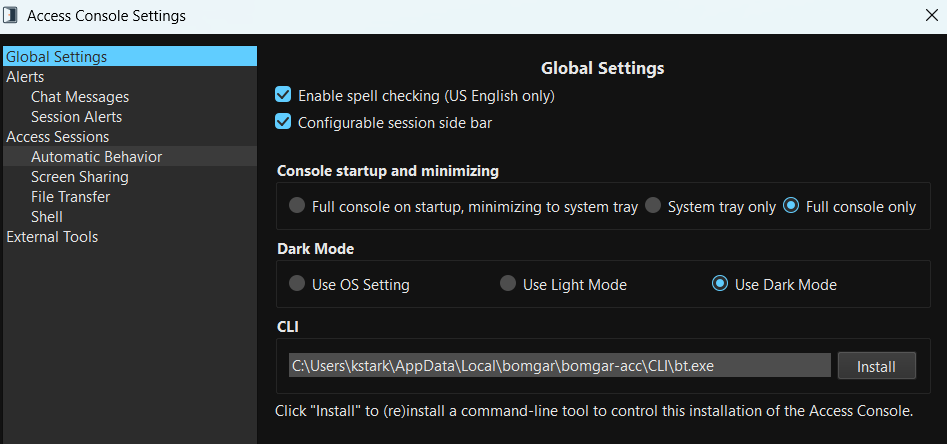
Global settings
From the Global Settings section, you can choose to enable or disable spell check for chat. Currently, spell check is available for US English only.
Choose if you want the session menu icon to display, if the sidebar can be detached, and if the widgets on the session sidebar can be rearranged and resized.
You can choose to change your display mode. Options include OS Setting (default), Light Mode, and Dark Mode.
The Dark Mode option applies to Windows and macOS only.
In addition to switching the display mode within the access console, users can change it in OS Settings by selecting Themes and related settings > Color > Choose your color.
The CLI section indicates if a Command Line Interface tool is installed for this installation of the Access Console. If it is not installed, you can choose to install it by clicking Install.
Alerts
Choose your alert settings for chat messages. When you receive a chat message, you can choose to hear a sound and to see the application icon flash.
If you would like to upload a custom sound for chat messages, click the […] button and select a WAV file on your computer. The file can be no larger than 1 megabyte (MB).
Choose if the team chat should include status messages, such as users logging in and out, or only chats sent between team members.
Choose if you want to receive pop-up notifications for messages received in a team chat and/or in a session chat.
Choose if you want to hear an audible alert when another user requests to share a session with you. If you would like to upload a custom sound for shared sessions, click the […] button and select a WAV file on your computer. The file can be no larger than 1MB.
You also can choose to receive pop-up notifications for certain events. These notifications will appear independent of your console and on top of other windows. Set where you wish to see pop-ups and how long they should display.
Access sessions
Choose if you want to automatically start screen sharing when you begin a session.
You can choose to open sessions as tabs in the console or to automatically detach sessions into new windows.
Set the default quality and size for a screen sharing session. When screen sharing starts, you can automatically enter full screen mode, which in turn can automatically collapse the chat bar.
Additionally, when screen sharing starts, the remote system can automatically have its display, mouse, and keyboard input restricted, providing a privacy screen.
Select the default RDP display size for all RDP sessions.
An option allows you to open a PRA connection expanded across all the monitors on the client computer regardless of the client monitor configuration. With this feature, you can fully utilize all the monitors connected to the client computer, therefore being able to adjust screen sizing and scaling during an RDP session across multiple monitors.
For easier access to screenshots you capture from the console, set the default directory where you wish to save your console-captured remote screenshots.
For easier file transferring, set the default directory from which you wish to start browsing your local file system.
Set the number of lines to save in the command shell history.
You can change the command shell display by selecting the font type, font size, text color, and background color.
Several options for the default shell are available, including Windows Command Prompt, PowerShell, Zsh, Bash, sh, fish, and tcsh. To set the shell preference order, select each shell and use the arrow buttons beside the list to move the selected shell up or down. Sessions start using the first available shell for the session.
External tools
To set the External Tool order, select each tool and use the arrow buttons beside the list to move the selected tool up or down. This affects the order of external tools in the dropdown list of tools for the Open Client button when starting a session.
If you want to use your own RDP tool, check Open remote RDP Sessions with an External Tool.
When using this feature with Windows Remote Desktop as the external tool, you can log in into browsers and apps on the remote computer using FIDO2 authentication from a FIDO2 hardware key on the local user's machine.
The local user's computer and the remote computer must use one of the following operating systems:
- Windows 11 single or multi-session with the 2022-10 Cumulative Updates for Windows 11 (KB5018418) or later.
- Windows 10 single or multi-session, versions 20H2 or later with the 2022-10 Cumulative Updates for Windows 10 (KB5018410) or later.
- Windows Server 2022 with the 2022-10 Cumulative Update for Microsoft server operating system (KB5018421) or later installed.
This is known to work with Chrome browser version 126 or better and Edge browser version 126 or better.
If you want to use your own SSH tool, check Open Shell Sessions with an External Tool. This setting applies to both command shell and Shell.
The Open Shell Sessions with an External Tool setting has limitations when used with the command shell. The proxy is for the shell only; it is not a full SSH tunnel. File transfers, for example, must still use the existing tools on the Jump Client.
Check Automatically add session aliases to SSH Config (when possible) to automatically add aliases to the ssh.config file. This creates a POSIX command in a Shell session, which you can copy and paste into your command line interface to make an SSH connection to the remote system. The alias is removed from the ssh.config file at the end of the session.
Important informationIn order to use your own tool, you must enable Database Connection in /login > Users & Security > Users > Access Permissions > Jump Technology > Database Connection. This may need to be enabled by a group policy. You must also enable the appropriate external tools in /login > Asset Management > Assets > Asset Settings.
External tools are added and configured in the /login administrative interface. Availability of external tools depends on user permissions and group policies.
Use the CLI for the access console
The Command Line Interface (CLI) tool allows you to initiate and manage remote sessions directly from the command line. This is available if an admin has checked Allow the Access Console CLI tool under Access Console at /login > Management > Security.
For more information, see Access console.
To use the CLI tool, you must be logged in to the access console, and the CLI tool must be installed. It is installed from Global Settings. During installation, you might receive instructions to add the installation location to the PATH, or it may be added to the PATH by the installation process.
Once installed, enter commands in a terminal or run dialog to interact with the logged-in rep instance.
You must be logged in to the access console for commands to work. The username for the Asset properties must be entered and must match the username for the CLI tool.
Enter commands
Enter a single CLI command with sub-commands.
Example
bt ssh <user>@<host>Subcommands take the form:
bt <command>Initiate a session
Search for a Vault account by name (for types that can inject) and an Asset by name. Asset searches are restricted to the type represented by the command. For example, bt ssh searches only Shell Assets.
If only one of each searched name is found, the session starts with that Asset and credential. If more than one result is found, you are prompted to choose the correct account and/or Asset.
A flag can be set flag to output the tunnel information in a format for use by another process or script, so that session calls can be piped to other functions or included in automated tasks such as VS code tasks. If this flag is set, the tunnel information prints, but the connection and external tool do not open.
Executing onExternalToolClicked() callback
For all types except SSH, the representative can attempt to execute the onExternalToolClicked() callback for the given type before returning control to the CLI tool, rather than transferring that logic to the CLI tool itself.
For SSH, the SSH session replaces the CLI tool process.
Use session specific subcommands
SSH
SSH subcommands take the form:
ssh <account>@<host>Once the session is established, it directly spawns the SSH process to connect to the local tunnel and exits.
Example
Create an SSH session:
bt ssh <user>@<host>RDP
RDP subcommands take the form:
rdp <account>@<host>Once the session is established, it
- spawns the default RDP client.
- prints the tunnel information to the CLI for informational purposes.
- exits.
Example
To open the RDP tool, enter:
bt rdp <user>@<host>DB
DB subcommands take the form:
db <account>@<host>Once the session is established, it:
- spawns the DB client for the selected DB type, if possible. Part of the return value must be DB type and/or command to try.
- prints the DB connection information.
- exits.
Database Connection
Database Connection subcommands take the form:
pt <host>There is no credential injection for Database Connections.
Once the session Is established, it prints the tunnel definitions and exits.
Because the tunnel is generic, it cannot spawn a specific tool.
Use other subcommands
List
List subcommands take the form:
listThe list subcommand shows connected sessions by Asset name.
Close
Close subcommands take the form:
close <session>The close subcommand closes the tunnel for the given session.
Use infrastructure access mode
Advanced users, such as developers, can select Infrastructure Access Mode when logging in to the console. This provides a simpler console, available from the system tray or menu bar. This is convenient for protocol and database tunneling, and BYOT sessions, but other session types are also supported.
Infrastructure Access Mode is not available on Linux systems.
To enable Infrastructure Access Mode, go to File > Settings. On the Global Settings tab, under Console startup and minimizing, select either Full console on startup, minimizing to system tray or System tray only. Choosing Full console only disables Infrastructure Access Mode. Your selection takes effect the next time you log in.
Once logged in, the Infrastructure Access Console (IAC) task bar widget displays, and an icon appears in the system tray (Windows) or menu bar (macOS). The IAC widget has two tabs, Assets and Active Sessions.
Assets:
- Shows a list of existing Assets.
- These items can be searched and sorted using the menu in the upper left.
- Hover over any item for more information about the item.
- Click any item to initiate a session. The widget shows the attempt in progress, with an option to cancel.
- Click Show Full Console to view the access console. The full console is required to begin a chat session or accept a session invite, and for some session types. You can close the full access console when it is no longer required and continue using the console in Infrastructure Access Mode.
Active Sessions:
- Shows any active sessions, and the session type.
- Click the dropdown arrow for options such as Show Session or End Session.
- Click the gear icon in the upper right to view What's New, About, and Quit the Access Console.
Updated 9 days ago
