Account groups | PRA On-prem
What are account groups?
Vault account groups are collections of user accounts within the Vault system, organized based on access permissions or roles. These groups are used to streamline the management of shared Vault accounts, enabling Vault administrators to efficiently grant users access to multiple shared accounts. Account groups can also associate a group of shared Vault accounts with a specific group policy. Note that shared Vault accounts can only belong to one group at a time, and personal Vault accounts cannot be added to an account group.
How are account groups useful to my organization?
Account groups help simplify credential management by allowing administrators to assign access to multiple shared Vault accounts at once, ensuring efficient and controlled access for users. These groups also provide an effective way to apply policies to a collection of shared accounts, enhancing security and compliance while reducing administrative overhead.
A shared Vault account can belong to only one group at a time and personal Vault accounts cannot be added to an account group.
How do I access the Account Groups page?
- Use a Chromium-based browser to sign in to your Privileged Remote Access URL.
This URL is provided in the BeyondTrust welcome email and includes your site URL followed by /login. - From the left menu, click Vault.
The Accounts page opens and displays by default. - At the top of the page, click Account Groups.
The Account Groups page displays.
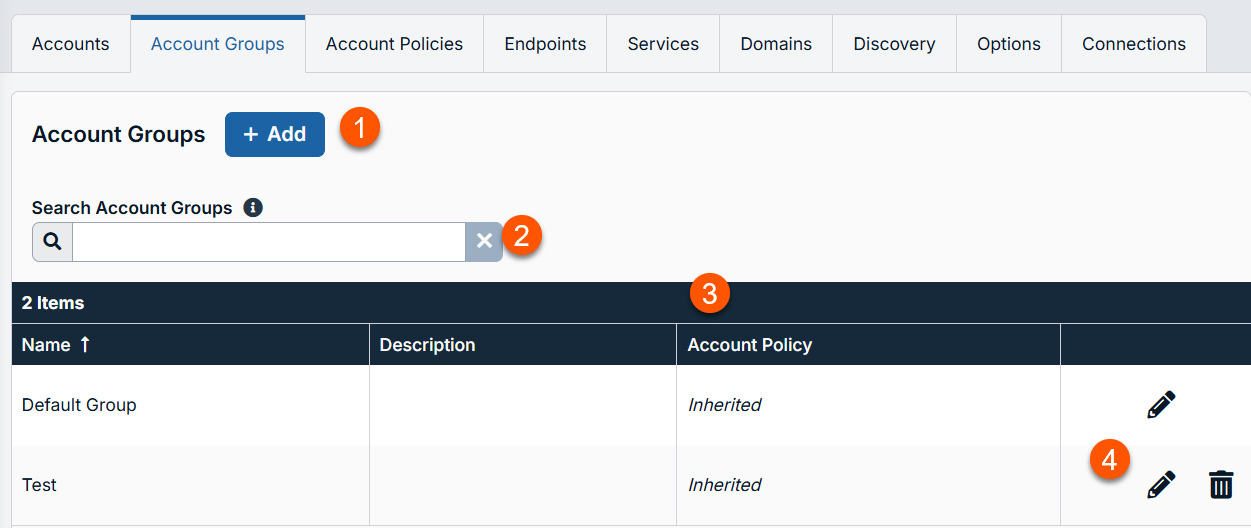
-
Add: Add a new Account Group.
-
Filter: Search on a Name or Description.
-
Account Groups columns: The list of columns varies on what columns you choose to display.
Account Groups columns
- Name: Unique name of the account.
- Description: A brief description of the Account Group.
- Account Policy: Select an existing policy or specify a custom policy.
-
Account Groups options: Edit an Account Group or delete an Account Group.
Add an account group
-
From the left menu, click Privileged Remote Access > Vault.
-
The Vault page opens and the Accounts tab displays by default.
-
Click the Account Groups tab.
-
Click Add.
The Add Account Group page displays. -
In the Name field, enter a name for the account.
-
In the Description field, enter a useful description for the account.
-
Select a specific policy for the account group or leave Account Policy set to the default value of Inherit Policy Settings. If Inherit Policy Settings is selected, the accounts in this account group inherit the policy settings set for the global default account policy on the Vault > Options page.
-
Under Accounts, select the group from the Source Account Group list, and then select the accounts to add to this group.
The Default Group is a system generated group that contains all user accounts that do not belong to an account group. The Default Group is selected by default.
You can filter the list of available accounts to add to the group by selecting a group from the Source Account Group list or by using the Search Selected Account Group box to search by Name, Endpoint, and Description.
Asset associations
Select the type of Asset Associations for the account group. The Asset Associations setting determines which Assets the accounts in this account group are associated with, so that only the accounts relevant to the target machine are available in the access console during credential injection attempts. Select one of the following associations methods:
- Any Assets: Accounts in this group can be injected into any Asset session in which the accounts are applicable.
- No Assets: Accounts in this group cannot be injected into any Asset session.
- Assets Matching Criteria: Accounts in this group can be injected only into Asset sessions that match the criteria you define, in which the accounts are applicable.
- You can define a direct association between applicable accounts in this account group and specific Assets by selecting the Assets from the list, and then clicking Add Asset.
- You can further define the association between applicable accounts in this account group and Assets by specifying matching criteria based on the following Asset attributes. If configured, accounts in this account group are available for injection for any Assets that match the specified attribute criteria in addition to any specific Assets you added as matching criteria.
- Shared Asset Groups: Select an Asset Group from the list.
- Name: This filter is matched against the value that appears in the Name column of the Asset in the access console.
- Hostname / IP: This filter is matched against the value that appears in the Hostname / IP column of the Asset in the access console.
- Tag: This filter is matched against the value that appears in the Tag column of the Asset in the access console.
- Comments: This filter is matched against the value that appears in the Comments column of the Asset in the access console.
If a user was granted access individually from the account group edit page and also through a group policy, the group policy access is overridden by the explicitly granted individual access for this user.
Search Account Groups
You can filter the list of available account groups by using the Search Account Groups box. Based on the account type, you can use Name or Description as the criteria to search.
Edit an Account Group
-
From the left menu, click Privileged Remote Access > Vault.
The Vault page opens and the Accounts tab displays by default. -
Click the Account Group tab.
The Account Groups page displays. -
Select a group in the list.
-
Click the pencil
 to edit a group.
 -
Make the necessary changes, and then click Save.
Delete an Account Group
-
From the left menu, click Privileged Remote Access > Vault.
The Vault page opens and the Accounts tab displays by default. -
Click the Account Group tab.
The Account Groups page displays. -
Select a group in the list.
-
Click the trash can
 to delete a group.
 -
Click Yes.
