Endpoint automation | PRA Pathfinder
What is endpoint automation?
Endpoint automation allows you to remotely execute scripts across multiple endpoints simultaneously without needing to start a support session, streamlining administrative tasks and improving efficiency.
How is endpoint automation useful to my organization?
Endpoint automation simplifies the management of multiple systems by enabling the automated execution of scripts, reducing the need for manual intervention and ensuring consistent updates and configurations across all endpoints.
The endpoint automation feature is only available to service mode Jump Clients with an active connection on Mac, Windows, or Desktop Linux.
How do I access the Endpoint Automation page?
- Sign into app.beyondtrust.io.
The BeyondTrust Home page displays. - From the main menu, click Privileged Remote Access > Asset Management.
The Asset Management page opens and the Jump Clients tab displays by default. - Click the Endpoint Automation tab.
The Endpoint Automation page displays.
The Endpoint automation page
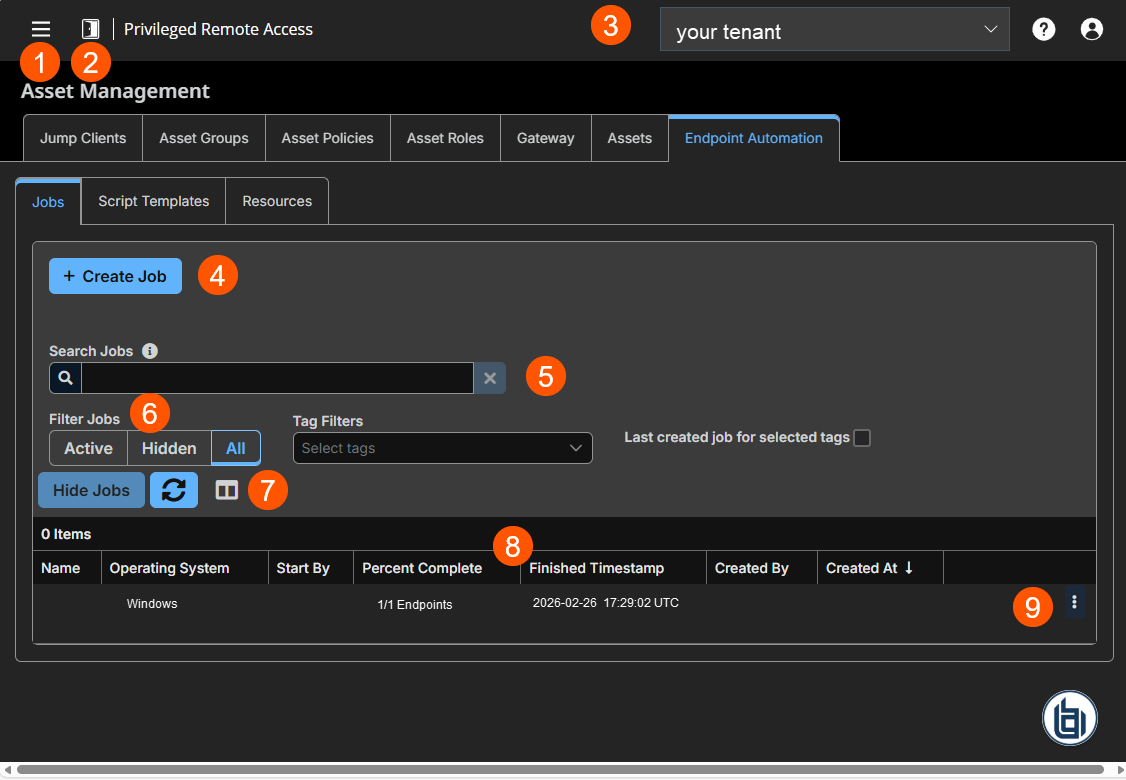
- Left menu: Easy access to all pages in Privilege Remote Access, including Status, Consoles & Downloads, My Account, Configuration, Asset Management, Vault, Console Settings, Users & Security, Reports, Management, and Appliance pages.
- Status: Opens the Status page.
- Header: Change your tenant site, manage your profile, and access documentation.
-
Create Job: Creates a new automation job.
-
Search: Search a job by name.
-
Filter: Filters three tabs: Active, Hidden, or All.
-
List options: Click Hide Jobs to hide a job, click
 to refresh the jobs list, and click
  to hide or display columns.
 -
Endpoint Automation columns: The list of endpoint automation jobs. Not all of the columns are displayed.
Endpoint Automation columns
- Name: The unique name of the job.
- Operating System: The name of the operating system the run is to run on.
- Start By: Determines the date/time when the job runs. This is set in the Start By field.
- Percent Complete: Displays the number of endpoints the job has successfully run.
- Finished Timestamp: Displays detailed information of the job. For example, date/time.
- Created By: The owner's name that created the job.
- Created At: Displays date/time of creation.
-
Endpoint automation options: You can get details, duplicate endpoints, hide or cancel endpoint jobs.
Jobs tab
Create a job
-
Click Create job.
-
In the Name field, enter a name for the job.
-
In the Start by field, select the starting date and time. To run a job immediately, select the current date and time.
-
In the Notes field, enter any notes if you would like to record more information about this job.
-
Select an existing script template and modify the fields as needed, or complete the following steps:
- In the Operating System field, select the operating system. Scripts are usually specific to operating systems.
A default command compatible with all operating systems is provided, along with a specific command for Windows PowerShell. In the Powershell cmdlet, Set-ExecutionPolicy, the Unrestricted parameter is set by default. This temporarily changes the execution policy to Unrestricted for the duration of the script.
- In the Run Script Command field, enter the complete script command. For an example of a Windows command, use cmd.exe /C %script%.
- In the Script field, enter a script. For example, type ping.com.
- If needed, add a resource to the script. Click Add Resource and select a previously added resource, or click Add External Resource and provide a filename and URL.
- In the Operating System field, select the operating system. Scripts are usually specific to operating systems.
-
From the Endpoint Search section, enter the search criteria for your endpoints.
TipFor more information about each option, click the i icon beside it. You must click Search Jump Clients before any endpoints become available. Remember that you will see only endpoints with the same operating system as designated by the script above.
-
From the list of search results, select specific Jump Clients and then click Add Selected Jump Clients to Job, or click Add All Jump Clients Search Results to Job.
-
The list of Jump Clients selected for the job appears at the bottom of the screen.
-
To remove Jump Clients from a job, select their check boxes in the Selected Endpoints list, then click Clear selected Jump Clients.
-
Once the list of Jump Clients for the job is complete, click Run job.
-
You can immediately view the job in the jobs list.
-
To cancel a pending job, click
 , then select Cancel Pending Endpoint Jobs.
- When you cancel a job, it doesn’t stop the process; it just prevents it from starting.
- If a job fails to start, it retries for up to 7 days.
- Only one job at a time can run on an endpoint.
- The length of time finished job data remains on the appliance can be configured on the Security page.
TipWhile you can begin by creating a job directly, you may find it more efficient to start by adding resource files, then creating script templates.
Job Status
The job statuses are the following:
| Status | Description |
|---|---|
| Pending | The server is waiting to schedule the job until certain conditions are true. |
| Scheduled | The job has been sent to the endpoint. |
| Running | The endpoint has notified the server that the script has started. |
| Finished | The endpoint has notified the server that the job has finished, or the server has declared it finished after it exceeded a timeout. |
Job status types
The job status has the following types:
| Status | Description |
|---|---|
| Success | The script is completed. |
| Error | The script returned an error, or an internal error occurred at the endpoint. |
| Canceled | A user canceled a pending job. |
| Timed out | The job exceeded the timeout period. |
| Ping timed out | The job failed to ping the server within the ping timeout period. |
| Endpoint offline timed out | The endpoint was not online within the timeout period. |
| Endpoint removed | The Jump Client was removed after the job was created, meaning the script could not be completed. |
View job details
-
For more information about a job, click
, then select Details. -
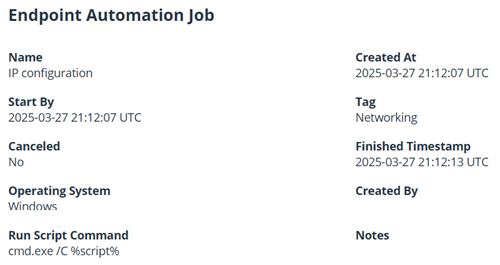
From the submenu, Details shows you all the information about the job in a static, non-editable form. In addition to the fields defined when the job was created, details include who created the script and when, when the script finished running, and if the script was cancelled.
This is an example of a Details report.
-
A table at the bottom of this page lists all jobs, which can be filtered by the Successful, Failed, or All tabs. The All view includes pending and running jobs.
- Click to refresh the view.
- Click to choose which columns to view.
- Click
-
From the Output Tail Report section, click Download Report to download the output tail either as a CSV or a text file. This provides a high-level overview of the results of completed scripts.
-
For more details about a finished job on a specific endpoint, click
 . This opens a modal window that displays the exit code, the log file path, any error codes, and the output tail, which may be useful for diagnosing errors.
Duplicate a job
- To duplicate a job, click , then select either Duplicate With All Endpoints, Duplicate With Unsuccessful Endpoints, or Duplicate With Successful Endpoints.
- This creates a new job with all fields identical to the previous job. You can modify these fields before running it.
- If you select Duplicate With All Endpoints, the same endpoints are automatically selected.
- If you select Duplicate With Unsuccessful Endpoints, only endpoints that failed the previous job are selected.
- If you select Duplicate With Successful Endpoints, only endpoints that succeeded with the previous job are selected.
You can modify the selected endpoints before running the job.
- Once you have made any desired modifications, click Run job.
- You can immediately view the job in the jobs list.
- To cancel a pending job, click , then select Cancel Pending Endpoint Jobs.
Hide a job
-
To hide jobs from the initial view, click Hide Jobs.
- Select one or more jobs to hide, then click Hide Selected Job(s).
- Cancel Hide Jobs cancels the current operation but leaves any previously hidden jobs as hidden.
- Now, you can filter jobs by the Active, Hidden, or All tabs.
- From the Hidden view, click Unhide Jobs to select jobs to return to active status.
- You can also show or hide a job by clicking , then selecting either Hide or Unhide.
-
Click
to refresh the view. -
Click
to choose which columns to view.
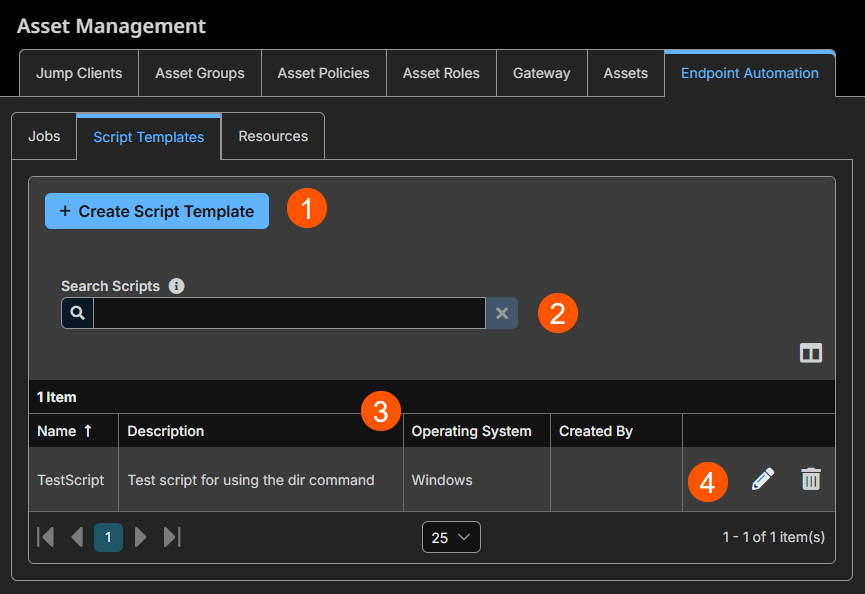
Script templates tab
The Script Templates tab lets you create a script template and shows a list of previously created script templates.
-
Create Script Template: Creates a new script.
-
Search: Search a job by name.
-
Script Template columns: The list of script templates. Not all of the columns are displayed.
Script Template columns
- Name: The unique name of the job.
- Description: The name of the operating system the run is to run on.
- Operating System: Displays the operating system.
Create a script template
- Click Create Script Template
The Create Endpoint Automation Script Template page displays. - In the Name and Description fields, enter a name and description for the script respectively.
- In the Operating System field, select the operating system. Scripts are usually specific to operating systems.
- In the Run Script Command field, enter the run script command. For example, on a Windows operating system, use cmd.exe /C %script%.
- In the Script field, enter the script. For example, ping .
- If needed, add a resource to the script. Click Add Resource and select a previously added resource, or click Add External Resource and provide a filename and URL.
- Click Save.
- You can immediately view the script template in the list of templates and can select it when you create a job.
Search scripts
-
In the Search Scripts field, enter the script name to search.
-
Click a column header to sort by that field.
-
Click
to choose which columns to view.
Edit a script
-
Select a script from a list.
-
Click
 to edit a script template.
 -
Make the necessary changes, and then click Save.
Delete a script
-
Select a script from a list.
-
Click
 to delete a script template.
 -
A confirmation dialog box displays. Click Yes.
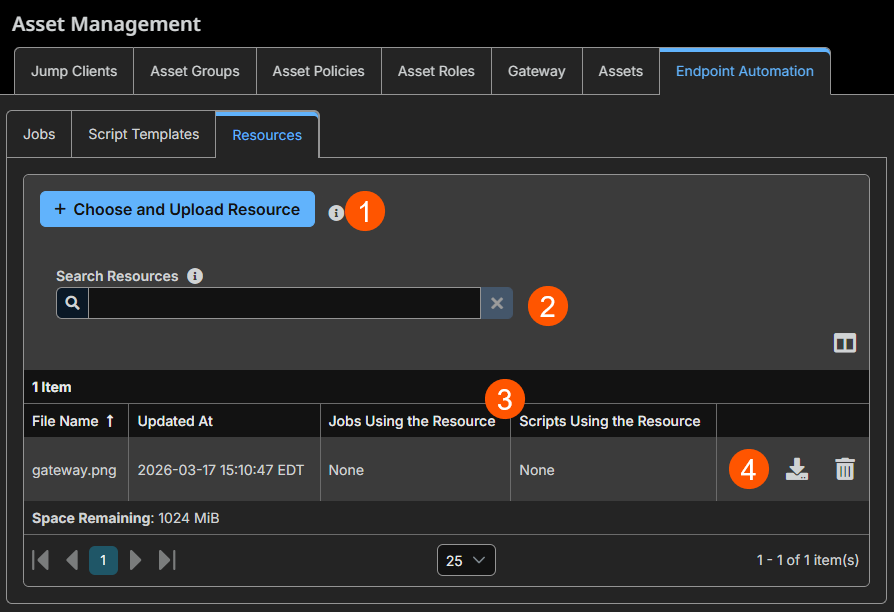
Resources tab
The Resources tab lets you upload resource files for use in endpoint automation jobs and shows a list of previously uploaded resources.
-
Choose and Upload Resource: Opens a dialog box to select a resource to upload.
-
Search: Search a resource by filename.
-
Resource columns: The list of resources. Not all of the columns are displayed.
Resource columns
- File Name: The unique name of the resource.
- Jobs using the Resource: Displays the jobs that are defined from the Jobs tab.
- Scripts using the Resource: Displays the scripts that are defined from the Scripts Templates tab.
-
Resource options: The option to download or delete a resource.
Add a resource
-
Click Choose and Upload Resource.
-
An Open dialog box displays.
-
Select the appropriate resource file.
-
Click Open.
This adds the resource (that is, batch.bat file) to the resource list where you can either download or delete the resource file.
The maximum resource storage size is 1 gigabyte (GB) by default and can be configured on the Security page.
Download a resource
-
From the resource list, locate your resource.
-
Click
 to download a resource file.
TipBy default, it downloads the resource file to the Downloads folder.
Delete a resource
-
From the resource list, locate the file you wish to delete.
-
Click
to delete a resource file. -
A confirmation dialog box displays. Click Yes.
If a resource is in use, it cannot be deleted.
Roles for Endpoint Automation
There are three users roles that control what display on this page and what actions you can perform:
- Not Allowed
- User
- Administrator
You can configure these roles from the Users & Security > Users page or Users & Security > Group Policies page.
Differences between Not Allowed, User, and Administrator roles
The following table explains the different tasks on what each role can and cannot perform.
| Endpoint Automation Role | What can they do? |
|---|---|
| Not Allowed | Nothing. The Endpoint Automation tab does not display. |
| User | You are able to create new automation jobs with the following restrictions:
|
| Administrator | You have full access and ability to create Jobs, Scripts Templates, and Resources. |
Updated 3 days ago
