ServiceNow | PRA
Important informationYou must purchase this integration separately from your BeyondTrust Privileged Remote Access solution. For more information, contact BeyondTrust's Sales team.
Organizations using ServiceNow can integrate with BeyondTrust PRA to provide secure privileged access to critical assets from within ServiceNow, satisfy internal and external compliance requirements with comprehensive audit trails, and integrate with change management processes.
- Outbound Access Sessions: Technicians can launch BeyondTrust access sessions from within ServiceNow incidents using BeyondTrust Jump Technology.
- Session Updates: BeyondTrust access session data is written back to ServiceNow incidents, change requests, and configuration items. This includes file transfers, system information, session notes, and session recordings.
- Change Management Endpoint Approval: BeyondTrust PRA can be configured to request approval from ServiceNow before a device is accessed via the BeyondTrust PRA access console.
ServiceNow application scope
ServiceNow supports integrations that are developed in a global scope and integrations that are developed in an application scope. This documentation covers an integration that was developed in our BeyondTrust PRA application scope.
For this integration, administrators are prompted when configuring items that live in the global scope. For example, when configuring the Form Layout of an Incident, the user is prompted with an option to Edit this Section in Global. The recommendation for this integration is to edit the section in the global scope, which allows the user to edit the form or record without having to switch out of our BeyondTrust application scope.
The ServiceNow application is available at the ServiceNow Store.
Prerequisites
Outlined below are requirements for the BeyondTrust PRA and ServiceNow integration. If any of the integration requirements are not yet met, they must be in place prior to starting the integration setup process unless the associated features of the integration are not required.
Review base integration requirements
Base requirements are a current version of a ServiceNow release with a working Service Desk application, and a current BeyondTrust Appliance B Series (physical or virtual) with at least one usable access console.
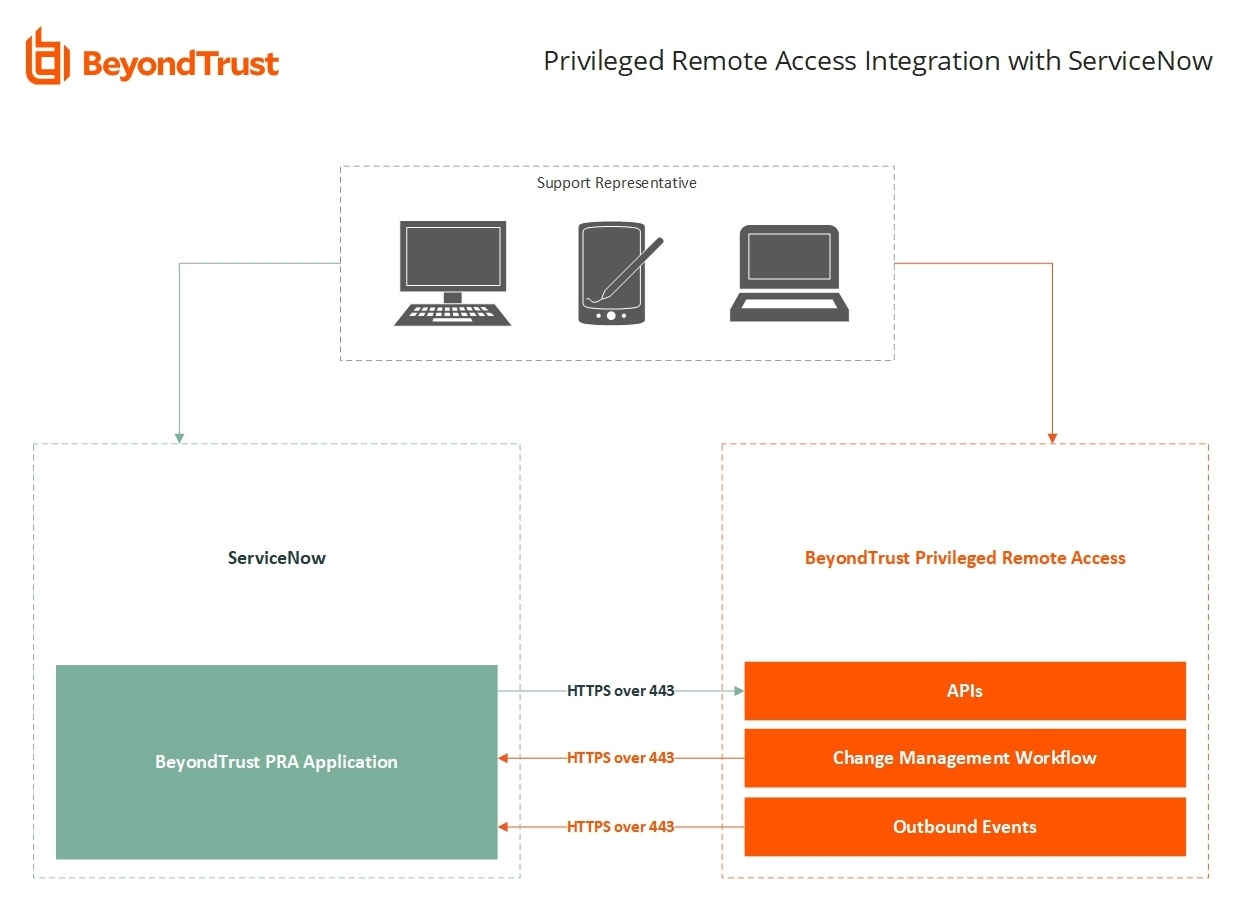
To configure network firewall rules for this integration, do the following:
- Allow TCP 443 traffic from the B Series Appliance to the appropriate ServiceNow instance.
- Allow TCP 443 traffic from the appropriate ServiceNow instance to the B Series Appliance.
- Optionally, use ServiceNow MID Servers for this integration.
For more information on MID Servers, see ServiceNow MID Server.
Review additional integration requirements
The PRA version of BeyondTrust's ServiceNow integration has additional features which require that certain ServiceNow functions be operational in order to work correctly. If these functions are not set up or actively used, the integration can still be installed and the basic features work, but the enterprise features are not usable until the necessary ServiceNow functionality has been implemented. This can be done after the initial installation of the integration update set(s). The additional features should immediately be usable, assuming the appropriate setup steps are taken during the integration setup as described in this guide.
To successfully integrate the BeyondTrust services with ServiceNow, the following requirements must also be met and reviewed:
- A working ServiceNow configuration management database (CMDB)
- One or more ServiceNow configuration items on which BeyondTrust Jump Client services can be or have been installed
The CMDB is used to launch BeyondTrust sessions based on the hostname of the machine added to the configuration item field of an incident. If the CMDB is not populated with any available hosts, BeyondTrust Jump cannot be used to remotely access them through ServiceNow's interface. These hosts can be added after the initial setup without making any changes to the integration.
BeyondTrust's supported operating systems include all of the major modern versions of Microsoft, Apple, and Linux. One or more computers running one of these operating systems needs to be populated in ServiceNow's CMDB for BeyondTrust's Jump features to work through ServiceNow. As mentioned above, this can be done after the initial installation of the integration.
Test the firewall
It is important to test all requirements of the integration before beginning setup. Most of these can be tested by the BeyondTrust and ServiceNow administrators within their respective systems, but to test the network firewall, the BeyondTrust admin should take the following steps to confirm that the necessary rules are in place.
- Sign into a machine either external to the B Series Appliance's network or in the same VPN as the ServiceNow instance, depending on how ServiceNow is connecting to the B Series Appliance's network.
- Sign into the B Series Appliance's /appliance interface.
- Browse to Support > Utilities :: TCP Connection Test.
- Enter the hostname of the ServiceNow instance, enter the port number of 443, and then click Test. A successful result is a Connected status message.
Do not enter the protocol when entering the ServiceNow instance, for example https://servicenow.example.com/. Instead, use the fully qualified domain name only, for example servicenow.example.com. In most environments, the BeyondTrust Appliance B Series resides in a DMZ network and has a public DNS address which ServiceNow contacts over the public internet. In some environments, BeyondTrust is not publicly accessible. In these cases, contact ServiceNow about implementing a VPN connection to your internal network for ServiceNow. For more information, see Virtual Private Network (VPN).
Configure Privileged Remote Access
All the steps in this section take place in the BeyondTrust /login administrative interface. Access your BeyondTrust interface by going to the hostname of your B Series Appliance followed by /login (e.g., https://support.example.com/login).
Verify the API is enabled
The BeyondTrust integration requires the BeyondTrust XML API to be enabled. This feature is used from within the integrating software to communicate with the BeyondTrust APIs.
In /login, navigate to Management > API Configuration and verify that Enable XML API is checked.
Create a ServiceNow OAuth API account
The ServiceNow API account is used from within ServiceNow to make Privileged Remote Access Command API calls.
-
In /login, navigate to Management > API Configuration.
-
Click Add.
-
Check Enabled.
-
Enter a name for the account.
-
OAuth Client ID and OAuth Client Secret are used during the OAuth configuration step in ServiceNow.
-
Under Permissions, check the following:
- Command API: Full Access.
- Reporting API: Allow Access to Access Session Reports and Recordings, and Allow Access to License Usage Reports.
-
Click Save at the top of the page to create the account.
Add outbound events
Outbound events are used to notify ServiceNow that a BeyondTrust Session has finished and is ready to be imported into ServiceNow.
-
In /login, navigate to Management > Outbound Events.
-
Click Add.
-
Provide a name of ServiceNow Integration or something similar, depending on your ServiceNow instance.
-
Set the URL to https://example.service-now.com/api/x_bmgr_bomgar_pam/outbound_event/session_end, where example.service-now.com is the ServiceNow instance name.
-
If using an outbound event token for added security, append outbound_event_token=YOUR-TOKEN to the end of the URL, so that the entire URL resembles https://example.service-now.com/api/x_bmgr_bomgar_pam/outbound_event/session_end?outbound_event_token=YOUR-TOKEN. You must also store this token with the appliance configuration record in ServiceNow.
-
For Events to Send, check Access Session End.
-
Click Save.
Create custom fields
BeyondTrust custom fields are used to map ServiceNow Tasks (incidents, change requests, problem records, and service catalog requests) and Configuration Items to BeyondTrust access sessions.
- In /login, navigate to Configuration > Custom Fields.
- Click Add.
- Enter the following values:
- Display Name: ServiceNow Task ID
- Code Name: snow_task_id
- Check the Show in Access Console option.
- Click Save to save the new field.
- Repeat the steps above for the following custom field values:
- Display Name: ServiceNow Configuration Item ID
- Code Name: snow_cmdb_ci_id
- Show in Access Console: checked
Set up the custom link
BeyondTrust custom links can be configured to allow users to quickly access the ServiceNow incident that is associated with the session.
-
In /login, navigate to Console Settings > Custom Links.
-
Click Add.
-
Enter a name for the link, and then set the URL to https://example.service-now.com/nav_to.do?uri=task.do?sys_id=%SESSION.CUSTOM.SNOW_TASK_ID% where https://example.service-now.com is the ServiceNow instance name. If needed, you can use any of the available macros to customize the link according to your specifications.
-
Click Save to save the new link.
Set up change management workflow
BeyondTrust change management workflow can be configured to require approval through an ITSM system before allowing access to BeyondTrust Jump Clients.
-
In /login, navigate to Jump > Asset Policies.
-
Under Ticket System, enter an appropriate Ticket System URL similar to https://example.service-now.com/api/x_bmgr_bomgar_pam/endpoint_approval.
-
Upload the CA certificate from the ServiceNow instance.
-
Enter the desired User Prompt. For example, with a change request workflow, enter ServiceNow ChangeID Required.
-
Click Save.
-
Next, under the Asset Policies section, click Add, or click Edit next to an existing Asset Policy.
-
Under Ticket System, check Require a ticket ID before a session starts.
Configure ServiceNow
Unless otherwise noted, all of the steps in this section take place in the ServiceNow interface. The development and/or test instances of ServiceNow should be used initially so that the integration can be thoroughly tested before installation in the production instance.
Install BeyondTrust integration
The Integration must be purchased directly from BeyondTrust. After the purchase, it is installed via the ServiceNow Store. There is no mechanism to purchase the integration at the ServiceNow Store. Follow the steps below to request and install the integration.
- Sign in to your ServiceNow platform with your corporate account. Contact your company Now Support (HI) admin if you do not have credentials.
- Search for BeyondTrust PRA Integration, or go to the app's page.
- Click Request App.
- Request Privileged Remote Access with ITSM.
- Within a business day, BeyondTrust approves the request and sends a copy of these installation instructions to the requester.
- Once you receive the confirmation, return to the app's page in the ServiceNow store.
- Click Complete Purchase.
- Review the contract details.
- If you agree, check Accept the Site Terms of Use.
- Click Complete Purchase.
- The app is ready for installation on your ServiceNow instance(s).
- Repeat the steps below for each instance.
- Sign into the ServiceNow instance on which you want to install the app.
- Navigate to System Applications > All Available Applications > All.
- Search for the app you want to install.
- Click Install.
For more information on installing applications, see ServiceNow's Help Page.
Create local update set
Local update sets are used in ServiceNow to capture configuration changes. They can be used to quickly transfer these configuration changes to other environments.
- Select System Update Sets > Local Update Sets, and click the New button above the list of update sets to create a new local update set.
- In the Name field, enter BeyondTrust - ServiceNow Integration Configuration (or an equivalent).
- Click Submit and Make Current. This update set captures any changes you make during the configuration process. Make sure that the BeyondTrust - ServiceNow Integration Configuration update set is selected in ServiceNow's update set dropdown for the following steps.
- Make sure the Application is set to BeyondTrust PRA Integration. If it is not, use the settings cog in the upper right of the screen to switch to the aforementioned scope.
- After configuration is complete and tested, the local update set can be imported or promoted to new instances of ServiceNow (e.g., the production instance) to quickly replicate the integration. This must be done after transferring the BeyondTrust - ServiceNow retrieved update set.
For more information on transferring update sets, see Transfer the update sets.
Update BeyondTrust PRA session event types
Event types are used to control which BeyondTrust events are processed with a BeyondTrust session import. This step updates the database with all the available event types.
- Select BeyondTrust PRA > Update Event Types.
- This loads all the available BeyondTrust session event types into the database so that unwanted events can be filtered out in a subsequent step when setting up your B Series Appliances.
Set up B Series Appliance
B Series Appliances are set up in ServiceNow to connect ServiceNow with a B Series Appliance.
- Select BeyondTrust PRA > Appliances.
- Click New to add a new BeyondTrust Appliance B Series and enter the following values:
- Name: Must be Default.
- Hostname: Hostname of the BeyondTrust Appliance B Series.
- OAuth Client ID/ OAuth Client Secret: the OAuth client ID and Client Secret that are used to authenticate to B Series Appliance. This is obtained in a previous step, Create an OAuth API account.
- Outbound Event Token: The token that is used as an added security measure to confirm outbound events are coming from the B Series Appliance that is sending the same token. If left blank, this outbound event token process is ignored. However, if a value is provided, the same value must be sent from all outbound events coming from BeyondTrust as a parameter named outbound_event_token.
- Integration Enabled: Turns the integration on and off.
- Import External Sessions: If checked, session reports for sessions that are started external to ServiceNow are imported into ServiceNow.
- Accepted IP Addresses: A comma-separated list of IP addresses from which this integration accepts outbound events.
- Auto Associate With User: If checked, when the session report is imported, the integration attempts to associate a ServiceNow user with the session. The lookup is based on the session's primary user's username.
- Auto Associate With Config Item: If checked, when the session report is imported, the integration attempts to associate a ServiceNow config item with the session.
- Events to Import: A list of BeyondTrust session events to process when importing a BeyondTrust session.
You cannot configure this setting until after the B Series Appliance has been saved.
Configure events to import
Event types are used to control which BeyondTrust events are processed with a BeyondTrust session import. This step defines which events are processed for each BeyondTrust session import.
- Select BeyondTrust PRA > Appliances.
- Click the name of your B Series Appliance.
- Click the Edit Events to Import button (the lock icon).
- Click the Add/Remove multiple button (the group of people icon) located on the right side of the field.
- Select the events you want from the Collection field on the left and use the arrows to move the events to the List field on the right.
You can use CTRL+A to select all events.
- Click the Save button when you are finished.
Configure BeyondTrust session-related lists
Related lists are used to provide a list of BeyondTrust sessions that are associated with a task (incident, change request, service catalog, etc.) or configuration item.
Task configuration
- Select Incident or the desired task type.
- Click Open to see a list of open tasks.
- Select an incident by clicking the Task Number.
- Right-click the title bar and select Configure > Related Lists.
- Ensure that Access Session > Task has been moved to the Selected column.
- Click the Save button.
- The BeyondTrust sessions list appears towards the bottom of the form once these steps are complete.
CMDB configuration
- Select Configuration > Servers.
- Click All to see a list of servers.
- Select a server by clicking the Name of a server.
- Right-click the Incident title bar and select Configure > Related Lists.
- Ensure that Access Session > Configuration Item has been moved to the Selected column.
- Click the Save button.
- The BeyondTrust sessions list appears towards the bottom of the configuration item form once these steps are complete.
Configure BeyondTrust username and authentication
-
Sign into your BeyondTrust /login interface with the same credentials as a ServiceNow user who is expected to be using Privileged Remote Access.
-
Download and install a BeyondTrust access console from the /login > My Account tab.
Troubleshoot login failure
- Make sure that BeyondTrust and ServiceNow are checking credentials against the same LDAP server(s), if appropriate. Check the LDAP server in the BeyondTrust interface under /login > Users & Security > Security Providers.
- If LDAP authentication is not being used, log in to ServiceNow. Select User Administration > Users, and then select the user to be used for testing and focus on the BeyondTrust Username field.
- If this field does not exist while viewing a user, hover over the icon next to User on the title bar, and then select Configure > Form Layout and move the BeyondTrust Username field from the Available list to the Selected list. Once done, enter the name of a known-working BeyondTrust user account in this field and save.
For more information on how to check the LDAP server for ServiceNow, see LDAP Integration.
Assign users appropriate roles
Give the appropriate roles to ITIL users who provide technical support using this integration, those who need to review session information, and those who will manage the app's configuration.
You must elevate the admin's role in order to make the following change.
-
Select User Administration > Users.
-
Select a user.
-
Find the Roles tab and click the Edit button.
-
Add the appropriate role or roles from the Collection list to the Roles list. The available roles are:
- x_bmgr_bomgar_pam.app_admin: Users assigned this role can view and manage the application's configuration.
- x_bmgr_bomgar_pam.data_viewer: Users assigned this role can view data created by the application (i.e., Access sessions and their ancillary records).
- x_bmgr_bomgar_pam.jump_user: Users assigned this role can leverage the application's UI actions and macros to initiate a BeyondTrust Privileged Remote Access session to an existing Asset either from a ticket with a Configuration Item or directly from the CMDB record.
-
Click Save.
Deprecated user role
The existing user role x_bmgr_bomgar_pam.user is deprecated and will be removed in a later version. Users with only this role can use the application and view data as before, but they are no longer able to manage its configuration.
If you can no longer see and edit the app configuration, assign the user role new x_bmgr_bomgar_pam.app_admin to users who require this access.
Transition all users to the new roles based on the access they require. There is no hierarchy to these roles. For example, a user with the role x_bmgr_bomgar_pam.app_admin can only manage configuration and cannot use the application's connect to functionality or view session data without being assigned one of the other roles as well.
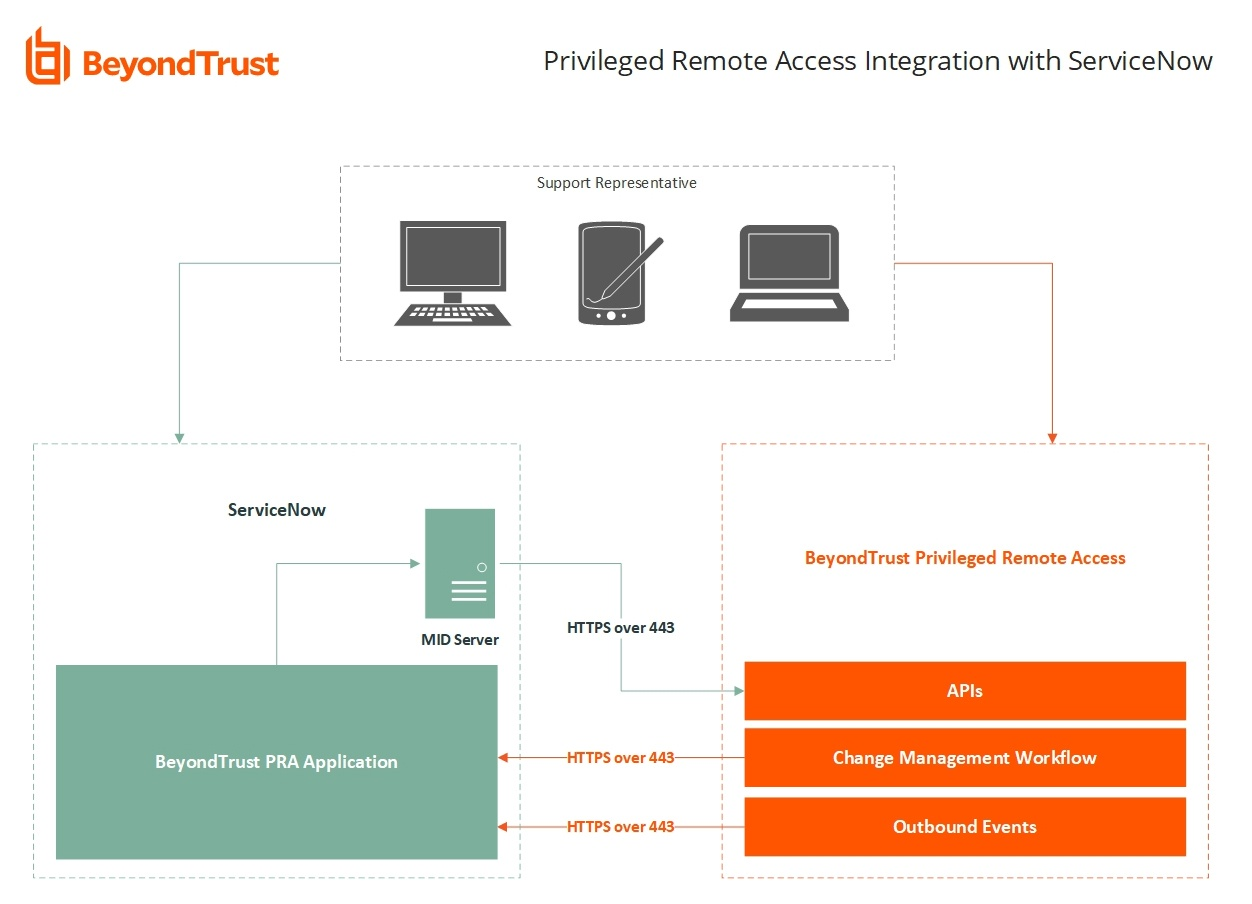
Use the ServiceNow MID server option
It is possible to avoid a direct connection between ServiceNow and Privileged Remote Access by using a MID server for internal Privileged Remote Access deployments.
To configure the integration to use a MID server for API requests to a Privileged Remote Access site, specify the MID server to use on the individual outbound REST messages:
-
In ServiceNow, navigate to System Web Services > Outbound > REST Message.
-
Filter to show only messages for the BeyondTrust application being configured.
-
Click the Name of one of the messages to edit its properties.
-
In the HTTP Methods related list at the bottom, select the Name of the method (typically post).
-
On the resulting form, select the HTTP Request tab and select your MID server in the Use MID Server field.
-
Click Update to save the changes.
Repeat these steps for each outbound REST message that is a part of the application.
For more information on MID Servers, see ServiceNow MID Server.
Set up change management workflow
BeyondTrust change management workflow works out of the box with a default ServiceNow configuration. The configuration can be customized, if necessary.
The Default Approval Processing list includes the checks that are made when a ticket approval request is processed in ServiceNow.
- Find the Ticket (aka Task): Searches for the task based on task number. If not found by number, search by task sys_id. If the task is not found, a failure response is sent back to BeyondTrust.
- Match the Rep: Checks to make sure the rep username matches the task assigned_to field user's user_name (User Id) or BeyondTrust PRA username field. If the reps do not match, a failure response is sent back to BeyondTrust.
- Match the Computer Name: Ensures the task's cmdb_ci name matches the computer name being Jumped to in BeyondTrust. If the computer names do not match, a failure response is sent back to BeyondTrust.
- Ensure Task Approval: Ensures the task's approval field is approved. If the task is not approved, a failure response is sent back to BeyondTrust.
- Ensure Field State: Ensures the task's state field is not closed, cancelled, or resolved (value is less than 3). If the state is not less than 3, a failure response is sent back to BeyondTrust.
Override change management
Change Management Override allows you to change the Change Management Workflow type. For most applications, this should be changed to Change Request.
There are out of the box criteria for the auto approval (ticket must be assigned to the user attempting to initiate the session, must have a CI that matches the target system, etc.). If those criteria do not meet the needs of an organization's environment, you can select to override that behavior by providing their own criteria. However, if the override box is selected but no manual criteria have been added, you'll get the following error message:
"Access to this device is denied. No endpoint approval has been configured even though it is set to be overridden. Please configure approval logic or uncheck the Override ITSM Access Approval checkbox in the BeyondTrust PRA integration configuration, then try again."
-
Go to the Appliance screen and check the Override Change Management option.
-
For ITSM Access Approval Record Type, select Change Request.
Privileged Remote Access Change Management Override provides an administrator a way to customize the Approval Process without the burden of manual coding.
- Go to the Appliance screen and check the Override Change Management option.
- Click on the New button next to the Change Management Overrides Table.
- The goal of this record is to compare a Task field value with data provided by the B Series Appliance or a value defined by the user. Here is a brief description of all the information:
- Task Field Name: This is the name of the Field inside the ServiceNow Task Table. A comprehensive list of the important Task table fields can be found at Important Task Table Fields.
- Comparator: The kind of evaluation performed. It can be an Equal, Lesser than, or Greater than comparison.
- Type of Field: If the Static option is selected, whatever value entered by the user in the Field Value is used. On the other hand, if the Reference option is marked, the value selected in the Bomgar Field dropdown is selected.
- Field Value: A hard-coded value entered by the user.
- Bomgar Field: A list of all the information sent by the B Series Appliance that the user can select.
- Error Message: In case the comparison between the ServiceNow Task Field Value and the Field value, or Bomgar Field selected by the user is negative, the Error Message value is returned to the B Series Appliance along with a deny access to the Jump. 3 reserved words can be used inside the Error Message that leverage the outcome result:
- %TaskFieldName%: The actual value returned by ServiceNow of the Task Field Name chosen.
- %ComparatorSymbol%: The symbol related to the option selected in the Comparator. Possible results are >, =, or <.
- %FieldValue%: The value used in the conditional logic, regardless of the option selected.
Transfer the update sets
The steps below are typically used after the integration has been imported and configured in a test/development instance of ServiceNow and is being transferred to a production instance. However, they are also applicable to transferring the integration between any ServiceNow instances.
- Follow the steps in the ServiceNow documentation to transfer the BeyondTrust - ServiceNow Integration update set(s) into the destination instance of ServiceNow.
This is typically done by retrieving the update sets from the destination instance or by exporting the update sets from the original instance as XML files. For details, see Export and Import XML files.
- Follow the same steps to transfer the BeyondTrust - ServiceNow Integration Configuration update set.
Configure production outbound event
- In the BeyondTrust interface, go to /login > Management > Outbound Events.
- Copy the URL of the event for the original ServiceNow instance.
- Click Add.
- In the URL field, paste and replace the name of the original ServiceNow instance with that of the new one such that /x_bmgr_bomgar_pam_bomgar_post.do is preserved at the end. The result should be similar to https://example.service-now.com/x_bmgr_bomgar>_pam_bomgar_post.do, as opposed to https://example-dev.service-now.com/x_bmgr_bomgar>_pam_bomgar_post.do.
- Under Events to Send, check Access Session End.
- Click Save.
- Locate the outbound event created during testing and then click Edit.
- Uncheck Enabled and then click Save.
Configure custom link
- Go to Access Console > Custom Links.
- Click Edit for the ServiceNow link, and then update the ServiceNow URL to direct to the destination instance of ServiceNow. Be careful to preserve /nav_to.do?uri=task.do?sys_id=%SESSION.CUSTOM.EXTERNAL_KEY% at the end.
- Click Save.
- Test the integration setup in its new location following the same steps used to test the original instance.
Test the setup
The following steps take place in ServiceNow and BeyondTrust and are provided to ensure that the integration is working properly. Troubleshooting suggestions are provided with each step in case of failure.
Test access configuration item button
- Sign into the BeyondTrust access console, and then log into ServiceNow with the same account. If BeyondTrust and ServiceNow use different authentication systems, manually assign your BeyondTrust user to your ServiceNow user as described in Configure BeyondTrust username and authentication.
- Open a configuration item in ServiceNow that has a corresponding Jump Client in BeyondTrust, and make sure the Access CI button shows up.
- Click the Access CI button. It should launch the BeyondTrust access console. In case of failure, make sure the following are true:
- The ServiceNow user account is mapped to a BeyondTrust user account as described in this guide.
- The ServiceNow API User Connection test completes successfully.
- The BeyondTrust Hostname, Username, and Password fields are set correctly in ServiceNow under BeyondTrust PRA > Appliances. These should match the API User Connection test.
Test BeyondTrust session import
- Sign into ServiceNow as an ITIL user or an admin.
- Use the Access CI button as described above to start a BeyondTrust session.
- End the session from the access console and close any session end messages on the user and/or customer sides of the session.
- Refresh the ServiceNow incident from which the session key was generated, scroll to the bottom of the page, and check the BeyondTrust Sessions list. There should be an entry for the recent session. If not, make sure the following are true:
- The API User Connection test works correctly as described above.
- There are no BeyondTrust errors reported for your ServiceNow instance in the BeyondTrust Outbound Events list. Your BeyondTrust admin can check this in BeyondTrust from the /login web interface under Management > Outbound Events.
- The IP address is set up correctly, following the steps below:
- Sign into ServiceNow as an admin.
- Browse to System Logs > Transactions, remove all existing filters, and add a URL filter of /x_bmgr_bomgar_pam_bomgar_post.do.
- Click one of the results and make sure the originating IP address of the transaction is included in the B Series Appliance IP Address field of the integration B Series Appliance settings under BeyondTrust PRA > Appliances > Default.
Use cases
Organizations using ServiceNow can integrate with BeyondTrust PRA to provide secure, privileged access to critical assets from within ServiceNow. This satisfies internal and external compliance requirements while maintaining comprehensive audit trails and integrating with change management processes.
connect to configuration item
Technicians can leverage BeyondTrust Jump Technology to access a configuration item associated with an incident directly from the incident. Additionally, this same technology can be leveraged directly from within a configuration item, even if it is not associated with an incident.
Once the session ends, a detailed report of the session is imported into ServiceNow and associated with the incident or configuration item record from which it originated.
Import BeyondTrust session data into a ServiceNow record
Once the BeyondTrust access session ends, ServiceNow is automatically updated with information gathered during the session, including:
- File Transfer Information
- Endpoint System Information
- Users Involved
- Endpoint Details
- Access Session Recordings
Change management workflow
BeyondTrust access requests can require a ServiceNow incident ID to be entered as part of the access request process. Once entered, the request is sent to ServiceNow where it can be programmatically denied or allowed using the BeyondTrust API.
Access ServiceNow records from the access console
Using BeyondTrust's custom linkability, a user can access the associated ServiceNow record directly from within the access console. This saves time searching for the record in ServiceNow and provides the user with any available session details, history, or other context to help resolve issues quickly.
Network diagrams
Network with mid server diagram
Updated 12 days ago
