
Active access sessions | PRA for Desktop
View active access sessions
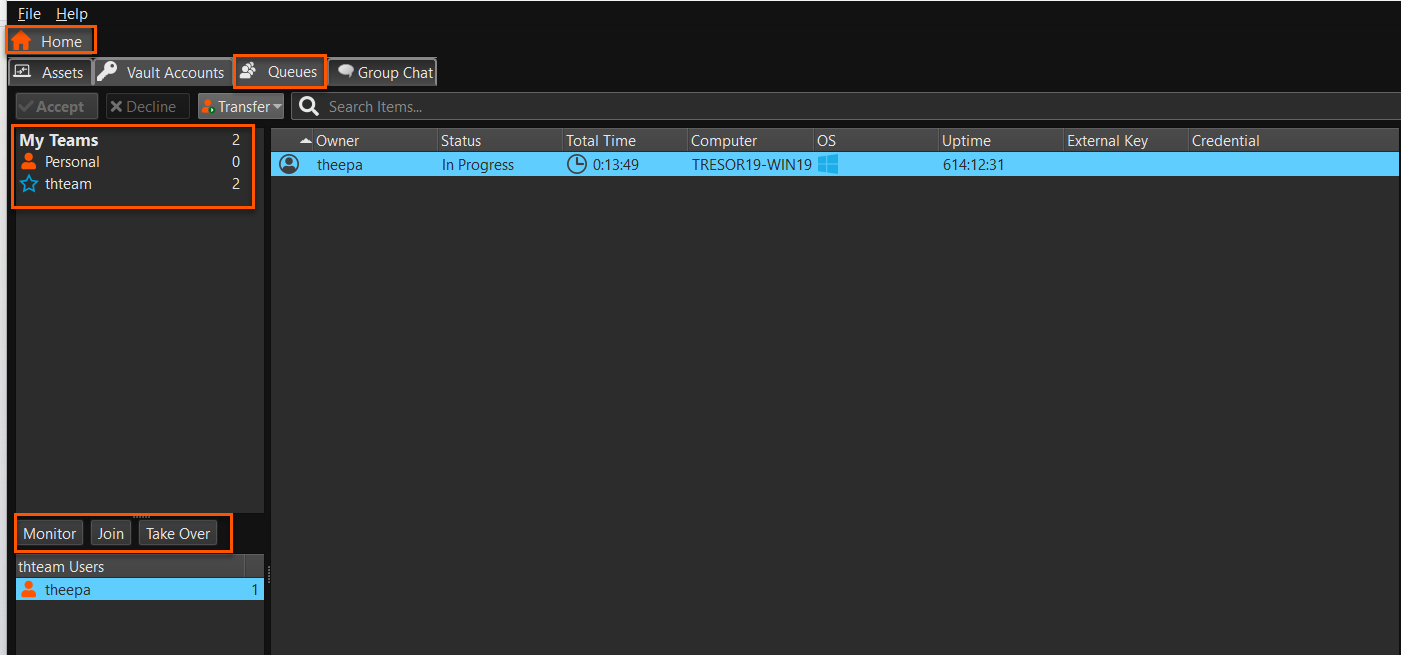
Session queues provide information about and access to currently running sessions. The Personal queue contains sessions you are currently running, as well as invitations for you to join a shared session.
You also have queues for any teams of which you are a member. If another user requests any member of a team to join a session, that invitation appears in the team queue. When no specific team is selected, team managers and leads can also see which team members have sessions running.
Click the star to the left of a team name to mark that queue as a favorite. If a team chat message is sent, an orange chat bubble appears in place of the star.
Sort your queues by several criteria, including the length of time the session has been running, the computer name, external key, etc. You can also search for an active session. Click on an item in queue to view its details. Click it again to close the details pane. The access console remembers the column order and the sort order of the session queue the next time the access console is launched.
You can run multiple sessions simultaneously. At the top of the access console, a tab exists for each session you have open.
Dashboard
The dashboard feature enables privileged users to view and monitor ongoing sessions, enabling administrative oversight to help manage staff. Based on roles assigned from the Teams page of the administrative interface, team leads can monitor team members of a given team, and team managers can monitor both team leads and team members of that team.
If a user is a team manager or team lead of one or more teams, selecting one of those queues causes the dashboard pane to appear beneath the queue selection pane on the Home tab of the console. In this pane appear any logged-in team members of a lower role for the selected team.
Select a user from the dashboard pane to view any sessions they may be running. A team manager or team lead can take over a session from another user of that team by selecting the appropriate session from the queue and clicking the Take Over button. This transfers ownership of that session to the team manager or team lead, with the original user remaining in the session as a participant.
It is also possible for a team manager to join a session in progress by clicking the Join button. The behavior is similar to joining a session via session invitation, except that no invitation is required.
The team lead can join or take over a team member's session only if the team lead has start session access to the Asset that was used to create the session, or the dashboard setting to allow join or take over without start session access is checked.
If configured in the /login interface, a team manager or team lead can monitor team members of a lower role even if there are no ongoing sessions, as long as those users are logged into the console.
An icon is displayed in the corner of the user's desktop to indicate that monitoring is taking place. When the user moves the cursor near this icon, the icon moves to another corner to prevent obscuring the screen. Select the user whose screen you wish to view and then click the Monitor button. This opens a new tab in your console, displaying the user's console.
To gain control of the user's computer, click the Enable Mouse/Keyboard Control button.
Within a team, a user can administer only others with roles lower than their own. Note, however, that roles apply strictly on a team-by-team basis, so that a user may be able to administer another user in one team but not be able to administer that same user in another team.
Chat with other users
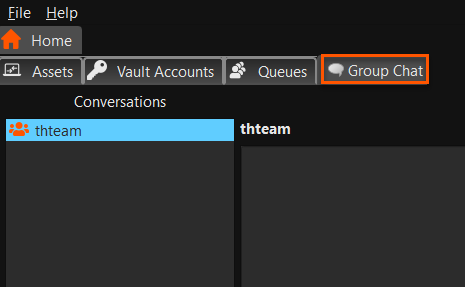
From the Home tab of the console, you can chat with other logged-in users. If you are a member of one or more teams, select whichever team you would like to chat with from the list of queues at the left of the Home tab. You can chat with all members of that team or chat with just that one.
Click the arrow icon at the top left of the sidebar to collapse the sliding sidebar. If the sidebar is collapsed, hover over the arrow by the hidden window to reveal it. Click the pin icon that replaced the arrow icon at the top left of the sidebar to re-pin the sliding sidebar.
When typing, misspelled words will be underlined in red. Right-click to view spelling suggestions or to ignore that spelling for the current console login.
In the settings, you can choose if the team chat should include status messages, such as users logging in and out, or only chats sent between team members.
Share your screen with another user
If your administrator has enabled this permission, you can share your screen with another user without the receiving user having to join a session. This option is available even if you are not in a session.
From a team queue, select a user, and click Show Screen. If working with more than one monitor, you can select which one to share or which apps will be visible to the other user. Once you have made your selection, the receiving user will get a notification with the option to accept or decline the invitation.
A Show Screen window appears, showing the name of the user that is now viewing your screen. This window contains a chat box and the options to stop screen sharing, grant the receiving user control, and select which monitor and which apps to share. You can stop sharing your screen but keep this window open, or you can close the sharing session completely. If you leave the Show Screen window open, you can restart sharing your screen.
Share my screen tools
Sharing user
 : Temporarily stop sharing your screen with another user. This pauses screen sharing but does not close the Show Screen window, allowing you to restart screen sharing.
 : Start screen sharing.
 : Grant mouse and keyboard control to the user viewing your screen.
 : Select the monitor to share with another user. The primary monitor is designated by a P.
 : Select which apps to share with the user viewing your screen.
 : End the screen sharing session. This closes the user screen sharing interface.
Viewing user
 : The user sharing their screen with you has granted you keyboard and mouse control.
 : Turn on a virtual pointer, visible on the sharing user's screen.
 : Capture a screenshot of the sharing user's screen at its full resolution.
 : View the remote screen at actual or scaled size.
 : View the remote desktop in full screen mode or return to the interface view.
: End the screen sharing session. This closes the user screen sharing interface.
Share session with other users
Invite another user to join a session by clicking the Share button in the session tools. By default, only teams to which you belong will be listed.
You can select a user listed in the teams displayed to invite them to join the session.
If you select Any User, the invitation is sent to the team queue so that any single user in the selected team can join the session. You can send multiple invitations if you want more users from the team to join your session.
Users are listed here only if they are logged into the console or have extended availability enabled.
If you are permitted to share sessions with users who are not members of your teams, additional teams are displayed, provided that they contain at least one member logged in or with extended availability enabled.
When you invite a user with extended availability enabled, they receive an email notification.
If you have sent an invitation and it is still active, you may revoke the invitation by selecting it from the Cancel Invitation menu. Only the session owner can send invitations. Invitations do not time out as long as you remain the session owner. Multiple active invitations cannot exist for the same user to join the same session.
An invitation is made inactive when one of the following events occurs:
- The inviting user cancels the invitation
- The session ends
- The invited user accepts the invitation
- The invited user declines the invitation
When an additional user joins a shared session, they are able to see the entire chat history.
Chat with other users during a shared session
The session chat window serves as a running log of everything that happens throughout the session, including files transferred and tools used.
If one or more users are sharing the session, you can chat with the other users. When an additional user joins a shared session, they are able to see the entire chat history.
Click the arrow icon at the top left of the sidebar to collapse the sliding sidebar. If the sidebar is collapsed, hover over the arrow by the hidden window to reveal it. Click the pin icon that replaced the arrow icon at the top left of the sidebar to re-pin the sliding sidebar.
When typing, misspelled words will be underlined in red. Right-click to view spelling suggestions or to ignore that spelling for the current console login.
Messages appear as plain text in the chat input area. You can add or edit BBCode tags within a message to add text formatting. Formatting will be applied once the message has been sent.
It is possible to reposition the different widget sections displayed on the sidebar, like the chat window, the session info pane, etc. When hovering over the title bar of a section, the cursor turns into a closed hand, allowing you to drag and reposition that section on the sidebar.
Connectivity issues with Peer to Peer enabled
If Peer‑to‑Peer (P2P) is enabled for a shared session, firewalls may sometimes cause connection issues. To help troubleshoot, open the hamburger menu in the top‑left corner of the screen ( ). Hold down the Shift key and click the menu, then select RTC Diagnostics… to view P2P and WebRTC connectivity details.
Extended availability
With extended availability, privileged users can receive email invitations to share sessions, even if they are not logged into the console. When sending an invitation, you may invite fellow team members. If permitted, you may also invite users from teams to which you do not belong.
If your account is configured for extended availability, you can enable or disable the functionality from the File menu of the access console.
If you have extended availability enabled, you will see a notification when you log into the console. From this dialog, you can easily disable extended availability to avoid distraction while in a session, for example.
Email notification and invitation
Each time you enable extended availability mode, the B Series Appliance will notify you via the email address configured for your user account.
BeyondTrust does not pull email addresses from external LDAP directory stores. The email address must be configured in BeyondTrust in one of two ways:
- An administrator can add an email address to a user account by going to /login > Users & Security > Users and editing the account.
- The user can set their own email address by going to the /login > My Account page.
The notification includes the URL of the site as well as a link to quickly disable extended availability mode.
The B Series Appliance also sends an email notification when you are invited to a session. This allows you to join a session even if you are not currently logged into the console. The email notification includes links to accept or decline the invitation, as well as to decline the invitation while disabling extended availability mode.
Invite an external user
Within a session, a user with the appropriate permission can request external users to participate in a session, for the duration of that session only.
The inviting user should click on the Share Session button and then select Invite External User.
A dialog opens asking the user to select a session policy. These policies are created in the administrative interface and determine the level of permission the external user will have. When you select a policy, the full description displays below.
Enter the name or names for the invited users, and the email addresses for invitations by email. Names appear in the chat window and reports. Click Add User to add additional users.
Next, enter comments about the external invitation.
Click Send Local Email for invitations by email, if available.
Otherwise, click Create Invitation, and a new dialog containing the direct URL and email option, if available, appears.
Depending on the options selected by your administrator, you may be able to send the invitation from your local email or from a server side email. You also can copy and paste the direct URL to the external user.
The external user must download and run the access console installer, which is an abbreviated process from the full access console installation.
The external users have access only to the session tab and have a limited set of privileges. An external user can never be the session owner. When the inviting user leaves the session, the external users are logged out.
Each external user invited allocates a BeyondTrust license.
Inject credentials within an RDP session
During a remote RDP session, you can use Vault credential injection to elevate privileges or authenticate with different credentials without leaving the session or typing a password (for example, to run an application as a different user). This includes injecting credentials mid-session, so you no longer need to disconnect and reconnect to perform a run as operation.
Privileged Remote Access (PRA) supports credential injection in two RDP connection modes: the built-in Access Console and a Bring Your Own Tool (BYOT) connection using the native Windows RDP client. Both modes are supported when connecting through a Gateway.
Prerequisites
Two components must be in place before credential injection is available in RDP sessions.
BeyondTrust Remote Desktop Agent installed on the endpoint
The BeyondTrust RDP Tools helper must be pre-installed on each endpoint where you want to use credential injection. This is a lightweight component deployed to remote systems, not to the representative's machine.
- Sign in to your PRA site at /login.
- Select Consoles & Downloads from the left menu.
The Access Console tab displays as default. - Click the Drivers tab.
- Click the Download Remote Agent Installer button. The file downloads as an MSI.
- Deploy the MSI to target endpoints using Group Policy or your organization's endpoint management tool.
Credential injection is not available in RDP sessions until the BeyondTrust RDP Tools component is installed on the endpoint.
Vault credentials
You must have a Vault account with appropriate credentials. Only Vault credentials are available for injection during RDP sessions.
Inject credentials in the Access Console
Use this method when you are connected to a remote endpoint through the PRA Access Console, including connections made through a Gateway. You can inject credentials at any point during the session, e.g.; at the login screen or mid-session when you need to elevate or switch users.
-
In the Access Console, start a session with the target endpoint and begin screen sharing.
-
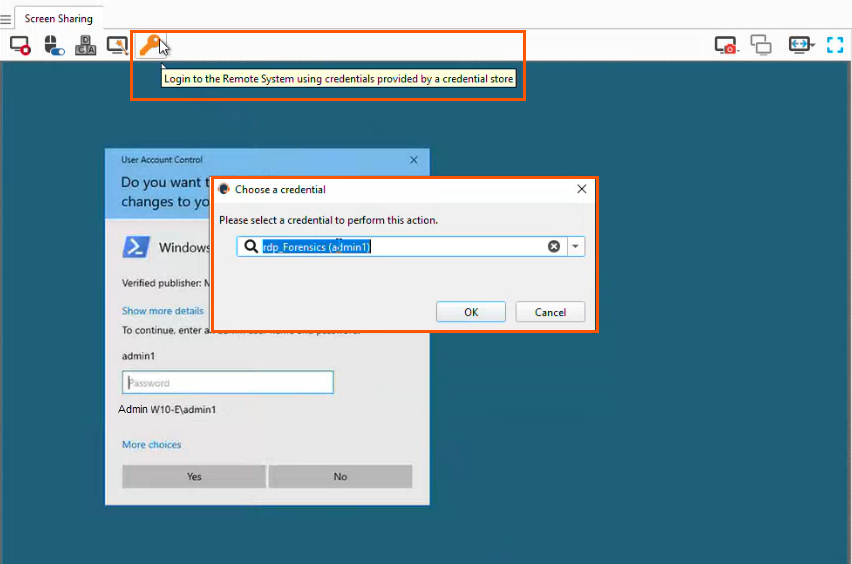
On the remote desktop, open the application you want to run with elevated privileges. For example, right-click PowerShell and select Run as administrator. A credentials prompt appears.
-
Select the Credential Injection icon (
 ). in taskbar. The icon is enabled when a Vault credential is available for use.
 -
In the Choose a credential dialog, select the appropriate credential from the list.
-
Select OK. PRA injects the credential and the application launches on the endpoint under the selected credentials.
Inject credentials using a BYOT native Windows RDP connection
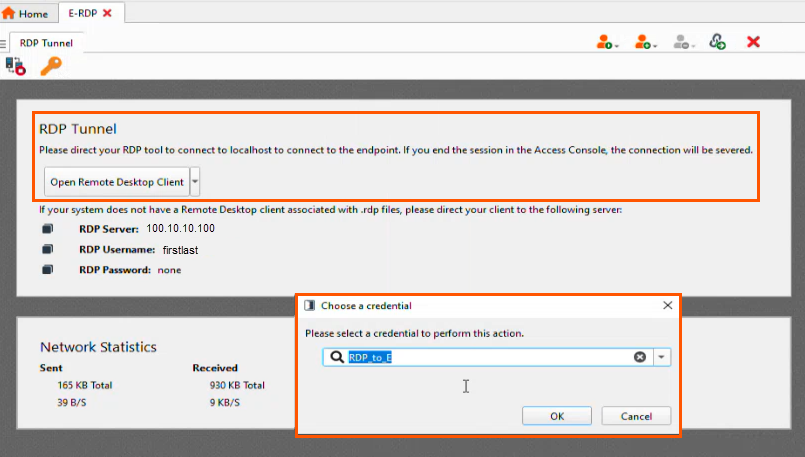
PRA also supports credential injection when you connect to an endpoint using the native Windows Remote Desktop client through a PRA tunnel. Use this method when you prefer to work in the native Windows RDP tool.
-
In the Access Console, select the File menu, and then click Settings.
-
In the Access Console Settings dialog, click External Tools.
-
Select tool to open your connection. Check the Open Remote RDP Sessions with an External Tool box, and then click OK. The external tool displays in the right panel of the console.
-
Click the orange arrow to the right of the tool, and then enter your credentials in the dialog.
-
Click OK.
-
In the RDP Tunnel panel, select the tool.
-
Click Yes on the Remote Desktop Connection dialog. The RDP session starts. When launching an RDP session using BYOT, the Credential Injection button remains available on the Console toolbar. To inject credentials mid-session, you must switch to the Console.
-
On the remote desktop, open the application you want to run with elevated privileges.
The Access console taskbar is hidden when the RDP client is in full screen mode. Exit full screen mode to view the taskbar.
-
Click the Credential Injection icon (
) in taskbar. A credentials prompt appears. -
Select the appropriate Vault credential from the list. PRA injects the credential into the prompt.
-
Click OK.
-
The application launches under the selected credentials.
Limitations
- Credential injection in RDP sessions requires the BeyondTrust Remote Desktop Agent to be installed on the endpoint. Sessions on endpoints without this component do not display the injection icon.
- Only Vault credentials are available for injection. Local or manually entered credentials are not presented through the injection dialog.
- The credential injection icon is not visible when the RDP client is in full screen mode. Exit full screen mode to access it.
VNC
Use BeyondTrust to start a VNC session with a remote Windows or Linux system. Because VNC sessions are proxied through a Gateway and converted to BeyondTrust sessions, users can share or transfer sessions, and sessions can be automatically audited and recorded as your administrator has defined for your site. To use VNC through BeyondTrust, you must have access to a Gateway and have the user account permission Remote Access Methods > : Remote VNC via a Gateway.
Create a VNC shortcut
To create a VNC shortcut, click the Create button in the Asset Management Interface. From the dropdown, select Remote VNC. VNC shortcuts appear in the Asset Management Interface along with Jump Clients and other types of Assets.
Enter a Name for the Asset. This name identifies the item in the session tabs. This string has a maximum of 128 characters.
From the Gateway dropdown, select the network that hosts the computer you wish to access. The access console remembers your Gateway choice the next time you create this type of Asset.
Enter the Hostname / IP of the system you wish to access.
By default, the VNC server listens on port 5900, which is, therefore, the default port BeyondTrust attempts. If the remote VNC server is configured to use a different port, add it after the hostname or IP address in the form of <hostname>:<port> or <ipaddress>:<port> (e.g., 10.10.24.127:40000).
Move Assets from one Asset Group to another using the Asset Group dropdown. The ability to move Assets to or from different Asset Groups depends upon your account permissions.
Further organize Assets by entering the name of a new or existing Tag. Even though the selected Assets are grouped together under the tag, they are still listed under the Asset Group in which each Asset is pinned. To move an Asset back into its top-level Asset Group, leave this field blank.
Assets include a Comments field for a name or description, which makes sorting, searching, and identifying Assets faster and easier.
To set when users are allowed to access this Asset, if a notification of access should be sent, or if permission or a ticket ID from your external ticketing system is required to use this Asset, choose an Asset Policy. These policies are configured by your administrator in the /login interface.
Use a VNC shortcut
To use an Asset to start a session, select the shortcut from the Asset Management Interface and click the Jump button.
When establishing the connection to the VNC server, the system prompts you to enter the user name and password.
Your VNC session now begins. Begin screen sharing to view the remote desktop. You can send the Ctrl-Alt-Del command, capture a screenshot of the remote desktop, and share clipboard text contents. You also can share, transfer or record the VNC session, following the normal rules of your user account settings.
Assets can be set to allow multiple users to simultaneously access the same Asset. If set to Join Existing Session, other users are able to join a session already underway. The original owner of the session receives a note indicating another user has joined the session, but is not allowed to deny them access.
Updated 3 months ago
