Teams | PRA On-prem
What are teams?
Teams are groups of users organized to improve efficiency by assigning leadership roles and directing endpoints to the most suitable users.
How are they useful to my organization?
Teams enhance productivity by streamlining session management, organizing users into focused groups, and displaying each team as a distinct queue in the access console for better endpoint routing.
How do I access the Teams page?
- Use a Chromium-based browser to sign in to your Privileged Remote Access URL.
This URL is provided in the BeyondTrust welcome email and includes your site URL followed by /login. - From the left menu, click Configuration.
The Options page opens and displays by default. - At the top of the page, click Teams.
The Teams page displays.
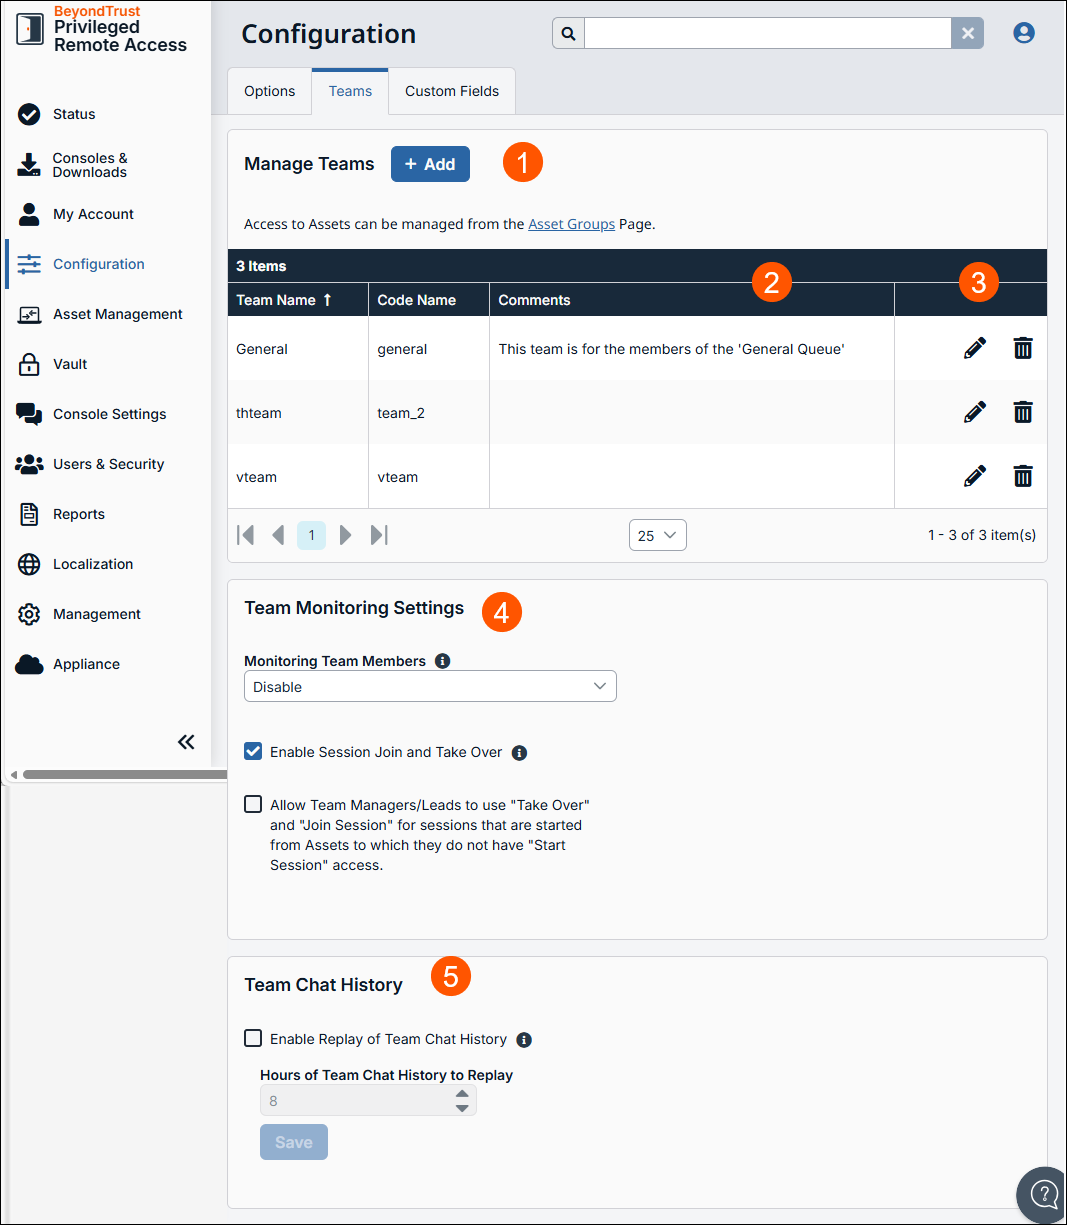
-
Add: Adds a new team.
-
Team columns: List of Team columns.
Team columns
- Team Name: Unique name of the team.
- Code Name: Set a code name. If not provide, one is automatically assigned.
- Comments: Enter notes about the team.
-
Team Monitoring Settings: Monitor team members, enable session join and take over, and allow team managers to use Take Over and Join Session.
-
Team Chat History: Record of a team chat.
Add a team
- Navigate to the Teams page, and click Add.
- Enter a unique Team Name.
- Optionally, enter a Code Name.
Code names are used for integrations. If you do not set a code name, one is created automatically. - Optionally, enter comments to describe the team.
- Optionally, click Group Policies to create or edit group policies you want associated with this team.
- Optionally, add team members.
- Click Save.
The team saves and displays in your Manage Teams list on the Teams page.
Add one or more team members to a team
Search for users to add to this team. You can set each member’s role as a Team Member, Team Lead, or Team Manager. These roles play a significant part in the Dashboard feature of the user console.
In the team members table, view existing team members. You can filter the view by entering a string in the Filter by name text box. You can also edit a member's settings or delete a member from the team.
To add a group of users to a team, go to Users & Security > Group Policies and assign that group to one or more teams in a given role.
You may see some users whose Edit and Delete options are disabled. This occurs when a user is added via group policy.
You can click the group policy link to modify the policy as a whole. Any changes made to the group policy apply to all members of that policy.
You also can add the individual to the team, overriding their settings as defined elsewhere.
Edit a team
- Click the pencil icon next to the support team you wish to edit.
The Edit Teampage displays. - Edit the team information.
The Edit Team page's content is identical to the Add Team page. - Click Save.
The team is saved.
Delete a team
- Click the trash icon next to the team you wish to delete.
- Click Yes.
Team Members
Search for users to add to this team. You can set each member's role as a Team Member, Team Lead, or Team Manager. These roles play a significant part in the Dashboard feature of the access console.
In the table below, view existing team members. You can filter the view by entering a user's name in the filter box. You can also edit a member's role or delete a member from the team.
To add a group of users to a team, go to Users & Security > Group Policies and assign that group to one or more teams in a given role.
You may be unable to edit or delete some team members. This occurs when a user is added via group policy.
You can click the group policy link to modify the policy as a whole. Any changes made to the group policy apply to all members of that group policy.You can also add the individual to the team, overriding their settings as defined elsewhere.
Team Monitoring Settings
Within a team, a user can administrate only others with roles lower than their own. Note, however, that roles apply strictly on a team-by-team basis, so a user may be able to administrate another user in one team but not be able to administer that same user in another team.
Monitoring Team Members
If enabled, a team lead or manager can monitor team members from the dashboard. Choose to Disable the ability to monitor, or choose Only Access Console to allow a team lead or manager to monitor a team member's access console. Monitoring affects team leads and managers for all teams on the site.
Enable Session Join and Take Over
If this option is checked, a team lead can join or take over a team member's sessions. Similarly, a team manager can administrate both team members and team leads. The team lead must have start session access to the Asset that was used to create the session, unless the option below is also checked.
Allow Team Managers/Leads to use "Transfer", "Take Over" and "Join Session" for sessions that are started from Assets to which they do not have "Start Session" access.
If this option is checked, a team lead can join or take over a team member's sessions, even if the team lead does not have start session access to the Asset that was used to create the session.
Team Chat History
Enable Replay of Team Chat History
If this option is checked, chat messages to everyone in the Team Chat area of the access console persist between access console logins. This prevents loss of chat history if the connection is lost. This does not affect chat within a session, or private chats.
Hours of Team Chat History to Replay
By default, 8 hours of history is retained. This can be changed from a minimum of 1 to a maximum of 24, using the + and - icons or entering the desired value. The time is set in one hour increments. Click Save after changing the time.
A maximum of 1000 chat messages is replayed. This limit applies regardless of the number of hours selected.
Updated 13 days ago
